8 min read
How to Wire a Motion Sensor to Multiple Lights (DIY Guide)

A motion sensor turns a light fixture into an automated power-saving beast. Many would agree that a motion detector with multiple lights is better than having a single light fixture due to the fact that you save money and power with this more streamlined setup.
Most people love this idea but are not so sure about the wiring. The wiring process is a difficult task to do yourself without any guidance. So, today I’m going to use my 15 years of electric experience to teach you how to wire a motion sensor to multiple lights.
In general, when you wire a motion sensor with multiple light fixtures, you should.
- Find the power sources for the lights.
- Cut off the power to the lights.
- Reroute the lights to a single power source.
- Wire the motion detector with a relay.
- Turn on the power and check the lights.
With those steps, all of your lights will be controlled by a single motion detector. We will go into the actual hard wiring details for these steps below.
Is it Safe to Wire a Motion Detector by Yourself?
Wiring a motion detector to multiple lights is no easy task. Unless you’re comfortable with handwork, I would suggest hiring an electrician for this job.
Mishandling such an electrical task might lead to disastrous outcomes. For instance, you might get electrocuted or start an electrical fire. So, only start this process if you think you can handle it and use the right safety precautions.
5 Step Guide to Wire a Motion Sensor to Multiple Lights
Below are the basic steps related to wiring a motion detector to multiple lights. Try to follow these steps correctly for a positive result. However, every circuit is different from one another. So, you might have to do some tweaks here or there. The below steps assume you are trying to do this without a prebuilt kit.
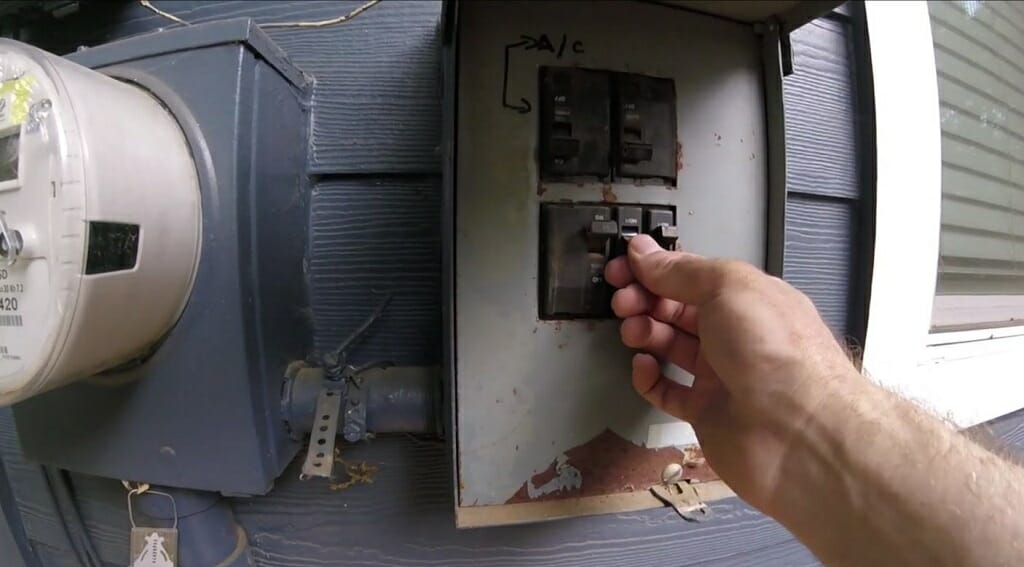
Step 1 – Figure Out the Connections

First and foremost, you should figure out the light fixtures’ connections. For instance, if you plan to add three lights to the motion sensor, you need to supply the power to those lights from one source. However, as I said earlier, these three lights might come from three different power sources.
So, inspect the main panel and determine the connection by turning on and off the circuit breakers.
Step 2 – Cut off the Power
After figuring out the sources, cut off the main power. Use a voltage tester to confirm step 2.
Step 3 – Reroute the Light Fixtures to One Power Source
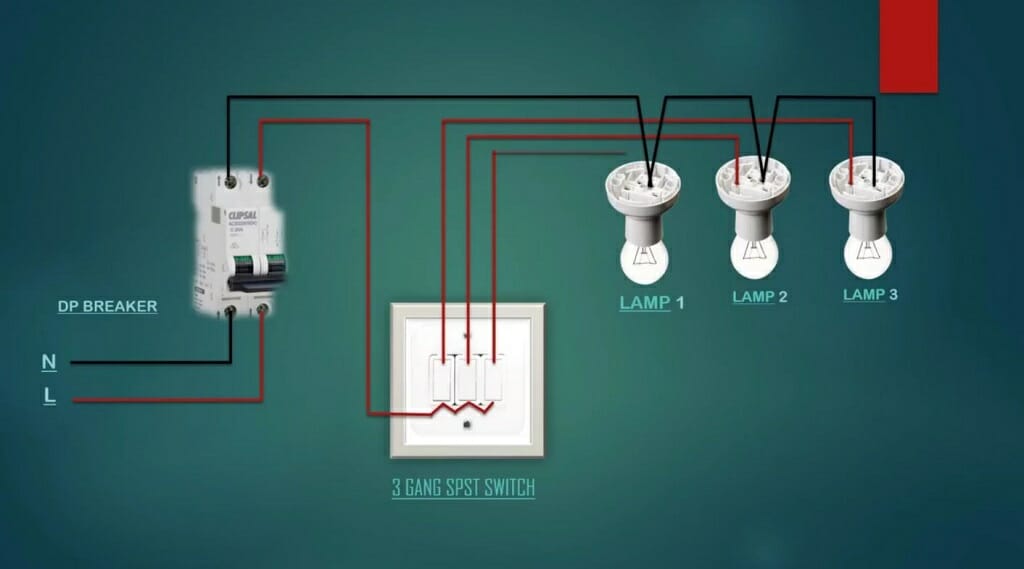
Remove the old connections and reroute the lights to one power source. Supply the power from one circuit breaker to all three lights. Turn on the power and check the three lights before starting the wiring of the motion sensor.
Keep in mind: After checking, cut off the power again.
Step 4 – Wiring the Motion Sensor
The process of wiring the motion sensor is a little tricky. We are going to connect a 5V relay to the circuit. You’ll get a better idea from the following wiring diagram.
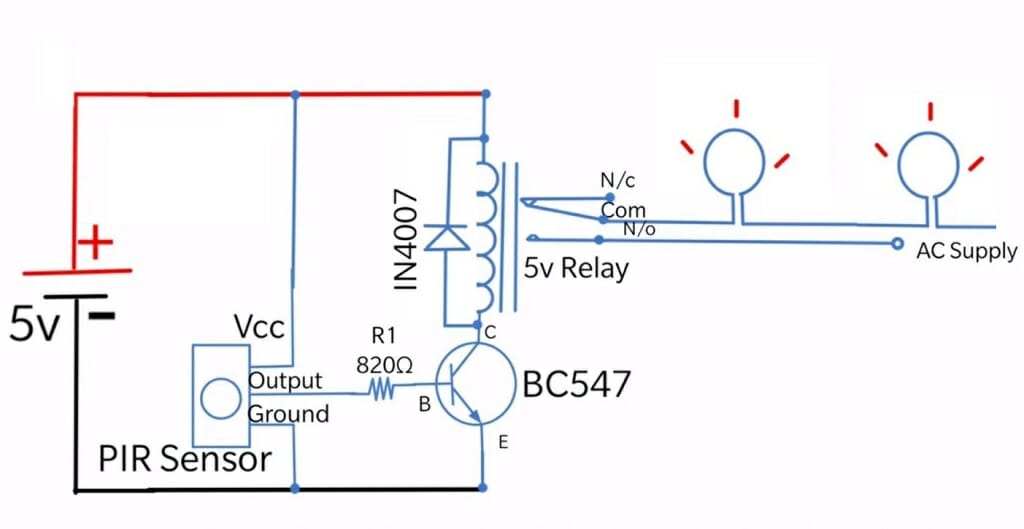
Some might understand the wiring process from the diagram above, and others might not. Here is an explanation of each item on the wiring diagram.
5V Relay

This relay has five pins. Here are some details about them.
- Coil 1 and 2: These two pins connect with one end to the transistor and the other to the positive wire of the power supply.
- NC: This pin connects to nothing. If it is connected to the AC power supply, the circuit will be ON before the motion sensor gets activated.
- NO: This pin is connected to the AC power supply wire (which goes through the lights); the circuit will be ON while the motion sensor is active.
- COM: This pin connects to the other wire of the AC power supply.
BC 547

BC 547 is a transistor. Usually, a transistor has three terminals: base, emitter, and collector. The middle terminal is the base. The right side terminal is the collector, and the left one is the emitter.
Connect the base to the resistor. Then connect the emitter to the negative wire of the power supply. Finally, connect the collector terminal to the coil pin of the relay. (1)
IN4007

IN4007 is a diode. connect it to the coil 1 and 2 pins of the relay.
820Ω Resistor

One end of the resistor connects to the output terminal of the PIR sensor and the other to the transistor.
PIR Sensor

The given PIR sensor has three pins; output pin, ground pin, and Vcc pin. Connect them according to the diagram.

Connect the Vcc pin to the positive wire of the 5V power supply. The ground pin should connect to the negative wire of the 5V power supply. Lastly, the output pin connects to the resistor.
Keep in mind: The above-given diagram shows only two light fixtures. However, if you want, you can add more lights.
Step 5 – Check the Lights

After correctly connecting the wiring, turn on the main power. Then, position your hand close to the motion sensor and check the lights. If you did everything correctly, the lights will start working.
Is There an Easy Way to Do This?
For some, the above wiring process won’t be difficult at all. But if you don’t have a basic knowledge of electricity, handling such a wiring diagram might not be easy. If that is the case, I have the perfect steps for you. Rather than going through the wiring process, buy a new kit that has a motion sensor, multiple lights, a relay, and other required equipment.
Some motion sensor lights come with wireless technology. You can control these motion sensors with a smartphone. These motion sensors might be a little expensive, but they will get the job done pretty effortlessly.
Risk of Wiring Light Fixtures by Yourself
Most often, the light fixtures in your home are connected to different types of circuits. So, they get power from different sources. You’ll have to connect these lights to one power source in this wiring process. One might think this is easy, but it isn’t. For instance, the wrong wiring can lead to a non-functional circuit. Sometimes you might experience far worse outcomes such as damaging all of your light fixtures.
Either way, this is not a good result for you. Especially if you are wiring by yourself. If something goes wrong, there won’t be anyone to fix that issue for you. So, always complete the wiring process with caution.
Wrapping Up
If you take home security seriously, having this kind of motion sensor system will do wonders for you. However, there are a few different options for the above task.
- Wiring a circuit by yourself.
- Hire an electrician to wire the circuit.
- Buy a wireless kit that has everything you need.
Choose option one if you are confident in your electrical wiring skills. Otherwise, choose from options two or three. (2)
Take a look at some of our related articles below.
- How to wire multiple lights to one cord
- How to wire a chandelier with multiple lights
- How to tell positive and negative wires on light fixture
References
(1) coil – https://www.sciencedirect.com/topics/engineering/
electromagnetic-coil
(2) skills – https://www.careeronestop.org/ExploreCareers/
Assessments/skills.aspx