15 min read
How to Wire Multiple Lights to One Switch (5 Steps)

It’s possible to wire multiple lights to one switch.
You can wire the multiple lights in several ways, so you must consider which one will be suitable. I will describe the procedure to wire them in series and parallel before describing other parallel options so you can easily expand the circuit to accommodate more lights. The single switch will be able to control the entire circuit.
Quick Summary: To wire multiple lights to one switch in parallel, connect the switch to the power source and the first light. Only the hot wire from both should connect to each terminal. Connect the neutral from the source directly to the first light. Then, connect each subsequent light by connecting only the same terminals (hot with hot and neutral with neutral). Connect the power source at the end.
Wiring multiple lights in series is less common, but I will show that, too. Continue reading for more detailed instructions.
Requirements and Precautions
Wire and Components
- Wire: You usually need a 14/2 wire for a regular lighting circuit.
- Components: You will need a power supply, a toggle switch, and the lights.
Tools and Materials
You will need some or all of the following:
- Tools: wire cutter, wire stripper, pliers, soldering iron
- Materials: electrical tape, wire nuts or connectors
Precautions

(1) Turn the main circuit breaker off for the circuit you will be working on. Don’t risk working with mains wiring without turning the power off first. Use a tester or voltmeter to confirm that the power is off.
(2) Don’t connect the hot and neutral wires. Only the positive or hot wire connects to the switch. The neutral wire should never enter it. Connecting the two would cause a short circuit. They should be kept separate with a load (the lights) in between so the two can connect to each terminal only on the lights.
Circuit Diagrams
You have two wiring arrangement options for connecting multiple lights: series and parallel.
The circuit diagrams below show a simple setup for wiring multiple lights to one switch on a circuit with two lights in series and parallel.
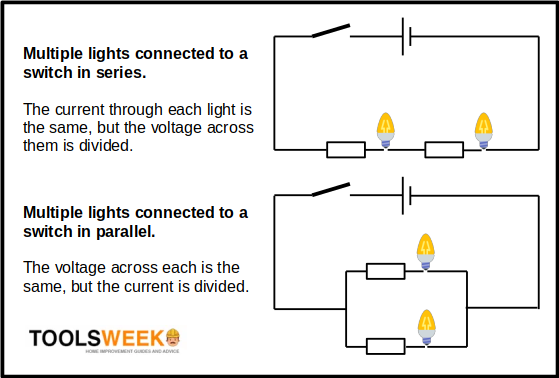
Two Lights in Series
The top diagram shows two lights in series with the switch.
Note that the opposite terminals of each light are connected, and the rest of the circuit is connected to the two end terminals. The current through each light in this circuit is the same, but the voltage across them is divided.
Also, there is only one path for the current to flow, so the whole circuit will fail if any one light fails.
Two Lights in Parallel
The bottom diagram shows two lights in parallel with the switch.
Note that the same terminals of each light are connected and the rest of the circuit to the start and end of the branches. The voltage across each light is the same, but the current through them is divided.
The branches provide alternative paths for the current to flow, so the circuit will remain operational even if any one light fails.
Current Flow
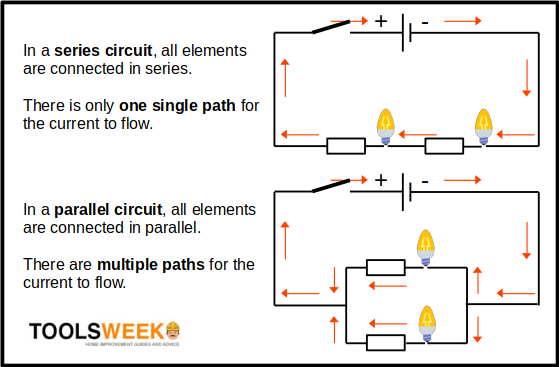
The paths for current flow are clearer by the arrows in the circuit diagrams below.
The power supply terminals in a DC circuit are marked positive and negative. The current flow shown here is the actual flow rather than the conventional current flow from positive to negative.
The point is to show that the current in a series circuit has only one path to flow, whereas there are multiple paths in a parallel circuit.
However, one switch controls the entire circuit in both cases. So, switching on or off will open or close the whole circuit, regardless of whether the lights are in series or parallel.
Wiring Arrangements for Multiple Lights
To wire multiple lights to one switch, they must all be on the same circuit and connected in series or parallel:
- To wire multiple lights in series, connect the opposite terminals of a series of lights together, then the remaining opposite terminals of the first and last ones to the power source.
- To wire multiple lights in parallel, connect the same terminals of the lights together, then the pair of terminals from any light to the power source.
Wiring in series is not usually recommended, so I will concentrate on parallel wiring and briefly cover the series arrangement. We will start with simple ones to clarify the concept. Then, you can add multiple lights as required (subject to the limitations pointed out under ‘Maximum Power and Number of Lights’).
We shall go through the procedure for each of the two arrangements in detail below.
RELATED How to Wire a Light in Series
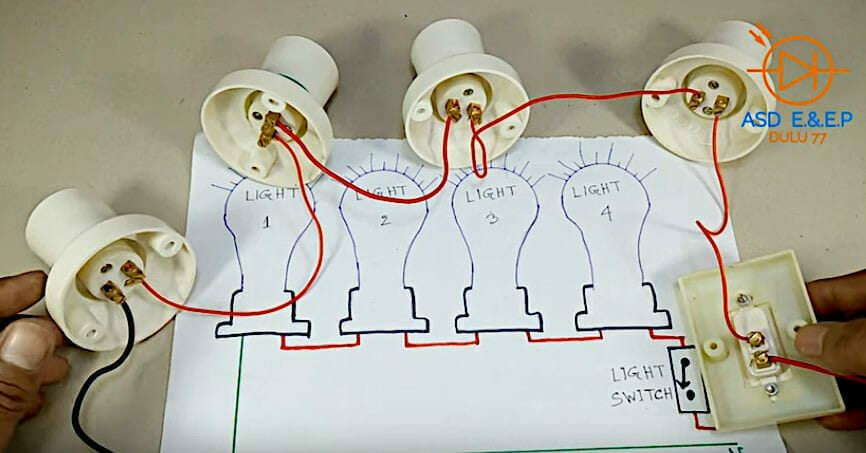
Wiring Multiple Lights to One Switch in Parallel
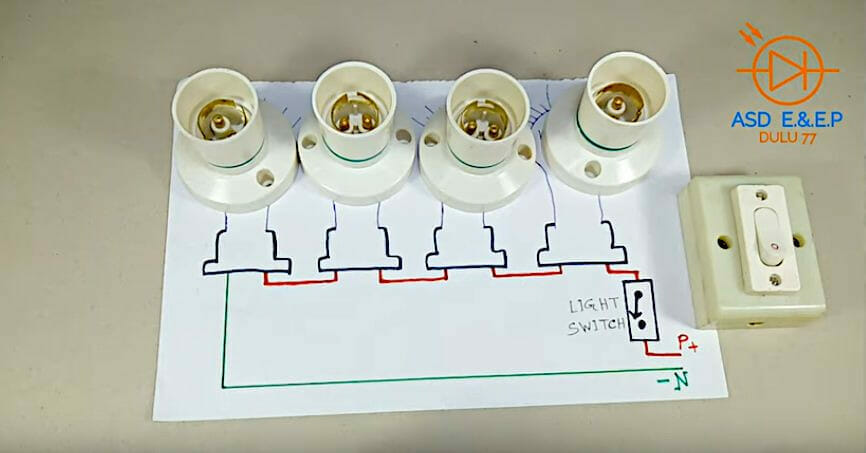
We will follow this diagram for wiring 4 lights in parallel with an AC supply:
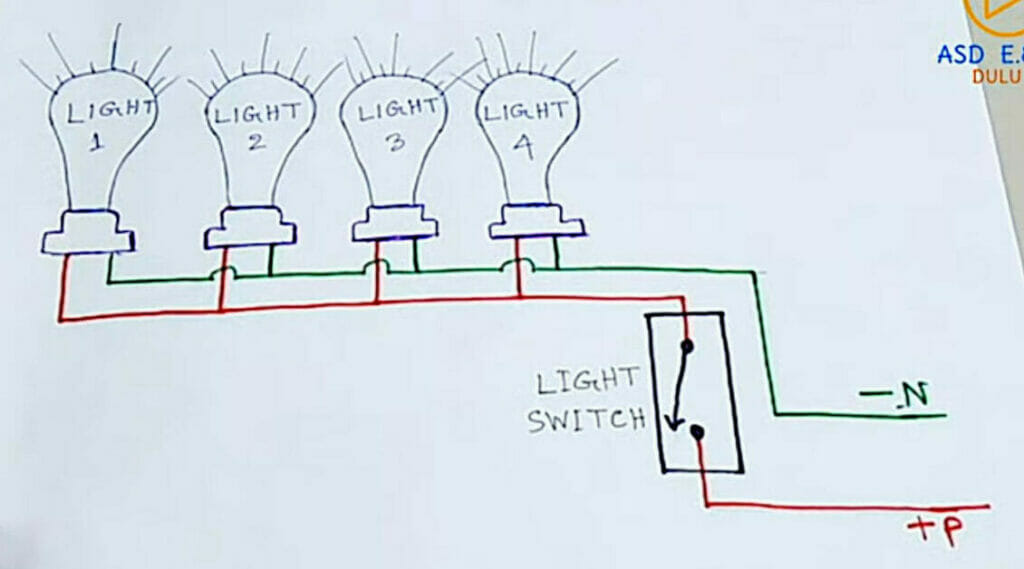
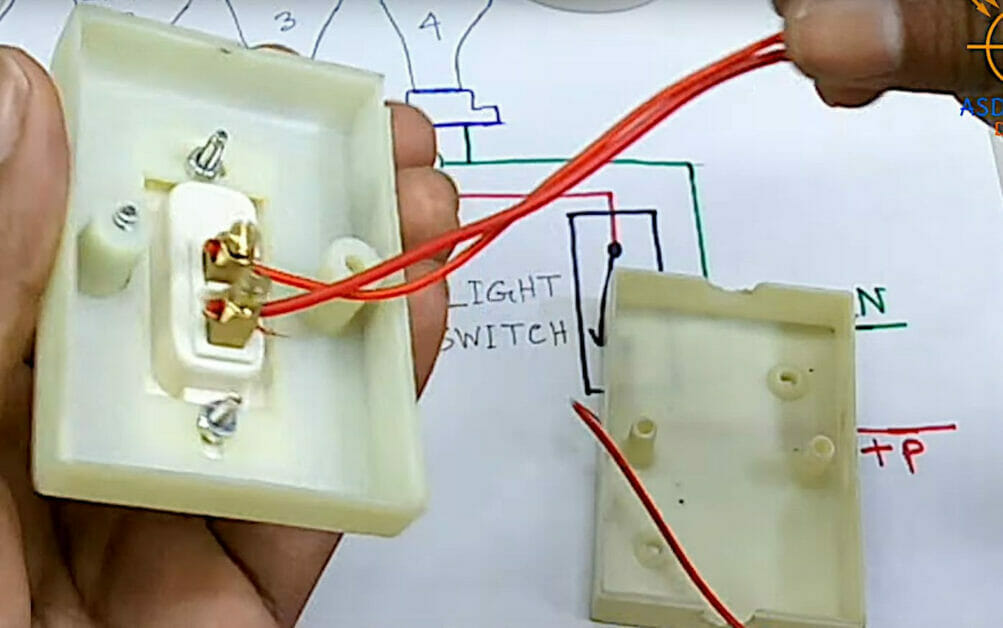
Step 1: Connect the Switch
Connect two red wires to the two terminals on the back of the switch.
Step 2: Connect the First Light
Connect one of the red wires from the switch to one of the terminals on the first light bulb holder and two black wires to the other terminal.
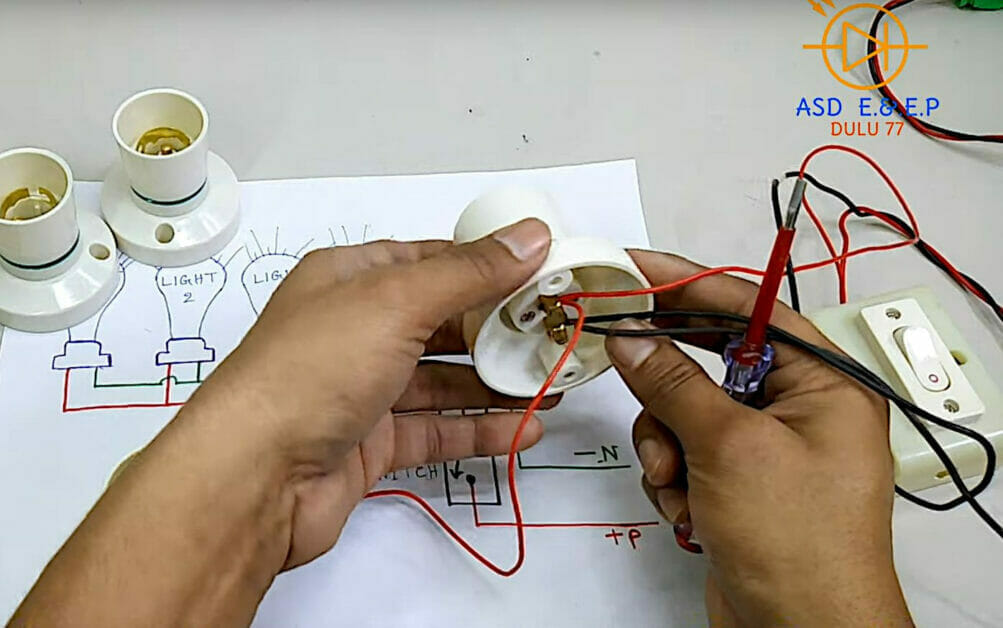
Step 3: Connect Subsequent Lights
Connect each subsequent light following the same pattern:
- Connect the red wire from the first light to one (positive) terminal on the next switch.
- Connect the black wire from the first light to one (negative) terminal on the next switch.
The remaining black wire on the first switch will connect to the power supply later.
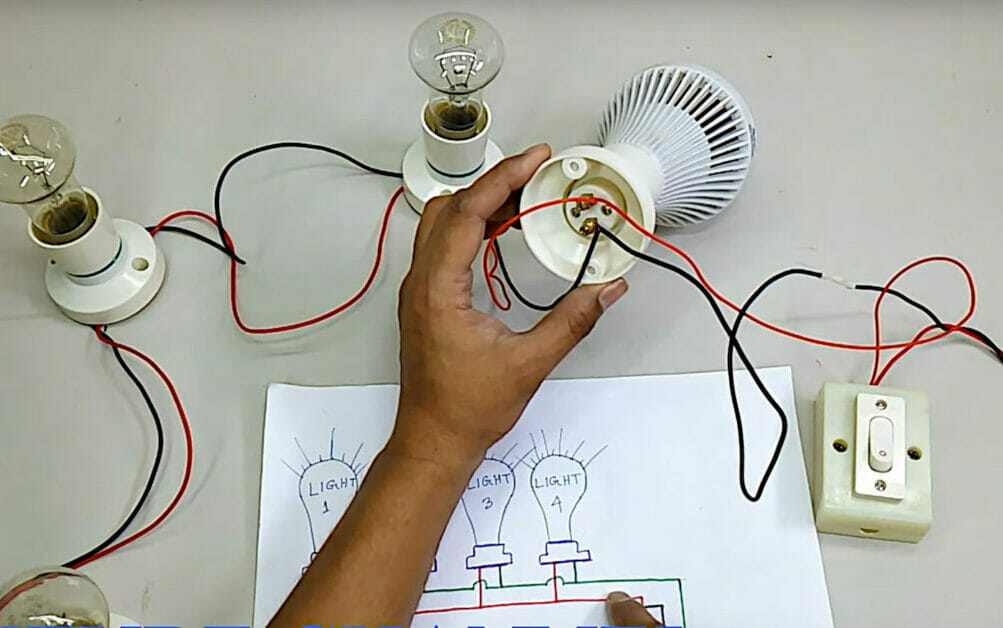
Step 4: Connect the Power
Connect the power after all the lights are connected.
This example connects the two power supply wires to the first light. Still, they can be connected to any other light as all the corresponding terminals are connected in a parallel arrangement.
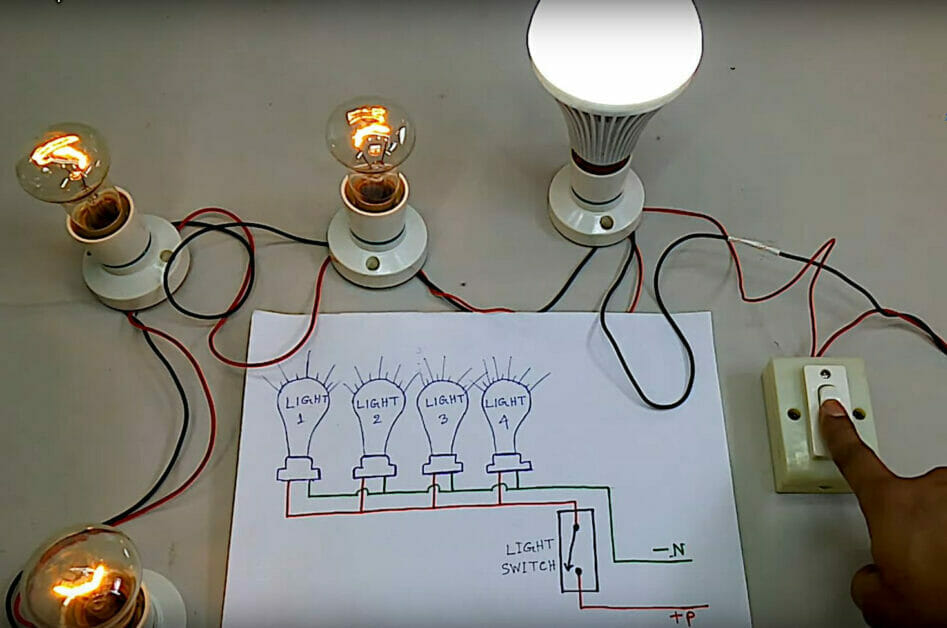
Step 5: Test the Circuit
Test the circuit when all the wiring is done, i.e., all the lights and the switch are wired together and connected to the power source.
Pressing the switch to the on position should turn all the lights together, and switching to the off position should turn all off.
Wiring Multiple Lights to One Switch in Series
We will follow this diagram for wiring 4 lights in series with an AC supply:
Procedure
Here are the steps to see how it would look to wire lights in series. I mentioned before that it’s not recommended, so this is only for demonstration. We will add a switch on the circuit so you can control the power easily.
First, look at the wiring below.
Notice the wiring in the picture below under each lightbulb holder (left) and the switch (right). The power or line wires are on the ends, one on the switch and one on the holder at the other end. All other wires connect the holders to each other on the remaining terminals and the last holder to the switch.
Follow these steps (after first disconnecting the power source):
Step 1: Strip the Wires
Strip the ends of all the wires.
Step 2: Connect the Wires between the Bulb Holders
Connect the positive or hot terminal on the first bulb holder to the opposite terminal on the next until you’ve connected all the lightbulb holders.
Step 3: Connect the First Bulb
Connect the first bulb in the series to a wire from the power source. Observe the polarity if it’s a DC system; otherwise, connect to the neutral connection.
Step 4: Connect the Switch
Connect the remaining terminal on the last lightbulb holder to the switch. Then, attach another small piece of wire from the other terminal to the positive or hot connection of the power source.
Step 5: Attach the Light Bulbs
Attach the light bulbs to each of the lightbulb holders.
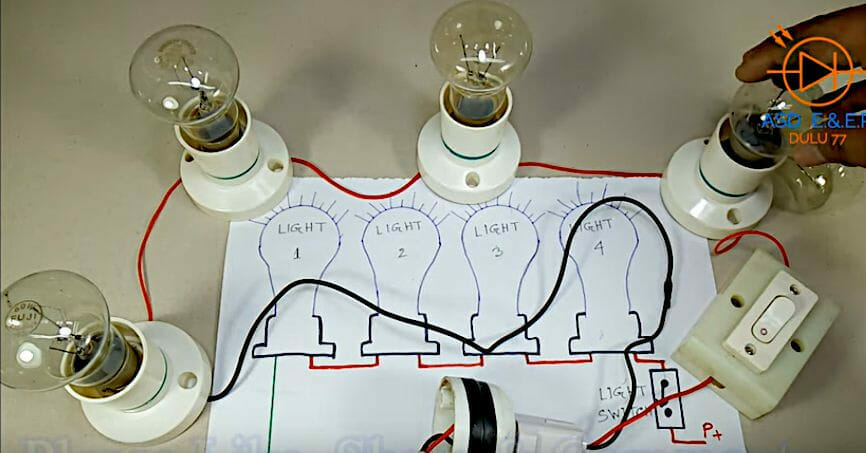
Step 6: Provide Power
Provide power to the circuit when all the wiring connections are done.
Maximum Power and Number of Lights
Although you can wire multiple lights to one switch, there are only so many you can have on the same circuit.
The number of lights is limited by the maximum power it can handle, which is determined by the circuit breaker and wiring beside the switch.
For example, a 15-amp circuit on a 120V electricity supply has a maximum power capacity of 1,800 watts. But the same capacity for continuous use is 1,440 watts, 80% of 1,800 watts. If each light operates on 10 watts, you can wire up to 144.
The table below mentions the maximum number of lights possible on 4 different circuit sizes (15, 20, 25, and 30 amps). It is based on the maximum safe wattage, assuming all the lights have the same wattage and there is no extra load on the circuit.
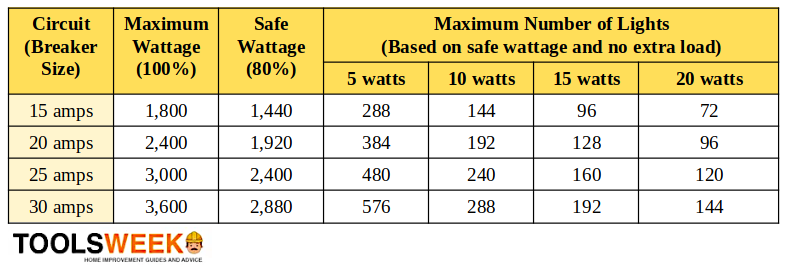
Use the following calculation to work out the maximum number of lights (of equal wattage) it will be safe to wire to one switch:
maximum number of lights = (breaker size x power supply voltage x 0.8) / wattage of each bulb
Even if you have a mix of lights with different wattages, the same rule applies of not exceeding the maximum wattage.
Parallel Options
I showed a simple parallel arrangement above, but more parallel options are possible.
The rule remains the same, i.e., connect only the same terminals and the power supply to any of the lights, but the topology can differ. The topology can make a difference in how much wiring you will need.
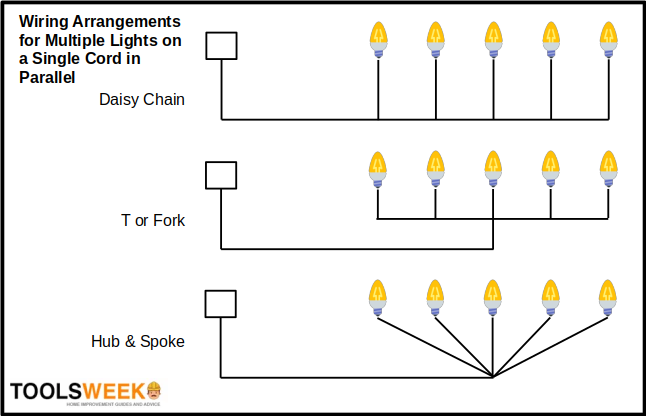
4 possible parallel arrangements are daisy chaining, forking, hub and spoke, and star topology:
- Daisy chaining is also described as ‘looping through’ because it resembles a series circuit, except that the same terminals are connected instead of the unlike or opposite ones. It’s easy to wire, but all lights downstream would fail if any one light fails (not those before it in the chain).
- Fork – The arrangement resembles a fork. You run a long stretch of wire to a light and fork the rest from there. It’s ideal for arranging lights in remote locations, far from the power source.
- Hub & Spoke – This arrangement is similar to the fork one, except that the spokes start from the end of the long wiring run instead of going to any light first. It is also best for serving remote spots.
- Star – A star topology is called a ‘home run’ because each light connects directly to the main junction or distribution box. It is permitted by the NEC 210.18 but requires much more wiring than the above three parallel arrangements.
The wiring arrangements below show the first three parallel options.
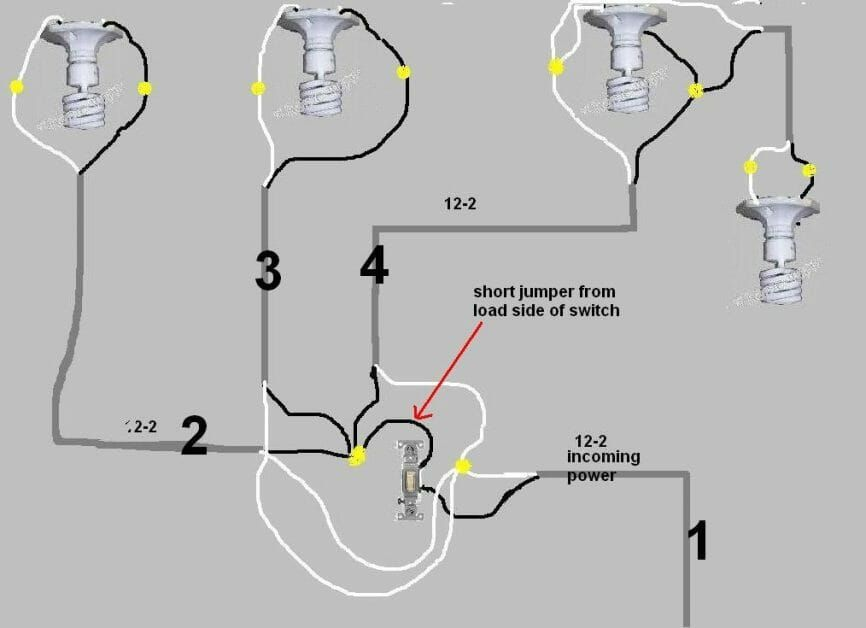
The illustration below shows the wiring in a hub and spoke arrangement. The extra light in the top right is an exception, as it is daisy chained to the light on the 4th spoke. It shows it’s possible to mix different arrangements.
RELATED How to Wire a Light in Series
Practical Applications
Wiring multiple lights in parallel is common, but a series arrangement, which I said was not recommended, is also used in certain situations.
Wiring Multiple Lights in Parallel

Wiring multiple lights in parallel is common in residential and commercial lighting circuits.
The parallel arrangement helps maintain the power of the remaining lights if any of them fails. So, you can, for instance, usually add or remove lights as needed without affecting the rest of the circuit (except in daisy chaining).
You can even add a switch on each parallel branch, but this article is about installing a single switch to control the whole circuit.
I’ve given an example below for daisy chaining multiple lights in parallel.
Wiring Multiple Lights in Series
Wiring multiple lights in series is less common but has its uses.
A series arrangement does not maintain the power of the remaining lights if any of them fails. So, removing a light, a failed light, or a broken wire will break the whole circuit.
However, a series arrangement has some advantages over a parallel arrangement. It is easier to wire in series than parallel, uses less wiring, and allows the battery to last longer in a DC circuit.
For these reasons, the series arrangement is popular for DC-powered decoration lights.
Daisy Chaining Multiple Lights in Parallel
This method connects the multiple lights in parallel by daisy chaining them.

Step 1: Arrange the Lights
Arrange the lights sequentially after first turning the power off.
Step 2: Cut the Wires
Cut the wires to the required length with a wire cutter.
Step 3: Strip the Wire Ends
Strip the ends of each wire with a wire stripper.
Step 4: Connect the Wires
Connect the like wire of each light to the like wire of the subsequent one.
So, the hot wire of the first light will connect to the hot wire of the second, the neutral to the next neutral, the ground to the next ground, and so on by looping through to the last light.
Then, connect the main cable from the power source or switch to the first light:
- Connect its hot wire to the hot terminal of the first light, and
- Connect its neutral wire to the neutral terminal of the first light.
If connecting to an existing ceiling fixture, the rule is the same: Connect like wires together. So, connect the white wire to the other white wires and the black wire to the other black wires.
Step 5: Secure the Connections
Make sure all the connections are secure. Tighten the caps or screws and use electrical tape where necessary.
Step 6: Turn the Power On
Finally, after re-checking to ensure you did all the wiring correctly and all the connections are secure, turn the power on to test the circuit.
References
Website Resources:
- Solar Christmas lights. https://www.amazon.com/dp/B00T1P632E?tag=outdoorhapp0e-20
Video References:
ASD Electrical & Electronics Projects

Zeothan Technician