8 min read
How to Wire a Light in Series
Wiring a light in series is fairly easy but not always recommended.
Quick-Step Summary: To Wire a Light in Series:
- Connect the opposite polarity terminals on the series of light fittings with wire. 14/2 wire is normally used in lighting circuits.
- Connect the remaining terminals on the first and last fittings to the power source.
- Optionally, connect a switch on the first positive or hot leg from the power source.
Continue reading to learn about wiring a light in series, together with a practical example for decoration lights.
Wiring Lights in Series
Lights are not usually wired in series because it has many disadvantages.
The biggest drawback is that if any one light fails, it will cause a break in the circuit, so all the lights will fail to work. It would also be tedious to identify which bulb failed!
But, in a series circuit, you would connect the lights by wiring from one light to the next before connecting back to the power source. It’s more common in DC circuits, where a positive pin of one light is connected to the negative pin of the next light, and so on.
Wiring a Light in Series
There are two possibilities for connecting an additional light in a circuit in series:
- The top circuit in the diagrams below connects a light in series with another light. The voltage will be divided, but the current across each will remain the same.
- Connecting a light in series with two other lights in parallel. This is the bottom circuit in the diagrams below. The voltage across each will remain the same, but the current is divided.
- I’ve added another circuit below to show the difference between wiring in series and parallel and how NOT to wire the light if you want to wire it in series. The voltage and current will both be divided.
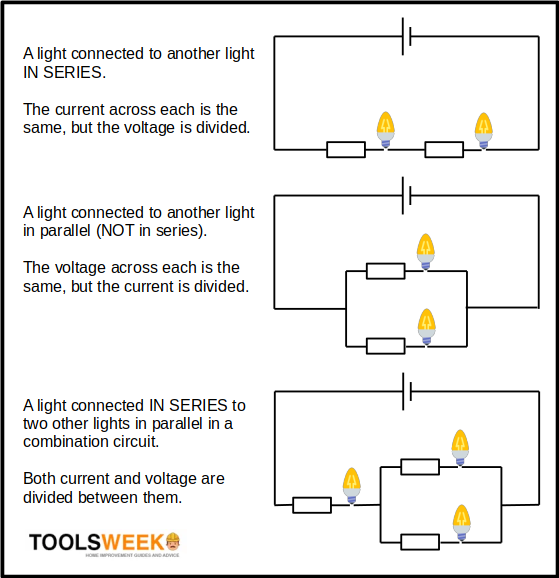
The difference you will notice between the series and parallel circuits is that there is only one single path for the current to flow when connecting a light in series, whereas there are multiple paths when connecting in parallel.

So, as you can see from the above diagrams, we do the following to connect a light in series:
- Connect the light next to the existing one.
- Connect one wire from the existing light to one terminal on the extra one and the other terminal on the latter back to the power source.
- Connect the light so that the current only has one path to flow along.
The first arrangement (extra light in series with the existing one) is simple, so we shall go through the steps in detail.
Wiring a Light in Series with Another
Requirements
You will need the following:
- Lightbulb holders: As many as you want to connect
- One toggle switch
- Wires: 14/2 wire is usually sufficient for a lighting circuit.
- Tools: screwdriver, wire stripper, pliers
Procedure
Here are the steps if you want to see how it would look to wire lights in series. We will also add a switch on the circuit so you can control the power easily.
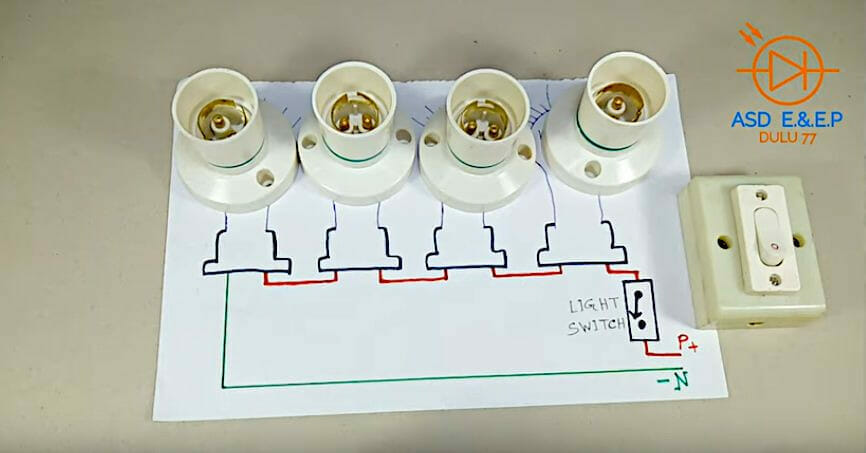
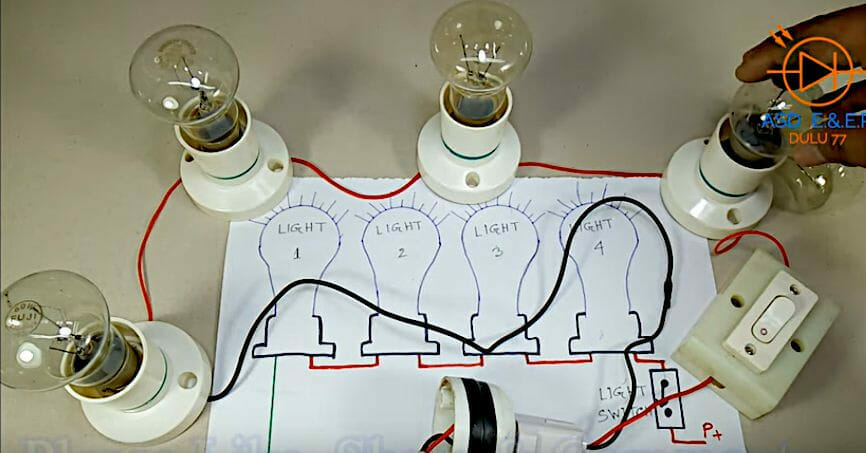
First, look at the wiring below.
Notice the wiring in the picture below under each lightbulb holder (left) and the switch (right). The power or line wires are on the ends, one on the switch and one on the holder at the other end. All other wires connect the holders to each other on the remaining terminals and the last holder to the switch.
Follow these steps (after first disconnecting the power source):
Step 1: Strip the Wires
Strip the ends of all the wires.
Step 2: Connect the Wires between the Bulb Holders
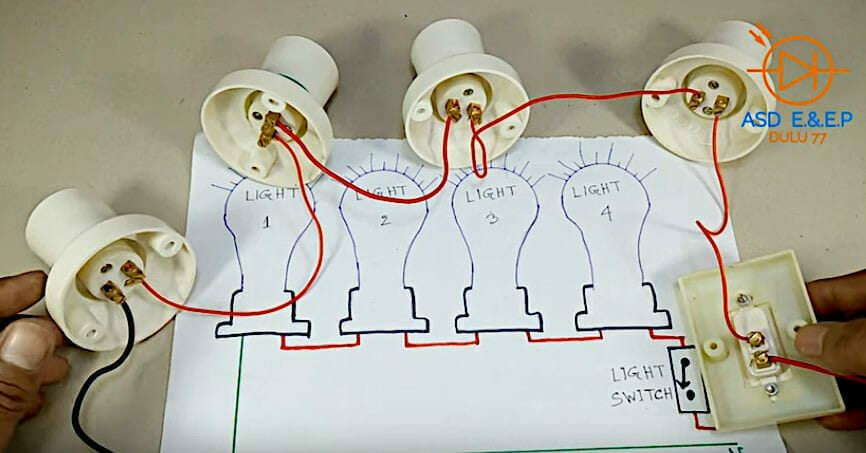
Connect the positive or hot terminal on the first bulb holder to the opposite terminal on the next until you’ve connected all the lightbulb holders.
Step 3: Connect the First Bulb
Connect the first bulb in the series to a wire from the power source. Observe the polarity if it’s a DC system; otherwise, connect to the neutral connection.
Step 4: Connect the Switch
Connect the remaining terminal on the last lightbulb holder to the switch. Then, attach another small piece of wire from the other terminal to the positive or hot connection of the power source.
Step 5: Attach the Light Bulbs
Attach the light bulbs to each of the lightbulb holders.
Step 6: Provide Power
Provide power to the circuit when all the wiring connections are done.
Uses of Wiring Lights in Series
Given the disadvantages of wiring lights in series, you might wonder why or when it’s done.
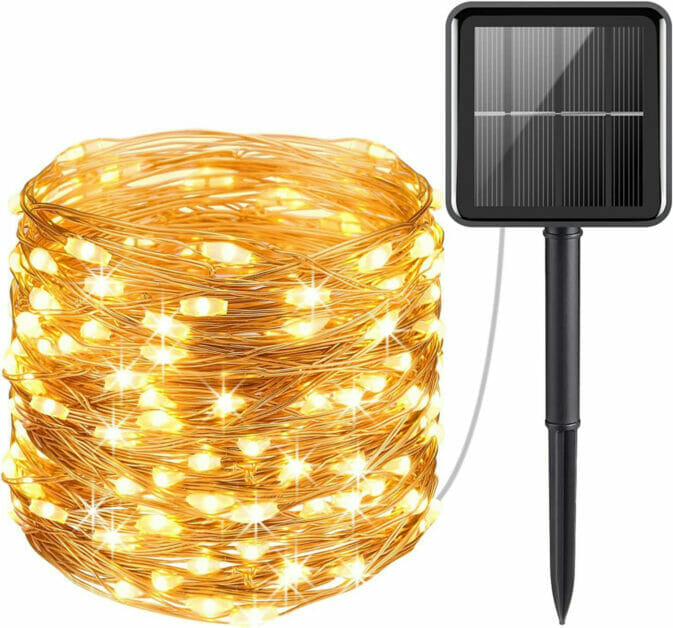
Decoration Lights
One item where you will see lights wired in series is a string of decoration lights. Wiring in series uses less wiring, so it makes sense than wiring lots of lights in parallel. Several prewired varieties are available, but it’s easy if you need to wire one yourself. The procedure is the same as described above.
Step 1: Attach the First Light
Attach one wire from the (disconnected) power source to one terminal on the first light.
It doesn’t matter if it’s an AC light, but observe the polarity if it’s a DC one. So, if it’s a DC light, connect only the positive wire to the positive terminal or the negative wire to the negative terminal (only one of the two).
Step 2: Attach the Next Light
Attach a small piece of wire from the remaining terminal on the first light to the opposite terminal of the next one. Either:
- Connect the first light’s positive terminal to the next light’s negative terminal;
- Or connect the first light’s negative terminal to the next light’s positive terminal.
So, don’t make the mistake of connecting the same terminals together when wiring in series.
Step 3: Repeat Step 2 (Iteratively)
Repeat Step 2 for as many lights as you have remaining until you get to the last. The last one should have the opposite terminal remaining to the terminal to which you connected the power source on the first light.
Step 4: Attach the Last Light
Attach the remaining wire from the (still disconnected) power source to the remaining terminal on the last light.
Note that the first and last lights in the series must have different terminals connected to the power source. One connects to the positive and one to the negative unless they are AC lights connected to an AC power source, in which case, one is hot, and the other is neutral.
FAQ Section
Q: If one bulb goes out, the rest will, too. Is that true?
Bingo! If one of those bad boys goes out in a series, the whole circuit takes a break. It’s like a chain: if one link breaks, the whole thing’s out of commission. It’s essential to check all your bulbs before you settle in for that big reveal!
Q: Is there a difference between wiring in series and parallel?
Absolutely! In series, the current has only one path to travel, but in parallel, it’s got options – multiple paths to flow. Think of it like a highway vs. a bunch of side streets.
Q: How do I know which wire goes where?
Follow the step-by-step guide above, and you’ll be on your way! It’s all about connecting the dots, or in this case, the terminals. And remember, always disconnect the power source first – safety first, thrills second!
Q: What if I want to add a switch to my series of lights?
Add a switch? No problem! Check out the steps above for how to add that switch and be in control. Flip it on, flip it off – you’re the boss!
Q: Any videos to help visualize the process?
Absolutely! Check out the links for some fantastic tutorials!
Do you have more burning questions? Drop them in! And remember, keep that enthusiasm high and always keep safety in mind.
References
Website Resources:
- Solar Christmas lights. https://www.amazon.com/dp/B00T1P632E
Video References:
ASD Electrical & Electronics Projects