11 min read
How to Wire Outlets in Series (Wiring Basics)
This article details how to wire an outlet in series with easy steps.
Quick Summary: We use the extra LOAD terminals on GFCI/AFCI outlets to wire in series. But you can also wire ordinary outlets in series using wire connectors and wiretaps. Otherwise, the general principle is the same: connect the hot (black) wires to the brass terminals, the neutral (white) ones to the silver terminals, and the ground wire to the ground terminal with a green screw.
I’ve also mentioned the benefits and drawbacks of wiring in series, how it differs from parallel wiring or daisy-chaining, and answered a few related questions.
Wiring Outlets in Series
You can wire outlets in series.
GFCI and AFCI outlets are often connected in series to provide the same level of protection downstream to other regular outlets or loads. The two (GFCI and AFCI) can also be connected in series because they offer different types of protection against ground and arc faults, respectively.
For example, on 210.12(A) AFCI-protected branch circuits, you can connect a GFCI outlet in series, and kitchen countertop outlets are often connected in series. [Mullin & Simmons, 2018]
However, wiring in parallel is more common, so it will be important to clarify the distinction and show why wiring in series is worth doing.
Wiring in Series and Parallel
When wiring outlets in parallel, each outlet receives electricity and operates independently.
So, if one fails, the others will continue to work. There are also other differences, which are mentioned in the table.
| Wiring Outlets in Parallel | Wiring Outlets in Series |
| Each outlet operates independently, so if one fails, the others will continue operation. The voltage across each is the same. You can overload a parallel circuit easily. | The total voltage is the sum of the voltage drops. You can provide the same protection to downstream outlets from GFCI/AFCI outlets. The outlet at the end might not work efficiently if appliances are plugged into the upstream outlets. |
Daisy-Chaining
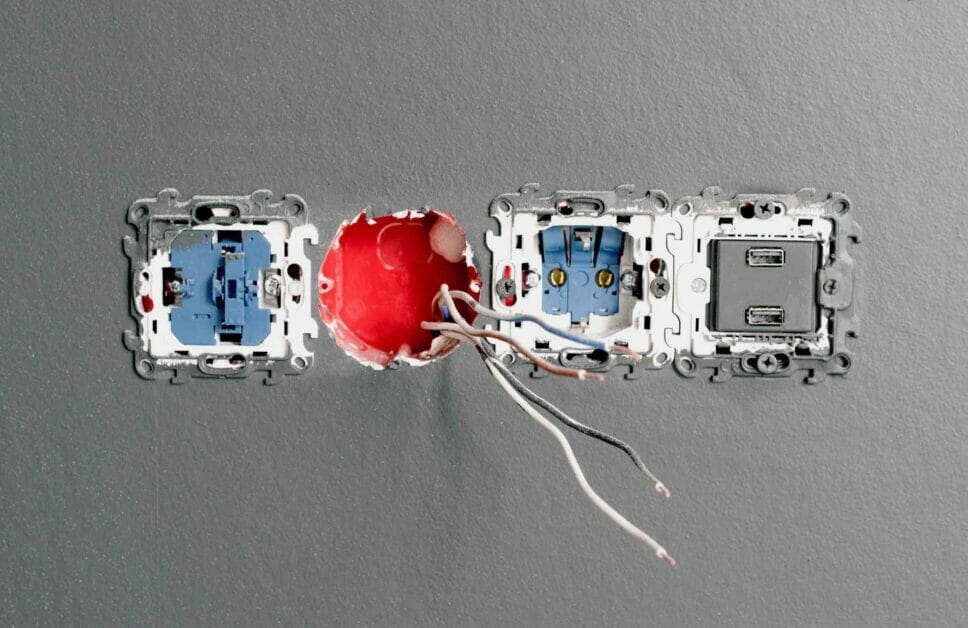
Terminals on Standard Electrical Outlets
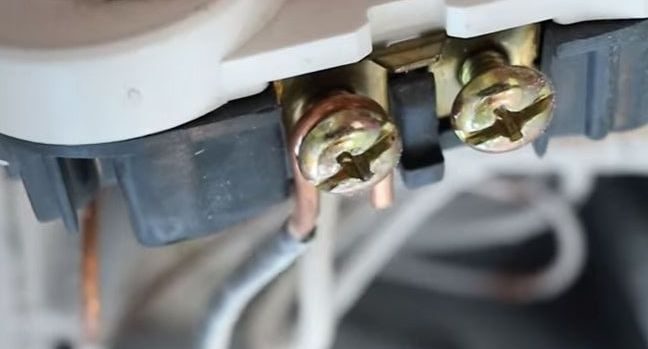
The standard electrical outlet has two brass/bronze terminals (for the hot wires), two silver/chrome ones (for the neutral wires), and one ground terminal.
A shunt connects each of the two pairs of terminals, as you can see in the picture below for the neutral connection. So, if connecting a single cable, only one wire of each type (hot and neutral) will connect to either of the two connected terminals, and it doesn’t matter which one, as they are both connected.
However, the usefulness of having two terminals for each type becomes apparent when connecting an extra cable.
Daisy-Chaining Outlets
When adding a second outlet downstream to an existing one, we can simply:
- Connect the hot (black) wire to the spare hot terminal (brass side);
- Connect the neutral (white) wire to the spare neutral terminal (silver side).
- Connect the ground (bare copper) wire by combining it with the existing one (after first removing it) using a wire connector, and from there, attach a small piece to connect to the outlet’s ground terminal with a green screw.
However, this simple daisy-chaining method connects the two outlets in PARALLEL, not in series. I only described the daisy-chain method to highlight the difference.
Now, we shall learn how to wire two outlets in series.
How to Wire Outlets in Series
The principle of wiring outlets in series is similar to how you would wire Christmas lights.
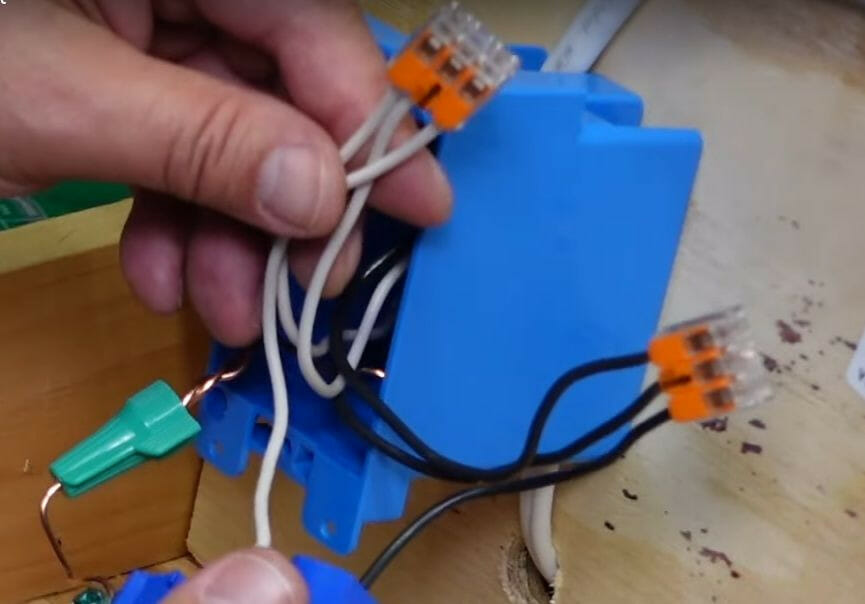
You will need three small pieces of each wire, called “wiretaps.”
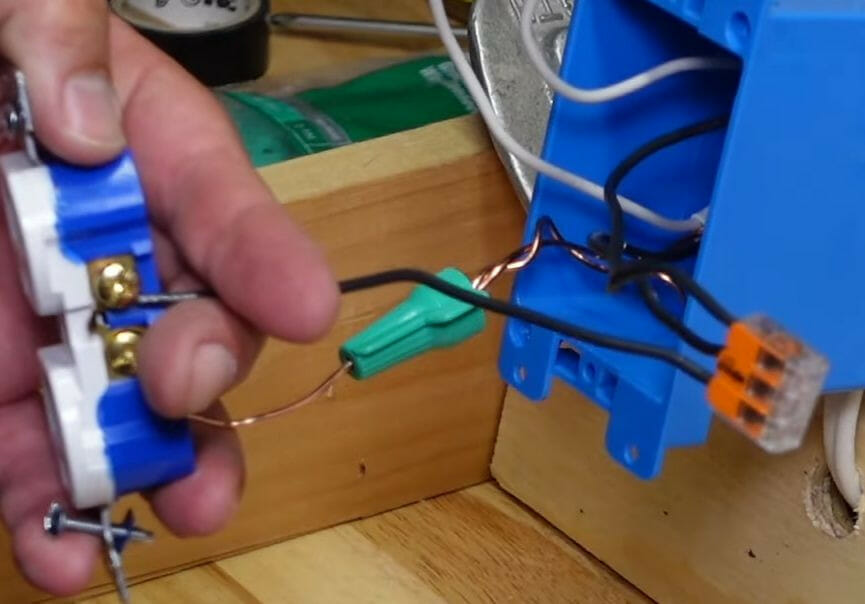
Step 1: Connect Like Wires Together
Splice or twist the bare ends of all three types of wire together – the one coming into the outlet, the one going to the next in the series, and the wiretap.
Then, use a wire cap over the spliced end. Alternatively, connect them by inserting them into a wire connector, in which case you don’t need to splice them.
Do the same for each type of wire. Your wire connectors should look somewhat like those in the picture below. The wire cap is sufficient for the ground wires, but it’s better to use wire connectors for the hot and neutral wires.
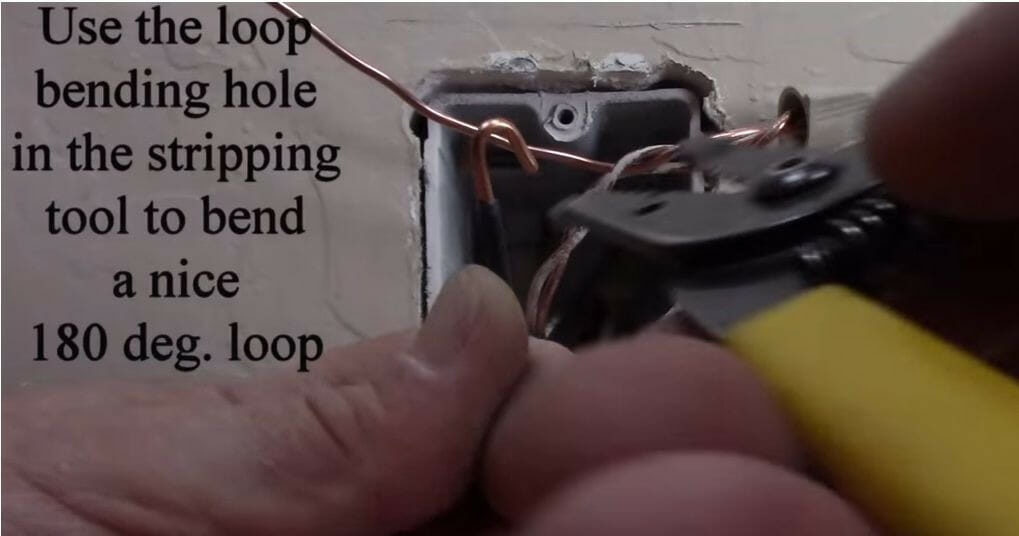
Step 2: Hook the Wiretaps
Hook the free ends of all three wiretaps (the three small pieces you made and connected) so they can connect to the outlet’s terminals.
Use the loop bending hold in the wire stripper to form 180° hooks. Otherwise, you can use nose pliers to get the same task done.
Step 3: Connect the Wiretaps
Connect the wiretaps as follows:
- Connect the hot (black) wiretap to the hot terminal (brass screw side);
- Connect the neutral (white) wiretap to the neutral terminal (silver screw side).
- Connect the ground (bare copper) wiretap to the outlet’s ground terminal with a green screw.
Step 4: Close the Outlet
Close the outlet by:
- Tucking all the wires inside the outlet’s box.
- Attaching the outlet to its box.
- Attaching the cover (or face) plate over the outlet. Try to align the screw vertically or horizontally, although it’s unnecessary.
I also recommend you test the outlet using a plug tester before using it.
Wiring Another Outlet to a GFCI/AFCI Outlet
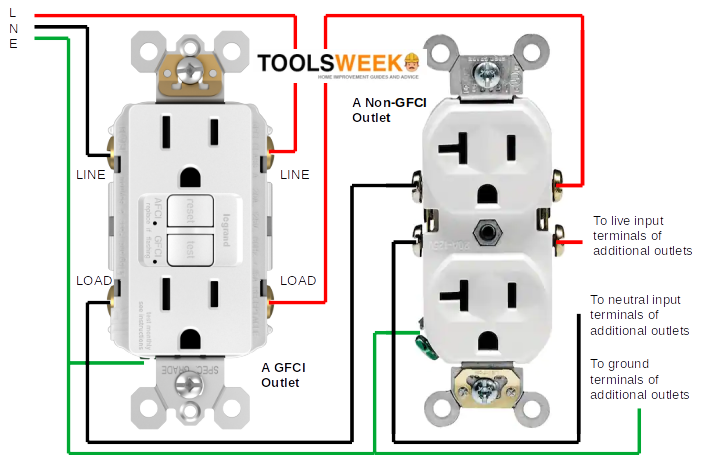
As wiring another outlet in series is commonly done when you have a GFCI or AFCI outlet, here’s the wiring diagram to follow:
Steps
Follow these steps:
- Turn the power to the circuit OFF at the panel.
- Open the existing GFCI/AFCI outlet.
- Extend a cable from its box to the secondary one.
- Identify the line and load terminals on the GFCI/AFCI outlet (see the above illustration)
- Connect the wires from the power supply cable (upstream) to the GFCI/AFCI outlet’s LINE terminals.
- Connect the cables’ wires to the secondary outlet to the GFCI/AFCI outlet’s LOAD terminals.
- Connect all the ground wires using a wire cap or connector and an additional wiretap, and connect the wiretap to the outlet’s ground terminal with a green screw.
- Connect the wires to the secondary outlet as you normally would (black wire on the brass terminal, white wire on the silver one, ground on the ground terminal).
You only need hooks at the ends of the wiretaps. Finally, re-attach the outlets, turn the cover plates on, and reconnect the power.
FAQs
How many outlets can you connect to in the series?
Theoretically, you are only limited by the circuit’s ampacity and the total load on the circuit, not the number of outlets. However, the general rule is 1.5-1.8 amps per receptacle.
So, that means, e.g., no more than 8-10 receptacles (or 4-5 double outlets) on a 15-amp circuit and a maximum of 11-13 on a 20-amp circuit.
What wire should I use to connect the outlets in the series?
The type of wire to use also depends on the circuit’s ampacity. Generally, you need a 14/2 wire for a 15-amp circuit or a 12/2 wire for a 20-amp one (both with the 3rd ground wire).
Can I wire outlets in series without a professional electrician?
You can wire outlets in series by yourself if you have the necessary tools and understand the process. However, it’s best to hire a professional electrician if you’re unsure or uncomfortable about any step. Working with electricity can be dangerous if not done correctly.
What is the difference between wiring outlets in series vs. in parallel?
When wired in series, the voltage across each outlet varies, and the current through each outlet is the same. If one outlet fails, it can affect the rest of the series. In contrast, when outlets are wired in parallel, each outlet operates independently. If one outlet fails, the other outlets will continue to operate normally.
Is it better to wire outlets in series or parallel?
Generally, outlets are wired in parallel so that each outlet operates independently and receives the same voltage. However, there can be circumstances where wiring outlets in series can provide benefits, such as the ability to extend GFCI/AFCI protection to downstream outlets.
What is the importance of the ground wire when wiring outlets in series?
The ground wire is essential as it provides a path for electrical current to follow in the event of a fault. This can help prevent electrical shocks or fires. When wiring outlets in series, you must connect the ground wire at each outlet.
What happens if I overload the outlets wired in series?
Overloading outlets can lead to overheating, which can cause the insulation around the wires to melt and lead to an electrical fire. It can also cause a circuit breaker to trip, interrupting the power supply to protect the circuit from damage.
Can I use different types of outlets in a series?
You can use different outlets (like GFCI, AFCI, or standard outlets) in the same series. Ensure the wiring is done correctly to maintain proper function and safety.
Safety Precautions When Wiring Outlets in Series
Working with electricity requires high caution to prevent electrical shocks, fires, or personal injuries. Before you start wiring outlets in series, it’s essential to follow some safety guidelines:
1. Turn Off the Power: Ensure the power to the circuit you are working on is turned off at the breaker box. Use a voltage tester to confirm the power is off before you begin work.
2. Wear Protective Gear: Insulated gloves can provide an added layer of protection against electric shocks.
3. Use Insulated Tools: Use tools with insulated handles, such as screwdrivers and wire cutters, to minimize the risk of electrical shocks.
4. Understand Your Limits: If you’re not fully confident in electrical wiring or the task seems too complex, don’t hesitate to hire a professional electrician. Safety is a priority, and it’s better to seek professional help than risk causing a dangerous situation.
5. Keep Your Work Area Dry: Never work in wet areas, as water conducts electricity and increases the risk of shocks. If the floor is wet, dry it first, and if your hands are wet, dry them thoroughly before starting your work.
6. Don’t Overload Outlets: While adding many outlets on a circuit is theoretically possible, try to avoid overloading them with too many high-power devices. Overloading can lead to overheating, damage to your electrical system, or even an electrical fire.
7. Inspect Your Materials: Before starting, inspect your wires and outlets for any damage. Damaged wires or outlets can lead to short circuits, sparks, and potential electrical fires.
8. Always Ground Your Outlets: When wiring outlets in series, always connecting the ground wire is crucial. This provides a path for electrical current to follow if there’s a fault, reducing the risk of electrical shocks or fires.
9. Avoid Touching Live Wires: Never touch a wire unless you’re sure it’s not carrying current. To be safe, even if you’ve turned off the power, always treat wires as if they’re life.
References
ArchAngel Electric (Power outlets above a kitchen counter). https://archangelelectricinc.com/services/
Ray C. Mullin, Phil Simmons. Electrical Wiring Residential. Cengage Learning, 2014.
Video References:
HandyDadTV
Terry Peterman