10 min read
How to Wire a 3-Way Switch with 4 Lights (DIY Guide)
If you’re looking to wire a 3-way switch with 4 lights, I’ll show you how in one of several possible ways.
The method shown here is an in-line configuration for the 3-way switching circuit part and daisy-chaining the 4 lights in parallel.
Quick Summary:
Switching Circuit:
- Connect the power supply hot wire to the first switch.
- Link both switches’ traveler terminals.
- Attach the second switch hot wire to the first light fitting.
Lighting Circuit:
- Link the last bulb’s neutral to a power source.
- Connect light wires with wire caps; add an extra connection to the fitting.
- Join hot wire from second 3-way switch to first light.
More details and circuit diagrams are included below.
Wiring a 3-Way Switch with 4 Lights
Wiring a 3-way switch to control four lights is similar to wiring it for a single light, except that you connect four lights in either series or parallel.
I don’t recommend wiring AC lights in series, as it has many disadvantages. But, in a series circuit, you would connect the lights by wiring from one light to the next before connecting back to the power source.
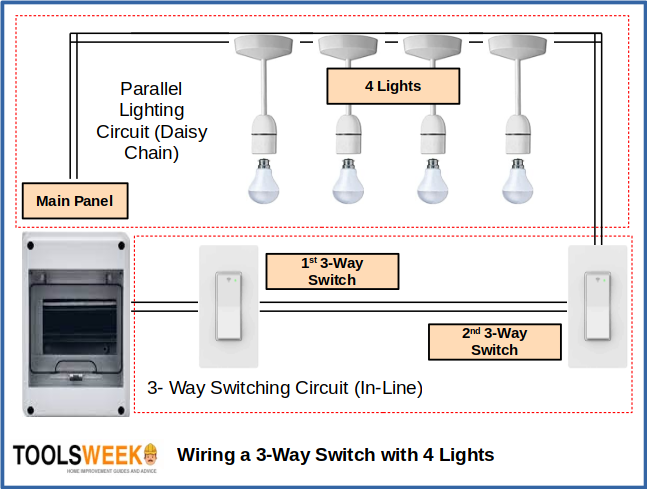
I will focus on wiring four lights in parallel to a 3-way switching arrangement in 2 parts: a switching circuit and a light circuit. Various configurations are possible (see the end of the article). Still, in this article, I will show the in-line configuration for the 3-way switching and daisy-chaining for the parallel lighting. It’s the best pair of configurations to get the job done quickly.
We will follow the circuit diagram below. I will give more details under each separate part.
Other Important Considerations and Tasks
Before starting to wire, have you considered or done the following?
Can the circuit handle four lights?
Usually, you don’t need to worry about this if it’s at least a 10-amp circuit and unless you have high-wattage lights.
If it’s a 10-amp circuit on a 110V supply, the total power of all four lights (their sum) should not exceed 880 watts, and if it’s a 15-amp circuit, the maximum is 1,320 watts. Also, four lights are within the limit 8 for a 15-amp circuit breaker (NEC 15-100).
But the switch should also handle the total current or power. Check its rating.
Do you have all the necessary tools and materials required?
You will need the following items:
- Lights: As many light bulbs as you want to connect (including their fixtures)
- Other electrical items: Wire, electrical tape, light fixtures, and wire nuts or connectors
- Tools: Wire cutter, wire stripper, screwdriver
Have you switched the power off at the breaker panel?

(1) Turn the main circuit breaker off for the circuit you will be working on. Don’t risk working with mains wiring without turning the power off first. Use a tester or voltmeter to confirm that the power is off.
(2) Only connect like wires together. Don’t directly connect unlike wires, i.e., the hot and neutral ones should be entirely separate throughout.
Wiring the 2 3-Way Switches (In-Line)
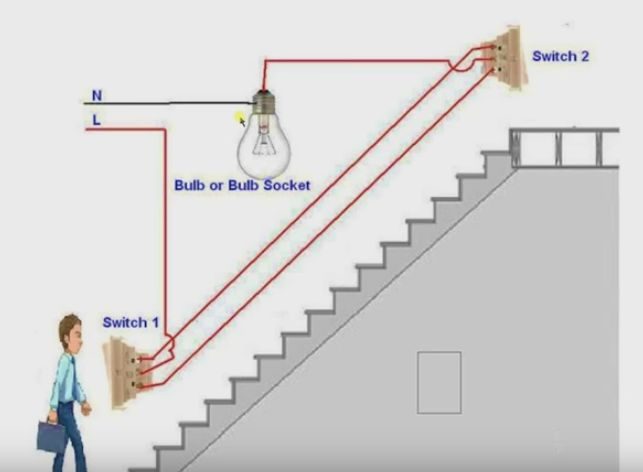
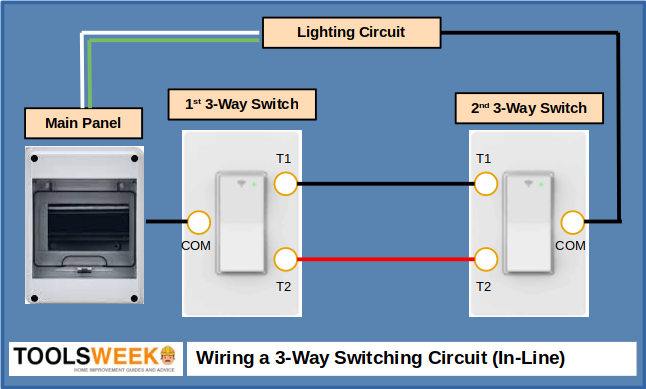
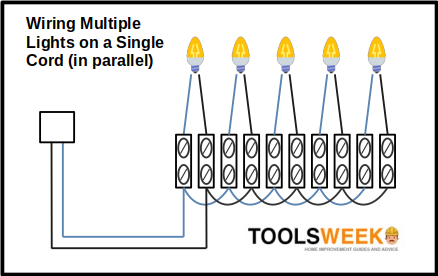
As 3-way switching is commonly used on staircases, the diagram below shows how the switches will be arranged (inline) – one at the top and one at the bottom. They could be at either end if it’s a hall or hallway.
Note the following:
- The live (L) wire from the power supply is the hot wire from the power supply.
- The neutral (N) wire to the power supply is the neutral (white) wire.
- The red lines are the hot wires, which are black in the US system.
- Although one light bulb is shown, we will connect four in parallel.
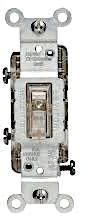
The 3-Way Switch
The 3-way switch:
- It is always used in pairs;
- It is only connected by the hot wire (never by the neutral);
- It has 3 terminals without any on/off positions because either can be in either state, depending on the position of the other switch. The three terminals are one “common” terminal and two “traveler” ones.
Wiring the 3-way Switch
Follow the steps below.
Step 1: Connect the Hot Supply Wire
Connect the hot (live) wire from the power supply to the first switch’s common (COM) terminal.
Step 2: Connect the Traveler Terminals
Connect the two traveler terminals of both switches, as shown in the circuit diagram below.
Connect T1 with T1 and T2 with T2. Although both are hot terminals (as is COM), you can use one black and one red wire to distinguish them.
Step 3: Connect the Hot Wire to the Lights
Connect the hot wire from the common (COM) terminal of the second switch to the first light fitting in the lighting circuit.
Wiring the Parallel Lighting Circuit (Daisy Chain)
When wiring lights in a daisy chain, you must prepare and connect the wires.
Follow the steps below.
Step 1: Connect the Neutral Wire
Connect the neutral (white) wire from the last bulb with the neutral terminal or wire of the power source.
Step 2: Daisy Chain the Lights
You need small pieces of wire to connect each subsequent light fitting until you get to the last one.
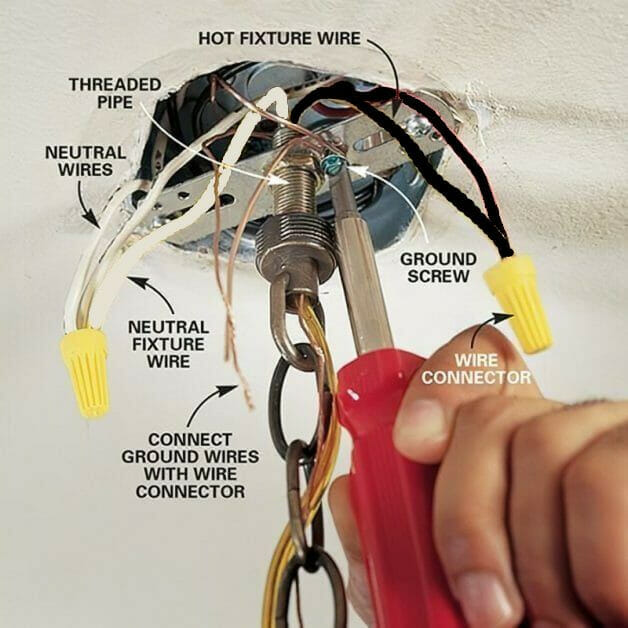
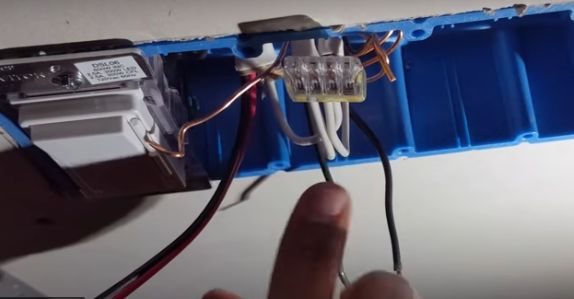
The basic rule applies to connecting the same wires, i.e., black with black, white with white, and ground with ground. Meanwhile, make a connection from each wire cap or connector to the hot and neutral terminals of the light fitting.
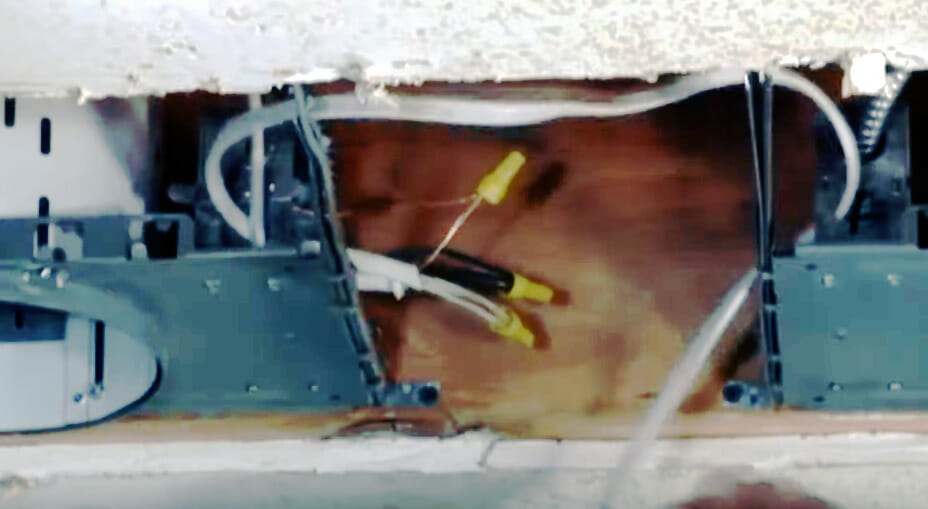
If they are recessed lights, the same wires are still connected and will look somewhat like in the picture below.
Step 3: Connect the Hot Wire
Connect the hot (black) wire from the second 3-way switch, i.e., the one farther away from the power source (in-line configuration), to the first light fitting.
Step 4: Secure the Connections
Ensure all the connections are secure before turning the power on.
Alternative Configurations
Although I showed how to wire four lights in parallel by daisy-chaining them to a 3-way in-line switching arrangement, alternative configurations are possible.
So you have several options. They include two different 3-way switching configurations and three different parallel lighting configurations. See the table below for these parts and configuration options (choose one red and one yellow).

To help you choose, consider the requirements, benefits, and drawbacks of each option:
- In-line 3-way switching is fine for most cases, especially if the power goes to one of the 3-way switches first (and the lights are downstream).
- Switch-loop 3-way switching – Consider this if the power supply is connected directly to the lighting circuit.
- 4 lights daisy-chained to a 3-way switch – It’s an easy circuit to arrange quickly. Same-wattage bulbs will have the same brightness, but if one light fails, it will impact others downstream.
- 4 lights in a fork or hub and spoke configuration – These are more complex alternatives that can overcome the aforementioned daisy-chain limitation.
- Four lights in a star topology – Each light will connect to the power source via the switches. It will require much more wiring; I won’t go into detail.
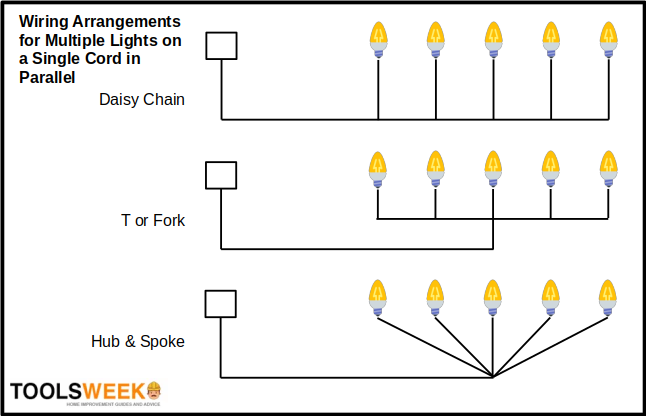
Alternative Configurations for Parallel Lighting
The first three configurations for wiring four lights in parallel are shown in the diagram below.
For example, here is one possibility of a fork arrangement:
The star topology option involves wiring each light to the switching circuit separately, requiring much more wiring. It involves the same principle of connecting only the same wires. As you can see in the picture below, the neutral wires are all connected inside a single connector.
More Details
See the following articles for more details about wiring each part:
- Wiring a 3-way switching circuit: https://toolsweek.com/how-is-a-three-way-switch-wired/
- Wiring multiple lights in parallel: https://toolsweek.com/how-to-wire-multiple-lights-to-one-cord/
References
3-way switch. https://www.homedepot.ca/product/leviton-3-way-lighted-toggle-switch/1000167435
David Herres. The homeowner’s DIY guide to electrical wiring. McGraw Hill Education. 2015
Video References:
Eddie Rainier
Niket Shah Plus
Zeothan Technician