14 min read
How to Test an Outlet with a Multimeter
Today, we’re diving into electrical outlets and how to test them using a multimeter. I’ve been through this process more times than I can count, and I’m here to guide you through it step by step.
Quick Summary:
- Step 1: Prep Your Multimeter – Ensure the outlet’s power is off. Then, grab your multimeter and set it to measure AC voltage.
- Step 2: Insert the Probes – Now, take your multimeter’s red and black probes and insert them into the two vertical slots of the outlet.
- Step 3: Grounding Test – Move the black probe to the rounded ground slot.
- Step 4: Reversal Test (If Necessary) – If you’ve got equipment that needs a specific current direction, you’ll want to do a reversal test.
I’ll walk you through these steps with handy illustrations, making it as easy as pie. Remember, a multimeter gives you the full story, not just a yes or no answer like a simple current tester.
What Can We Test on an Outlet?
I’ve been down this road many times and am excited to share my insights and tips. So, what’s on the agenda? We’re looking at three key things:
- Is Power Reaching the Outlet? It’s like checking if the water’s running in your faucet.
- Is the Outlet Properly Grounded? Think of grounding like your home’s electrical anchor – it keeps everything stable and safe.
- Is the wiring inside the outlet Proper or reversed? This is about ensuring everything’s in order, like ensuring your socks are on the right feet.
Although you can use a simple current tester for these tests, a multimeter will give you exact voltage readings.
Essential Tools for Outlet Testing
Let’s chat about the tools you’ll need for this electrical adventure. Trust me, having the right tools in your belt makes all the difference.
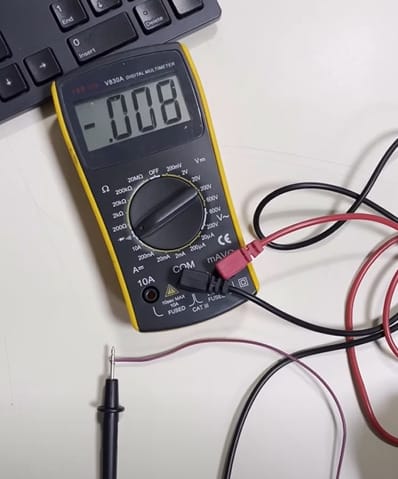
Multimeter (Analog or Digital): Your analog or digital multimeter is your trusty sidekick.
Plug-in Tester (Optional) Now, these little guys are nifty for a glance. I’ve used plug-in testers when I’m in a hurry or need a quick confirmation that things are in order.
Screwdriver: And then, there’s the trusty screwdriver. This is when you must go beyond the surface and see what’s happening behind the scenes.
Testing an Outlet for Power
Let’s roll up our sleeves and get into one of the most essential skills in our home improvement toolkit – testing if power reaches an outlet. I’ve been there and done that, and I’m here to walk you through it step by step.
Step 1: Set the Multimeter
First off, grab your multimeter. This little gadget is your best friend when it comes to electrical work. You’ll want to set it to measure AC voltage – look for the wavy line symbol.
Select a range that covers your home’s voltage, up to 120 or 240 volts, depending on where you live.
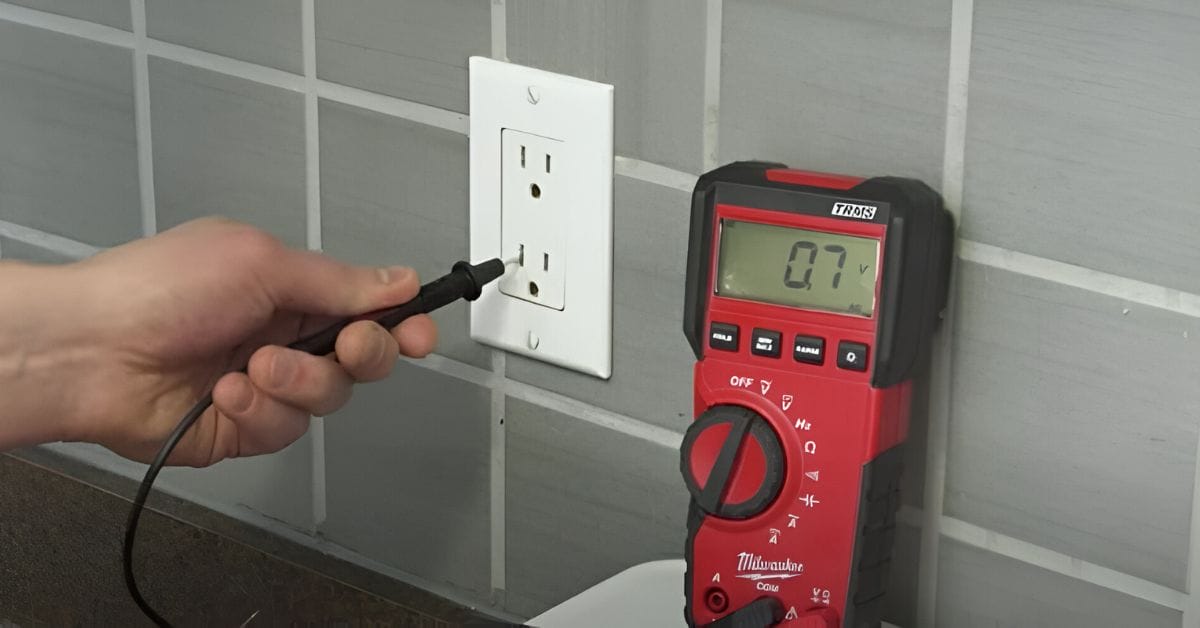
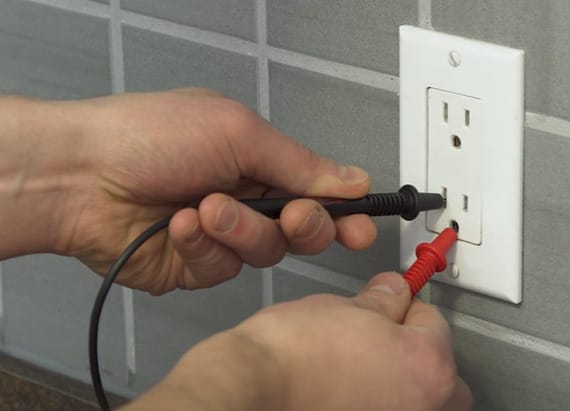
Step 2: Insert the Probes
Now, it’s time to get those probes in place. You’ve got two slots to work with – one’s a bit shorter (that’s your hot connection), and the other’s longer (that’s neutral).
If you’re like me and like things to match, put the red probe in the short slot and the black probe in the longer one. It’s AC voltage, so if you mix them up, no sweat – it’ll work either way.
Step 3: Check the Reading
With your probes snugly in the slots, it’s showtime. Take a look at your multimeter. If there’s power in the outlet, you’ll see some action – a spinning dial on an analog multimeter or some digits on a digital one.
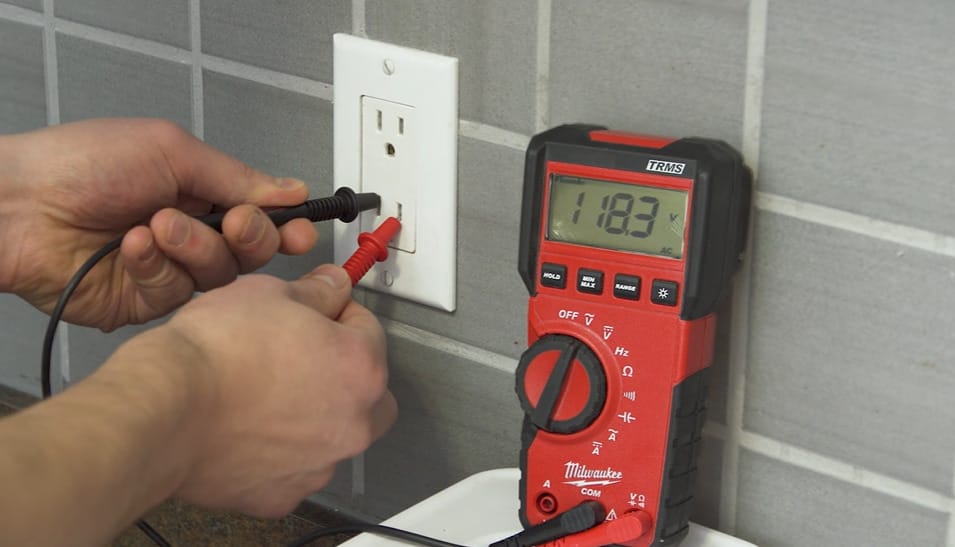
A normal reading? It’ll be around your main supply voltage, usually between 110-120 volts if you’re in the US.
But what if there’s no movement, or the reading’s low? Well, that’s your cue that something’s up. Maybe the circuit breaker tripped, or there’s a wiring issue. I remember finding an outlet dead as a doornail, and the breaker had tripped. A quick flip, and we were back in business.
So there you have it, folks – testing a power outlet broken down into simple steps. Keep these tips in your back pocket, and you’ll tackle electrical projects confidently in no time! Stay safe, and happy DIY-ing!
Testing if an Outlet is Properly Grounded
Let’s talk about something important in our homes that often goes unnoticed – ensuring our outlets are properly grounded. It’s like making sure your house has a solid foundation.
I’ve had a few experiences where this little check saved me from potential hazards.
Step 1: Get Your Multimeter Ready
Grab your multimeter – this handy tool is like your DIY sidekick. Set it to measure AC voltage because we deal with it in our home outlets.
Step 2: Probe Placement
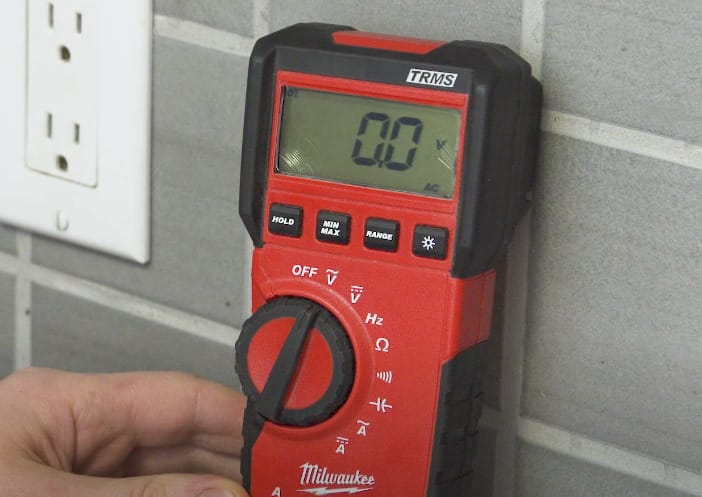
Now, take the red probe – your live wire friend – and plug it into the small outlet slot. This slot is usually the hot one. Then, introduce the black probe – your neutral buddy – to the ground slot. That’s the rounded, U-shaped friend waiting to join the party. Sometimes, I think of it as setting up a little meeting between them.
Step 3: Check the Reading
With your probes in place, it’s time for the moment of truth. Check the reading on your multimeter. Ensure there’s no current outside the outlet.
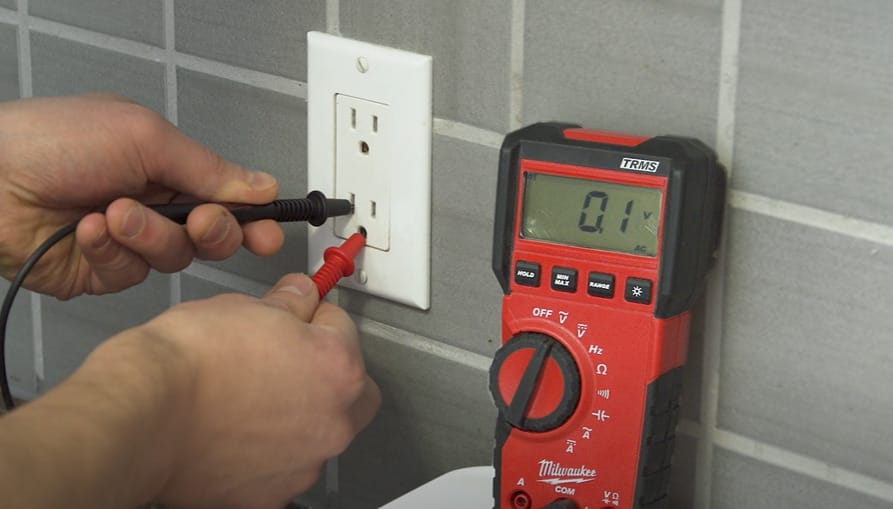
If your multimeter reads more than 0.001 volts on the casing, it’s a red flag. In that case, you’ll want to turn off the power and look closer to ensure everything’s as grounded as possible.
I remember once I found an outlet that wasn’t grounded properly. It was like finding out your car’s been running without a seatbelt – a bit unsettling.
Checking if the Wiring is Proper or Reversed
Check if your outlet’s wiring is playing by the rules or if it’s got its wires crossed, literally. I’ve encountered this a few times, and let me tell you, it’s an interesting puzzle to solve.
Step 1: Gear Up with Your Multimeter
First, grab your trusty multimeter. I always feel like a bit of an electrical detective when I’ve got mine in hand. Make sure it’s set to measure AC voltage – that’s your bread and butter for home electrical work.
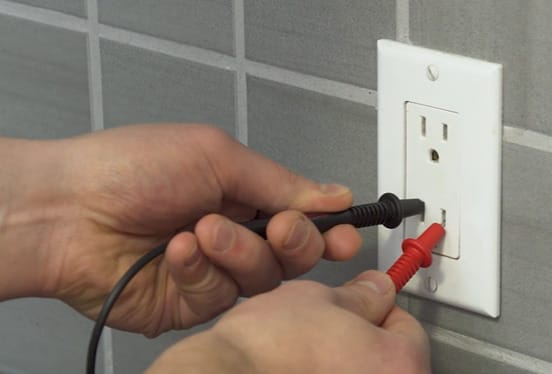
Step 2: Insert the Probes
Normally, you’d put the red probe (that’s your live wire buddy) into the short slot (hot) and the black probe (your neutral sidekick) into the long slot (neutral).
But in this case, switch it up – red goes into the long slot, and black goes into the short one. It feels like wearing your shirt inside out, but trust me, it’s all part of the plan.

Step 3: Check the Reading
Look at your multimeter with your probes in their ‘reversed’ positions. If it shows a reading, then bingo – your outlet’s wiring is reversed.
I remember the first time I found a reversed outlet in my old workshop. It was like discovering a secret passage – unexpected but thrilling.
If the wiring is reversed, don’t sweat it too much. This isn’t a big deal for most household gadgets and gizmos. However, if you’re into more sophisticated stuff, like certain electronics or specialty equipment, that’s when you need to pay attention.
Troubleshooting Tips for Testing Outlets with a Multimeter
Testing outlets with a multimeter can sometimes feel like trying to solve a mystery. Over the years, I’ve had my fair share of head-scratching moments while navigating the quirks of home electrical systems.
But fear not! I’m here to share my experiences and tips to help you avoid common pitfalls.
| Common Problem | Solution and Tips |
|---|---|
| Incorrect Multimeter Setting | Always double-check that your multimeter is set to measure AC voltage when testing home outlets. It’s a simple oversight but a common one. I remember once setting my multimeter to DC instead of AC voltage. The reading was nonsensical, and it took me a moment to realize my mistake. |
| Uncertain Readings | Ensure the probes are firmly inserted into the outlet slots. Loose connections can cause unstable readings. Also, check if your multimeter’s batteries need replacing. There was this one time when the readings were fluctuating wildly. I initially thought there was an issue with the outlet. |
| No Reading on a Known Live Outlet | Verify that your multimeter is functioning correctly by testing it on another outlet you know is working. Sometimes, the issue is with the tool, not the outlet. I’ve been fooled by this more than once. I’d test an outlet, get no reading, and start wondering if there was a major wiring issue. |
| Safety Concerns | Always handle the probes by the insulated part and keep your other hand in your pocket if possible. This reduces the risk of a dangerous electrical path through your body. I’ve had a few close calls due to complacency. Once, I almost touched the metal part of the probe while it was inserted into the outlet. |
| Misinterpreting Ground Test Results | A slight reading on the ground test doesn’t always indicate a problem. Induced voltages often cause it and is usually harmless. However, if in doubt, consult a professional. Early in my DIY days, I got a reading on the ground test and mistakenly thought the outlet was faulty. |
| Confusing Outlet Layout | Familiarize yourself with different outlet types and layouts. If you encounter something unusual, take a moment to research before testing. In some older homes, I’ve encountered outlets with unconventional layouts, which threw me off initially. |
Remember, every challenge is an opportunity to learn something new. Stay curious, stay safe, and don’t hesitate to ask for help or look up more information when in doubt. Happy testing!
Maintaining Electrical Outlets
Maintaining your electrical outlets and multimeter isn’t just about ensuring they work properly; it’s about safety and efficiency, too. I’ve learned a few tricks that I’m excited to share with you.
Maintaining Electrical Outlets
- Regular Testing: I make it a point to test the outlets in my home every six months. It’s like a routine check-up. This way, I catch any issues before they become serious problems. It’s easy to forget, so I usually mark it on my calendar – a little reminder goes a long way.
- Visual Inspections: Now and then, I walk around my house and give the outlets a quick visual check. I’m looking for wear and tear, discoloration, or loose fittings. I learned this the hard way when I once overlooked a slightly charred outlet, which later turned out to be a sign of an underlying issue.
- Cleaning: Dust and debris can accumulate in and around your outlets. I use a dry cloth to clean around the outlets gently. Remember, never insert anything into the outlet slots – safety first!
- Replacement: If an outlet is not functioning properly or shows signs of damage, it’s time for a replacement. I remember replacing an old outlet in my workshop; it wasn’t just an upgrade in functionality but also a boost in safety.
Caring for Your Multimeter
- Proper Storage: I always store it in its case after using my multimeter. It’s not just about keeping it clean but protecting it from accidental drops or spills. I learned this when my first multimeter was damaged because I left it on a busy workbench.
- Regular Calibration: To ensure accuracy, I get my multimeter calibrated annually. This might seem excessive, but accuracy is key, especially when dealing with electricity.
- Battery Check: There is nothing more frustrating than picking up your multimeter for a quick test only to find the batteries dead. I check and replace the batteries regularly. Plus, I remove them if I’m not planning to use the multimeter for an extended period.
- Clean Contacts: Occasionally, I clean the probe tips and contact points with a soft, dry cloth. This helps maintain a good connection and accurate readings. Remember, residue and dirt can be your worst enemies in getting accurate readings.
Remember, caring for your tools and home is a continuous process. It’s not just about fixing things when they break; it’s about regular maintenance to prevent problems in the first place. Stay diligent, and happy DIY-ing!
Frequently Asked Questions
- Can a Faulty Outlet Affect My Appliances?
- Absolutely! A faulty outlet can be more than just an inconvenience. It can lead to poor appliance performance or even damage your beloved gadgets. It’s like ensuring the water your plants drink is clean – your appliances need a healthy outlet to function at their best.
- Is It Safe to Test Outlets If I’m Not an Electrician?
- Yes, it’s generally safe if you follow the right steps and precautions. Always use a reliable multimeter, and don’t forget those safety tips I mentioned earlier. However, if you’re ever in doubt, there’s no harm in calling in a professional. Better safe than sorry!
- What’s the Risk of Using a Reversed Wired Outlet?
- For most household appliances, there’s no immediate risk. They’ll still work. However, for certain equipment, especially those sensitive to polarity, it could be a problem. It’s like plugging in a USB – it might fit both ways, but only one way is right.
- Can I Test an Outlet without Turning Off the Power?
- Yes, you can test an outlet without turning off the power, and in fact, you need power to test its voltage. Handle the multimeter probes with the insulated grips and avoid touching metal parts. It’s like juggling – you need to keep the balls in the air, but you’ve got to be careful not to drop them!
- How Do I Know If My Multimeter Is Accurate?
- Test your multimeter on a known voltage source, like a standard battery, to check its accuracy. If the reading is off, it might need recalibration or new batteries.
References
Organizations:
- National Electrical Manufacturers Association (NEMA). https://www.nema.org/
- International Electrotechnical Commission (IEC). https://www.iec.ch/homepage
Books:
- “Wiring a House” by Rex Cauldwell. https://www.barnesandnoble.com/w/wiring-a-house-rex-cauldwell/1118175264
- “Electrical Safety Handbook” by John Cadick, Mary Capelli-Schellpfeffer, Dennis K. Neitzel, Al Winfield. https://www.barnesandnoble.com/w/electrical-safety-handbook-4th-edition-mary-capelli-schellpfeffer/1127944053
Website Resources:
- Fluke Corporation. https://www.fluke.com/
- DIY Network. https://www.diynetwork.com/
Video References:
AMRE Supply
Wikipeedika