15 min read
How to Check an Outlet with a Multimeter (3 Way Guide)
Hey DIYers! If you’re wondering whether your electrical outlets are up to snuff, I’ve got just the tool for you – a multimeter. This little gadget is a game-changer for checking faulty outlets or those pesky loose connections.
Key Takeaways: Let’s dive into what we’ll cover with our trusty multimeter: Power, Grounding, and Polarity. These are the big three checks to ensure your electrical setup is top-form.
🔌 Power Test – We’re on a mission to determine if your outlet is serving up the electricity it should.
🌍 Grounding Test – This one’s all about safety. We’re checking to see if your outlet is properly grounded.
⚡ Polarity Test – Figuring out if the wiring behind your outlet is set up correctly.
Stick with me, and I’ll guide you through each of these steps to make sure your electrical system is not just working but working correctly and safely. Let’s get to it!
Safety Precautions
Alright, folks, let’s talk safety because this is serious business. When dealing with live power outlets, we need to be extra cautious.

Here’s my golden rule: never, and I mean never, touch the metal prongs of the multimeter probes. I’ve learned this the hard way, and it’s a mistake you only make once!
Also, a little trick I use is holding both probes in one hand. This way, the current won’t pass through your entire body if there’s a shock.
Safety first, always – we want to fix our homes, not become part of the circuit!
Way 1: Checking an Outlet for Power
Alright, team, let’s jump into how to conduct a POWER TEST with a multimeter on your outlet. It’s a straightforward process, but attention to detail is key.
Trust me; I’ve been around enough outlets to know anyone can handle this task with the right guidance.
You will need a multimeter to check any outlet. Either an analog or digital type will do.
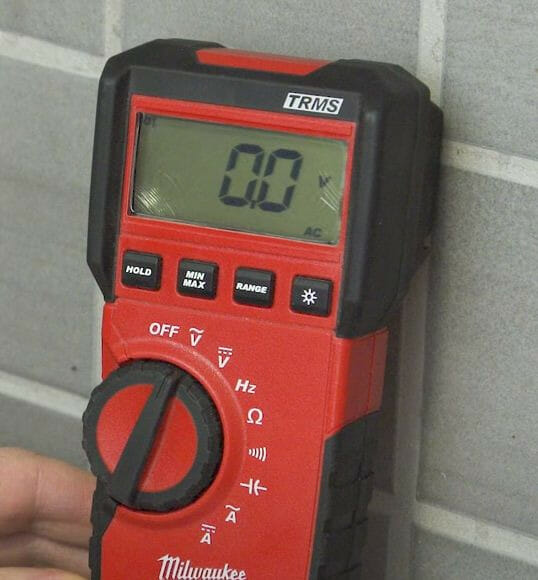
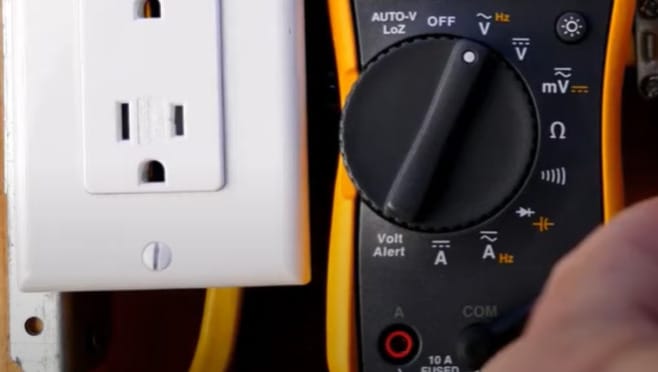
Step 1: Set the Multimeter
- First, grab your multimeter – it doesn’t matter if it’s analog or digital. What you’re going to do is set it to measure AC voltage. Look for the setting with a little wavy line symbol.
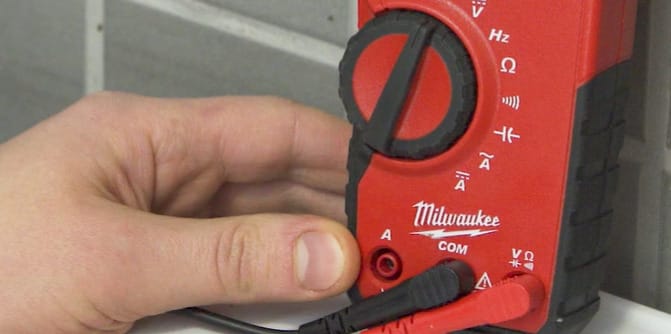
- Now, plug the red probe into the jack marked ‘V’ (for voltage, folks), and the black one goes into the ‘COM’ jack. I always double-check these connections.
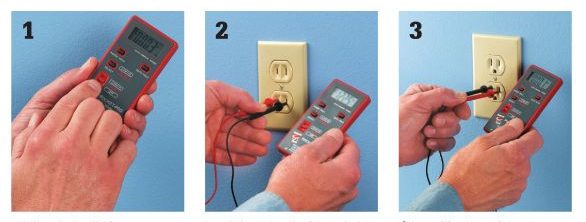
Step 2: Insert the Probes
- Next up, let’s insert those probes into the outlet. You’ll see two slots – one shorter, one longer. In the electrical world, these are known as ‘hot’ and ‘neutral.’
- Here’s the cool part about AC voltage – it doesn’t matter which probe goes where. But, if you want to play it by the book, red goes to the short slot and black to the longer. I’ve mixed them up more times than I can count, and guess what? It still works.
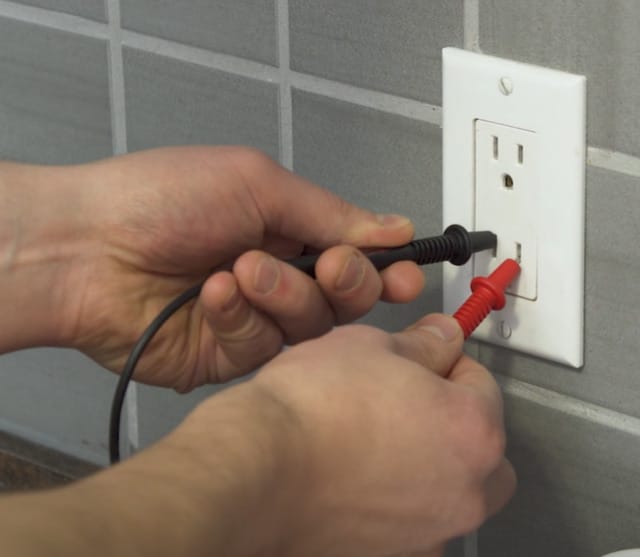
- Remember, there’s also a third slot, the round one – that’s your ground. Treat each slot with respect; they all can pack a punch.

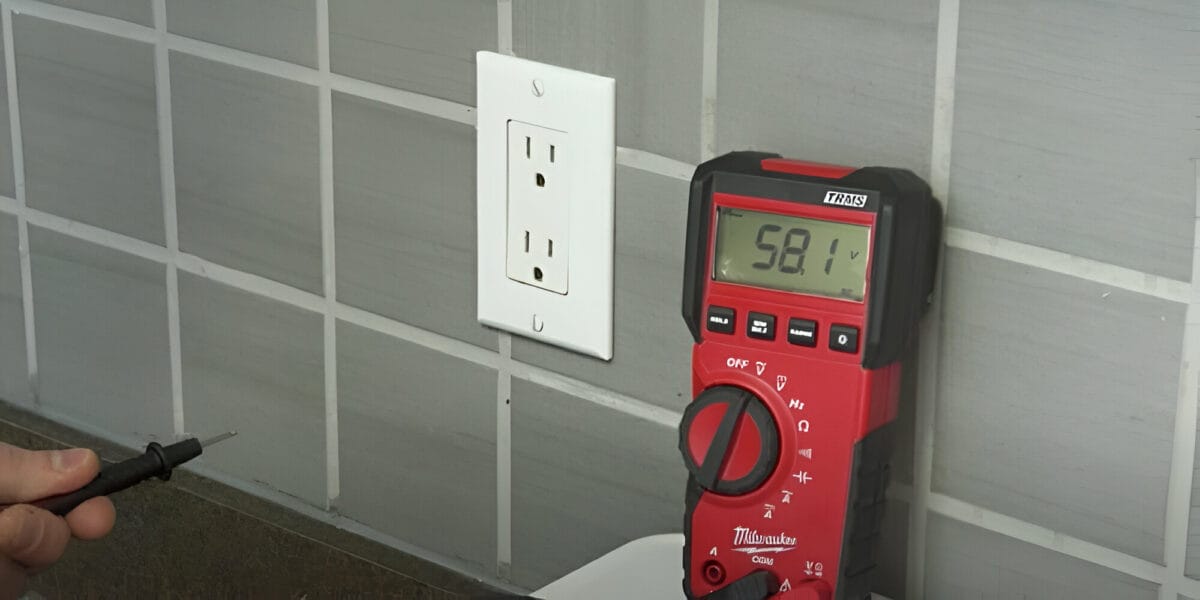
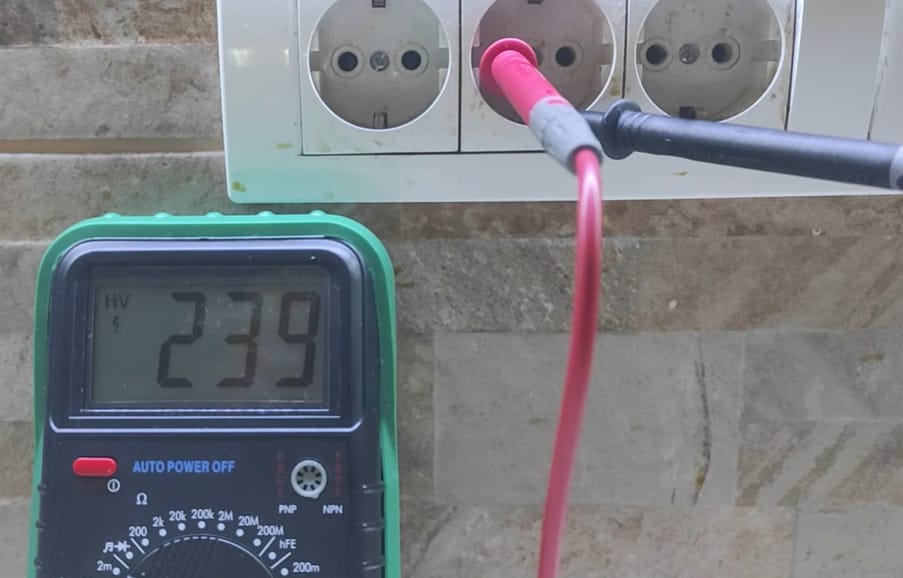
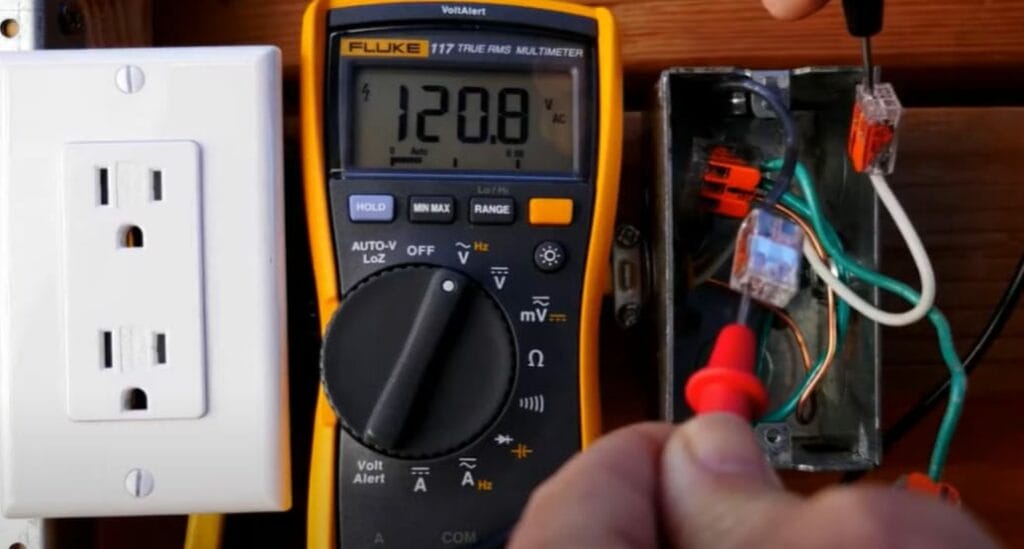
Step 3: Check the Reading
- With your probes in place, it’s time to check the reading. If there’s power, your multimeter will tell you. Analog? Watch that dial spin. Digital? Look for those numbers.
- A normal reading? It should be close to your main supply voltage, typically around 110-120 volts here in the U.S.

- Through my adventures with outlets, I’ve seen all sorts of readings. The key is knowing what’s normal for your setup. If it’s way off, that’s a story for another day (or a call to a pro).
And there you have it – checking power in an outlet with a multimeter. Stay safe, and happy testing!
Way 2: Checking an Outlet for Ground
Hey everyone! Let’s investigate how you can check if your outlet is properly grounded. Grounding is super important for safety – it’s like having a backup plan for your electrical system.
I’ve seen my share of grounding issues; let me tell you, it’s something you want to get right. Here’s how I do it:
Step 1: Crank Up Your Multimeter
- First off, set your multimeter to the highest AC voltage range it’s got. This is to make sure we cover all bases. I remember this one time I didn’t do this and got a reading that threw me off. Lesson learned!

Step 2: Insert the Probes
- Now, pop those test probes into the outlet’s hot (shorter slot) and neutral (longer slot). It doesn’t matter which probe goes where – I love that about AC voltage; it doesn’t sweat the small stuff.

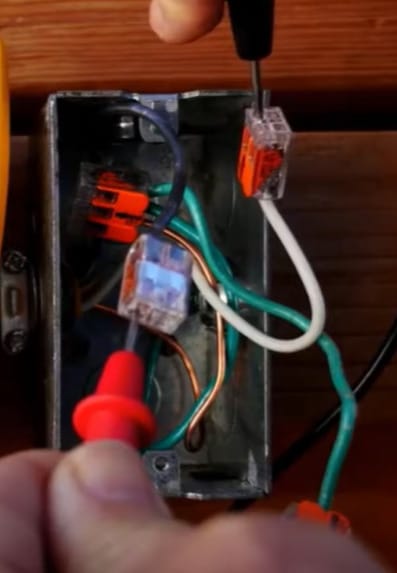
Step 3: Test the Grounding
- Here’s where the magic happens. Carefully pull out the black probe – usually the one I start with – and move it to the third hole, the ground slot. It’s round and pretty hard to miss.
Step 4: Check the Reading
- Keep an eye on that multimeter. A properly grounded outlet? It’ll show you the same measurement as when both probes were in the hot and neutral slots. I’ve had my ‘aha’ moments with this test, finding out some outlets weren’t grounded when I thought they were.

Video | Electro University
And there you have it! Grounding might not be the most glamorous part of electrical work, but it’s one of the most crucial. Take it step by step and always prioritize safety. Happy grounding!
Way 3: Checking an Outlet for Polarity
Alright, folks, let’s talk about running a Polarity Test on your outlets. This test is all about making sure your wiring’s on point. It’s a simple check, but it can tell you a lot. I’ve encountered some outlets with reversed wiring, and while it’s usually not the end of the world, it’s good to know. Let’s break it down:
Step 1: Set Up Your Multimeter
- Kick things off by setting your multimeter to the highest AC voltage range. This setting gives you the best chance to catch any weirdness with your outlet’s wiring.
Step 2: Insert the Probes
- Now, grab your probes. Place the red one in the small vertical slot – your hot slot. Then, the black probe goes into the longer slot, known as the neutral.
- I always double-check to ensure I have them in the right slots. It’s easy to mix them up, but hey, we’re only human.
Step 3: Check the Reading
- Here’s the moment of truth. Your multimeter shouldn’t show a reading if your outlet’s wired correctly. That’s right, nada.
- But if you do get a reading, it’s a heads-up that your wiring might be reversed. I’ve seen this a few times in older homes.
And there you have it – your quick guide to conducting a Polarity Test. It’s a handy little check that can save you from some surprises down the line. Stay safe, and keep on testing!
Troubleshooting Common Multimeter Issues
Let’s tackle some common hiccups you might encounter while using a multimeter. These issues can range from inconsistent readings to a non-responsive device, and I’ve seen them all.
I’ll share my experiences and solutions to these problems. Understanding these can be a real game-changer in your electrical troubleshooting journey.
| Common Issue | Description | Solution |
|---|---|---|
| Inconsistent Readings | The multimeter shows fluctuating voltage readings, which can be confusing. | I always ensure that my probes are firmly inserted in the outlet – a loose connection often causes this. Also, I check my multimeter’s batteries; I’ve been fooled by weak batteries more than once! |
| Multimeter Not Responding | No reading or response from the multimeter when probes are inserted. | I first replace the battery, as it’s usually the simplest solution. If that doesn’t work, I check the internal fuse. I’ve blown a few fuses in my time by accidentally testing high currents. |
| Readings Don’t Match Expected Voltage | The voltage reading is significantly off from the standard 110-120V. | This can signal an outlet or wiring issue. I recall a situation where a voltage drop was caused by an overloaded circuit elsewhere. When in doubt, I suggest consulting with a professional. |
| Zero Reading in a Known Live Outlet | The multimeter shows zero voltage in an outlet I know should be working. | I double-checked to make sure I’d set it to AC voltage. If correct, I test the multimeter on another outlet to rule out a device issue. Sometimes, the simplest solutions are the ones we overlook. |
| Probes Spark When Inserted | Inserting the probes into the outlet causes a spark. | A small spark can be normal, especially in outlets under heavy loads. But if the sparking is significant, it could indicate a more serious issue like a short circuit. In these cases, I always err on caution and consider professional help. |
Remember, safety comes first! If you’re ever in doubt during your DIY electrical adventures, it’s best to call in the experts. Electrical work is fascinating, but it comes with risks that need to be respected.
Maintenance Tips for Multimeters
Hey there, DIYers! Let’s chat about keeping your multimeter in tip-top shape. Like any trusty tool in your arsenal, your multimeter needs a little TLC to keep giving you those spot-on readings.
Here’s what I’ve learned from my time in the trenches with these handy gadgets.
Regular Cleaning is Key
First up, keep it clean. Dust, dirt, and grime are the enemies of precision. I make it a habit to give my multimeter a gentle wipe-down after each use. A soft, dry cloth does the trick. And for those nooks and crannies? A can of compressed air is like a magic wand.
Battery Care 101
The heart of your multimeter is its battery. Weak or dead batteries? They’ll give you readings that are as unreliable as a two-dollar watch. Change them regularly, even if you think they’ve got some juice left. I learned this hard when I got some funky readings during a crucial job.
Check Those Probes
Your probes are the hands of a multimeter. Frayed or damaged probes give inaccurate readings and can be downright dangerous. Inspect them regularly for any wear and tear. And if they look suspect? Replace them, no questions asked.
Calibration Counts
Now, here’s the big one – calibration. Even the best multimeters drift over time. I recommend calibrating your multimeter professionally at least once a year, especially if you use it frequently or in critical applications. Think of it as an annual check-up for your tool.
Storage Smarts
When you’re not using your multimeter, where you store it matters. A cool, dry place is your best bet. Extreme temperatures and moisture? I keep mine in a protective case.
Avoid Mixing and Matching
A quick note – stick to the accessories (like probes and leads) designed for your specific multimeter model. Mixing and matching might seem fine, but it can affect accuracy and safety. I’ve seen some odd results from mismatched gear, and it’s not worth the risk.
Following these maintenance tips will make your multimeter a reliable partner in your electrical adventures for years. Remember, a well-maintained tool is a dependable tool! Stay safe and happy measuring!
Frequently Asked Questions
- Can I Use a Multimeter on Any Outlet?
- Absolutely! Whether a standard household outlet or a bit more complex, your multimeter is up for the task. Ensure it’s set to the correct measurement type – AC voltage for standard outlets.
- How Often Should I Replace My Multimeter’s Batteries?
- Don’t wait for them to die on you mid-test. I replace mine regularly, depending on how often I use the tool.
- Is It Safe to Check a Live Outlet with a Multimeter?
- Yes, it’s safe if you follow the right procedures. Never touch the metal part of the probes, and always use the right settings on your multimeter.
- How Do I Know If My Multimeter Is Accurate?
- The golden rule: calibration. If you’re using it for critical tasks, get it professionally calibrated at least once a year. And always cross-check readings with a known voltage source if you suspect it’s off.
- Can I Use a Multimeter on Appliances Like a Washing Machine or Refrigerator?
- You bet! A multimeter can help diagnose issues with large appliances. Checking voltage, continuity, and sometimes even capacitance can give you insights into what’s happening under the hood. But remember, if you’re uncomfortable with it, there’s no shame in calling a professional.
References
Organizations:
- The Electrical Safety Foundation (ESFI). https://www.esfi.org/
- Occupational Safety and Health Administration (OSHA). https://www.osha.gov/
Books:
- “Beginner’s Guide To Multimeters. How To Use All The Functions On Your Multimeter” by Bryant A. Boughton. https://www.google.com.ph/books/edition/Beginner_s_Guide_To_Multimeters/Hy-OzgEACAAJ?hl=en
- “How To Use A Multimeter Simplified: A Complete DIY Step by Step Guide” by Shawn Corbett. https://www.google.com.ph/books/edition/How_To_Use_A_Multimeter_Simplified/42iRzQEACAAJ?hl=en
Website Resources:
- Safe Electricity. http://safeelectricity.org/
Video References:
Sparky Channel
Electro University
AMRE Supply