6 min read
How to Read an Analog Multimeter (4-Step Guide)

You might be asking why you need to know how to use an analog-digital multimeter in this digital age.
In the electronics testing field, analog multimeters are a reliable tool. Experts still use analog meters for troubleshooting in some areas because of their precision and genuine RMS value conversion.
In General, Here Are the Basic Steps to Read an Analog Multimeter:
- Place the probes on the appropriate connections. Select whether to test for ohms, voltage, or current first.
- Select an AC volt input. Make sure the maximum range is more than intended.
- Contact the leads to the terminals of the object you are testing.
- Check the results. The top scale is ohms. The right side indicates lesser resistance.
I will cover more below.
How to Read an Analog Scale
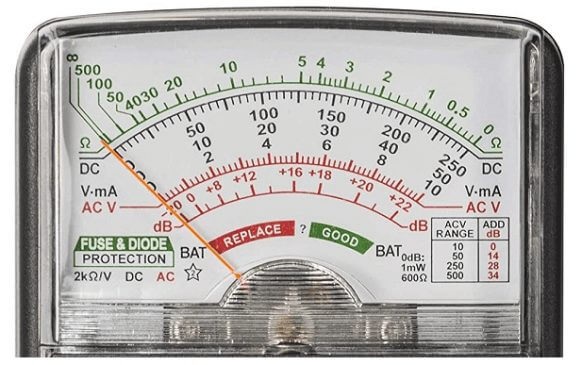
The analog scale is comprised of a lot of lines and numbers. This could be confusing for beginners, so here, you will learn the basic methods to read the scale correctly:
- You can use the ohmic scale (the top line – Ω) to calculate resistance from left to right. You must multiply the scale measurement with the range selected based on the specified range. If your range is 1k and your pointer is steady at 5, your reading will be 5k ohms.
- You should perform the range adjustment similarly for all quantity measurements.
- You can measure voltage range and current scales below the ohmic scale. DC voltage and current are measured next to the ohmic scale on the black line. The red line always represents AC measurements. It’s important to remember that you should evaluate current and voltage data from right to left.
To Read an Analog Meter, Do The Following
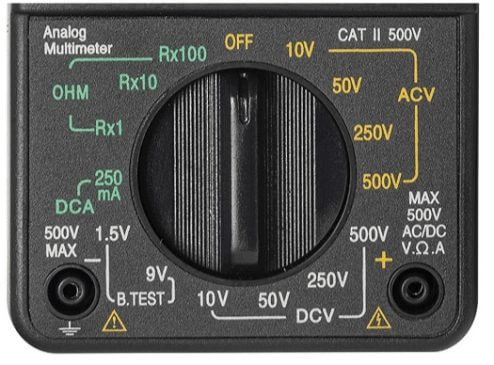
Step 1: Attach your analog multimeter to the test leads. To measure varying quantities, use the following configurations:
Use Cases:
- Measuring voltage: To measure voltage, you would set the meter to the ACV (alternating current voltage) or DCV (direct current voltage) range, depending on the type of voltage being measured.
- Measuring current: To measure current, you would set the meter to the ACA (alternating current amperage) or DCA (direct current amperage) range, depending on the measured current.
- Measuring resistance: You would set the meter to the ohms (Ω) range.
- Testing continuity: To test continuity, you would set the meter to the continuity test range, often indicated by a symbol such as a diode or a speaker.
- Testing transistors: You would set the meter to the hFE (transistor gain) range to test transistors.
- Testing capacitors: To test capacitors, you would set the meter to the capacitance (μF) range.
- Testing diodes: To test diodes, you would set the meter to the diode test range, often indicated by a symbol such as a diode or a triangle.
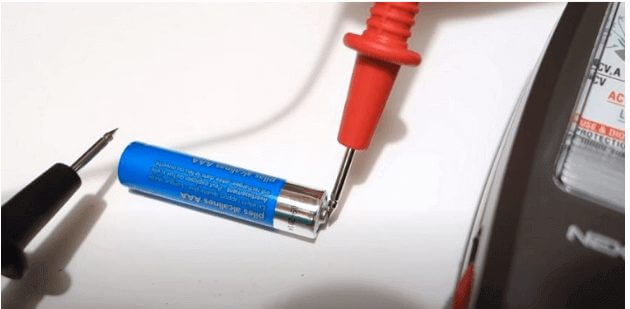
Step 2: Attach the test probes to the item to be measured in each configuration and check the scale reading. We’ll use monitoring DC voltage as an example in this discussion.
Step 3: Put the probes into the AA battery’s two ends (approx. 9V). Depending on your chosen range, the pointer should fluctuate across the scale. The needle should be between 8 and 10 on the scale if your battery is fully charged.
Step 4: Use the same method to measure the quantities in different configurations.
As previously stated, range selection and multiplication are essential for accurate analog reading. (1)
For example, if you’re measuring the voltage of a car battery with an analog-digital multimeter, the range must be greater. You’ll need to do some simple multiplication to read the final output.
If your DC volt range is 250V and the needle is between 50 and 100, the voltage will be around 75 volts depending on the precise location.
Getting to Know the Panel
Understanding the device’s panel is also crucial in reading an analog multimeter. Here is what you need to know:
- Volts (V): The unit of electrical potential difference or electromotive force. It measures voltage, the difference in electric potential between two points in a circuit.
- Amps (A): The unit of electric current. It is used to measure the flow of electric charge in a circuit.
- Ohms (Ω): The unit of electrical resistance. It is used to measure the resistance of a circuit element or component.
- Microamps (μA): A unit of electric current equal to one-millionth of an ampere. It measures very small currents, such as those in a transistor or other small electronic component.
- Kilohms (kΩ): A unit of electrical resistance equal to 1,000 ohms. It measures relatively high resistance levels, such as those in a resistor or other passive circuit element.
- Megohms (MΩ): A unit of electrical resistance equal to 1 million ohms. It measures very high resistance levels, such as those in an insulation test or other specialized measurement.
- ACV stands for “alternating current voltage,” while DCV stands for “direct current voltage.”
- An alternating (AC) is an electrical current that periodically changes direction. It is the current type typically used in household and industrial power systems, and it has a frequency of 50 or 60 Hz (hertz) in most parts of the world.
- Direct current (DC) is an electrical current that flows in only one direction. It is often used in electronic circuits and devices, such as batteries and solar panels.
- ACV and DCV measurements measure the potential difference between two points in a circuit. ACV measurements are used to measure AC voltage, while DCV measurements are used to measure DC voltage.
An analog multimeter may also have other values or scales on its dial or scale, depending on the specific features and capabilities of the meter. It is important to refer to the manual or instructions for the specific multimeter being used to understand the meanings of these values.
At the bottom left of the multimeter, you should see where to attach your test leads.
Next, you can access the advanced options through the ports in the bottom right corner. When you need to invert the polarity of your measurement, the additional polarity switch comes in handy. You can use the center switch to select the amount to be measured and the desired range.
For example, turn it to the left side of the dial if you wish to measure voltage range (AC) using an analog multimeter.
Important Tips and Techniques
- When using analog multimeters, select a suitable range for reliable results. You should perform this both before and during the quantity measurement. (2)
- Before doing a big test or troubleshooting, always calibrate your analog multimeter. I highly recommend a weekly calibration if you use your device daily.
- If you detect significant changes in measurements, it’s time to replace the batteries.
- If you are sure about the exact value of the volt quantity to be measured, always select the highest range.
References
(1) multiplication – https://www.britannica.com/science/multiplication
(2) quantity measurement – https://www.sciencedirect.com/science/article/
pii/026322419600022X