10 min read
How to Wire a 12v Busbar (Steps, Tools, Safety)
The information I’ll give you in this article will help you wire a 12V busbar.
Key Steps: When wiring a pair of 12V busbars, connect the positive terminal of each load to a stud on the positive busbar and their negative terminal to a stud on the negative busbar. Then, connect the positive busbar to the battery’s positive terminal via a fuse and the negative one to its negative terminal via a shunt.
I’ve included a wiring diagram and a guide to help you choose the right busbar.
Busbars and Their Uses
A busbar is a conductive material that distributes electrical power from one point to several other locations in your electrical system. It makes connecting multiple components or devices to a single battery terminal easy. It functions as a hub for neatly organizing all the power connections.
You may have seen busbars inside electrical panels of mains electricity (120V) for the neutral and ground connections. But they are also common in low-voltage (12/24/48V) systems, as found in solar-powered systems and camping vans.
Busbars are typically made of copper, brass, or aluminum in the form of a long strip or bar. Their sizes and number of connection points vary, so you can choose one suitable for your particular electrical system. Generally, the larger the bus bar, the greater its capacity for handling larger current.
So, it’s a good idea to use a busbar if you have at least three or more electrical connections sharing the same terminals. If you have only 2 or 3, you can connect directly to the battery, but a busbar becomes essential if you have any more than that.
If you’re unsure which busbar to get, I’ll help you choose. First, I’ll show you how to wire one.
Wiring a 12V Bus Bar
Here’s a wiring diagram for two (positive and negative) busbars connected to a 12V battery:
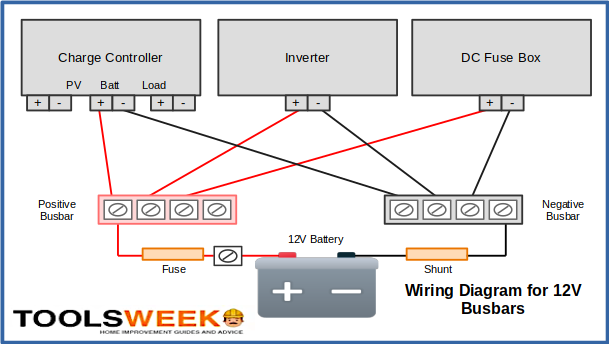
A charge controller, inverter, and DC Fuse Box are shown connected to the busbars because they are commonly used this way. Still, additional loads can also connect to the remaining terminals. Note the following:
- The wire from the battery’s positive terminal has a fuse, and the one from the negative terminal has a shunt.
- The positive terminals of the three connected items (charge controller, inverter, and DC fuse box) connect to a terminal on the positive busbar (separate one for each), and their negative terminals to a terminal on the negative busbar.
- The charge controller has three pairs of positive and negative terminals. The busbar connects to the one marked ‘Batt’ or ‘Battery.’
- The busbars shown here have 4 terminals (or studs) each, so one is spare on both, as only three items are connected.
- The busbars are shown colored, but it’s only for identifying them easily. Otherwise, they are identical objects.
- The wires crossing in the diagram are separate and direct from each load to a busbar, i.e., they are not interconnected.
A charge controller is normally used for connecting solar panels, which will be wired to the terminals marked ‘PV.’ The remaining ‘Load’ terminals are for all the loads that connect to the solar-powered system.
The inverter provides AC power to appliances, and the DC Fuse Box provides DC power to devices that run on DC (12V) power.
I suggest you do the installation and wiring in this order:
Step 1: Mount the Busbar
Mount the busbar securely on a non-conductive and fire-resistant surface.
Locate it close to the battery so its leads are kept short. The positive busbar connects to the battery’s positive terminal, and the negative busbar to its negative terminal.
Step 2: Connect the Loads
Connect the loads to the busbar terminals described above, i.e., the charge controller, inverter, DC Fuse Box, and other loads.
Step 3: Connect the Battery
Connect the battery last to power all the connected items via the busbars.
Your final setup may look something like this:
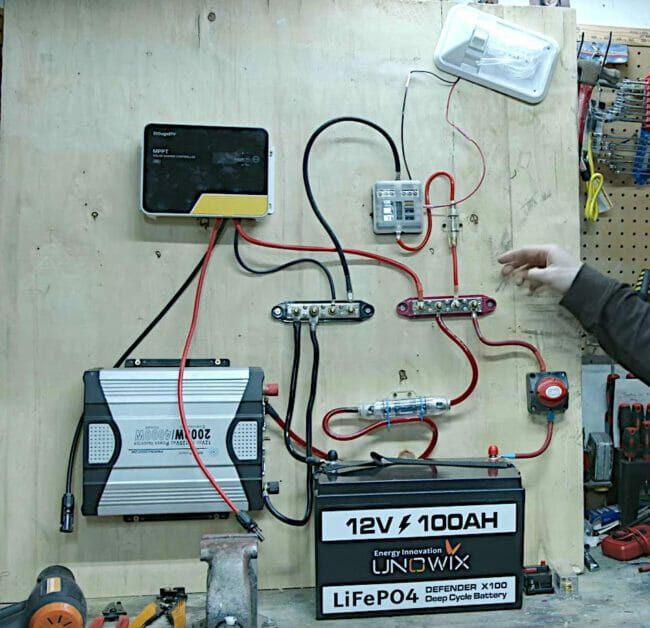
As you can see, a bus bar is not essential, but it makes it easy to make multiple connections to the battery’s two terminals. The wires hanging from the MPPT charge controller above the inverter connect to the solar panel.
FAQs
Is there an alternative to using busbars?
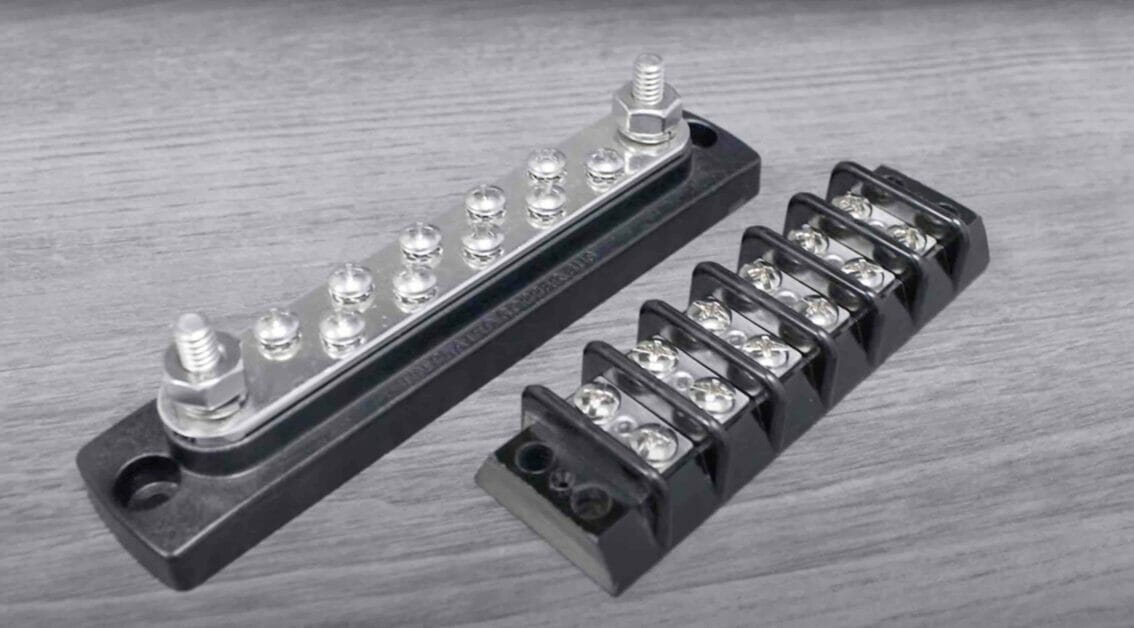
Yes. If you have only 2 or 3 items to connect, you can use terminal blocks instead, like the ones shown below.
How do I connect busbars if I have more than one battery?
Whether you have 2 or more batteries in series or parallel, you only need two busbars, one each for all the positive and negative connections.
Connect the positive busbar to the end positive terminal and the negative busbar to the negative terminal.
Can you help me choose the right busbar?
Certainly, I’ve created a separate section for that below.
Choosing the Right 12V Busbar
When choosing the right busbar, consider the number of items you connect and the maximum current draw.
Other important considerations are the busbar size, the type of studs, and the conductive material used.
Generally, the more connections or the higher the current draw, the larger and better quality busbars you will need.
Busbar Size
The busbar sizes must be appropriate for your electrical system.
They should be thick enough to manage the total current but not so large that they don’t fit well with the rest of the system.
Number of Loads
The number of terminals or studs on each busbar must be at least as many as the number of items you will connect, i.e., the loads.
For example, if you have 3 items, as in the above example, you must use busbars with at least 3 or 4 studs.
Generally, 100-200 A busbars are adequate for a small electrical system, whereas a large one may require 500-600 A busbars. But see below for calculating the maximum current draw.
Type of Studs
The busbar terminals or studs also vary by quality, as does the material used in the busbars. The following three types are commonly used:
- M4 – General type, suitable for low-current systems.
- M6 – Common in small-current systems.
- M8 – Required for high-current systems and wire lugs.
Conductive Material
As mentioned, busbar quality relies on the conductive material used to make them.
Copper busbars are the best quality in terms of electrical and thermal properties but are expensive, so alternatives such as aluminum and brass are also available.
Maximum Current
The maximum current draw is the sum of amperage of all connected loads plus an additional safety margin (around 20-25%).
For example, a 100 A inverter, a 30 A charge controller, and a 20 A DC fuse box allow for a maximum current of 1.25 x (100 + 30 + 20) = 187.5 amps.
Safety Precautions When Wiring a 12V Busbar
Working with electrical systems, particularly when setting up or making adjustments, requires strict adherence to safety protocols.
If done haphazardly, electrical work can result in dangerous situations, including shocks, fires, and damage to your equipment.
Here are crucial safety measures you should always observe:
- Always Disconnect the Battery before Wiring:
- This is the golden rule. Before starting any electrical work, ensure the power source is turned off. In the context of a 12V busbar, this means disconnecting the battery. This prevents unexpected electrical surges or short circuits while handling the wiring.
- Use Insulated Tools:
- When working with electricity, always use tools that have insulated handles. This serves as an additional protection layer against accidental electrical contacts. Standard tools can conduct electricity, making it easy for you to get a shock if they accidentally touch a live wire or terminal.
- Wear Protective Gloves:
- Protective gloves made of insulating material can protect your hands from accidental contact, cuts, or abrasions. Remember, even low-voltage systems can produce a painful shock under the right conditions. Additionally, goggles shield your eyes from potential sparks or debris that might become airborne during installation.
- Work in a Well-lit Area:
- Proper lighting is essential when working with intricate wiring systems. Seeing the colors of wires, labels, and connections can prevent errors and reduce the risk of accidents.
- Avoid Working in Wet Conditions:
- Water is a conductor of electricity. Avoid wiring or handling electrical components with wet hands or in a damp environment. If you’re working outdoors, ensure there’s no imminent rain threat, and always place your components on a dry surface.
- Keep a Fire Extinguisher Nearby:
- If something goes wrong, having a fire extinguisher within arm’s reach is a good safety measure. Ensure it’s rated for electrical fires.
- Double-check Connections:
- After making all connections, it’s a wise practice to review each one to ensure they are secure and in their proper places. Loose or incorrect connections can lead to malfunctions or hazards.
Troubleshooting
Despite the best preparations, things might not go as planned when wiring your 12V busbar.
Here’s a guide to help you address some common issues you might face:
- No Power to the Connected Devices:
- Check the Battery Connection: Ensure the battery is connected correctly and there’s no corrosion on the terminals. Clean terminals can significantly enhance power transmission.
- Examine the Fuse: The fuse connected between the battery and the busbar could have blown. Inspect it and replace it if necessary.
- Review Wiring Connections: Double-check all connections on the busbar to ensure they’re secure and properly connected.
- Intermittent Power or Fluctuating Voltages:
- Inspect Wiring for Damages: Look for frayed or broken wires that might cause intermittent connections. Replace any damaged sections.
- Check for Loose Connections: A connection that isn’t securely tightened can lead to fluctuating power. Ensure all connections to the busbar are snug.
- Overheating Issues:
- Examine Current Draw: Ensure you’re not overloading your busbar. Overdrawing current can lead to overheating.
- Check for Short Circuits: A short can lead to overheating. Look for any wires touching each other or the metal frame of the setup.
- Buzzing or Humming Sounds:
- Tighten All Connections: A loose connection can sometimes hum, especially if there’s arcing.
- Review Load Balancing: If one side of your system draws significantly more power than the other, it could lead to buzzing. Consider redistributing your devices to balance the load.
- Devices Not Working, But Others Are:
- Inspect Individual Device Wiring: The issue might be with the device itself or its direct wiring rather than the busbar. Check its connections and ensure it’s in working condition.
- Switch Ports: Move the device’s connection to another terminal on the busbar to rule out a defective terminal.
- Visible Sparks or Arcing:
- Turn Off Power Immediately: If you notice any sparks, turn off the power immediately to prevent any hazards.
- Inspect for Short Circuits: Look for wires touching each other or conductive surfaces.
- Ensure Proper Insulation: All wiring should be properly insulated to prevent arcs. Check for any exposed sections of wire.
- Busbar Corrosion or Discoloration:
- Clean the Busbar: Use appropriate cleaners to remove corrosion. Corrosion can hinder the flow of electricity and cause inefficiencies.
- Ensure Proper Environment: If your busbar is exposed to harsh conditions, consider relocating it or adding protective measures.
Always remember, if you’re unsure about any aspect of the troubleshooting process or feel the situation might be unsafe, it’s best to consult a professional or someone experienced in electrical systems.
References
Pacer
Van Kookz