14 min read
How to Test Fuses with a Multimeter (6 Step Guide)

Below, I will teach you how to check a fuse with a multimeter. It is also necessary to look inside the fuse to get into the nitty gritty and see if it’s blown. I will teach you how to do both below.
Quick Summary: Testing Fuses with a Multimeter is easy with these 6 steps. Here’s the rundown:
🔌 Step 1: Turn Off the Supply
🔍 Step 2: Insert the Probes
🔔 Step 3: Select the Continuity Function
🤏 Step 4: Touch the Ends of the Fuse with Probes
🔄 Step 5: Select the Resistance Mode
📏 Step 6: Touch the Ends of the Fuse in Resistance Mode
In this article, I’ll guide you on how to use a multimeter to test your fuses. We’ll delve into setting your multimeter to measure continuity, etc. So, whether it’s a fuse in your car or home, you’ll be ready to tackle it.
How Do You Test a Fuse with a Multimeter?
Testing a fuse with a multimeter is easier than you might think! We need to follow a few steps, which I will explain.
And remember, regular fuse testing helps prevent serious problems down the line, so don’t put off this simple task!
Step 1: Turn Off the Supply
I always make sure the power source is off. Double-checking to ensure no power is running is crucial, whether a car or a household appliance. That means unplugging the device or turning off the circuit.
Once, while working on a vintage car’s electrical system, I got a little overconfident and skipped this step. Just a slight brush against a live wire, and a spark flew.
It was a tiny jolt but a huge reminder: safety always comes first. Whether it’s a lamp or a car, I double-check that power source like a ritual.
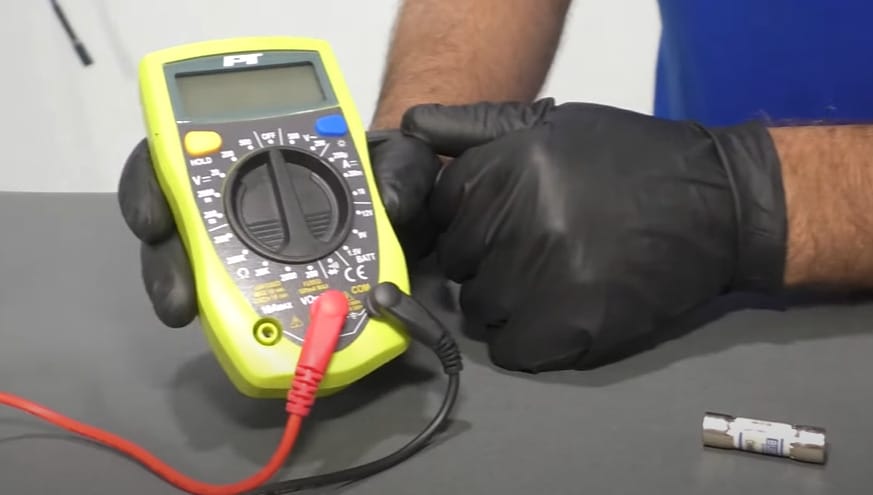
Step 2: Insert the Probes
When I get to the multimeter, I remember there are three ports: COM (common or ground), mAVΩ (for voltage or resistance), and 10A (for current).
I plug the red probe into mAVΩ and the black one into COM. If I deal with a current over 250mA, the red goes into the 10A port. This can vary with different multimeters, though.
I remember this one multimeter I used in a workshop years ago. It had slightly different port configurations, and it took me a while to get the hang of it.
That experience taught me to always familiarize myself with the tools I’m using. The red probe in mAVΩ and the black in COM are almost muscle memory now.
Step 3: Select the Continuity Function

Next, I set the multimeter to continuity mode, indicated by that nifty soundwave symbol. Here’s why: when the multimeter beeps and shows zero resistance, the fuse is intact, signaling no break in its internal pathway.
This feature never fails to impress. For example, I was helping a buddy with his old radio. We were stumped, thinking a fuse was to blame. But with its reliable beep, the continuity test showed us the real issue lay elsewhere.
Moments like these make you appreciate the precision and reliability of a good multimeter.
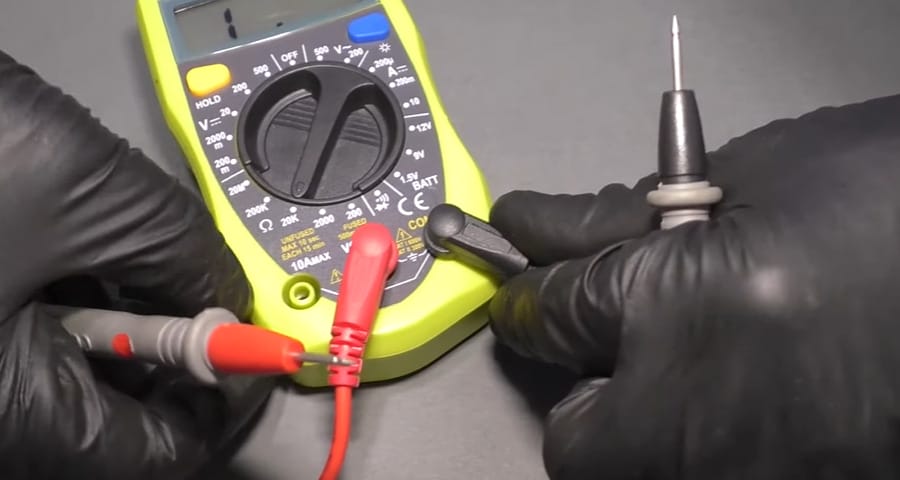
Step 4: Touch the Ends of the Fuse with Probes
Now for the hands-on part. I put the fuse on a non-conductive surface and touched each end with the probes. Red or black, it doesn’t matter which end they touch. A beep or zero reading? That’s a good sign; the fuse isn’t blown.
There’s something satisfying about this part. I recall testing fuses in a DIY solar panel setup. Carefully touching the fuse ends, hearing that beep was the sound of progress. It’s a simple step but oh so crucial.
Step 5: Select the Resistance Mode
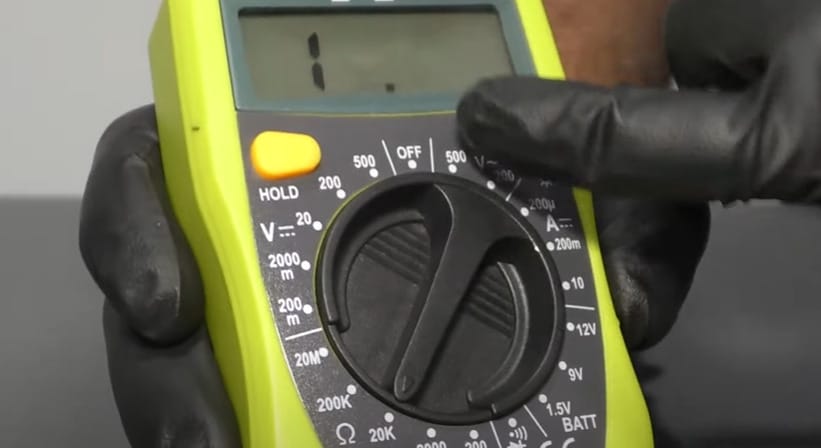
Now, it’s time to dive deeper into the resistance mode. Switching the multimeter to this mode, symbolized by that familiar resistor icon, isn’t just a step – it’s a revelation.
The resistance test is like getting a second, more in-depth opinion. It’s especially crucial for those sneaky, partially blown fuses that might pass a continuity test but fail in functionality.
I learned this the hard way on a challenging project. The fuse passed the beep test, but resistance testing revealed it was hanging by a thread. That moment has taught me the value of thoroughness and not just going by face value.
Step 6: Touch the Ends of the Fuse in Resistance Mode
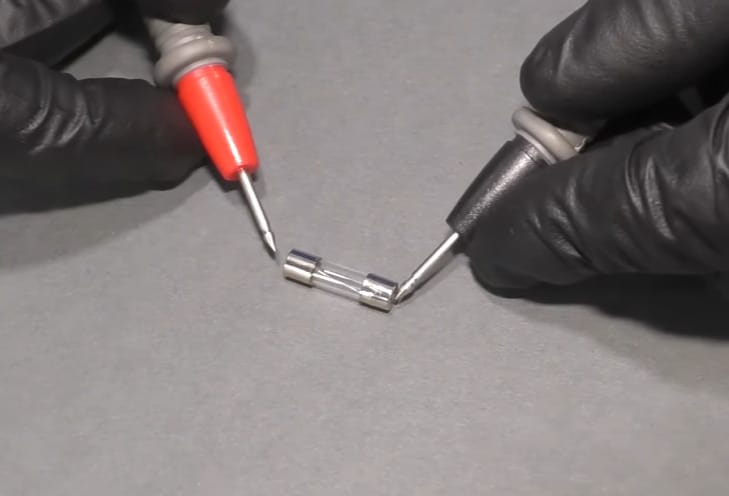
Just like before, I touch the fuse ends with the probes. A reading of zero resistance here is what I’m looking for. It confirms the fuse is indeed in good shape.
I remember this one time I was restoring an old arcade machine. The resistance mode showed zero, confirming the fuse was good. It was the final piece in the puzzle, bringing the old game back to life. I remember the thrill of making things work again every time I use this mode.
That’s my go-to process for testing fuses. It’s more than just a troubleshooting step; it’s part of regular maintenance to keep everything running smoothly. And believe me, a bit of preventive care can save a lot of headaches later on.
Comparison of Testing Procedures for Different Fuse Types
Let’s break down the nitty-gritty of different fuse types, their construction, function, and why certain testing methods best suit each. This table will give you the insight you need to handle them like a pro:
| Fuse Type | Construction & Function | Testing Procedure | Common Uses | Special Considerations |
|---|---|---|---|---|
| Glass Tube Fuses | These fuses have a clear glass cylinder housing, allowing for easy visual inspection. A thin wire melts when the current exceeds its rating, breaking the circuit. | 1. Visual Inspection: Look for visible wire and signs of burning. 2. Multimeter Test: Set to continuity mode and test each end. | Often found in older electronics and electrical panels. | Handle gently to prevent breaking the fragile glass. |
| Blade Fuses | Comprising a flat, plastic body with two prongs, blade fuses are designed for easy inspection and replacement. They contain a metal strip that melts under excessive current. | 1. Visual Check: Look for melting or damage signs. 2. Multimeter Test: Continuity mode, touch probes to the top contacts. | They are widely used in automotive applications and modern systems. | Their design allows easy checking and replacement. |
| Ceramic Fuses | These opaque, cylindrical fuses, typically white or brown, are made for higher current applications. The ceramic body is more heat resistant, housing a wire or strip that melts to interrupt the circuit. | 1. Visual Inspection: Check for cracks (harder due to opacity). 2. Multimeter Test: Continuity mode, probes to the ends. | They are used in industrial settings and high-current environments. | It is more challenging for visual inspection; multimeter testing is more reliable. |
Deep Dive into Construction and Testing:
- Glass Tube Fuses: The clear glass lets you see the internal wire easily. When testing, if the wire is intact, continuity is likely. But remember, glass is fragile – a delicate touch is key.
- Blade Fuses: Their design is user-friendly for quick checks. You can often tell at a glance if they’re blown. But the multimeter test is your double assurance – it confirms the visual inspection.
- Ceramic Fuses: tough cookies designed to handle more heat and current. Visual inspection can be tricky due to their opaque nature, making the multimeter an essential tool for testing these fuses.
Navigating Common Roadblocks: Multimeter Fuse Testing Troubleshooting Guide
Troubleshooting while testing fuses with a multimeter is all about knowing the potential hiccups and how to sail past them smoothly. Here’s the lowdown on some common issues you might encounter and the smart ways to tackle them:
- No Continuity Sound: If you expect that beep but get silent, double-check that your multimeter is set to the right mode. It’s easy to be on the wrong setting accidentally. The fuse might be blown if the setting’s right but still quiet. But before you toss it, inspect the fuse visually for any signs of damage – sometimes, the problem is clear as day.
- Multimeter Not Displaying Readings: When your multimeter seems to be on a coffee break and not giving any readings, take a moment to check the battery of the multimeter itself. It’s a simple thing but often overlooked. Also, ensure the probes are properly inserted into the right ports. It’s like plugging in a charger – if it’s not in, it won’t work.
- Inconsistent Readings: If the readings are jumping around like a cat on a hot tin roof, ensure your probes have a firm connection with the fuse ends. A wobbly contact can lead to fluctuating readings. Steady hands do the trick.
- Fuse Looks Fine but Tests Bad: Sometimes, a fuse might look okay to the eye, but the multimeter says otherwise. In these cases, trust your tool. Invisible damage like a hairline crack or internal damage can escape the naked eye, but not your trusty multimeter.
- Testing in a Circuit: If you’re testing the fuse while still in a circuit, remember that other components can affect your readings. It’s usually best to test the fuse after removing it from the circuit for the most accurate results.
- Safety Concerns: Always remember, safety is king. If you’re dealing with a high-voltage fuse, it’s better to be safe than sorry. If you’re not 100% comfortable or the situation looks risky, calling in a professional is the smart move.
- Fuse Type Confusion: Different fuses can have different testing methods. If you’re working with an unfamiliar type, a quick check of the fuse type’s specific testing method can save you a lot of head-scratching.
By keeping these tips in your back pocket, you’ll be well-prepared to handle whatever comes your way during fuse testing with a multimeter. Remember, it’s about being methodical, patient, and safe. Happy testing!
Staying Safe While Testing: Essential Safety Measures for Fuse Checks
When testing fuses, especially where high current is involved, playing it safe is not just smart – it’s a must. Here’s how you keep things in the safe zone:
- Insulated Tools Are Non-Negotiable: Always use a multimeter with insulated probes. It’s your first defense against accidental shocks, especially in high-current environments. A good multimeter often has a rubber or plastic coating on the handles – this isn’t just for comfort; it’s for safety.
- Light It Up: A well-lit workspace is crucial. You want to see what you’re doing, especially when dealing with small components like fuses. Good lighting helps you avoid misreading your multimeter or incorrectly placing probes.
- Power Down: Before you test, ensure the power source is off. This might sound like a broken record, but it’s an easy step to overlook in the hustle. Ensure no current flows, whether unplugging the appliance or switching off the breaker.
- Right Gear, Right Protection: Don’t shy away from protective gear when dealing with a high-current situation. Safety goggles and gloves can seem over the top for small tasks, but they’re your buddies in preventing accidental sparks or short circuits from causing harm.
- Check and Double-Check: Before you touch a fuse with probes, double-check your multimeter’s settings. Ensure it’s in the correct mode and range for your testing. This ensures accurate readings and prevents potential damage to your multimeter or the circuit you’re working on.
- Know Your Limits: If you’re new to using a multimeter or dealing with a particularly complex circuit, there’s no harm in seeking help or guidance. Sometimes, getting a second opinion or a more experienced perspective can make all the difference in ensuring safety.
By following these safety measures, you’re protecting yourself and ensuring the integrity of the device you’re working on. Remember, in electrical work, taking shortcuts can have serious consequences. Stay safe, and happy testing!
Frequently Asked Questions
- Can I Test A Fuse Without Removing It?
- Here’s the lowdown: Testing in-circuit can be tricky. You might get readings from other parts of the circuit. Best practice? Pop that fuse out and test it solo. This way, you know you’re getting the real story from just the fuse.
- Why Doesn’t My Multimeter Beep During A Continuity Test?
- No beep? First, check if your multimeter is set right. If it is, and still no beep, it’s likely your fuse has said goodbye. Remember, no beep equals no continuity – time for a new fuse!
- Is There A Risk Of Shock When Testing Fuses?
- Safety first, always! Make sure everything’s powered down before you start. With the power off, there’s no shock risk. Stay alert, and always double-check.
- How Do I Know If My Multimeter Is Accurate?
- Trust but verify, my friends! Test your multimeter on something with a known value, like a resistor. If it’s showing the right numbers, you’re good to go. If not, it might be time for a check-up or a new meter.
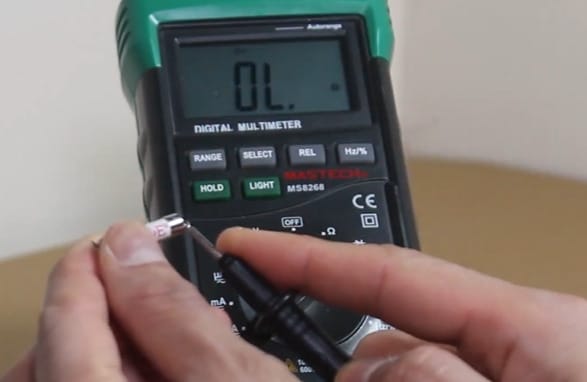
- What Does An ‘OL’ Reading Mean?
- ‘OL’ is a multimeter talk for “Over Limit.” It means there’s no continuity – the path’s broken. In fuse terms, it’s a clear sign your fuse has blown its top. Time to replace!
- Can A Fuse Look Good But Still Be Bad?
- You bet! Sometimes, a fuse might play it cool and look alright, but inside, it’s a different story. That’s where your trusty multimeter comes in – it sees what our eyes can’t.
- Do I Need A Special Multimeter For Car Fuses?
- Not really! Your regular multimeter does the job. Cars usually use blade fuses; your multimeter is ready to tackle those. Just be sure to set it to the right mode.
- How Often Should I Test My Fuses?
- Well, it’s not a daily thing. But if you suspect something’s off with your appliance or car, check those fuses. Regular checks are good preventive medicine for your electrical health!
References
Organizations:
- InterNational Electrical Testing Association (NETA). https://www.netaworld.org/home
Books:
- “Beginner’s Guide To Multimeters: How To Use All The Functions On Your Multimeter” by Jocelyn Elliott. https://books.apple.com/us/book/beginners-guide-to-multimeters-how-to-use-all-the/id1605886887
Website Resources:
- Electrouniversity. https://electrouniversity.com/how-to-test-a-fuse-with-a-multimeter/
- EC&M. https://www.ecmweb.com/
- Fluke. https://www.fluke.com/
Video References:
1A Auto: Repair Tips & Secrets Only Mechanics Know
HealMyTech