4 min read
How to Test a Temperature Gauge with a Multimeter

Defective temperature gauges or sensors tend to give unrealistic results when used, which leads to expensive trips to mechanics and unnecessary maintenance hence troubleshooting is key. You need a fully functional temperature gauge with top-notch accuracy.
The temperature gauge or sensor helps in maintaining a constant temperature for optimal engine functions.
To guide you through the steps of checking the condition of your temperature gauge, I have outlined four detailed ways of ensuring your temperature gauge is functioning optimally.
In General, checking and correcting temperature sensors’ issues involves:
1. Checking the wires and common ground
2. Checking the Ohm signal from the Sending Unit
3. Checking the Ohm signal at the gauge, and finally
Scrutinizing the gauge itself
In this guide, we will go through the aforementioned steps in more detail.
You will need the following tools:
- A digital multimeter
- Connecting wires
- Source of power (1)
- Temperature gauge
- A Calculator, pen, and a paper
- Sender unit
- A car

How to Troubleshoot a Defective or a Seemingly Normal Temperature Gauge
Follow these steps to verify the efficiency of your temperature gauge:-
- Checking the wires and the common ground. If the wires are not properly connected or they have worn out and disconnected the temperature gauge will not function well, or even cease to function. To check the common ground of a wire hold one probe on the multimeter to the ground wire and connect the other probe to the wire electrical post (ground) to make your multimeter function as an ammeter. It will display the various values on the screen. The value should be zero for a grounded wire otherwise there is a fault.
- Checking the Ohm signal channeled from the sending unit. A lot of times you will find yourself in a situation where you have to replace the sending unit of the temperature gauge in your vehicle. To check the Ohm range you will need to connect the sender to the multimeter, making sure you connect the positive terminals correctly (i.e. positive to positive and negative to negative). Make sure you get the readings of the sender in empty and full positions so you can select the correct sender unit for your vehicle. After connecting the sender unit to a digital multimeter in the ohms setting (you can choose 2000 ohms – you may scratch the sender unit terminals to get better readings), note the values or the ohm range. Knowing the ohm range of your sender unit helps you to select the compatible sender unit for your car.
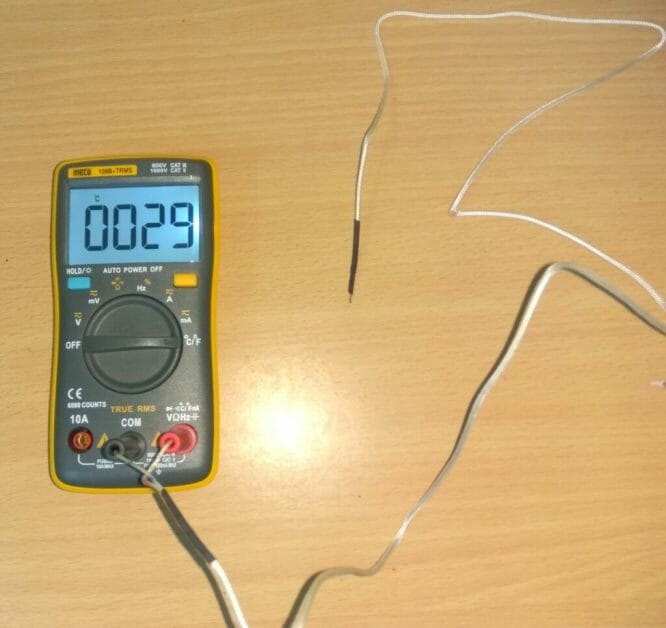
- How to check the ohm signal at the gauge. For you to measure ohms, also known as resistance at the gauge, ensure that no current is flowing into the sender unit or any other component you would like to test, then insert the black and red plugs/plugs in the COM and into the voltage omega VΩ units respectively, switch the multimeter to resistance mode denoted by Ω and set your range high. Connect the probes to the sender unit or the device you would like to test (do not mind polarity since resistance is not directional), adjust the range at the gauge, and obtain the OL value which is often 1OL.
- Finally, examine the gauge. You can do this by following the steps below:
- Disconnect the temperature gauge from the sending unit
- Switch the (ignition) key to the ‘on’ position
- Attach the temperature sensor wire to the engine using jumper wires
- Make sure the reading of the temperature gauge is in between cold and hot
- Switch the key to the position labeled ‘off’
- See if the fuses in the car, and connected to the temperature gauge are burned out and replace them if they are
- Ground the wire (jumper) that is pegged on the sender unit terminal next to the engine.
- Then turn the ignition key ‘on’ without starting the car. At this point, if the temperature gauge displays ‘hot’ it means there is an open wire in the sending unit, and you should repair the temperature gauge.
Wrapping Up
I hope this tutorial helped you, maybe now you won’t need to go to the mechanics multiple times to test or repair the gauge. You can do it yourself and minimize expenditure on your car. (2)
Take a look at some of our related articles below.
- How to check for battery drain with multimeter
- How to test a light switch with a multimeter
- How to test 3-wire crank sensor with multimeter
References
(1) Power of source – https://www.weforum.org/agenda/2016/08/6-sources-of-power-and-advice-on-how-to-use-it/
(2) minimize expenditure on your car – https://tiphero.com/10-tips-to-reduce-car-costs