7 min read
What Is the Red Wire on a Light Switch? (Breakdown)
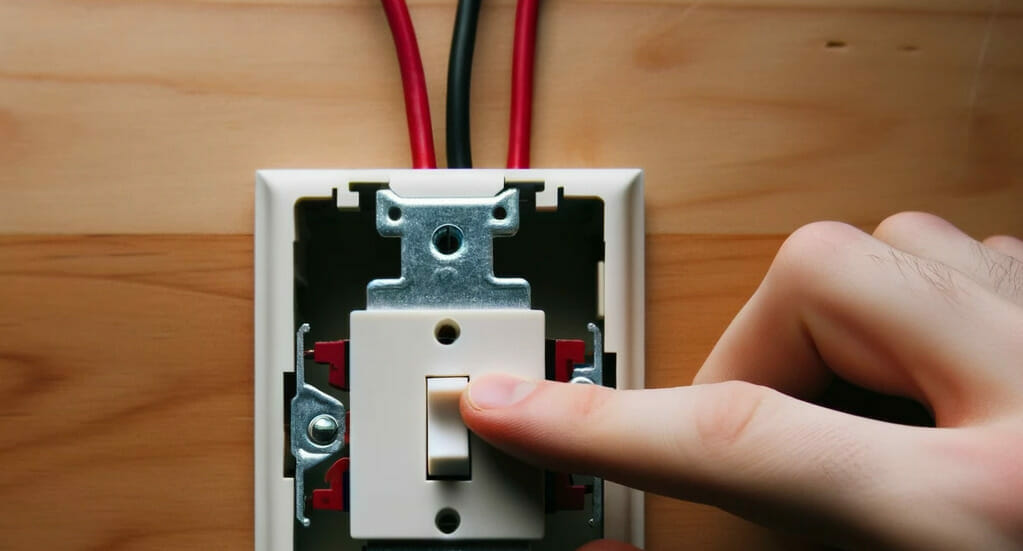
If you are accustomed to only seeing a black hot wire on a switch, you may be surprised to see a red one and would like to know what it is.
The red wire on a light switch is typically a secondary hot wire used for a traveler connection in a 3-way switch setup. It connects to the corresponding traveler terminal on the second switch to distinguish it from the black hot wire connecting the other pair of traveler terminals.
Continue reading to learn more about the red wire on a light switch.
The Red Wire in 3-Way Lighting
Although it’s common to see a red wire in a 3-way light switch, it doesn’t have to be red.
The red wire is only used because it is generally recognized in the US electrical system as a secondary hot wire. So, 3-way lighting helps distinguish between the wires used for the traveler connections. You could use 2 black wires instead, but then you won’t be able to tell them apart, i.e., which of the 2 traveler terminals each one is connected to.
A pair of 3-way switches are usually configured in 2 different ways. Both involve using red wire.
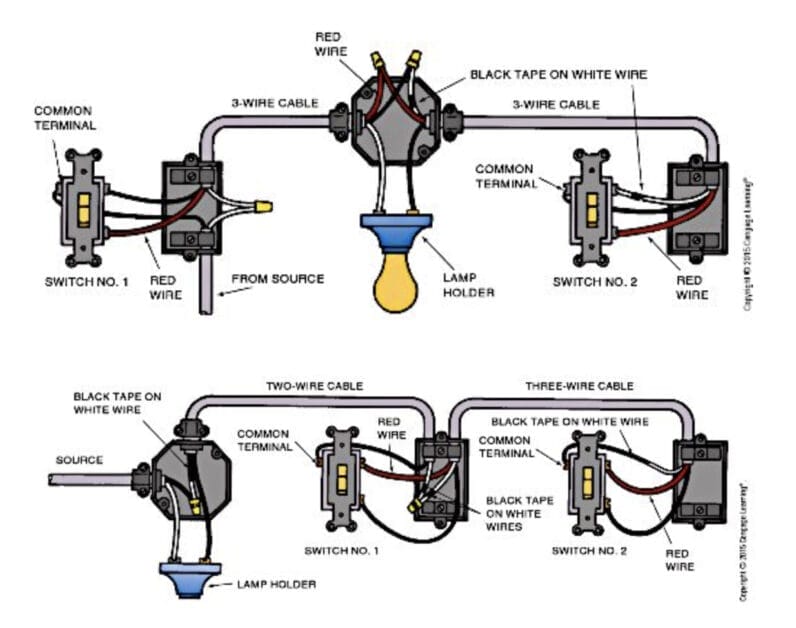
Remember that the red wire is hot when working on a light switch. Please don’t confuse it with the ground wire. You will see the following wires in a switch:
- Black wire for the primary hot wire
- Red wire for the secondary hot wire
- Green wire as the ground wire
You can confirm the red wire is hot using an electrical tester, voltmeter, or multimeter. The tester should light up, and the voltmeter or multimeter should show around 110-120V.
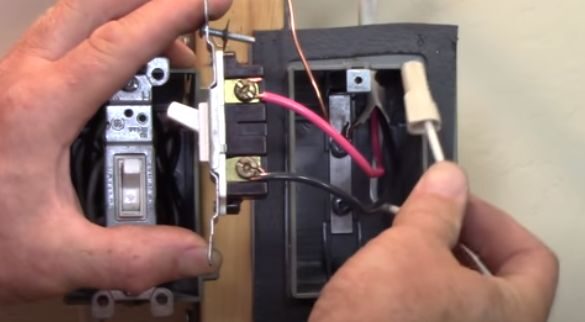
You will usually see 2 black wires when you open a switch. One is the line wire from the power source, and the second is connected to one of the (T1 or T2) traveler terminals. Both terminals normally have a brass screw. The green (or bare copper) wire is a single wire connected to the ground terminal, which normally has a green screw.
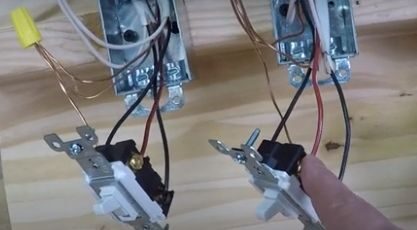
There is no special terminal or screw dedicated to the red wire. Its function is the same as the black hot wire, so it connects to one of the 2 (T1 or T2) traveler terminals in brass with a brass screw. The 2 traveler terminals are normally together on one side, as in the above picture. Here’s another view of the same from above:
If you also see a white wire, it should never be connected to the switch unless it’s reidentified as a hot wire, usually with black or red tape around it near the end. It’s normally terminated or capped behind the switch.
FAQs
Let’s dive deep and answer some of the most common questions about that mysterious red wire in a light switch. Let’s power through these questions together!
- What’s the Big Deal About the Red Wire?
The red wire in a light switch is typically your secondary hot wire, mainly used for traveler connections in a 3-way switch setup. It’s like the sidekick to your main hero – the black wire. - Can I Use Two Black Wires Instead?
Technically, yes, but using a red wire clarifies things. Imagine wearing two left shoes; it just doesn’t feel right! - Is the Red Wire Dangerous?
Just like any other wire in your switch, if it’s hot, it can be. Always ensure you turn off the power when working on any electrical projects. Safety first! - Why Not Just Use Color Codes I’m Familiar With?
Electrical codes exist for a reason! It’s all about safety and clarity. Using the standard color codes ensures that anyone working on the circuit in the future will instantly recognize the purpose of each wire. - I See a White Wire, Too. Should I Connect It to The Switch?
Hold up! Unless that white wire is marked with black or red tape (meaning it’s been reidentified as a hot wire), it usually shouldn’t connect to the switch. It’s often capped off behind the scenes. - I’m Feeling Overwhelmed; Can I Do This on My Own?
Hey, don’t sweat it! If you’re ever unsure, there’s no harm in calling in a pro. But with some knowledge and the right tools, many of you can tackle this DIY project head-on.
Remember, folks, every home project is a journey. Equip yourself with knowledge, take it step by step, and always prioritize safety. Keep up the great work, and happy DIY-ing!
Further Learning: Real Life Scenarios
Real-life Scenarios Involving the Red Wire:
- The Switch Doesn’t Work Both Ways: Jeremy, a DIY enthusiast, decided to replace his old light switches. After replacing them, he found that the light could be turned on from one switch but couldn’t be turned off from the other. Upon inspecting the wiring, he realized he’d mixed up the traveler wires. Ensuring the red wire (traveler wire) was connected to the correct traveler terminal on both switches fixed the problem.
- Assuming Red is Always Hot: Claire, renovating her basement, saw a red wire and assumed it was a live wire, just like the black one. However, in her setup, the red wire was being used differently. It’s a reminder that while red is often used as a secondary hot wire, testing and confirming its function is essential before making assumptions.
- Overloading the Switch: Tom installed a 3-way switch for his living room lights. Later, he decided to add another light fixture to the circuit. Instead of properly extending the circuit, he attached the new fixture’s hot wire to the red traveler wire, thinking it would carry the load. This led to an overloaded circuit and frequent tripping of the circuit breaker. Consulting with an electrician, he learned about the specific roles of each wire and corrected his mistake.
- Bypassing the Red Wire: Sarah, noticing her 3-way switch wasn’t functioning correctly, bypassed the red wire and directly connected the two black wires. The result? Her switches no longer worked in tandem. One switch could turn the light on or off, but the other became redundant. She later learned the importance of the red wire in ensuring both switches could control the light.
- Confusing Red with Ground: Sometimes, unconventional wiring colors are used in older homes. James, working in a house built in the 1960s, saw a red wire and, without testing, assumed it was a hot wire. To his surprise, the previous homeowner had used red as a ground in some areas. Fortunately, James caught this during testing, avoiding potential electrical hazards.
- Neglecting Wire Caps: Lisa temporarily disconnected her 3-way switch system during a home renovation. She removed the switches but left the red wire exposed without capping it. Later, when the power was accidentally turned on, the exposed red wire caused a short circuit. This incident underscores the importance of always capping off exposed wires, even if they’re believed to be inactive.
By sharing these real-life experiences, it becomes evident that while the red wire in a 3-way switch setup has a specific function, it’s crucial to approach it (and all electrical work) with caution, knowledge, and respect for safety standards.
RELATED How is a Three-Way Switch Wired?
References
Books:
- Ray V Herren. Agricultural Mechanics: Fundamentals & Applications. Cengage Learning. 2014. https://books.google.com.ph/books?id=hTYEAAAAQBAJ
Video References:
Conquerall Electrical
Flannel Guy DIY
Terry Peterman