9 min read
How to Wire Two Light Switches (6 Steps)

You might want to wire two light switches to control a light from two locations.
It’s possible to make this arrangement, but you must ensure you wire properly to allow controlling the light from either of the two locations and not, for example, have to switch both of them on. It can be confusing and complicated, but not if you follow this guide.
To wire two light switches, get a pair of 3-way switches and wire as per the inline arrangement by connecting the two corresponding traveler terminals on each switch. Then, connect one switch’s COM terminal to the load and the hot wire from the power source to the other switch’s COM terminal.
A wiring diagram is included.
How NOT to Wire Two Light Switches
Suppose we wire two regular light switches in series along a lighting circuit, as shown below.
Note that a switch is always installed on a circuit’s positive leg using the black wire. The neutral (white) wire never enters a switch.
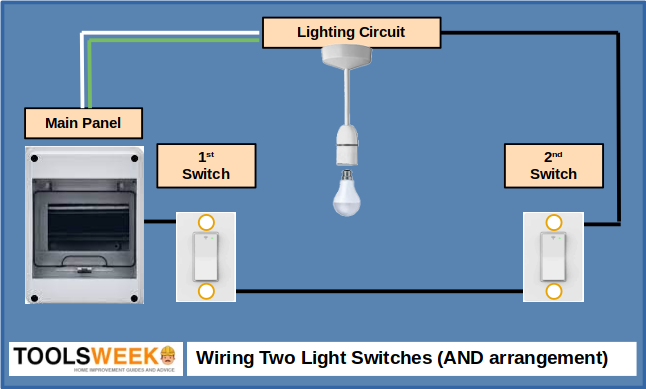
In the above setup, the light would only come on if BOTH light switches are turned on to complete the circuit. Switching only one of them on would leave a break in the circuit, so the light would not turn on, and it would remain off when both switches are in the off position. This setup is not practically useful.
This is the way NOT to wire two light switches. I only showed it to contrast with the proper method so you can understand the concept of having an OR and AND arrangement.
The solution people normally want is to be able to switch the light on and off using EITHER ONE of the two switches. For example, you would like to switch a stairway light on or off from the bottom or top.
You might be wondering how this would be possible. Continue reading because I’ll show you how it can be done.
Wiring Two Light Switches (Proper Method)
The proper way to wire two light switches on a lighting circuit is to use a pair of 3-way switches.
They will allow you to use either one OR the other switch to control the light. This is different from the AND arrangement above.
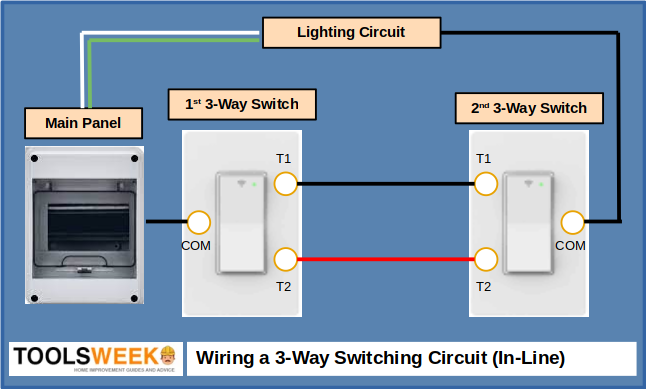
The circuit diagram would look as shown below. This is one possible way called an “inline” arrangement. The wires would be behind the switches, but they are shown above them so you can see which terminals they connect to.
3-Way Switches
So, the secret to controlling a lighting circuit from either of two switches is using a pair of 3-way switches.
A 3-way switch does not have any on or off position marked on it because this varies depending on the state of the other 3-way switch.
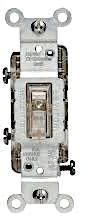
Internally, it has three terminals, all in brass (for hot wires only), because a neutral (white) wire is NEVER connected. On one end of the switch (or the center) will be a terminal marked “common” or COM, and the other two unmarked ones are called “travelers.”
In this 3-way switch (shown below), the two terminals on one side are the travelers, and the single terminal on the other is the common one. But your one might differ, so check the markings.
Now that you know about the terminals on a 3-way switch, let’s wire two of them on a lighting circuit. Follow these steps after switching the main power OFF at the circuit breaker.
Step 1: Choose the Locations
First, choose where you want to install the two 3-way switches.
For example, you might have them on the top and bottom of a staircase or at two ends of a large room, corridor, garage, or hall.
Step 2: Attach the Switch Boxes
Attach the box for each switch at the two chosen locations.
Step 3: Run the Wiring
Run two long stretches of wire between the two switches.
12-2 AWG Romex wire should be sufficient for a lighting circuit. You can use thinner 14-3 wire for the portion between the two traveler terminals, but using the same 12-2 wire throughout is better.
I recommend you use 2 different colored wires for the traveler connections. As both are hot connections, use black wire for one pair of T terminals and red wire for the other.
Step 4: Connect the Wires
Connect the two wires installed in Step 3 to the corresponding T (traveler) terminals.
So, connect T1 of Switch 1 to T1 of Switch 2 and T2 of Switch 1 to T2 of Switch 2, as shown in the above diagram, for wiring a 3-way switching circuit.
Step 5: Attach the Hot Wires
Attach the hot (black) wire from the lighting circuit to the COM terminal on one of the two switches, whichever is closest. As in the diagram, I assume you connected it to the 2nd 3-way switch.
Attach the other hot wire from the panel or other power source to the COM terminal of the other switch.
Step 6: Turn the Power On
You can now turn the power on and test your two-switch lighting circuit.
If the circuit fails to work as intended, I suggest you:
- Re-check the wiring, comparing it with the wiring diagram provided.
- Ensure all the terminal connections are tight.
- Do a continuity test if you suspect current is not flowing through a particular stretch of wire, e.g., due to a break.
If doing a continuity test, note that there is not meant to be continuity between the traveler terminals, only between the common and either of the two traveler terminals in only one position (and not in the other). This is as it should be because each switch position connects to only one of the two traveler terminals, never to both simultaneously.
Examples
Let’s look at some examples where 2 light switches would be wired.
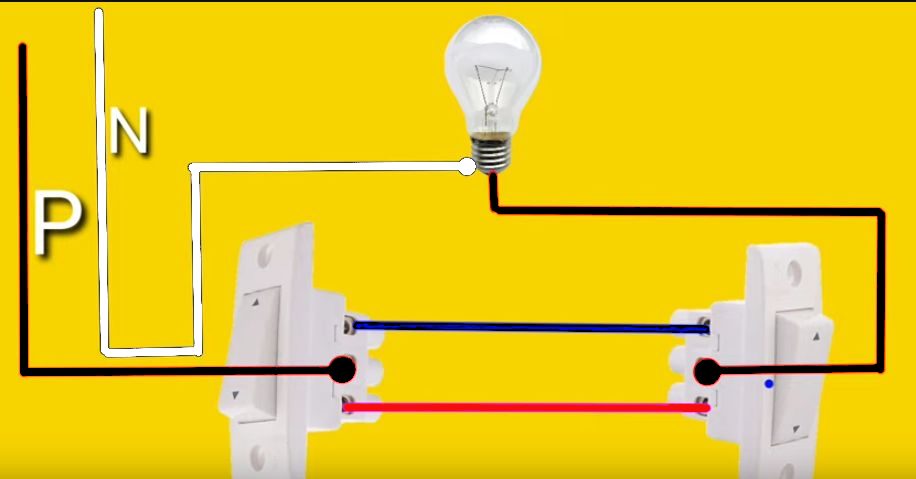
Example 1: Two Light Switches across a Room
Two light switches wired across a room (corridor, garage, or hall) would look like the diagram below. The P (phase) is the hot wire.
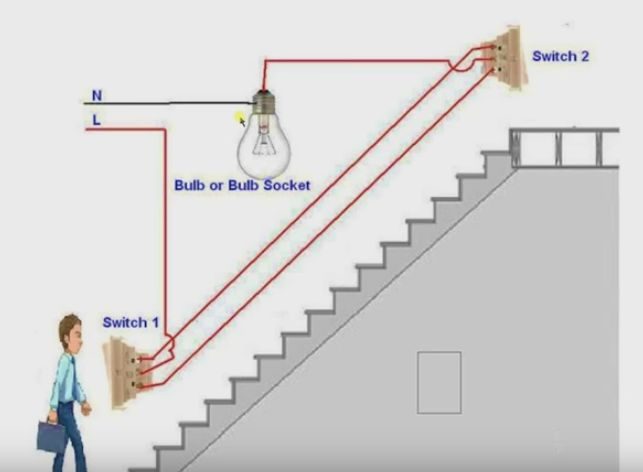
Example 2: Two Light Switches on a Staircase
Below is a wiring diagram for a staircase.
The wiring arrangement is exactly the same as above. The red wires connected to the L terminal of the supply are the hot or “live” wires, which are either black or red in the United States. The black neutral wire shown here is white in the United States.
RELATED How is a Three-Way Switch Wired?
An Alternative
An alternative to the inline method for wiring 2 light switches is possible.
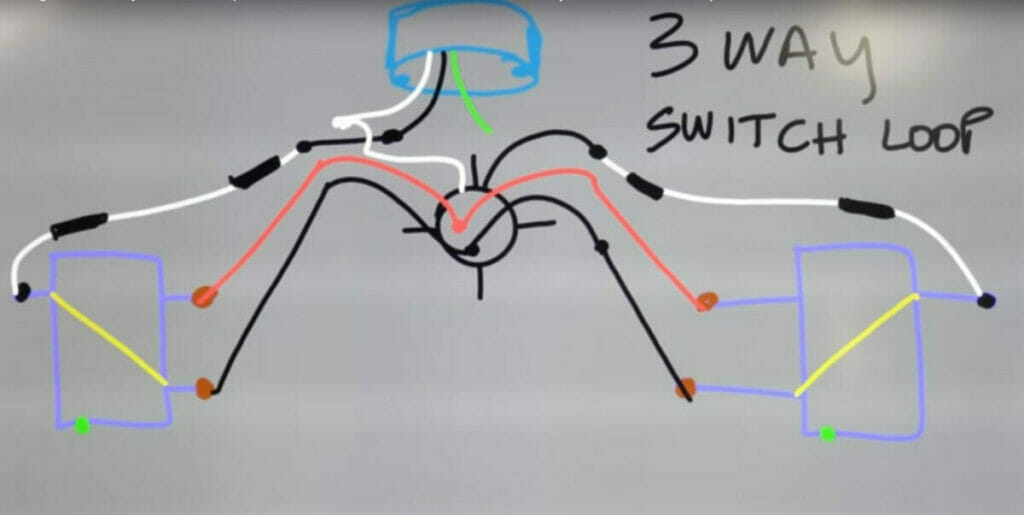
Switch-Loop Configuration
It’s called a switch-loop configuration and is suitable if the power is connected directly to the load, i.e., all the wires go straight to the light fitting.
Follow this procedure if the switch-loop configuration suits your situation:
- Instead of connecting the ungrounded conductor to the load, wire-nut it through the nearer 3-way switch and then to the farther one’s common terminal to function as the input.
- Connect the neutral (white) wire from the power source directly to the load’s neutral terminal.
- Run a wire from the first 3-way switch to the load and another between the two 3-way switches. Again, you can use different colored wires to connect the travelers to distinguish them.
In the illustration below, the electrician uses white wire to connect the load to each switch’s common terminal but re-identifies them as black using black electrical tape.
RELATED How to Wire a 4-Way Switch
FAQ Section
1. Can I use regular rather than 3-way switches to achieve this?
While you can technically use regular switches, they’d have to be in the ‘on’ position to make the magic happen! For flexibility and true “light-switching” power, you’ll want to use those 3-way switches.
2. I’ve connected everything, but the light isn’t turning on. What’s up with that?
First things first! Check your connections and make sure they match up with our guide. Are all terminals tight? It might be time for a continuity test if you’re still in the dark. Don’t give up; you’ve got this!
3. Is there any difference between the inline and switch-loop configurations?
Great question! The inline is your go-to when power feeds into one of the switches, while the switch-loop method shines when power goes directly to the light. Both are fantastic – it depends on your setup!
4. Can I use 14-3 AWG Romex wire instead of 12-2?
You bet! While I personally like the consistency of using 12-2 throughout, you can use 14-3 for the traveler connections.
5. I’ve heard of smart switches. Can I use them in a 3-way setup?
Oh, diving into the future, are we? Absolutely! Many smart switches support 3-way configurations. Just ensure you follow the manufacturer’s instructions.
6. I’ve got a dimmer switch. Can I combine that with a 3-way switch setup?
Totally! Make sure at least one of the 3-way switches is compatible with dimming, and you’ll adjust that mood lighting quickly!
References
Website Resources:
Video References:
Electric Fitting Videos
Electrician U
Niket Shah Plus