13 min read
How to Wire a 3-Way Dimmer Switch (3 Scenarios & Steps)

A 3-way dimmer switch is wired like a regular 3-way switch, so installing one is not difficult.
Whether you’ve never wired a 3-way switch before, replacing an existing 3-way toggle switch with a dimmer switch, or installing a 3-way switch in a single-pole application, this guide has got you covered.
To wire a 3-way dimmer switch, connect the two corresponding T or traveler terminals with the other 3-way switch, which must be a regular toggle type, preferably with one red and one black wire. Then, connect the line wire from the panel or the load wire from the appliance to the common or COM terminal on the 3-way dimmer switch, which may be black or copper. The regular 3-way switch’s COM terminal connects to the other line or load wire.
I’ve included a wiring diagram if you’re new to 3-way switching, covered 3 scenarios, and added extra tips for 3-way dimmer switches.
The Dimmer Switch
A 3-way dimmer switch is similar to a regular 3-way toggle switch except for the additional electronic unit that reduces the power to the load.
Internally, they are physically larger than regular switches unless they are electronic dimmers.
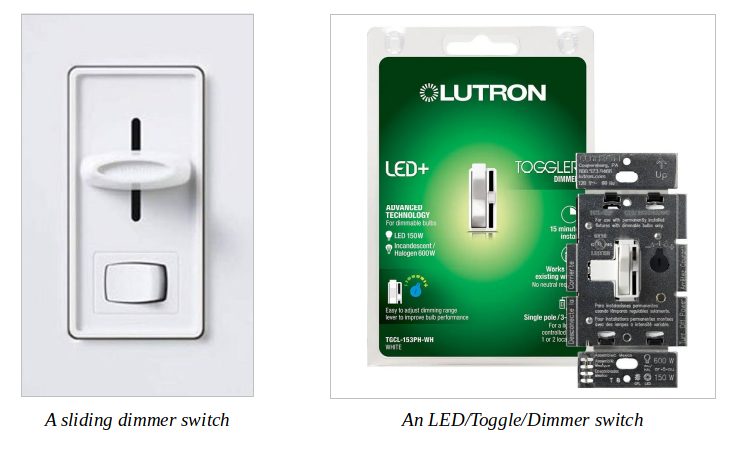
Some dimmers come with extra features such as a soft start, an LED nightlight, and the option to return to a previous setting after a power outage. The one on the left in the picture below is a simple sliding 3-way dimmer switch, whereas the one on the right can also function as a toggle switch and comes with an LED indicator.
Before Installing a 3-Way Dimmer Switch
Before installing a dimmer switch, ensure the load you want to control can be used with a dimmer.
Not all lights and fans are compatible. Read the packaging or find the manufacturer’s instructions on its website.
Also, check the power consumption on the circuit. Dimmer switches are typically rated at 125 VAC, 600 watts, and 60 hertz. 800- and 1,000-watt ones are also available.
If it has a standard 600-watt capacity, the current it can safely carry is 5 amps (600 / 120). Calculate the total wattage or amperage and only install a dimmer switch if it’s within 80% of the limit. So, for a 600-watt switch, the wattage should not exceed 480 watts, or the current should be no more than 4 amps.
Installing a Dimmer Switch
Dimmer switches fit in standard switch boxes and come in two basic types: sliding and rotating, and each may be continuous or stepped.
The wiring part is done if you already have a 3-way switch setup, i.e., with a pair of regular 3-way switches on a lighting circuit.
You only have to replace one of the regular switches with a 3-way dimmer type (not a regular one-way dimmer). You can skip the wiring steps and start where we install a switch after first removing the existing one.
I will guide you through the complete process of wiring a 3-way dimmer switch in 3 scenarios:
- Scenario 1: Installing and Wiring a 3-Way Dimmer Switch – Follow this procedure if wiring for the whole circuit for the first time.
- Scenario 2: Replacing a Regular 3-Way Switch with a Dimmer Switch – Follow this procedure if you already have a 3-way circuit with regular toggle switches.
- Scenario 3: Wiring a 3-Way Dimmer Switch in a Single-Pole Application – Follow this procedure if installing or replacing a 1-way switch.
Requirements
You will need the following to wire a 3-way dimmer switch:
- One 3-way dimmer and one regular 3-way toggle switch
- Wire (see Step 3 in the first procedure below)
- Tools: screwdriver, pliers, wire stripper, electrical tape, tester

If you already have a 3-way switching circuit, you need a single 3-way dimmer switch, as you only need to replace ONE of the two regular 3-way switches.
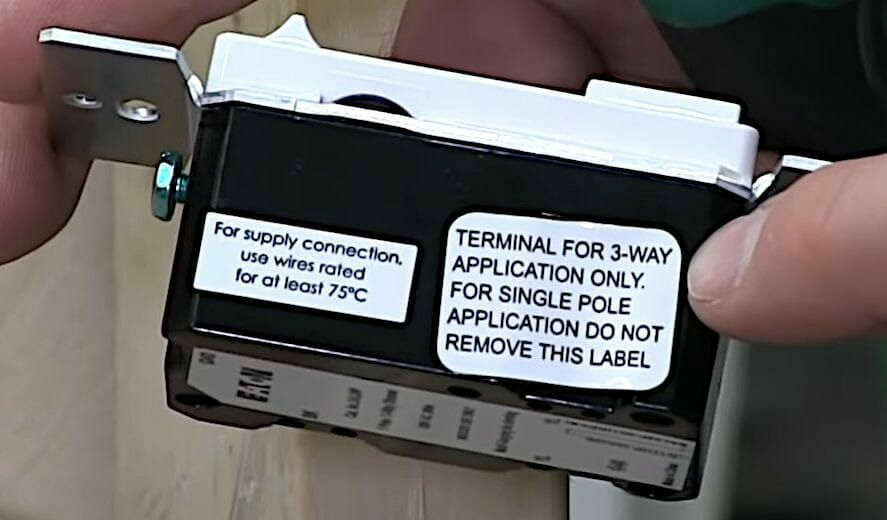
Some dimmer switches can function as 1-way- or 3-way switches like the one below. Use one of the two traveler terminals as a regular or 3-way dimmer switch.
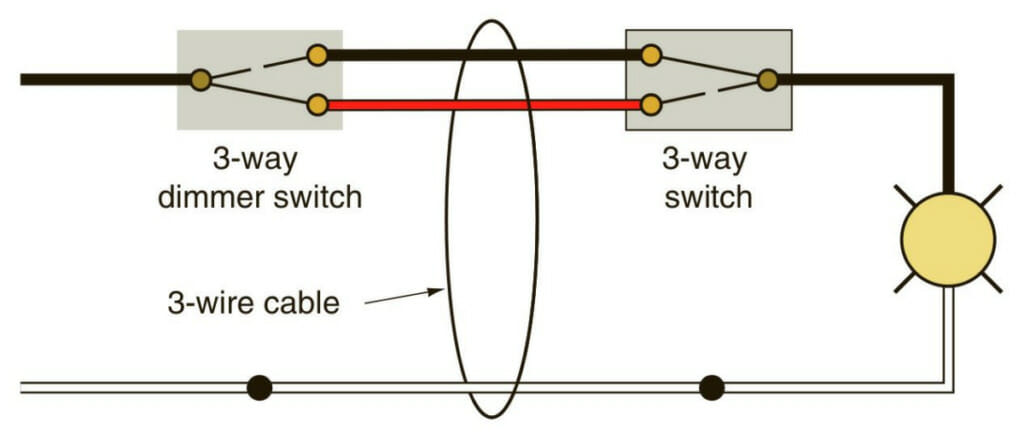
Wiring Diagram
Below is a wiring diagram for a circuit with two 3-way switches, one of which is a 3-way dimmer switch.
Note that you wire a 3-way dimmer switch with a regular 3-way switch. The circuit diagram is the same for two regular 3-way switches in an inline configuration. The only difference is the type of switch used at one of the two locations.
Scenario 1: Installing and Wiring a 3-Way Dimmer Switch
Step 1: Choose the Locations
First, choose the location where you want to install the two 3-way dimmer and regular switches.
For example, you might have them on the top and bottom of a staircase or at two ends of a large room, corridor, garage, or hall.
Step 2: Attach the Switch Boxes
Attach the box for each 3-way switch at the two chosen locations.
Step 3: Run the Wiring
Run two long stretches of wire between the two switches.
12-2 AWG Romex wire should be sufficient for a lighting circuit. You can use thinner 14-3 wire for the portion between the two traveler terminals, but using the same 12-2 wire throughout is better.
I recommend you use 2 different colored wires for the traveler connections. As both are hot connections, use black wire for one pair of T terminals and red wire for the other. Otherwise, they can be both black or red. It doesn’t matter, but ensure you only connect the corresponding terminals.
Step 4: Connect the Traveler Wires
Connect the two traveler wires installed in Step 3 to the corresponding T (traveler) terminals.
So, connect T1 of Switch 1 to T1 of Switch 2 and T2 of Switch 1 to T2 of Switch 2, as shown in the above diagram, for wiring a 3-way switching circuit.
If the 3-way dimmer switch is pre-wired, you can connect the right wires together using wire nuts, caps, or wagos.
Step 5: Attach the Hot Wires
Attach the hot (black) wire from the lighting circuit to the COM terminal on one of the two switches, whichever is closest. It can be either the regular or dimmer 3-way switch.
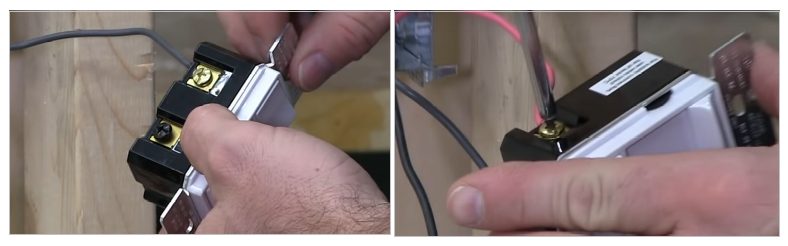
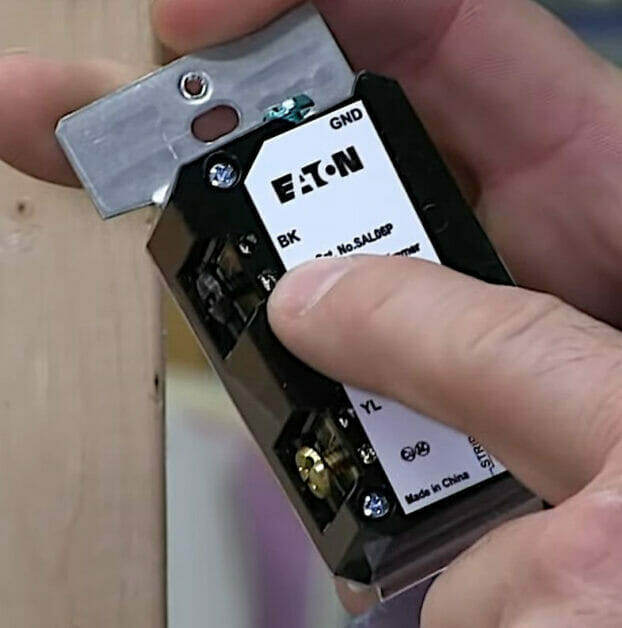
Attach the other hot wire from the panel or other power source to the COM terminal of the other switch. Some 3-way dimmer switches have a special black screw on the COM terminal like the one shown below.
Step 6: Turn the Power On
You can now turn the power on and test your 3-way dimmer switch lighting circuit.
If the circuit fails to work as intended, I suggest you:
- Re-check the wiring, comparing it with the wiring diagram provided.
- Ensure all the terminal connections are tight.
- Do a continuity test if you suspect current is not flowing through a particular stretch of wire, e.g., due to a break.
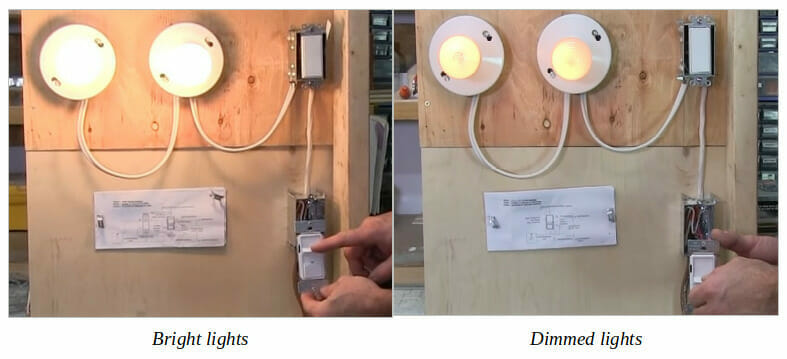
If the setup works, you can now control the brightness of the lights using the dimmer switch.
Scenario 2: Replacing a Regular 3-Way Switch with a Dimmer Switch
Step 1: Disconnect the Power
Disconnect the power at the main panel by switching off the circuit breaker.
Step 2: Remove the Regular Switch
Remove one of the regular 3-way switches you want replaced with a dimmer switch.
Step 3: Wire the Dimmer Switch
Install the dimmer switch according to the same configuration:
- The black line wire from the panel or the load (light or fan) attaches to the COM terminal.
- The two line wires from the other (regular) 3-way switch attach to the T (traveler) terminals. They are usually both black, one black and one red, or both red.
- Attach the green wire to the bonded ground wire in the switch box.
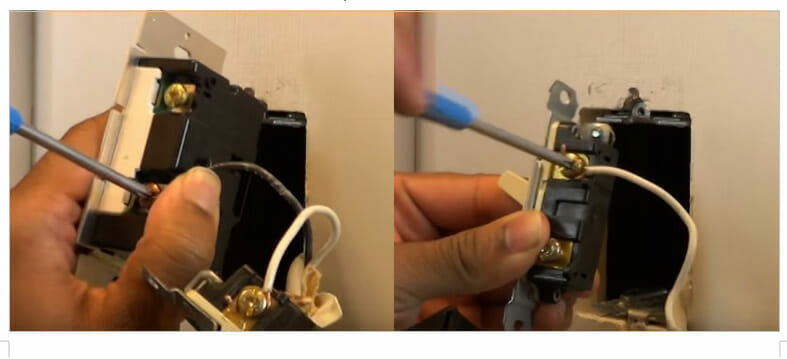
Step 4: Secure the Dimmer Switch
Secure the dimmer switch by tightening the terminal and cover plate screws.
Step 5: Restore the Power
Restore the power to the circuit after the wiring is done.
Scenario 3: Wiring a 3-Way Dimmer Switch in a Single-Pole Application
As I mentioned earlier, some 3-way switches can serve to control either a 1-way or 3-way circuit.
Although designed primarily for 3-way switching, you can use a 3-way dimmer switch in a single-pole application. The way to do this is to ignore one of the two traveler terminals and treat the other one as the second terminal as in a regular 1-way switch.
The extra traveler terminal may be covered by a piece of tape, like the one I showed under ‘Requirements’. Leave the tape on if you won’t use this second traveler terminal.
Follow these steps:
Step 1: Turn the Power Off
Turn the power off at the breaker panel.
Step 2: Remove the Existing Switch
Remove the existing switch if replacing it with a 3-way dimmer switch. Ignore this step if wiring it for the first time.
Step 3: Attach the Line or Load the Wire
Attach the line (from the panel) or load (from the appliance) wire to the black or copper terminal on the 3-way dimmer switch, the COM terminal.
Step 4: Attach the Second Hot Wire
Attach the remaining hot wire (coming from either the panel or appliance) to one of the traveler terminals.
The picture below shows it in white and will be re-identified as black. If one of the two traveler terminals is untaped or uncovered, whereas the other is taped or covered, use the first one and ignore the latter.
Step 5: Attach the Switch
Attach the switch to the box and turn the power on. The 3-way dimmer switch is ready to use (which will function as a 1-way dimmer switch).
More Tips Related to Dimmer Switches
When Installing a Dimmer Switch
Ensure the box is large enough to accommodate a dimmer switch, including the wires and splices. Don’t try to jam one inside, as it could cause a short circuit or ground fault.
Situations for Not Using a Dimmer Switch
Don’t use a dimmer switch to control something temporarily. They are for use with permanently installed lighting or fans.
Don’t use a dimmer switch to control a switched receptacle. It is not designed for that purpose. If you do, it would reduce the voltage, which could damage the connected appliance.
Don’t use an ordinary dimmer switch to control an inductive load. Inductive loads require a special dimmer switch if you want to use one to control it. It would be marked in VA (volt-amperes) and indicate that it can be used for an inductive load.
Issues with Dimmer Switches
A common issue with dimmer switches (controlling incandescent lamps) is hearing a hum. Two dimmer switches on the same circuit might increase the chances of humming.
It happens due to chopping the AC sine wave, causing the lamp filament to vibrate. Change the dimmer switch’s setting to a slightly higher or lower level. Replace the dimmer switch if the problem persists.
FAQs: Amping Up Your 3-Way Dimmer Game!
Ready to light up your space? Let’s tackle those burning questions!
- Is every light fixture compatible with a 3-way dimmer switch?
- Not all of them! Before diving in, ensure your fixture can jive with a dimmer. Always check the packaging or consult the manufacturer’s website.
- I’ve got a hefty chandelier. Can my dimmer handle it?
- You’ve got to play by the rules here! Dimmer switches typically come rated with a voltage and wattage capacity. Ensure your chandelier’s wattage doesn’t exceed 80% of the switch’s capacity. Do the math, and keep it safe!
- I’m hearing a weird humming noise from my dimmer. What gives?
- Ah, the mysterious hum! With some incandescent bulbs, you might experience this due to the AC sine wave being chopped. You can fiddle around and adjust the settings a bit. If that doesn’t give you peace, consider swapping out the dimmer.
- Can I use a dimmer for my outlet?
- Hold your horses! A dimmer is not designed to control a switched receptacle. Plugging in appliances can be risky business with reduced voltage. Stick to using them for lights or fans.
- Any top tips for first-time dimmer installers?
- Absolutely! Make sure the switch box is spacious enough for your dimmer, and remember, they’re for permanent fixtures. Don’t try to control temporary setups. Also, give the circuit a test run before sealing everything up.
- I’ve only got a single-pole setup. Can I still rock a 3-way dimmer?
- You bet! Some 3-way dimmers can dance solo or with a partner. You’ll use one of the traveler terminals for a single-pole application and leave the other one be.
Remember, fellow DIYers, safety first. When in doubt, consult an expert! Now, let’s make that home shine!
References
Website Resources:
- A sliding 3-way dimmer switch. https://www.amazon.sa/-/en/LUTRON-ELECTRONICS-SCL-153PH-WH-Single-Dimmer/dp/B009PNML32
- LED/Toggle/Dimmer switch. https://www.lowes.com/pd/Lutron-Toggler-Single-Pole-3-Way-White-LED-Toggle-Light-Dimmer/3376148
- Ray C. Mullin & Phil Simmons. Electrical wiring residential based on the 2017 National Electrical Code. Cengage Learning. 2018
Video References:
House Improvements
Lutron Electronics