9 min read
How to Wire a Double Pole Switch (Steps & Guide)

This guide will help you wire a double-pole switch with two extra terminals compared to a regular one.
It will be useful if you’ve only wired regular switches before or never wired one. I’ve explained the extra terminals, the use of DPST switches in 220-volt circuits, and how to avoid confusion over the white wires used for either hot or neutral.
In a nutshell, to wire a double-pole switch, we only connect the hot and ground wires (never the neutral one) as follows:
- Connect the black (first hot) line wire to the line terminal on one side of the switch and the black load wire above it on the load row.
- If it’s a 3-conductor cable, connect the red (second hot) line wire to the line terminal on the other side and the corresponding load wire above it. If it’s a 2-conductor cable containing a white wire, re-identify it as the second hot wire.
- Splice the green wires together and connect them to the green screw terminal.
More details are below.
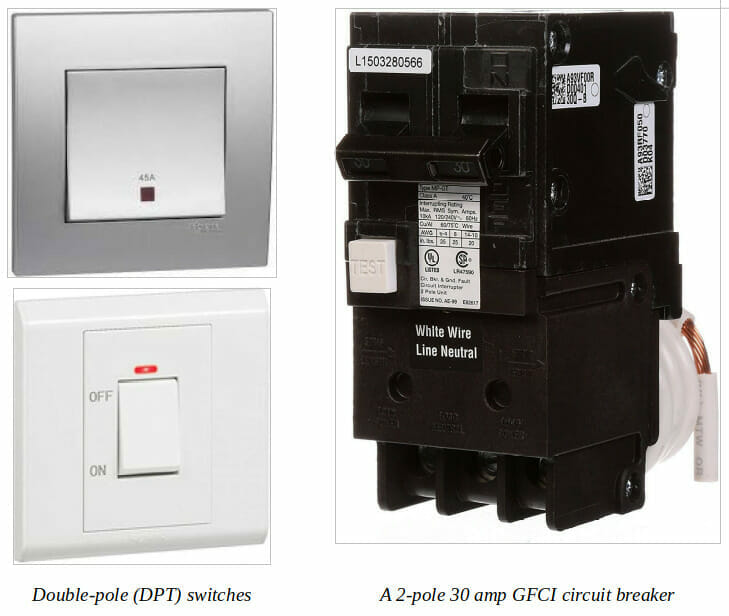
The Double-Pole Switch
A double-pole switch is an ideal and inexpensive option for simultaneously switching the power on or off to two circuits.
For example, you can control a 220-volt appliance with two hot wires (on a 3-phase supply). You can buy ones that share a common toggle and look like a regular, single switch but have terminals inside for 2 circuits. Technically, they are called DPST (double pole single throw) switches.
Double-pole switches are typically rated at 30 amps but are used on less than 30-amp circuits.
Wires
Whereas a single-pole switch has only one hot wire entering it (besides the ground wire), a double-pole switch has two, whether for carrying 110-120V each or controlling a 220-240V circuit.
The two hot wires are both black or else black and red. Sometimes, white wire is used because it is present in a cable with regular black and white wires, but in this case, it would be relabelled as hot.
Also, you would normally see thicker 10-gauge wire on a 220V circuit or 12-gauge wire on 20-amp 110V circuits.
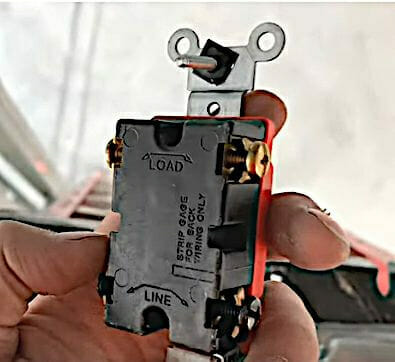
Terminals
A double-pole switch has to control two circuits, so it has 4 terminals besides the ground one.
The two incoming wires are attached to one pair, while the outgoing ones are attached to the other. So, it has 4 brass screws (or 2 brass and 2 black like the one below), usually two on each side. The ground screw is green.
220-Volt Circuits
Because a double-pole switch is common on a 220-volt circuit, let me briefly explain how it’s arranged in a panel that normally provides 110-volt circuits.
A 220-volt circuit feeds power from two separate bus bars in the panel. This contrasts with a regular 110-volt circuit that draws power from only a single bus bar. Also, there is no return wire unless the appliance requires 110 volts for some functions.
Besides 220-volt circuits, DPST switches can also be used to control 2 regular 110-volt circuits wired in parallel simultaneously.
Procedure for Wiring a Double-Pole Switch
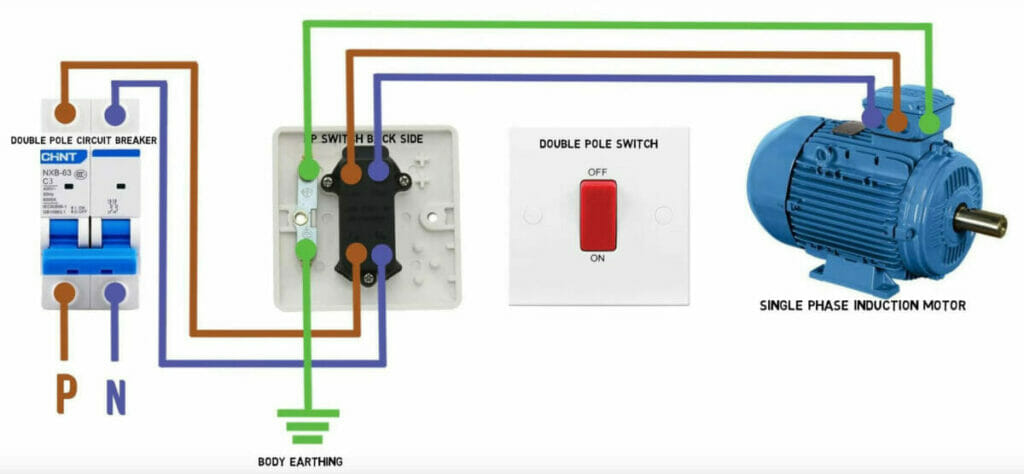
Wiring Diagram
Below is a wiring diagram for a double-pole switch connected to a single-phase induction motor.
Note that:
- The non-ground wires are shown in brown and purple, normally either black, one black, and a white one re-identified as hot, or one black and one red.
- A double-pole circuit breaker protects the circuit.
Step 1: Switch the Power Off
Switch the power off for the circuit(s) you will work on.
Step 2: Connect the Wires
Connect the 5 wires to the 5 terminals on the double-pole switch as instructed below, depending on whether you’re using 2-conductor or 3-conductor cables.
If using a regular 2-conductor cable (with black and white wires, plus a ground wire):
- Connect the black line wire (from the power source) to the black terminal on the switch’s left side.
- Connect the black load wire (from the appliance) to the brass terminal above it, on the same left side.
- Connect the white line wire (not neutral but re-identified as hot) to the black terminal on the switch’s right side.
- Connect the white load wire to the brass terminal above it, on the same right side.
- Splice the green wires together and connect them to the green screw terminal.
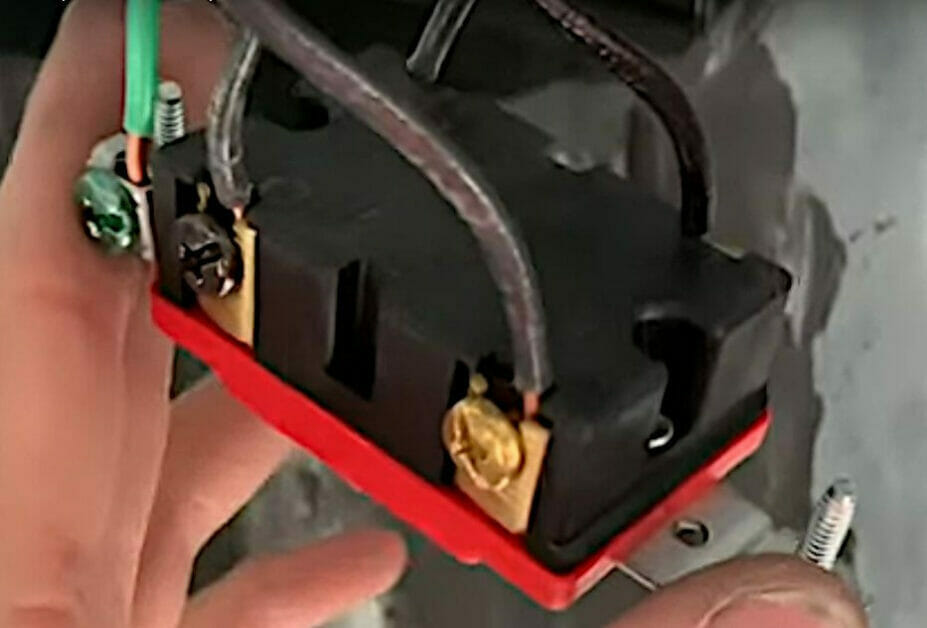
You can also get 2-conductor cables with two black wires as the conductors (plus the ground wire). The picture below shows such a connection.
If using a 3-conductor cable (with black, red, and white wires, plus a ground wire), the connections are the same as above except:
- The red wire is used for the second hot wire instead of white.
- The white (neutral) wires are terminated behind the switch by capping them, as they do NOT connect to the switch.

Note: The white wire in a 2-conductor cable is not neutral but re-identified as hot (by taping the end with black electrical tape), whereas it remains a neutral wire in a 3-conductor cable and is terminated by capping. In the latter case, it should NOT be connected to the switch.
Step 3: Ensure all the Screws are Tight
Ensure all five screws on the double-pole switch are tight. Optionally, you can seal the sides with electrical tape, as done in the picture below.
Step 4: Attach the Switch to the Cover Plate
Attach the switch to the cover plate or the switch’s box.
A Practical Example
One homeowner wanted to replace a regular toggle switch in his bathroom with a double-pole switch to simultaneously switch the fan and light on and off.
The existing cables were 2-conductor ones with black and white wires, so he had to use them instead of running new ones. The wiring diagram shows the existing switching arrangement for two lights and one fan and the change to using a double-pole switch to control one light and the fan.
The wiring was done according to the instructions in this guide. The single switch now serves the function of two separate switches used before.
FAQs
Can I use a double-pole switch if I’m wiring just one circuit?
Yep! While it might be like using a sledgehammer to crack a nut, you can. But remember, single-pole switches are designed specifically for one circuit. So, unless you’re thinking of maybe wanting a double-pole setup later on, you might want to stick with the simpler, slimmer, and often cheaper single-pole.
I’ve been hearing about these 3-way switches. Is that the same as a double-pole switch?
Great question! No, they’re not the same. A double-pole switch lets you control two circuits at the same time. Meanwhile, a 3-way switch lets you control one appliance or circuit from two different spots. Imagine flipping the switch at the bottom of the stairs and then again at the top. Handy, right?
Is there any risk of using a white wire as a hot wire? It’s all good as long as you re-identify it! The white wire might be used as a second hot wire in some setups. If you do this, always mark it so it’s clear it’s hot – usually by taping the end with black electrical tape. Safety first!
Do I always need a double-pole switch for 220-volt circuits?
Most of the time, yes. A 220-volt circuit typically uses two hot wires, so a double-pole switch is the go-to choice. But as always, there are exceptions based on specific needs and setups.
Can I do any cool projects or upgrades with a double-pole switch
Absolutely! For instance, if you’re tired of fumbling around with two switches for your bathroom light and fan, you can replace them with one double-pole switch. That way, one flip, and you’re good to go. It’s all about making life a little easier and more efficient!
References
Website Resources:
- Double-pole switch (45A). https://uae.sharafdg.com/product/schneider-electric-kb31dr45n_as-vivace-silver-45a-250v-double-pole-switch-with-neon-cooker-control-water-heater/
Video References:
Daily Electrician
Just for You
Learning Engineering