13 min read
How to Ground a Wire (4 Situations + 4 Steps)
A grounded wire connects the metallic casing of an appliance plugged into an outlet and a grounding rod embedded inside the earth.
If your wires are not grounded, which is usually the case if you live in an older home, this article is for you. You must know how to make proper connections at three key points – inside outlets, in the main panel, and at the grounding rod. You must also ensure the entire path is unbroken.
Quick Steps: To Ground a Wire
- Connect the ground wire to a metallic part of the device or appliance.
- Connect the ground wire inside an outlet to a metallic part of the box.
- Connect the ground wire of each branch circuit to the ground bus in the main electrical panel.
- Connect the ground bus with a wire to the grounding rod in your home.
I will show how grounding is done at the above 4 locations.
Getting Started – Grounding a Wire
Electrical grounding of a wire involves connecting the electrical system to the ground to provide a safe path for current to flow in an emergency. For a complete ground path arrangement, you must have the following:
- A grounding rod embedded in soil and connected by wire to the ground circuit of your home’s electrical system;
- A ground bus in your main electrical panel where all the branch circuit ground wires are connected;
- A ground terminal or connection point in each outlet or appliance on every circuit or at least the one you want to be grounded.
- A ground connection on the device or appliance.
Grounding at the Grounding Site
Alright, gear up, folks, as we delve into the heart of electrical grounding at the epicenter of it all – the Grounding Site! This is where the rubber meets the road, or should I say, where the wire meets the earth. Let’s break it down into digestible, easy-to-follow steps.
Step 1: Choose Your Grounding Site Wisely
- Locate a spot as close to the main electrical panel as possible to minimize resistance. This spot should be free from obstructions like water lines or gas pipes. Oh, and steer clear of any spots where water tends to gather. We’re grounding electricity, not creating a waterpark!
Step 2: Drive that Ground Rod!
- Grab a grounding rod, which should be at least 8 feet long, and drive it into the ground. Use a sledgehammer or a ground rod driver to get that rod snugly into the soil. Aim to have just a few inches peeking out above the ground, like the periscope of a submarine!
Step 3: Wire It Up
- Now, it’s time to connect a grounding wire from your main electrical panel to the grounding rod. Use a solid copper wire, and ensure it’s securely clamped to the rod using a ground rod clamp. This is your electrical lifeline, the vein that courses with currents, keeping things safe and sound!
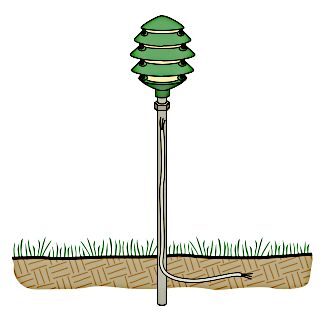
Step 4: Water-Proof Luminaire
- If installing a luminaire, mark it as “suitable for wet locations.” This is like the raincoat for your lighting, ensuring moisture steers clear from your electrical setup.
Step 5: Check the Code
- Familiarize yourself with Article 100 of the NEC, which gives you the lowdown on grounding essentials. Section 250.4(A1) is your go-to reference that ensures your grounding gig is up to snuff, keeping those pesky over-voltages at bay!
- Article 100 of the NEC defines the ground as “the earth.” Section 250.4(A1) states that grounded electrical systems “shall be connected to earth in a manner that will limit the voltage imposed by lightning, line surges, or unintentional contact with higher-voltage lines and that will stabilize the voltage to earth during normal operation.”
Step 6: Inspection Time
- Once your grounding site is all setup, it’s wise to have a professional electrician inspect your handiwork. They’ll ensure everything is copacetic and your home is a safe haven from electrical mishaps.
The ground wire at the ground site serves as the ground-fault return path.
If using a luminaire, it must be marked as “suitable for wet locations” so that water cannot enter inside.
Grounding in the Main Panel
You provide a proper grounding connection to the home circuit by including a ground bus in the panel and connecting it directly to the earth using a metallic ground rod.
The ground wires from all the outlets and appliances in the branch circuits should connect to this ground bus bar.
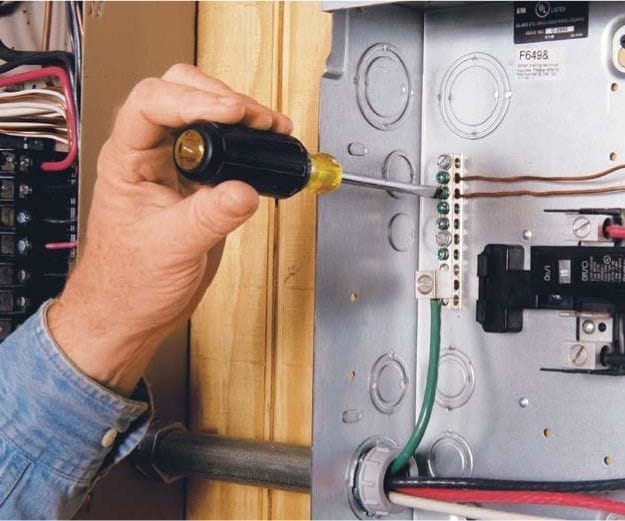
Nowadays, it is common to have a 3rd ground wire in outlets connected to the ground bus via the ground terminals on outlets and appliances.
Grounding inside Outlets
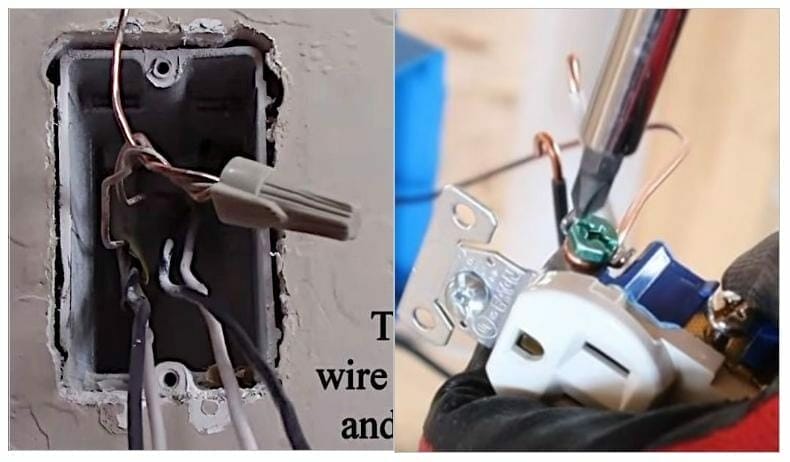
Inside the outlet or appliance, the ground wire must be connected to a metallic part of the box, which usually has a green screw if it’s a terminal.
The ground wire is normally bare copper or with green or yellow sheathing.
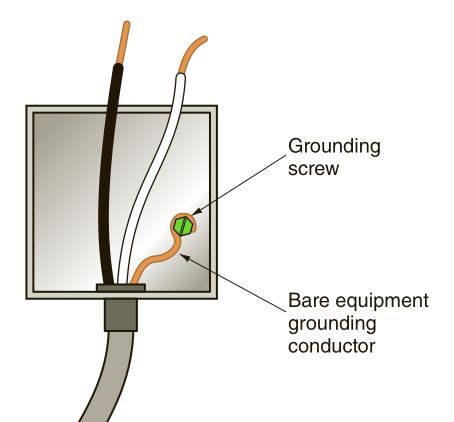
Some outlets have a pigtail for the ground wire, making it even easier to connect.
If you have a single ground wire, connect it to the ground terminal with a green screw.
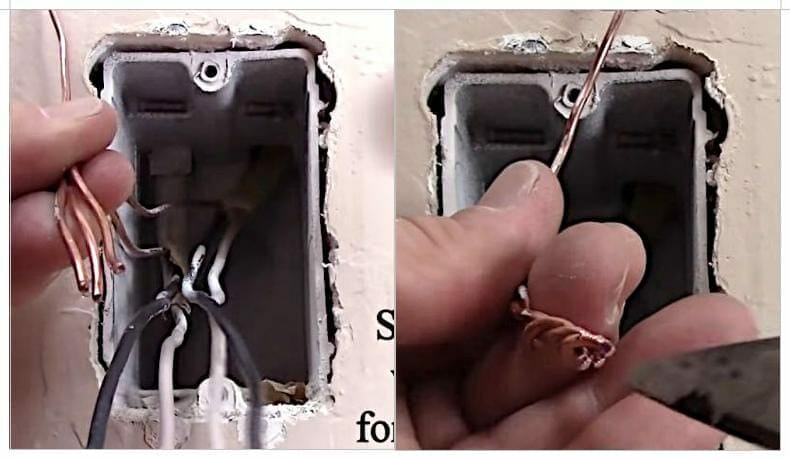
If you have several ground wires coming through an outlet and, as is usual, only a single ground terminal to connect them to, splice all the ground wires together with an additional short piece to connect to the terminal.
So, do the following:
- Bring the wire ends together along with an additional small piece.
- Splice the wires by twisting their ends together.
- Place a cap over the twisted group of wires.
- Connect the extra wire to the ground terminal or point.
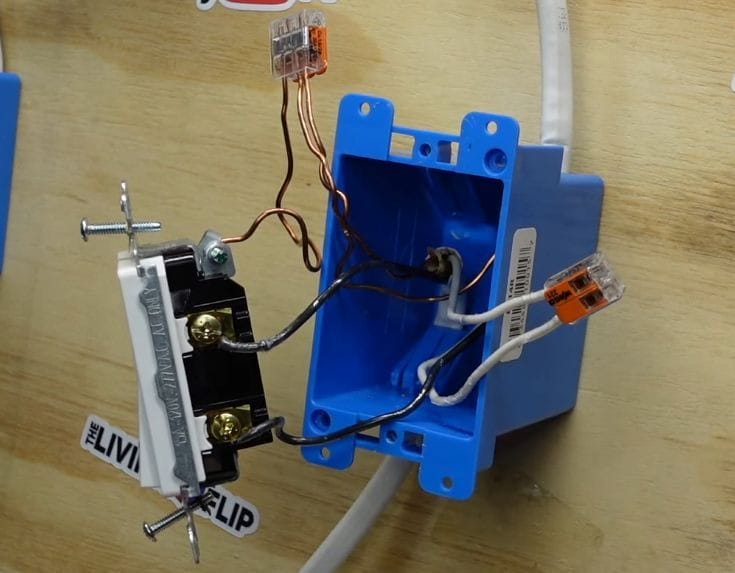
An alternative to using a wire cap is a wire connector or wago.
Insert each wire end into a slot on the connector instead of splicing. The extra piece still connects to the ground terminal. See the picture below.
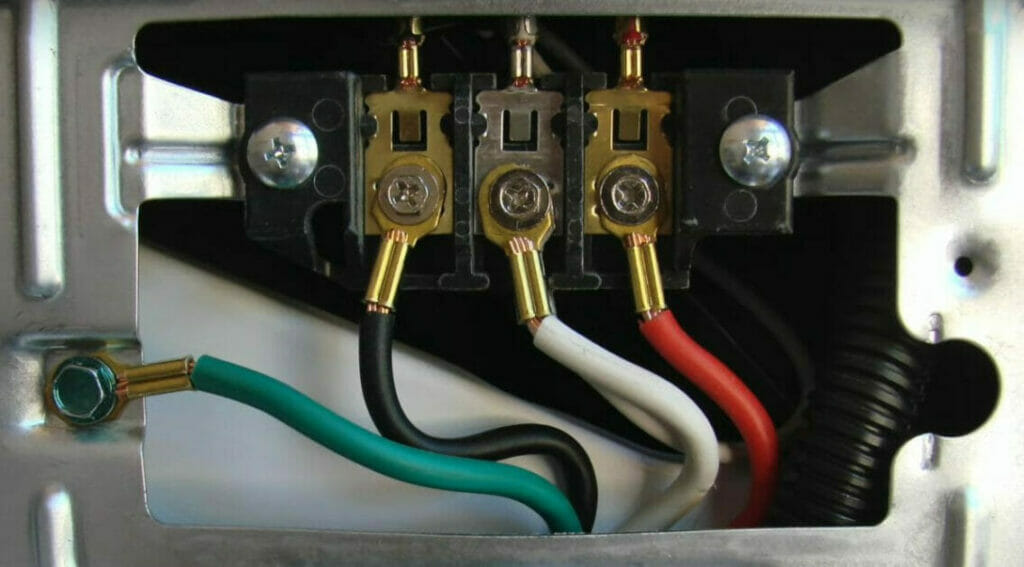
Grounding an Appliance
Some heavy-duty appliances provide a special grounding connection to connect the ground wire, as in the example below of a clothes dryer.
Step 2: Power Down
- Now, don’t just yank the plug; turn off the appliance and unplug it from the outlet. It’s like saying, “Hold on there, Sparky, we’re going safely!”
Step 3: Spot the Grounding Terminal
- Look for the grounding terminal on your appliance; it’s often marked with a grounding symbol or may be colored green. This is your appliance’s handshake with safety!
Step 4: Get Your Ground Wire Ready
- Prepare a grounding wire; it should be a solid or stranded copper wire, usually green or bare. This wire is your safety superstar, so ensure it’s up to code!
Step 5: Connect to Conquer
- Connect one end of your grounding wire to the grounding terminal of your appliance and the other end to a grounded metal box or a grounding rod. It’s like setting up a safety hotline between your appliance and the ground!
Step 6: Secure the Connection
- Ensure the connections are snug and secure. A loose connection is a lousy connection when it comes to grounding. So tighten those screws and make sure everything is hunky-dory!
Step 7: Test the Waters, or Rather, Wires!
- Once connected, plug in the appliance and power it up. Use a circuit tester to ensure the grounding is effective. It’s like giving your appliance a safety thumbs up!
Step 8: Keep It Tight
- Periodically check the grounding connections for tightness and integrity, especially after moving the appliance. It’s the maintenance mambo, and it keeps the safety symphony in tune!
Is Grounding a Wire Necessary?
Appliances can still operate without the ground wire connected, but it’s not recommended as they won’t be able to provide safety.
You can get an electric shock when touching the light fixture or even get electrocuted. Also, the light fixture might get damaged during an electrical overload without a proper ground connection.
Safety Precautions
I cannot stress enough how vital it is to prioritize safety when knee-deep in wires and electrical gadgets. It’s not just about getting the job done; it’s about doing it safely. So, here’s the lowdown:
First and foremost, before you even think about unscrewing that outlet cover or tinkering with any wires, head over to your main circuit breaker and shut that power off! This is your number one defense against a shocking surprise, literally. It’s as simple as flipping a switch, but it’s the barrier between you and a potential electric shock.
Now, I know we all fancy ourselves DIY experts, and it’s great to have that can-do spirit. But let’s face it: electrical systems are not to be trifled with. They are complex, and a misstep can have serious consequences. If you are scratching your head or unsure about any part of the grounding process, it’s time to call in the cavalry – a professional electrician. These folks are seasoned pros who know the ins and outs of electrical systems and can ensure everything is up to snuff, grounded correctly, and safe.
Not sure where to find a trusty electrician? No worries! A quick search online or a shout-out on your local community board can provide recommendations for reputable electricians in your area. And hey, while you’re at it, why not take the opportunity to learn from them? Watching a pro at work can provide invaluable insights and bolster your own DIY skills for future projects.
Remember, folks, electrical work is not a playground. It demands respect, knowledge, and the right set of skills. So, play it safe, switch off that power, and when in doubt, call a professional. Your safety and the safety of your loved ones are paramount, and nothing — I mean nothing — is worth compromising that. So gear up, power down, and let’s ground those wires safely!
FAQs
1. Why is grounding so important?
Grounding is your silent guardian, your electrical knight in shining armor that escorts stray currents safely back to the earth. It’s not just about keeping your appliances in check; it’s about ensuring your home is a safe haven, not a shocking hazard.
2. How do I know if my home is grounded?
Ah, the age-old question! If your home is a modern marvel, chances are it’s grounded. But if it’s an older gem, you might want to get it checked out. An electrician can give you the lowdown with a simple inspection. Or, grab a circuit tester from your local hardware store and test those outlets yourself!
3. I’m a DIY dynamo. Can I ground my home myself?
You’ve got the spirit, but grounding is a game for the seasoned pros. It’s a complex dance of wires that requires a keen eye and knowledgeable noggin. If you’re not a certified electrician, it’s best to call in the experts. Safety first, DIY second!
4. What’s the deal with grounding rods?
Grounding rods are like the roots of your home’s electrical system, burrowed into the earth, providing a safe pathway for rogue currents to shimmy down to the ground. It’s a key player in the grounding game, making sure any electrical oopsies don’t turn into fiery whoopsies!
5. Can I use water pipes for grounding?
Ah, the old-school way! While water pipes have been used in grounding’s historical tapestry, it’s not the safest or most reliable method today. Metal pipes can corrode or be replaced with plastic, disrupting your grounding groove. Stick with grounding rods and wires for a steadfast safety setup.
6. What if I experience a shock even with grounded outlets?
Oh no, that’s a shocker! Even with grounding, things can go awry. If you experience a shock, it’s time to call an electrician pronto. There could be a fault in the system or an issue with your appliances. Don’t play the guessing game; get a pro to scope out the scene.
7. How often should I have my electrical system checked?
Regular rendezvous with an electrician to check your system is a smart move. Every few years, or if you notice anything quirky like flickering lights or funky outlet behavior, give your electrician a ring. It’s all about staying ahead in the safety saga!
8. Is grounding the same for all types of buildings?
Not all grounds are created equal! Different buildings have their own set of rules when it comes to grounding. From residential retreats to colossal commercial complexes, the grounding game changes. Always have a savvy electrician tailor the grounding gig to your building’s unique blueprint.
There you have it, folks! The electrifying essentials to keep you grounded and guarded. Remember, when in doubt, don’t DIY; call a pro to ensure your grounding game is strong and shock-free!
References
Books:
- Ultimate Guide: Wiring, 8th Updated Edition by Creative Homeowner. https://www.barnesandnoble.com/w/ultimate-guide-creative-homeowner/1133147764
- Electrical Wiring Residential by Ray C. Mullin, Phil Simmons. https://www.abebooks.com/9781337101844/Electrical-Wiring-Residential-Mullin-Ray-1337101842/plp
Video References:
Ask the Electrician
The Excellent Labororer
HandyDadTV
Terry Peterman