9 min read
How to Wire Tweeters to Amp (3 Ways)
By the end of this article, you’ll be able to wire your tweeters to an amp.
Car tweeter speakers, even inexpensive ones, can significantly improve your speaker system as they create high-frequency noises. However, you might be unsure how you could wire and install tweeters in your car. Well, there are several ways to wire automobile tweeters, one of which is by connecting them to an amplifier.
In general, you can wire your tweeters with built-in crossovers to an amplifier through the following methods:
- Wiring to an amp with connected speakers/unused channel amp with full-range output option.
- Tapping off of already connected full-range speakers
- Connecting to unused channel amp separate from subwoofers
Read on as we discuss the details further.
3 Ways on How to Wire Tweeters to Amp
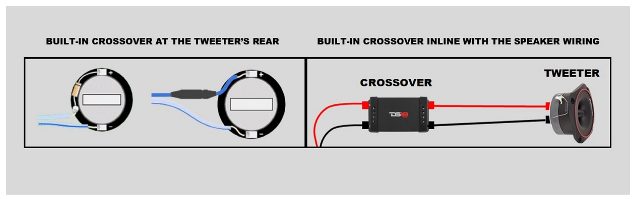
Car tweeters have built-in crossovers.
In most situations, it is integrated into the tweeter’s back or placed directly alongside the speaker wiring. These crossovers are relatively crucial when installing tweeters. They separate the frequencies and ensure that each is sent to the appropriate drive unit. The highs go to the tweeter, the mids to the mid, and the lows to the bass.
Without the crossovers, the frequencies would go in completely wrong directions.
Here are several configurations for wiring tweeters with crossovers to amplifiers:
Wiring to an Amp with Connected Speakers or Unused Channel Amp with Full-Range Output Option
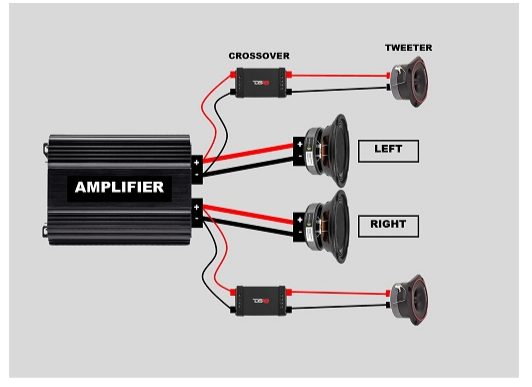
Tweeters can be connected to an amp along with your current component speakers.
This applies to both full-range speakers and speakers connected to crossovers. Most amps can typically handle the parallel speaker load produced by adding the tweeters. Also, adhere to the positive and negative wiring connections on the amplifier.
Then, ensure that the speaker polarity at the tweeter is the same (either on the tweeter or marked on the inline tweeter crossover).
Tapping Off of already Connected Full-Range Speakers
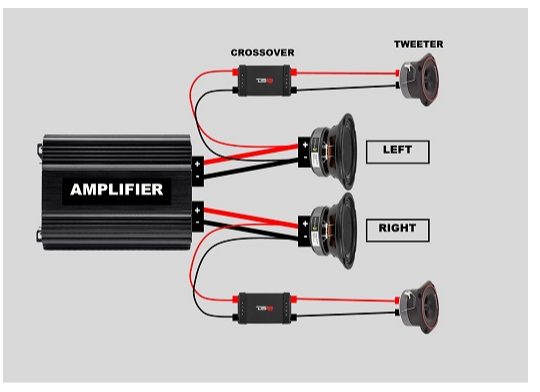
You can tap off the terminals or speaker wires of existing full-range component speakers to simplify the task and conserve speaker wires.
Don’t mix up the polarity. For the best car audio, connect the tweeter’s positive and negative speaker wiring like the speakers already connected to the amplifier. You can connect them parallel to the speakers to save time, effort, and speaker cable. As long as they are full-range speakers, you will receive the same audio signal as you would at the amplifier.
However, I don’t recommend this for speakers using low-pass crossover, either in the amp or before the speakers.
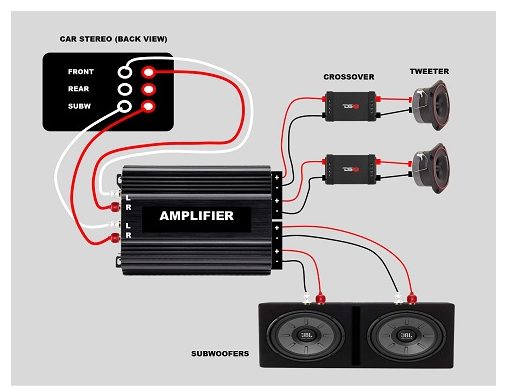
Connecting to Unused Channel Amp Separate from Subwoofers
In this method, an amplifier must have distinct amp channels accessible and a full range audio signal input to be used with a subwoofer or pair of subwoofers.
It’s because subwoofer channels in amplifiers are only used in low-pass mode, which prevents the tweeters from playing treble. Also, loud bass can saturate tweeters and potentially produce distortion.
Furthermore, to connect the second pair of signal inputs to free full-range amp channels, utilize a pair of RCA Y-splitters at the amplifier or a pair of full-range RCA outputs from your head unit.
Connect the tweeter channel RCAs to the full-range front or rear outputs, and connect the subwoofer amp inputs to the full-range rear or subwoofer RCA jacks.
Then, to match your existing component speakers, you’ll likely need to set the amp gain at a respectable amount.
Additionally, tweeters are not permitted on monoblock (bass-only) amplifiers or subwoofer output channels with a low-pass crossover.
Tweeter high-frequency sound output is not available in either of these scenarios. Monoblock (single-channel) subwoofer amplifiers are almost universally made just for producing bass. They are made to generate a lot of power and drive subwoofers at loud volumes.
Thus, there is no treble (highs) to drive tweeters.
Using the Amp’s Built-in Crossovers for Tweeters
Nowadays, high and low-pass crossovers are often included in automotive amplifiers as an optional feature.
The manufacturer’s specification page or the box usually provides information about the tweeter crossover frequency specifications.
Also, for the best results, use a high-pass amp crossover with the same or a lower crossover frequency. You can utilize those amp crossovers when installing tweeters that have built-in crossovers through the following:
Utilizing Both the Amp and Tweeter Crossovers
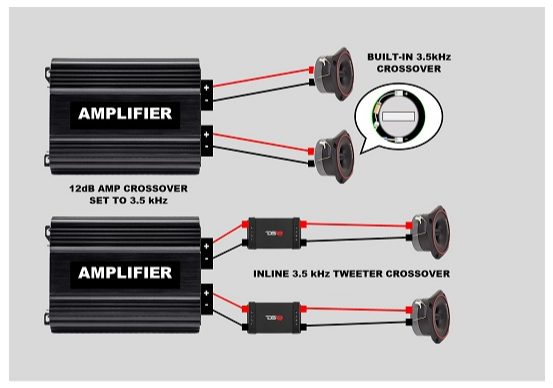
To improve the poor performance of cheap built-in 6dB tweeter crossovers, you can employ your car tweeters with an amplifier’s 12dB high-pass crossover.
It also functions for inline tweeter crossovers. Set the amp’s frequency to match it to the tweeter. For example, if your tweeter has built-in 3.5kHz, 6dB/octave crossover, set your amp’s 12dB/octave high-pass crossover to 3.5kHz.
As a result, more bass may be blocked, allowing the tweeters to be driven more powerfully and loudly while experiencing less distortion.
Replacing Tweeter Crossovers with the Amp Crossovers
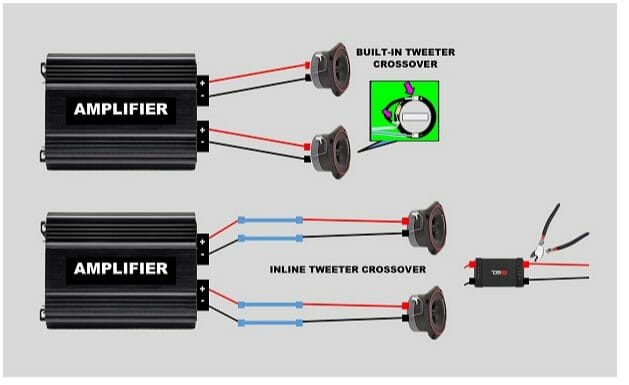
You may entirely ignore the tweeter’s inexpensive crossover by using the amp’s built-in high pass crossover.
Cut or disconnect the crossover wiring for inline tweeter crossovers, then join the wires together. Then, for tweeters with built-in crossover at its rear, solder jumper wire around the tweeter’s capacitor to bypass it.
After that, set the high-pass crossover frequency of the amp’s crossover to the same value as that of the original crossovers.
Connecting Tweeter Speaker Wires Like a Pro
I advise utilizing higher-quality connectors whenever possible for optimum installation quality.
There are just a few steps required:
Step 1: Strip the speaker wire and prepare it for the connector.
Step 2: Place the wire firmly into the (appropriate size) crimp connector.
Step 3: Use a crimp tool to securely and correctly crimp the wire to create a permanent connection.
Stripping Speaker Wires
You can use numerous tools to strip speaker wire. I advise using a crimp tool which is a cost-effective instrument. (1)
Mostly, these can strip and cut wire in addition to crimping connectors. The technique is to pinch the wire’s insulation, not the individual wire strands. If you squeeze a stripper too firmly and snag the wire inside, you’ll probably break the wire and have to start over. It can be tricky at first and requires some experience.
After a few tries, you’ll be able to strip the speaker wire without too much difficulty.
To cut speaker wire for the tweeter, follow these steps:
Step 1: Place the wire into the stripper and carefully snap the insulation shut. Use enough pressure to keep the wire in place and gently compress the insulation, but avoid applying pressure on the inside wire.
Step 2: Hold the tool firmly and apply pressure to prevent movement.
Step 3: Retract the wire. The exposed wire should be left in place if the insulation breaks off.
Some wire types can be harder to strip without breaking, especially smaller gauges like 20AWG, 24AWG, etc.
Practice on some extra wire, so you don’t waste what you need for tweeter installation on your first few attempts. I advise removing the wire just enough to reveal between 3/8″ and 1/2″ bare wire. Crimp connectors should be compatible with 3/8″ or greater. Avoid leaving too much length since, once installed, it can stick out of the connector.
Using Crimp Connectors to Connect Wires Permanently
To correctly crimp the speaker wire, follow these steps:
Step 1: Remove the wire, leaving 3/8″ to 1/2″ of bare wire exposed.
Step 2: To ensure that the wire can be correctly inserted into the connector, tightly twist it.
Step 3: Firmly press the wire into one end to engage the metal contact inside. Make sure to insert it fully.
Step 4: Near the end of the connector, insert the connector into the crimp tool in the proper position.
Step 5: To leave an impression on the connector’s exterior, crimp firmly using the tool. The internal metal connector needs to curve inward and firmly grasp the wire.
Step 6: You should do the same with the speaker wire and the opposite side.
Tip: After finishing, pull lightly on the wire while holding the connector. The wire should be able to escape. You need to redo it if it does since you crimped it incorrectly.
Essential Tips on Wiring Tweeters to an Amp
When wiring tweeters to an amplifier, it’s best to keep the following in mind:
- Before the wiring process, turn off the primary power source and ensure no wires or components of the circuitry are touching one another to avoid certain risks, such as short-circuiting. Then, turn off your car’s ignition and put on protective equipment to stay safe if corrosive chemicals are spilled. After that, you must unplug the negative line from your car’s battery to turn off the power. (2)
- You’ll need around the same (or a higher) RMS power rating for your tweeters to drive them at maximum volume. It’s okay if your amplifier has even more power than is required because it will not be used. Also, over-driving the tweeters might permanently damage them by burning out the voice coils. Moreover, although utilizing an amp with at least 50W RMS/channel is optimal, I recommend at least roughly 30W of power only. An amp with low power usually is not worth bothering with because car stereos only have about 15–18W per channel, which isn’t very much.
- You should install at least two tweeters to achieve good surround sound. Most people are fine with two tweeters, but if you want your car’s audio to originate from several different places in your vehicle, you may decide to install more.
Take a look at some of our related articles below.
- How to wire tweeters without crossover
- How to wire component speakers to 4 channel amp
- What is the 12v accessory wire on a car stereo
References
(1) cost-effective – https://www.sciencedirect.com/topics/social-sciences/cost-effectiveness
(2) chemicals – https://www.thoughtco.com/what-is-a-chemical-604316
Video Reference