8 min read
How to Wire Boat Lights to a Switch (6-Step Guide)
By the end of this guide, you should know how to wire boat lights to a switch quickly and easily.
A general light switch on your boat will not allow you to turn the navigational lights off/on conveniently. You need another switch that will help you to operate the lights accordingly – a toggle switch is the best choice. I have installed and fixed many boat light issues, and if you are a fisherman or a boat owner who wants to sail at night; this guide will make sure you are safe.
In general, to wire navigational boat lights to a toggle switch.
- First, use a drill to make a hole on the dash and then install the toggle switch on the dashboard.
- Connect the positive wire to the longer prong on the switch.
- Bridge the ground and the shorter prong on the toggle switch with a green wire.
- Wire the in-line fuse holder to the boat lights and then connect the positive wire to the power supply.
- Install the fuse in the fuse holder
Read the following sections for more details.
Tools and Materials Required
- Drill
- Toggle switch
- Red cable
- Green cable
- Fuse
- In-line fuse holder
- Liquid vinyl – electrical sealant
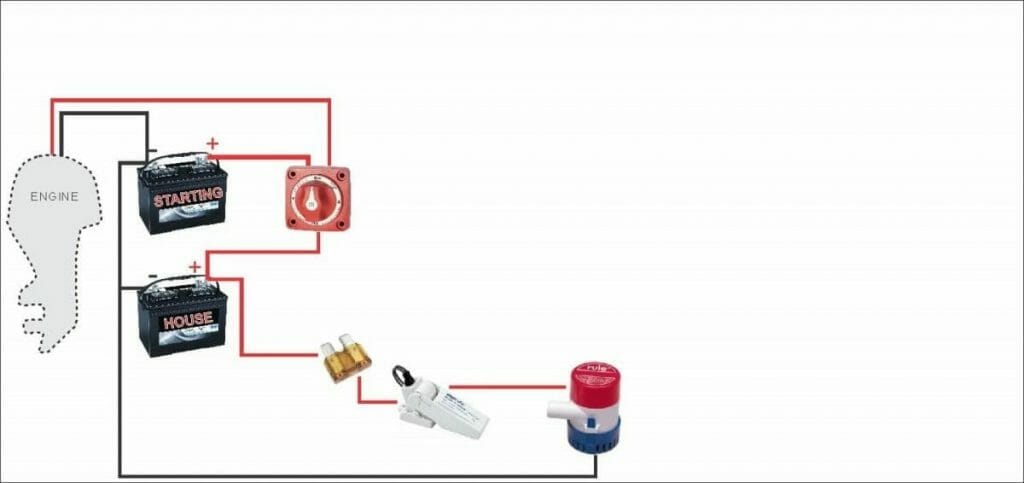
Wiring Diagram
Step 1: Drill a Hole to Mount the Toggle Switch
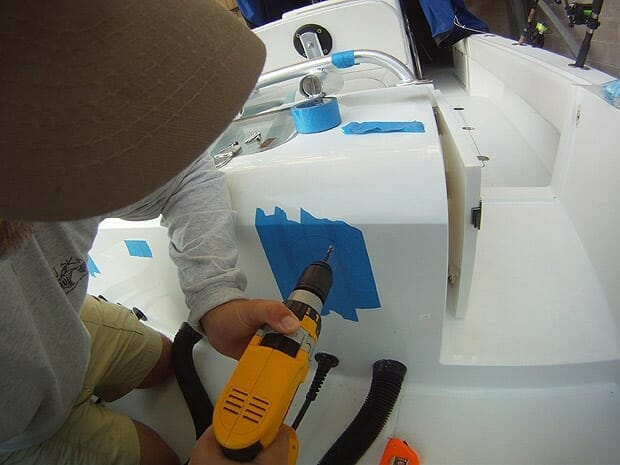
Drill a nice hole in the dashboard to install the toggle switch. To avoid collateral damage, ensure you know what lies behind the dash. Proceed carefully.
Step 2: Mount the Toggle Switch on The Dash
Before you install the toggle switch in the dash, turn it counterclockwise. Unscrew it to get rid of the mounting ring on the threaded collar.
Then, insert the toggle switch in the opening you drilled in the dash. Screw back the mounting ring on the threaded collar of the toggle switch.
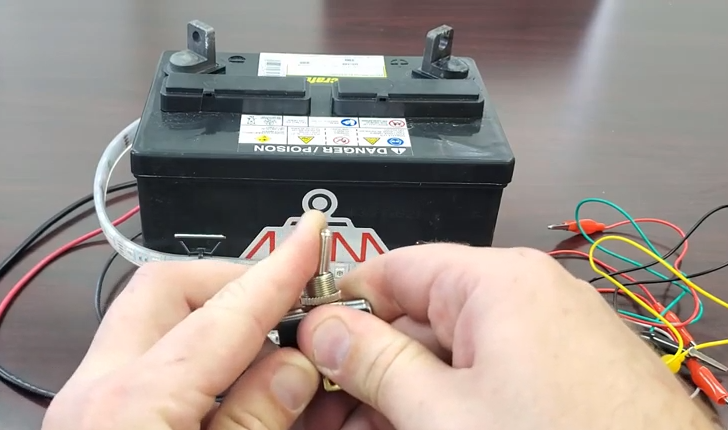
Step 3: Connect the Wires – Green and Red Wire
I recommend stripping about one inch of the insulation coating of the wires before twisting them.
That guarantees a proper connection. Then, use wire nuts to encapsulate the twisted terminals for safety. Otherwise, the cables may touch other critical elements in the boat and cause issues. You may use duct tape to cover the spliced ends if you cannot find wire nuts. (1)
Now, attach the positive cable to the longer prong on the toggle switch. Then, bridge the common ground bus and the shorter prong (on the toggle switch) with the green cable.
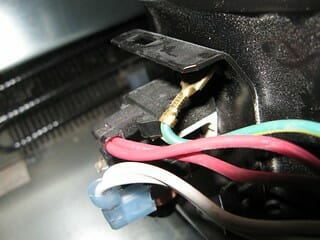
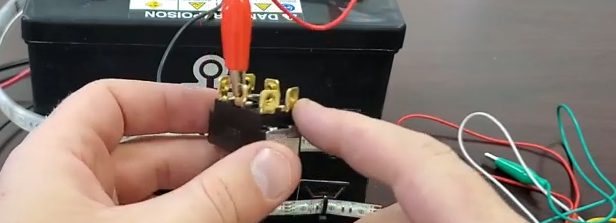
Step 4: Connect the In-Line Fuse Holder to The Lights
To the middle post of your toggle switch, connect one wire of the in-line fuse holder. Then, attach the wire coming from the lights to the remaining cables on the in-line fuse holder.
Step 5: Connect the Positive Wire to The Power Supply
You can now attach the red/positive wire to the circuit breaker panel in the boat.
To do that, use a screwdriver to open the circuit breaker. Then, slide the bare terminal of the red or hot wire between the plates below the breaker screw. Next, screw the hot wire by tightening the two plates.
Step 6: Connect the Fuse
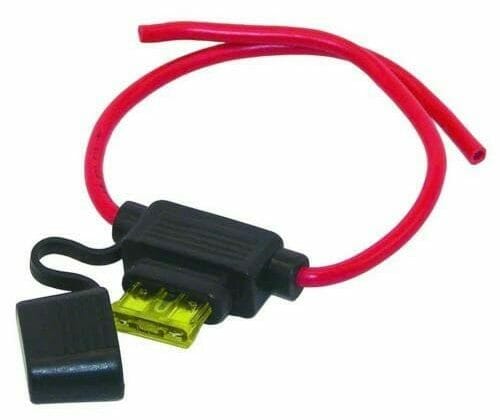
Gently, open the in-line fuse holder and place the fuse. Close the fuse holder. (use a compatible fuse.)
The fuse should have the correct amperage and size. Otherwise, the fuse will not blow as required. Your circuit and lights may get fried in the event of an electrical fault. Fetch the fuse with the correct amps from a shop – it will depend on the nature of your boat.
Warnings
Wiring boat lights involves the handling of electrical wires and other components. So, always proceed carefully to avoid injuries or damage to the boat.
You need to protect your eyes and hands. Have on your safety goggles and gloves (made of insulated fabric). That way, you cannot incur eye injuries from any possible cause or electrical shock (insulated gloves will protect your hands). (2)
Tips
Before you insert the fuse:
Seal the connections to the toggle switch and the connection between the fuse holder and the light cables with a liquid vinyl electrical sealant.
Regulatory Compliance
Ensuring your boat’s lighting is in compliance with maritime regulations is crucial for the safety of yourself, your passengers, and other vessels on the water. Here are some key points to consider based on your outlined topics:
- Understanding Local and International Regulations:
- International regulations on maritime lighting are governed by the International Maritime Organization (IMO) through the Collision Regulations (COLREGs) which specify the lighting requirements for vessels1.
- In the United States, the U.S. Coast Guard sets out regulations in their Navigation Rules. Powerboats under 12 meters in length, for example, are required to have separate or combined red and green sidelights covering 112.5 degrees and visible for 1 nautical mile, among other specifications2.
- Visibility and Color Standards:
- Proper Placement:
- Lights must be placed correctly on your vessel, such as masthead lights being above the sidelights to ensure they are visible from all required angles5.
- Special Light Requirements:
- Trawlers, dredgers, and vessels at anchor have specific lighting configurations. For instance, vessels engaged in trawling should exhibit two all-round lights in a vertical line, the upper being green and the lower white6.
- Meeting Intensity and Quality Standards:
- Lights need to be bright enough to be seen from a minimum distance away, and this is often specified in terms of luminous intensity, generally measured in candelas7.
- Maintenance and Functionality:
- Regular checks are necessary to ensure that lights are functioning correctly and are not obscured by any part of the boat or its cargo. Compliance isn’t just about the initial installation but about maintaining the lights properly89.
- Updating Charts and Manuals:
- Keeping updated nautical charts and copies of lighting regulations on board is crucial. Mariners must apply critical corrections to their paper nautical charts to keep them up to date10.
- Lighting During Restricted Visibility:
- You are required to display the appropriate lights at night or during times of reduced visibility, ensuring the type and heading of another boat is visible7.
- Document Compliance:
FAQ Section
Can I Wire My Boat Lights Directly to the Battery?
It’s generally not recommended to wire lights directly to a battery because doing so would mean they’re always powered, posing a risk of draining the battery. Instead, connect them through a switch and fuse for safety and control.
What Size Fuse Should I Use for My Boat Lights?
The size of the fuse depends on the power draw of your lights and the wire gauge. Check the light manufacturer’s specifications for the correct amperage and use a fuse slightly higher than the operating current.
Is It Necessary to Use a Toggle Switch for Boat Lights?
Using a toggle switch allows for easier control of your boat lights, enabling you to turn them on and off as needed. It’s a simple and effective way to manage your lighting system on a boat.
Can I Use Any Type of Wire for Boat Lighting?
It’s important to use marine-grade wire that’s designed to withstand the harsh marine environment. The wire should be tinned, stranded, and have appropriate insulation.
What Should I Do If My Boat Lights Don’t Work After Installation?
First, check all connections to ensure they’re secure and not corroded. Then, test the fuse and the power source. If these are functioning, use a multimeter to check for continuity and identify where the fault might be.
How Can I Ensure My Wiring Is Protected Against the Marine Environment?
Use a liquid vinyl electrical sealant to encapsulate connections, and make sure all wiring is run through conduits or clamped down to prevent chafing. Connections should be made with marine-grade materials to resist corrosion.
Do I Need to Disconnect the Battery When Wiring Boat Lights?
Yes, for safety reasons, always disconnect the battery before starting any electrical work on your boat to prevent shocks and shorts.
How Can I Test the Toggle Switch Before Finalizing the Installation?
You can use a multimeter to test the toggle switch. Set the multimeter to the continuity setting and place the probes on the switch terminals. The multimeter should show continuity when the switch is on and no continuity when it’s off.
References
(1) boat – https://www.britannica.com/technology/boa
(2) insulated fabric – https://www.ehow.com/info_7799118_fabrics-materials-provide-insulation.html
Video Reference