9 min read
How to Wire a Train Horn (9 Easy Steps)
You don’t have to be a train driver or passenger to enjoy the sound of a train horn, as you can install one in your truck, too.
Let’s not forget that it can also function very well with a loud and clear sound that can be heard more than 200 feet away. So continue reading if you’re eager to wire a train horn.
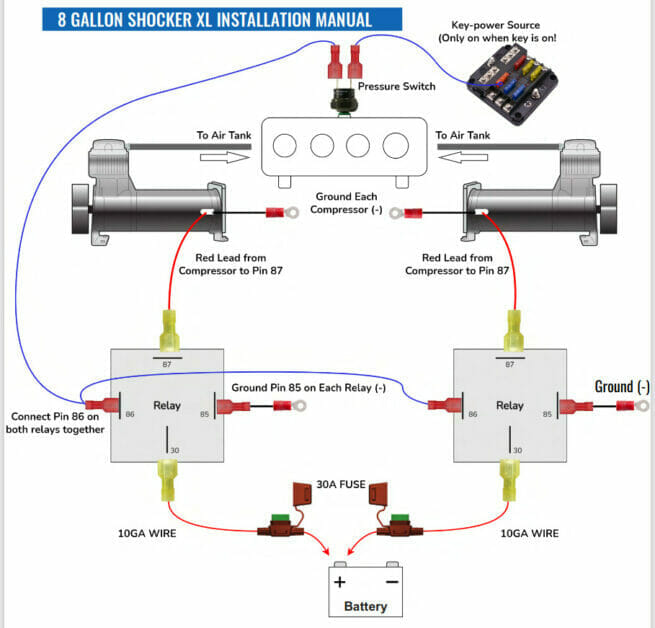
Quick Summary: To wire a train horn on a truck, follow the wiring diagram included in your kit. Generally, you connect the red lead from the compressor to Pin 87 on the relay, the wire from the pressure switch to Pin 86, Pin 30 to the battery’s positive terminal via a solenoid relay, and ground Pin 85. Use 18-gauge wiring, and optionally connect a fuse to the wire on the battery.
I’ve included a wiring diagram as an example.
Wiring Diagram
We will follow the wiring diagram below provided with a specific train horn kit.
It shows a double set of relays, air compressors, air tanks, and horns, but you could equally install just one. See Step 5 for the wiring details.
However, if it differs, you must follow the wiring diagram provided in your kit.
Important Considerations
Regulations
Before you go out and buy a train horn for your vehicle, make sure it’s permitted in your state.
Check your local regulations if they forbid you from using train horns in other vehicles. If there’s only a noise or loudness limit, get a train horn that emits sound within it, and I’ll guide you on the rest of the installation and wiring processes.
Operational Mechanism
You don’t have to worry about this too much, but as a train horn operates differently from a regular factory horn, you must make special accommodations for it.
Unlike a factory horn, which works on the principle of a vibrating metal diaphragm powered by electricity, a train horn is powered with air from an air compressor. It also has a diaphragm that vibrates, but it may be plastic.
A train horn produces a louder sound because the whole horn vibrates, not just the diaphragm.
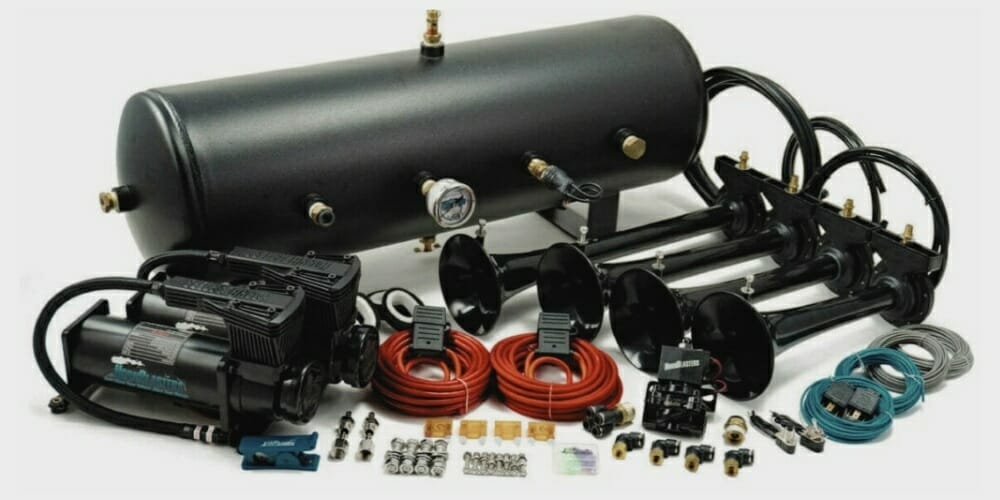
So, to install a train horn, you have to accommodate the following parts in your vehicle:
- The train horn
- The train horn button
- An air tank
- An air compressor
- Additionally, you will need brass fittings and wires.
A Suitable Spot for the Train Horn
Firstly, choose a suitable spot to position the train horn.
You will have more options with the small train horn, but if it’s large, it’s usually mounted on the truck’s floor, near the spare tire, on the grill, or inside the engine compartment.
Space on the Dashboard
Choosing a suitable spot on the dashboard for the train horn’s button would be best.
We will secure the train horn with bolts on the dashboard. Choose a spot you can reach easily.
Air Leaks
We must try to avoid air leaks while installing a train horn. I will show you how within the steps.
Efficiency
Minimize the distance between the air compressor and the power supply to maximize efficiency.
Wiring
I recommend you use an 18-gauge wire for all the wiring.
Installing and Wiring a Train Horn
I will guide you through the installation process, but the focus here is on the wiring part.
Step 1: Attach the Train Horn
Place the train horn in your desired spot. Drill holes as necessary and secure the horn with bolts. You don’t want it to fall off while driving.
Step 2: Attach the Train Horn Button
Attach the train horn button to your desired dashboard or steering wheel spot. Drill a hole if necessary and secure it firmly.
Step 3: Attach the Air Compressor
Attach the air compressor in either an upright or horizontal position.
Place it close to the power supply (see the efficiency consideration above) in a spot exposed to good airflow. It should never be placed upside down.
Step 4: Attach the Air Tank
Attach the air tank using its mounting hardware.
Secure it in a place away from windows and high-traffic areas. It should also be far from the air compressor, so keep the line long for good sound.
Allow enough room for the tubes as well.
Step 4: Disconnect the Battery
Disconnecting the truck’s battery is essential before wiring.
Step 5: Wire the Air Compressor
We will wire the air compressor first.
Follow its wiring diagram to connect it to the power supply. You also need to connect it to the air tank and the relay and ensure it is well-grounded.
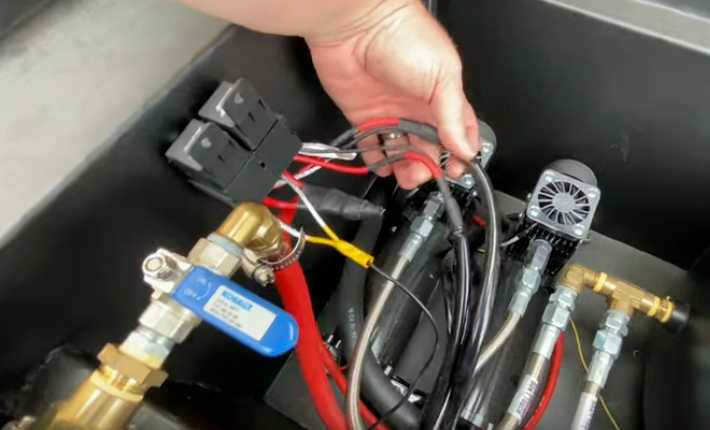
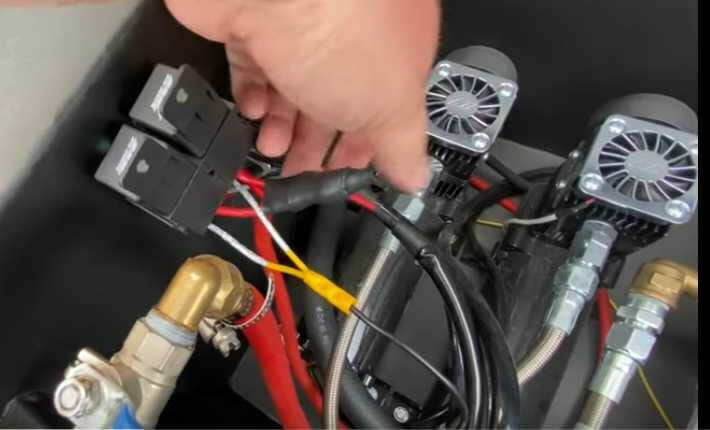
Connect the red lead from the compressor to Pin 87 on the relay. The picture below shows a pair of wires from the relay (Pin 87) that connect to the compressor.
Step 6: Connect the Air Compressor to the Air Tank
Connect the air compressor to the air tank in this step.
While connecting the two, ensure the pressure switch is connected securely.
Step 7: Connect the Air Tank to the Air Valve
Connect the air tank to the air valve in this step.
Step 8: Connect the Air Valve to the Horn
Connect the air valve to the train horn in this step.
Step 9: Wire the Relay
Wire the relay as follows:
- Pin 85 must be grounded.
- The pressure switch on the air tank connects to Pin 86. You can connect it to the same Pin 86 from another relay if arranging a two-horn setup.
- The read lead from the compressor connects to Pin 87.
- Connect the wire from the battery’s positive terminal (via the solenoid valve) to Pin 30.
The picture below shows the two wires from the relay (Pin 86) that connect to the pressure switch.
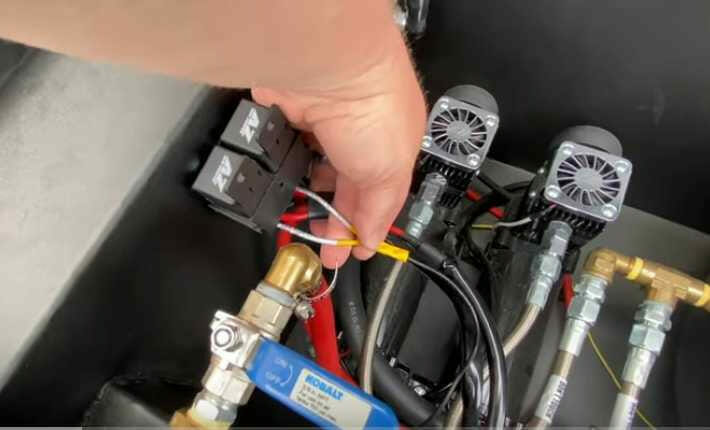
The picture below shows the two wires from the relay (Pin 86) that connect to the pressure switch.
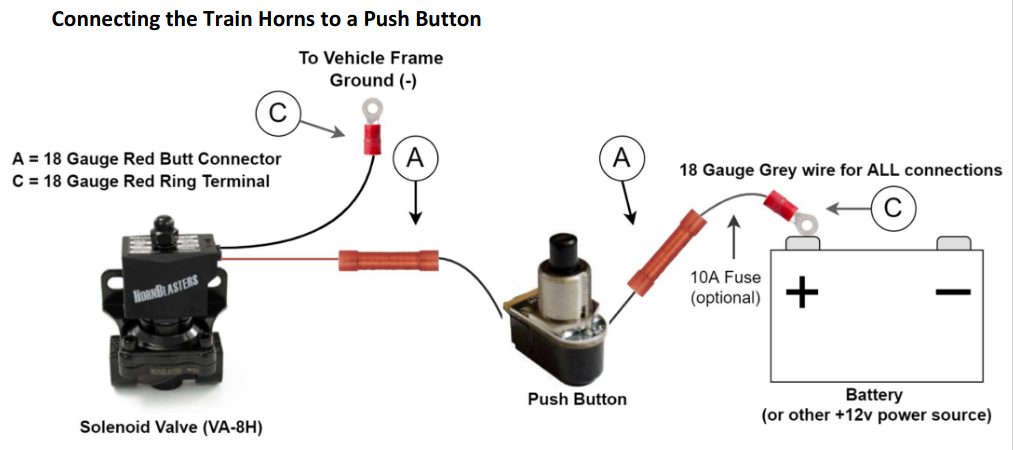
Step 10: Connect the Switch to the Battery and Horns
Finally, we will connect the train horn’s switch to the vehicle’s battery and the train horn.
Connect the push button between the battery’s positive terminal and the solenoid valve, as shown. Optionally include a 10A fuse in the leg that goes to the battery. The points marked A in the diagram are 18-gauge butt connectors, and C are ring terminals.
Final Checks
Here are some additional checks and other things to do after the wiring is done:
- Check all wire connections to ensure they are free of any weak spots.
- Use electrical or Teflon tape over all wire connections to ensure good sealing.
- Ensure all brass fittings are also secure.
- Ensure there are no air leaks anywhere.
Testing and Troubleshooting
Test the horn after covering all the above steps, including the additional final checks.
If nothing happens when you press the horn, here are some more things to ensure:
- Check the power supply wires are connected properly.
- Check the horn fuse.
- Ensure the air tank is pressurized. The ideal pressure is 150 PSI.
- Recheck all the wiring.
RELATED Horn Relay Diagram
Troubleshooting Your Train Horn Setup: My Tips
Hey there, folks! So, you’ve followed the steps to get that awesome train horn sound for your truck, but maybe you’ve hit a bump on the track? Not to worry! Let’s nail down some common hiccups and how to get that horn tooting in no time.
1. Horn Doesn’t Sound Off:
- Battery Check: Before you dive in, make sure your truck’s battery is fully charged and operational.
- Fuse Inspection: Sometimes, it’s as simple as a blown fuse. Check the horn fuse and replace it if needed.
- Connection Confirmation: Go back and double-check all those connections. Make sure everything’s tight and right.
2. Horn Sounds Weak or Different:
- Air Pressure: A train horn needs good pressure to give its full sound. Ensure the air tank is pressurized correctly, aiming for that 150 PSI.
- Leak Detection: Listen closely. If you hear a hissing sound, you might have an air leak. Check all hose connections and tighten them where necessary.
3. Air Compressor Issues:
- Overheating: If that compressor’s too hot, it might not function correctly. Make sure it’s located somewhere with good airflow.
- Grounding: Confirm the compressor is well-grounded. Poor ground can cause a world of issues.
4. Horn Button Doesn’t Respond:
- Connection Recheck: Sometimes it’s as easy as a loose connection. Ensure the horn button is wired correctly to both the battery and the solenoid valve.
- Switch Testing: Test the button for any faults. You might need a simple replacement.
5. Strange Noises from the Compressor:
- Mounting Check: Ensure the compressor is mounted securely. If it’s rattling around, it might make some funky noises.
- Intake Filter: If your compressor is struggling, check the intake filter. It might be clogged and need a good cleaning or replacement.
6. Air Tank Issues:
- Pressure Relief: If the pressure relief valve keeps going off, you might be overfilling the tank. Stick to that 150 PSI limit.
- Drainage: Moisture can accumulate in the tank. Drain the tank regularly to avoid any complications.
Remember, friends, always turn off and disconnect your battery when working on any electrical components of your truck. Safety first!
And hey, if you’ve tried all these tips and are still having trouble, there’s no shame in calling in a pro or reaching out for expert advice. Sometimes two heads (or horns) are better than one!
References
Train horn kit. https://hornblasters.com/products/conductors-special-844k-nightmare-edition-train-horn-kit
Video References:
The Horn King