13 min read
How to Wire a Dryer Plug (Steps 3 & 4 Wire Systems)
Wiring a dryer plug is not difficult but requires care, especially as there are 2 different schemes: a 3-wire and a 4-wire system.
A 3-wire system is more common on older dryers, whereas a 4-wire one is more common on newer dryers. Also, it’s not only the plug; you also have to wire at the terminal block and maybe the outlet and circuit breaker and reidentify the white wire.
Quick Summary:
To wire a 3-wire dryer (240V, no dedicated neutral):
Use a10-30 SRDT or 10-2 NM cable and connect:
- At the terminal block: Connect the two (black and red) hot wires to the end terminals on both sides and the white neutral wire to the middle one, leaving the ground strap in place.
- At the plug end: Connect the two hot wires to the brass terminals, the neutral wire to the silver one, and the ground wire to the ground terminal.
To wire a 4-wire dryer (240V, dedicated neutral):
Use a 14-30 ST or SRDT or 10-3 NM cable and connect:
- At the terminal block: Connect the two (black and red) hot wires to the end terminals on both sides and the white neutral wire to the middle one after removing the ground strap.
- At the plug end: Connect the hot wire to the brass terminal, the neutral wire to the silver one, and the ground wire to the ground terminal.
I’ve also briefly covered plug adapters, tips for safely installing dryers, and electrical troubleshooting.
Wiring a Dryer Getting Started
Automatic electric dryers connect to an electrical power source in one of three ways [Kleinert, 2013]:
- An electrical plug and cord that plugs into a 240-volt outlet
- Direct hardwiring to a circuit breaker or fuse panel
- Direct wiring to a fused electrical disconnect box with a built-in shut-off switch
This article covers the first method via a 3- and 4-wire power cord and plug.
Requirements & Materials
Power Cord: You will need a UL-approved, 30-amp power cord that is:
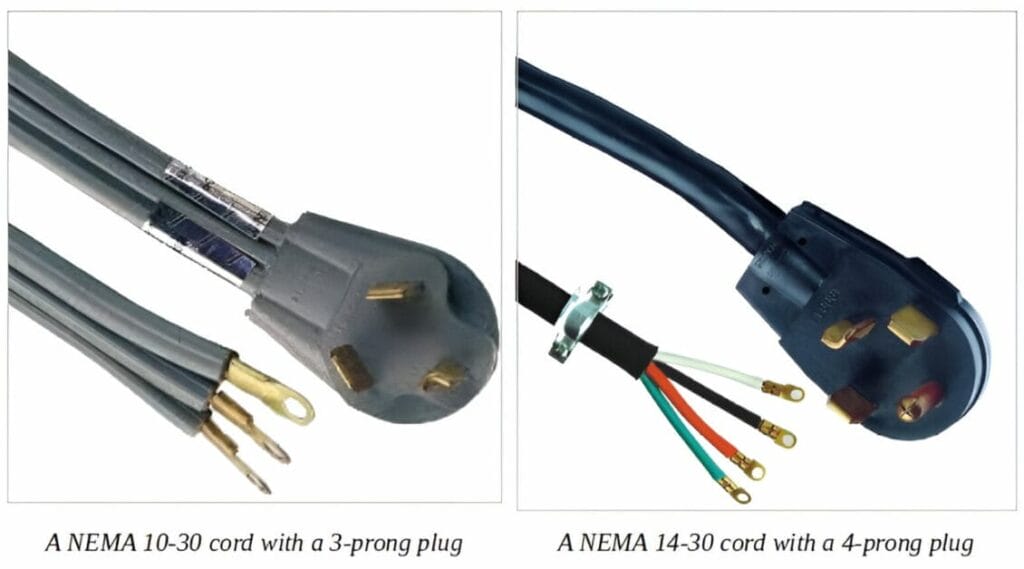
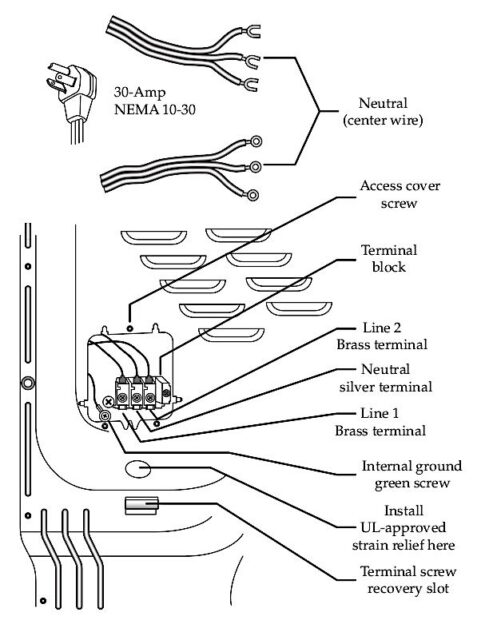
- For a 3-wire cord: NEMA 10-30 type SRDT or 10-2 NM (non-metallic) cable.
- For a 4-wire cord: NEMA 14-30 type ST, SRDT, or 10-3 NM cable.
The SRDT is an SRD cable with thermoplastic insulation and outer covering), with a strain relief on the dyer’s electrical terminal box.
The right cord is essential because it can handle the voltage and current and protect the dryer from electrical mishaps.
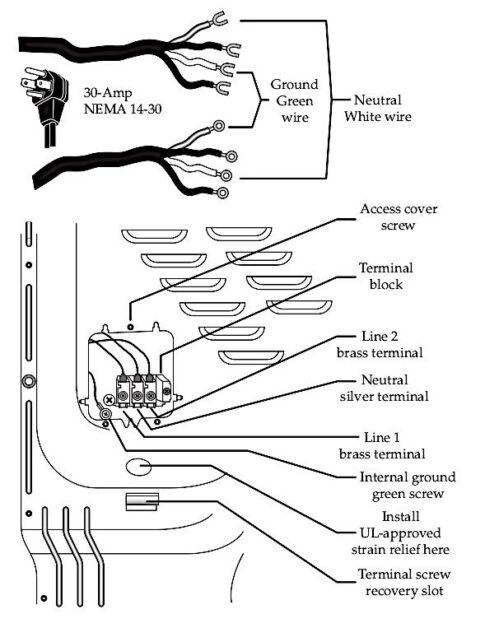
Plug: You will also need a 3- or 4-prong plug (according to the number of wires in the cord).
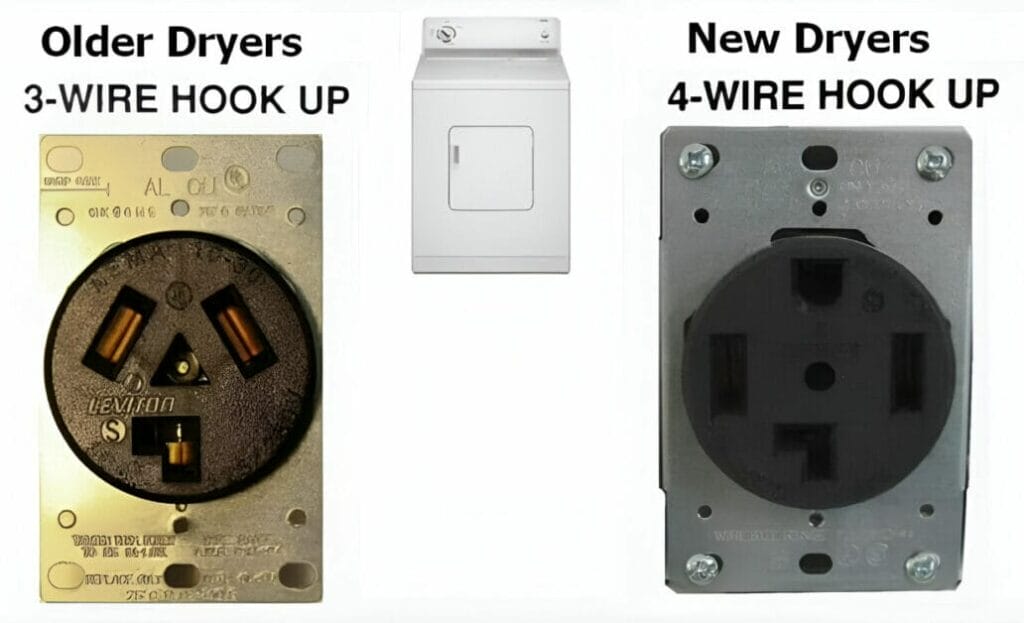
The power cord (with a plug on its end) must correspond to the dryer outlet you have or will install according to the type of dryer. Generally, older dryers use a 3-wire hook-up, whereas newer ones rely on a 4-wire cord, plug, and outlet, as shown in the image below.
Circuit Breaker: A double-pole, 30-amp circuit breaker
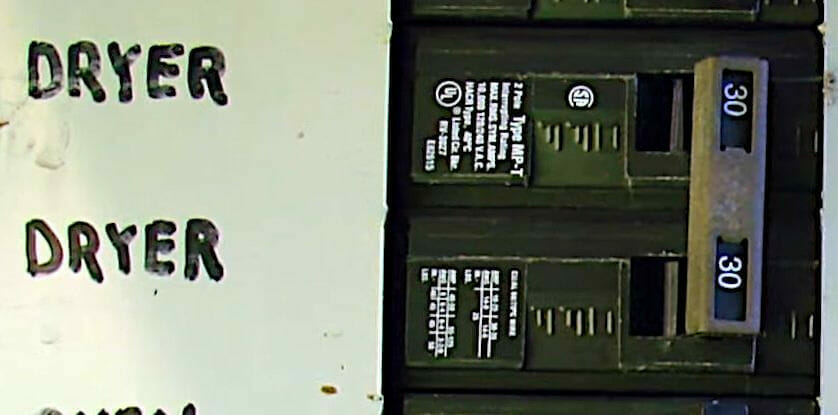
Installing a double-pole 30-amp circuit breaker in the service panel applies regardless of the method (3-wire or 4-wire). Open two adjacent knockouts for it.
Tools: You will require some or all of the following tools:
- wire cutter
- wire stripper
- nose pliers
- screwdriver
Materials: electrical tape
Instructions: The instructions given in this article apply generally to wiring an automatic electric dryer plug. Consult the manufacturer-provided instructions in the dryer owner’s manual.
Testing Equipment: Multimeter
Precautions
TURN OFF the circuit breaker in the service panel (if one is present already) or the main switch while installing a circuit breaker.
Wiring a Dryer Plug to a 3-Wire Power Cord
Terminal Block Connections
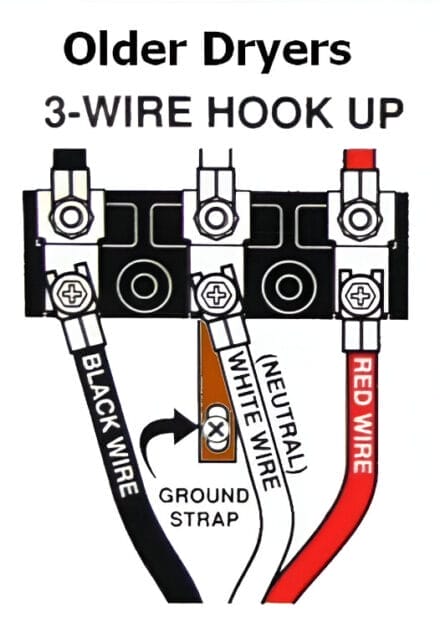
You will see 3 terminals in the terminal block on a dryer for a 3-wire hook-up, plus a ground strap.
Procedure for a 3-Wire Hook Up
Follow these steps for a 3-wire dryer cord hook-up on the terminal block:
- Step 1: Strip the Wires
- Strip about ¾ of an inch of the insulation from the ends of the wires. Form a hook on the ends or loop around the terminals, as appropriate.
- Step 2: Open the Terminal Block Cover
- Remove the access cover screw on the terminal block to remove the cover and get access to the terminals inside.
- Step 3: Connect the Hot Wires
- Connect the two hot wires, black and red (or black and white, reidentified as red), to the two end (brass) terminals on either side.
- Step 4: Connect the Ground Wire
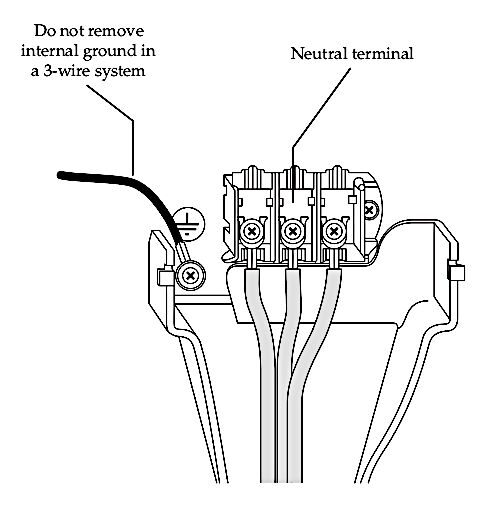
- Connect the white ‘neutral’ wire to the middle neutral (silver) terminal above the ground strap. It will function technically as the ground wire, as there is no dedicated neutral wire. The ground strap remains. The wire connections on the dryer’s terminal block should look like this:
Procedure for Wiring a 3-Prong Plug
Follow these steps to wire a 3-prong dryer plug:
- Step 1: Open the Plug
- Remove the screw on the plug to remove the cover and get access to the terminals inside.
- Step 2: Connect the Line Wires
- Connect the Line 1 and 2 wires to the 2 brass terminals on the terminal block.
- Step 3: Connect the Neutral Wire
- Connect the white neutral wire to the silver terminal on the terminal block.
- Step 4: Connect the Ground Wire
- Connect the ground wire to the internal ground green screw.
You must also install a UL-approved strain relief at the point indicated near the terminal block.
Power Cord
A 3-wire power cord and plug wired to a terminal block:
3-Wire Dryer Outlet
The wires on the back of the 3-wire dryer outlet should look something like this (no dedicated neutral wire):
The white wire above has been reidentified as a red, hot wire (to provide 240 volts in total). It should not be confused with a neutral. Also, it should be identified the same way in the main panel. To avoid confusion, use a cable with black and red wires for the hot connections.
Wiring a Dryer Plug to a 4-wire Power Cord
Terminal Block Connections
You will see 3 terminals in the terminal block on a dryer for a 4-wire hook-up, plus a ground terminal. The dedicated ground eliminates the possibility of an electrical shock.
Procedure for a 4-Wire Hook Up
Follow these steps for a 4-wire dryer cord hook-up on the terminal block:
- Step 1: Strip the Wires
- Strip about ¾ of an inch of the insulation from the ends of the wires. Form a hook on the ends or loop around the terminals, as appropriate.
- Step 2: Open the Terminal Block Cover
- Remove the access cover screw on the terminal block to remove the cover and get access to the terminals inside.
- Step 3: Connect the Hot Wires
- Connect the two hot wires, black and red (or black and white, reidentified as red), to the two end (brass) terminals on either side.
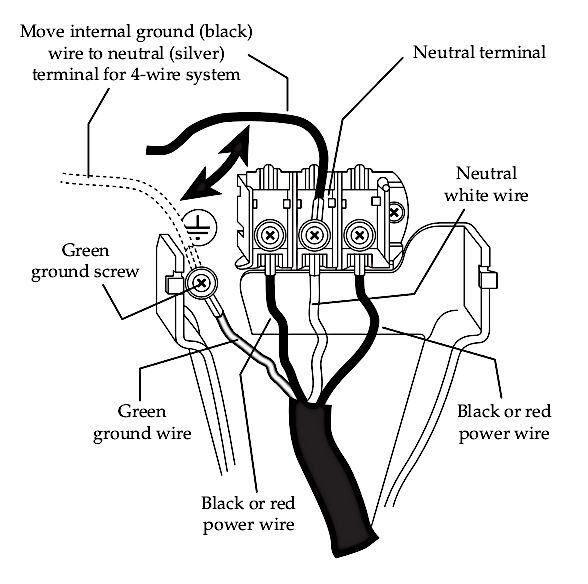
- Step 4: Connect the Neutral Wire
- The white dedicated neutral wire connects to the middle (silver) terminal above the ground strap. It will function as a neutral, dedicated to that, not as a ground wire (unlike the 3-wire hook-up).
- Step 5: Connect the Ground Wire
- Remove the ground strap and connect the green ground wire to the ground terminal with a green screw, usually under the neutral terminal (or to one side).
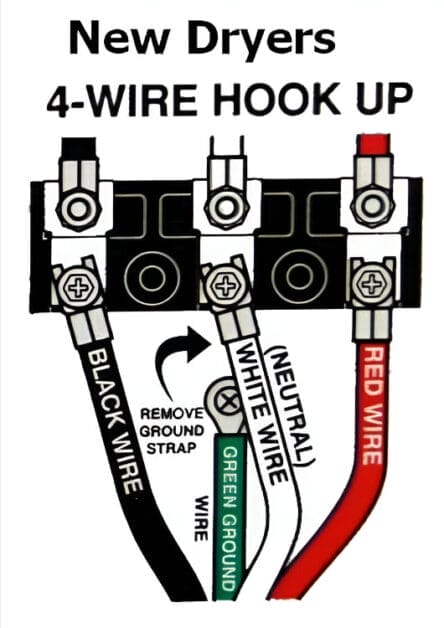
The wire connections on the dryer’s terminal block should look like this:
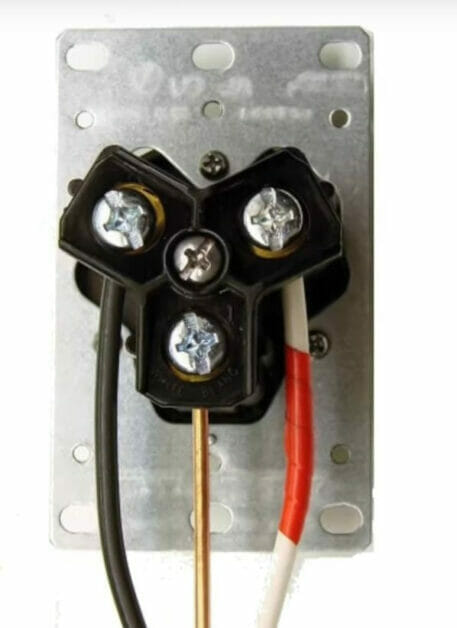
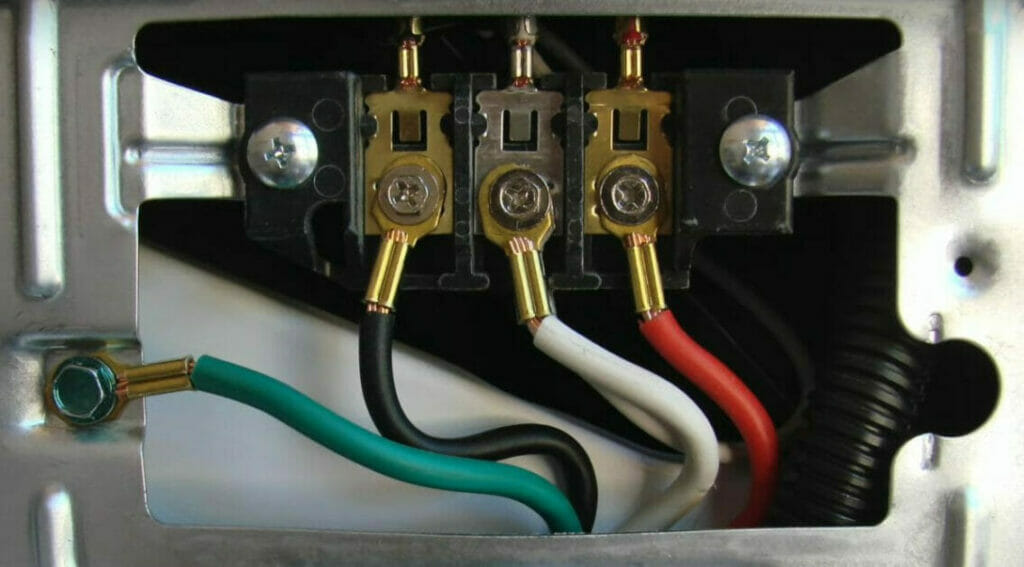
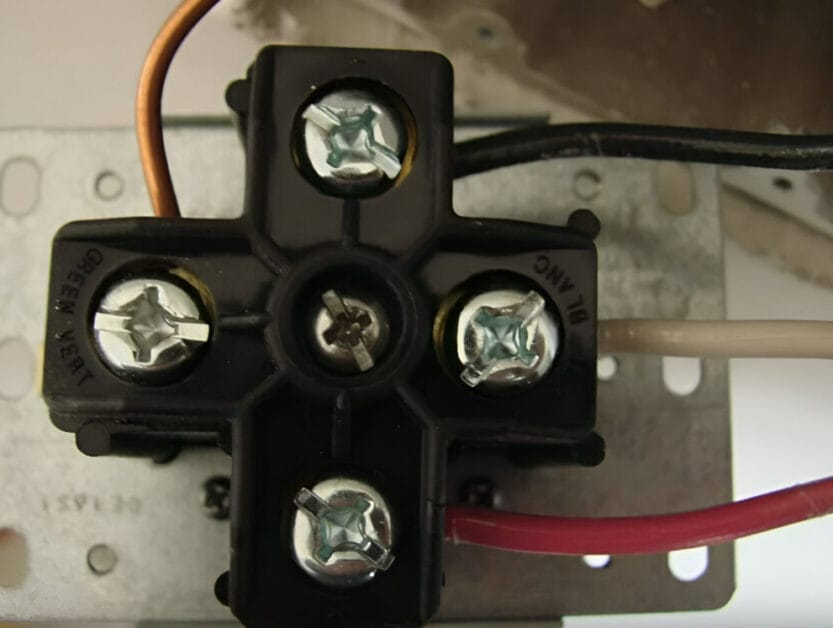
Here’s a view of the 4 wires connected to an actual dryer. You can tell:
- It’s a new dryer, as it relies on a 4-wire hook-up.
- It has a dedicated neutral wire because it’s separate from the ground (the white wire in the middle).
- It has a dedicated ground connection for the green wire, which is attached to a metal part of the dryer.
Procedure for Wiring a 4-Prong Plug
The procedure for wiring a 4-prong dryer plug is similar to a 3-prong one, except for the extra line wire to provide 240 volts. Follow these steps.
- Step 1: Open the Plug
- Remove the screw on the plug to remove the cover and get access to the terminals inside.
- Step 2: Connect the Line Wires
- Connect the Line 1 and 2 wires to the 2 brass terminals on the terminal block.
- Step 3: Connect the Neutral Wire
- Connect the white neutral wire to the silver terminal on the terminal block.
- Step 4: Connect the Ground Wire
- Connect the ground wire to the internal ground green screw.
You must also install a UL-approved strain relief at the point indicated near the terminal block.
Power Cord
4-Wire Dryer Outlet
The wires on the back of a 4-wire dryer outlet should look something like this:
There are 2 hot wires above (to provide a 240-volt supply), one in black and one in red. The white wire here is for the dedicated neutral connection and is not reidentified. It’s for the 4th prong on the outlet.
Plug Adapters
If you have an old or new dryer that uses a 3- or 4-wire cord and need to plug it into a 4- or 3-prong outlet, you don’t have to change your outlet or dryer.
For instance, you may have bought an older or newer dryer, relocated it near an outlet that requires a different number of prongs, or moved into an older or newer home. Whatever the reason, you can keep the existing outlet and dryer and use an adapter instead of converting one to the other system.
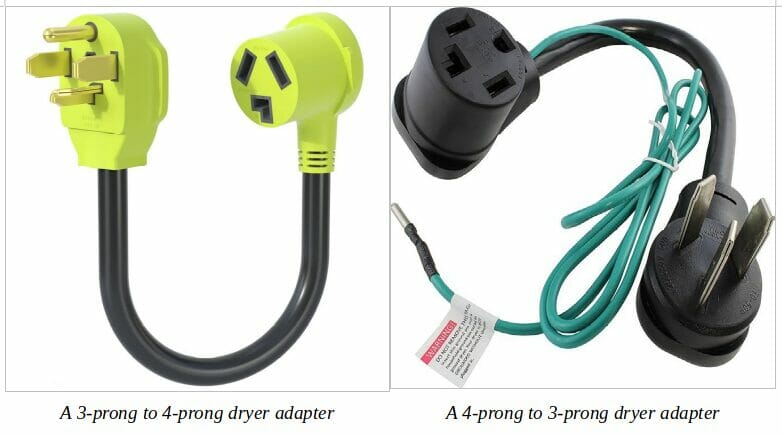
Adapters are available both ways, i.e., for a 3-prong to 4-prong plug or vice versa, like the ones below.
Dryer Location and Installation
When installing the electric dryer in a suitable location, consider the following to minimize the need to rewire the plug or change the cord:
Access: Give the dryer easy access to an existing electrical line or arrange a new one nearby.
Codes: Observe your local codes for electrical connections (plus plumbing and ventilation).
Fire risk: Minimize fire risk by not installing the dryer on a carpet or other hazardous floor.
Level: Install the dryer on a level and firm floor to minimize vibrations.
Spacing: Ensure adequate spacing around the dryer, especially if it’s close to a wall or inside a recessed area or closet. Check the manufacturer’s recommendations.
Ventilation: Ensure adequate ventilation in the room where you place the dryer. Give it an external exhaust if it’s a mobile home. Keep the duct length short and the number of elbows to a minimum.
Voltage: Ensure the power source provides sufficient voltage for the dryer, as per the manufacturer’s recommendations
Electrical Troubleshooting
No Power
If the dryer appears to have no power, check the following:
Continuity: The door switch, timer, and motor windings have continuity.
Error Code: If the dryer displays an error code, check what the code indicates in the operation manual.
Grounding: The dryer is properly grounded.
Plug Wiring: You wired the plug properly.
Switch: Test the ‘push to start’ switch to ensure the switch contacts operate normally.
Voltage: The dryer is getting the correct voltage from the power source. It should be close to 110-120 or 220-240 volts.
Wiring: There should be no loose contacts or broken wiring.
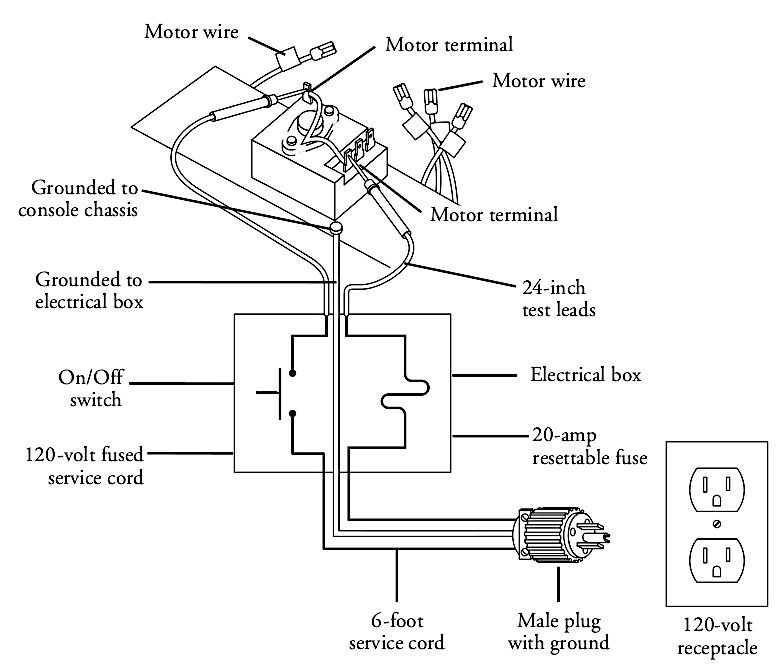
Internal Wiring
Internally, a dryer plug is typically connected, as shown in the diagram below. Consult it if you suspect the problem is internal. Ensure all the connections are good and secure.
References
Website Resources:
- A 3-prong to 4-prong dryer adapter. https://aoweitour.com/products/dryer-four-prong-to-three-prong-adapter
- A 4-prong to 3-prong dryer adapter. https://www.amazon.com/AC-WORKS-S10501430-018-3-Prong-Connector/dp/B07XKCFVJ3/
- A NEMA 10-30 cord with a 3-prong plug. https://www.cablesgo.com/product/dryer-cord-30-amp/
- A NEMA 14-30 cord with a 4-prong plug. https://www.cablesgo.com/product/dryer-cord-30-amp-nema-14-30p/
Books:
- Eric Kleinart. Troubleshooting and repairing major appliances. 3rd edition. McGraw-Hill Corporation
Video References:
Ask the Electrician