7 min read
How to Wire a Ceiling Fan with Light (4 Setups and Methods)
Wiring a ceiling fan with a built-in light fitting is similar to how you would wire an ordinary ceiling fan, but the extra wire and the possible need for a switch or two can get confusing.
With a wiring diagram and consideration of 4 different possibilities, this guide makes it easy.
Quick Summary: There’s an extra hot wire when wiring a ceiling fan with light. Generally, you still connect all the same wires, i.e., all the hot, neutral, and ground wires, including those from the power supply cable. However, if you need to add a switch, it will come in between either or both of the hot legs of the circuit.
I’ll show you how to do it for each scenario.
Requirements
The only special tools you will likely need are a screwdriver, a wire stripper, and pliers.
Besides the ceiling fan with light and cables, you might also need one or two switches, depending on the setup. Also, you will need a step ladder.
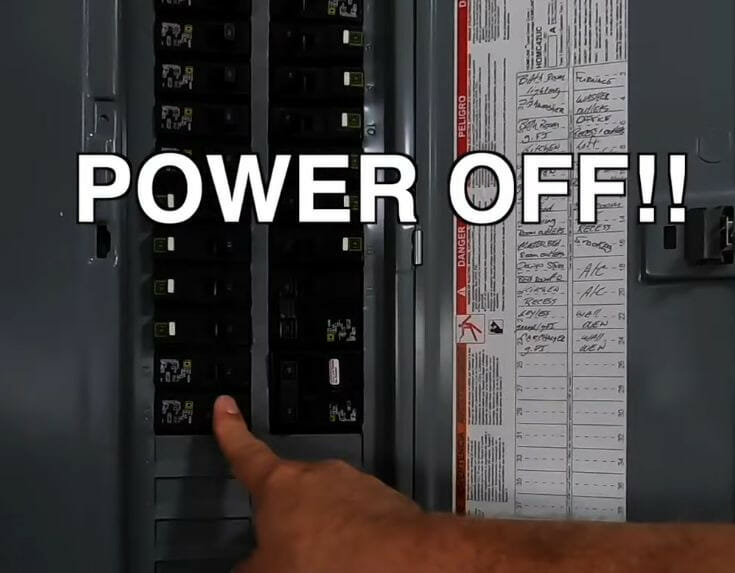
Remember to turn the power off at the circuit breaker before wiring the ceiling fan.
Wiring and Switching
Wiring Diagram
We will follow this wiring diagram in general with some modifications, depending on your scenario:
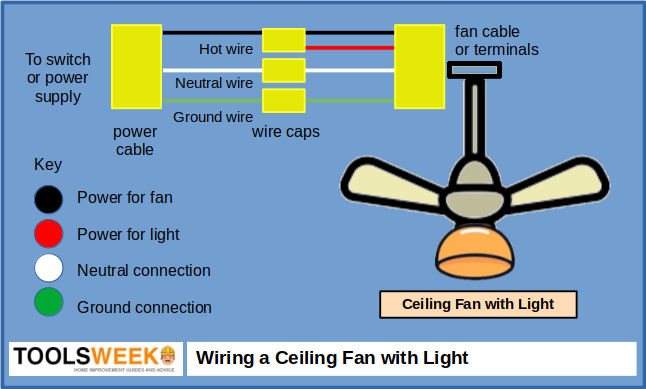
Note the following:
- The cable from the fan will have four wires; otherwise, the fan will have four terminals to connect the power supply wires. They are two hot terminals (one for the fan and one for the light), a neutral terminal, and a ground one. However, you might have a fan that combines the two hot terminals in a single one, in which case both will be powered on or off together.
- The power supply cable to the fan will have three wires. You will normally connect them to the fan indirectly via wire caps, although it may be possible to connect them directly.
- This diagram applies if you want a single switch to control the fan and light together. Some fans with lights have a pull chain for turning the light on or off. Otherwise, you will have to make a little change: Instead of terminating the red hot wire in the hot wire cap, take it to a second, separate light switch.
Switching Options
So, you have multiple options for switching power to the ceiling fan with light:
- The fan has two pull chains – In this case, you don’t need to wire to a separate switch.
- The fan has one pull chain – In this case, you only need to wire one of the hot (black or red) wires to a separate switch.
- The fan has no pull chain – You can either connect both hot wires to a single switch (so that both are controlled together) or connect each to a separate switch, which will require two 2 switches.
Apply one of the four methods below according to your setup and preference.
Wiring the Ceiling Fan with Light
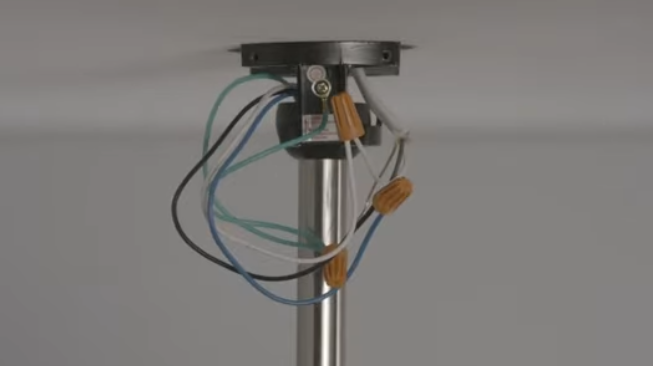
Wiring the Fan Directly (No Separate Switch)
Follow these five steps if wiring the fan directly without adding any switch:
- If there are two separate hot terminals, connect both hot wires from the fan to a wire cap and a 3rd short piece of black wire.
- Bring the power supply cable directly to the ceiling fan.
- Connect the power cable’s hot wire to the short black piece from Step 1 or directly to its hot terminal if there’s only one terminal.
- Connect the power cable’s neutral (white) wire to the fan’s neutral wire using a wire cap or its neutral terminal.
- Connect the power cable’s ground (green or bare copper) wire to the fan’s ground wire using a wire cap or its ground terminal.
The picture below shows the second hot (red) wire in blue.
Wiring with One Switch for Separate Control
Follow these steps if wiring with a single switch for either the fan or light:
- Bring the power supply cable to the ceiling fan.
- Connect the power cable’s hot wire with the fan’s hot wire using a wire cap for the part (fan or light) that doesn’t have a switch on the fan itself.
- Connect the fan’s other hot wire to the switch.
- Connect the power cable’s neutral (white) wire to the fan’s neutral wire using a wire cap or its neutral terminal.
- Connect the power cable’s ground (green or bare copper) wire to the fan’s ground wire using a wire cap or its ground terminal.
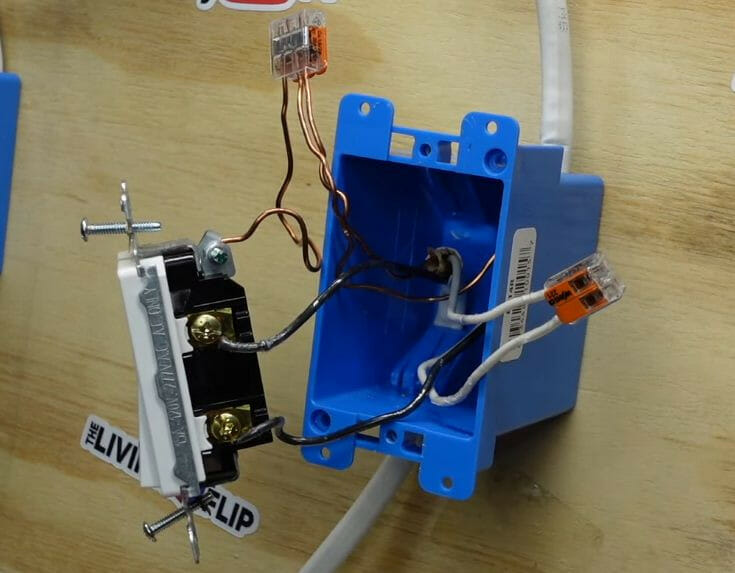
Wiring with One Switch for Combined Control
Follow these steps if wiring with a single switch for controlling both the fan and light together:
- Bring the power supply cable and the cable from the fan to the switch.
- Connect the fan cable’s two hot wires using a wire cap and a 3rd small piece to connect to the switch. And the fan’s hot wire to the switch’s other hot terminal.
- Connect the power cable’s hot wire and the small wire from Step 2 to the switch (its two hot terminals).
- Connect the power cable’s neutral (white) wire to the fan’s neutral wire using a wire cap at the switch. They should be capped together and bypass the switch so the neutral wire does NOT make any contact with it.
- Connect the power cable’s ground (green or bare copper) wire to the fan’s ground wire, along with a 3rd small piece to connect to the switch’s ground terminal.
The connections on the switch should look like the previous method (see the picture above), except for Step 3.
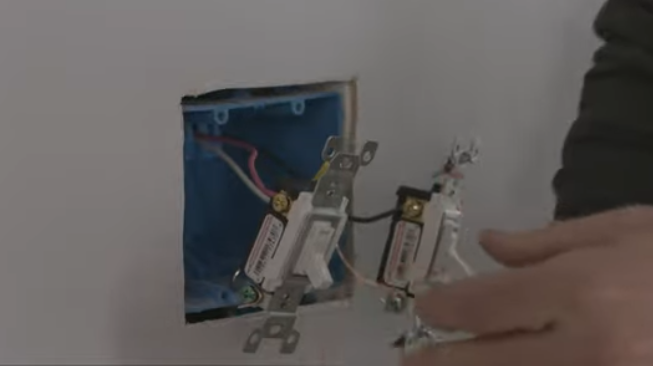
Wiring with Two Switches for Separate Control
Follow these steps if wiring with two switches for separate control of the fan and light:
- Bring the power supply cable and the cable from the fan to the switches.
- Connect the power cable’s hot wire and one of the fan’s hot wires to one of the switches.
- Connect the power cable’s hot wire and the fan’s other hot wire to the second switch.
- Connect the power cable’s neutral (white) wire to the fan’s neutral wire using a wire cap at the switch. They should be capped together and bypass the switch so the neutral wire does NOT make any contact with it.
- Connect the power cable’s ground (green or bare copper) wire to the fan’s ground wire, along with a 3rd small piece to connect to the switch’s ground terminal.
Only turn the power back on at the panel when you have finished all the wiring and attached all parts, i.e., the ceiling fan and switches, if any.
References
Video References:
HandyDadTV
The Home Depot