11 min read
How to Test a Stator with a Multimeter (7-Step Guide)
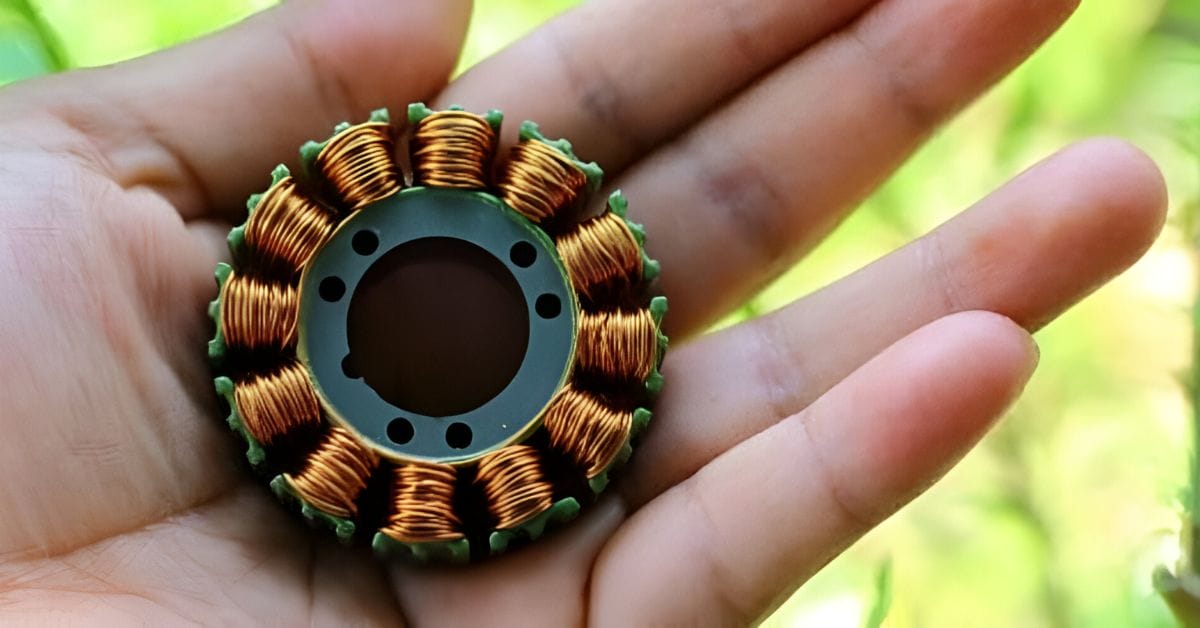
Hey everyone! If you’re into fixing bikes, you’ve probably faced the classic conundrum of figuring out whether your stator is doing its job.
Knowing how to test a stator with a multimeter is a skill worth having up your sleeve. Here’s how to do it:
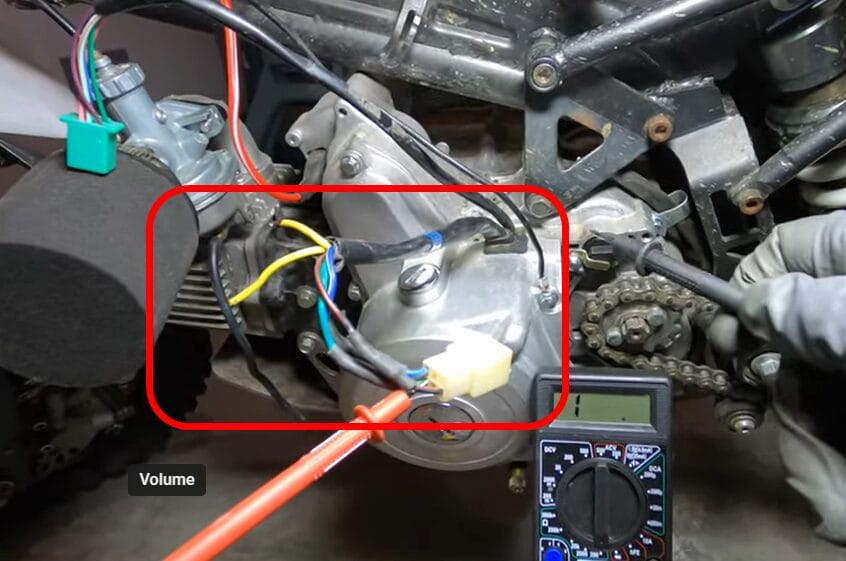
- Step 1: Start by carefully disconnecting the wiring harness from the stator – on a pit bike, you usually deal with three wires.
- Step 2: Set your multimeter to 200 ohms, which is key for checking electrical continuity.
- Step 3: Connect one multimeter wire to the stator’s green ground wire, then touch the other to a grounded metal part; a reading of around 0.6 indicates good continuity.
- Step 4: Switch your multimeter to the AC voltage setting, aiming for the 200 range, to prep for power output testing.
- Step 5: Place one multimeter lead on the stator’s red and black wire, grounding the other, ready for the next step.
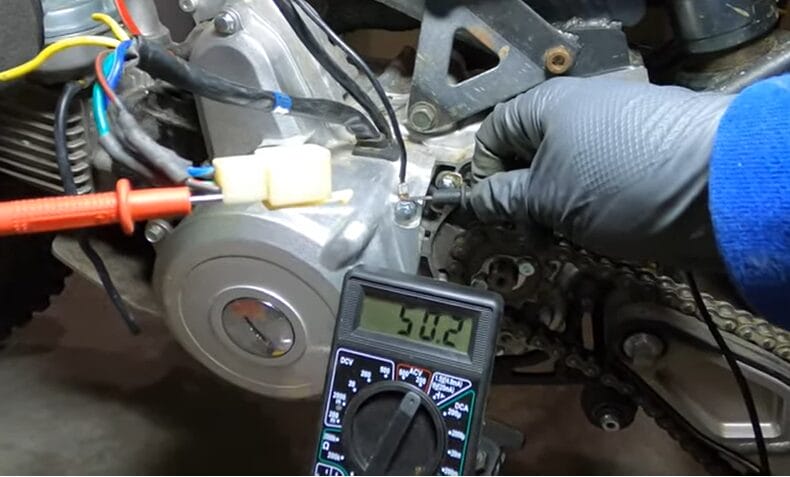
- Step 6: If your bike has an electric start, fire it up – a well-functioning stator should show about 50 volts.
- Step 7: Finally, test the blue wire similarly; no reading could signal an issue with the stator.
In this guide, we’ll dive into the nuts and bolts of stator testing. It’s a task that might sound complex, but trust me, it’s something you can handle. Let’s get started on this electrifying journey.
How to Test a Stator Using a Multimeter
We’re diving into how to test a stator using a multimeter. This is a crucial step, especially if you’re facing spark issues in your engine. So, let’s get started, and I’ll walk you through the process step-by-step.
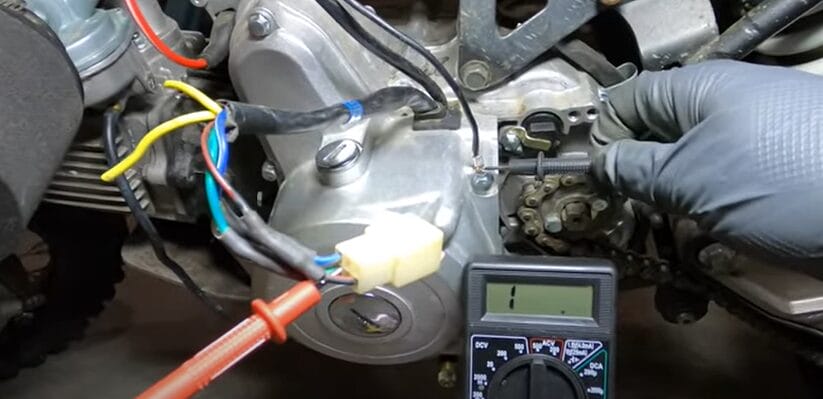
Step 1: Unplug the Wiring Harness
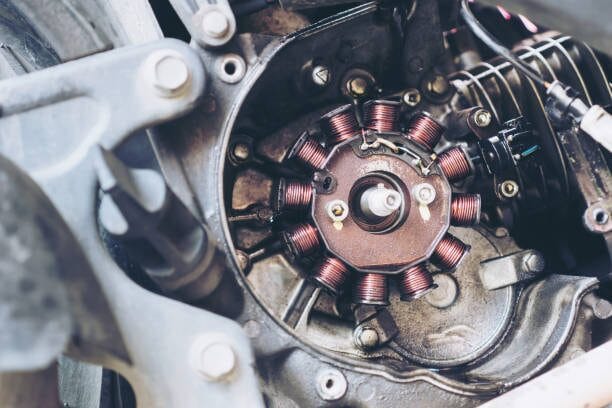
Locate and carefully unplug the wiring harness from the stator. You typically have three wires on a pit bike like a 110 cc electric start engine.
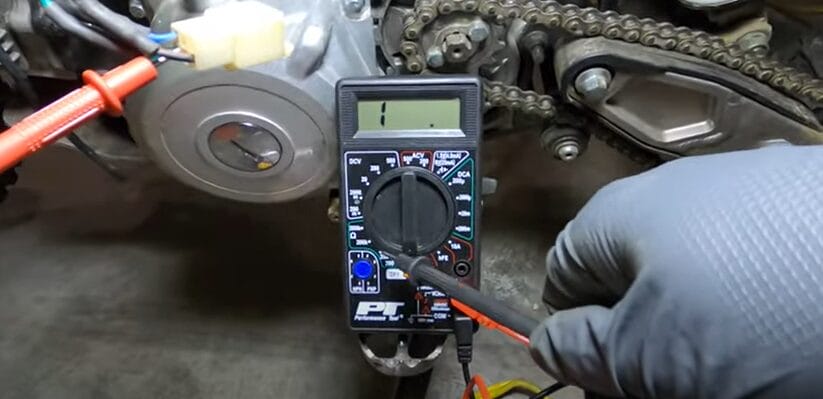
Step 2: Setting Up Your Multimeter
Set your multimeter to the 200 ohms setting. This is crucial for checking if there’s a continuous electrical path present.
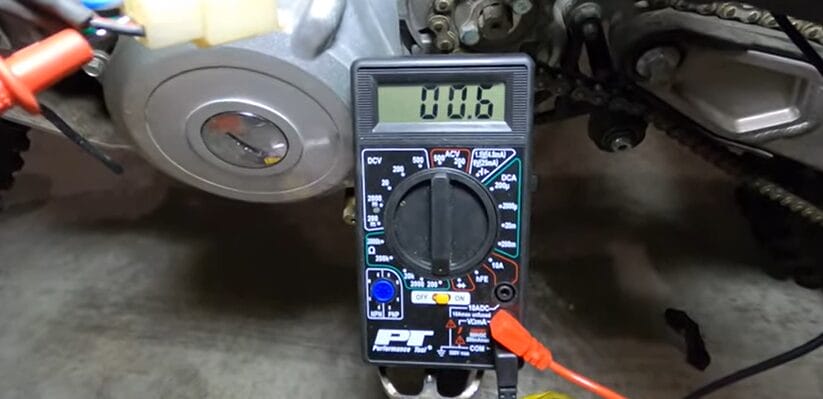
Step 3: Testing Ground
Attach one wire of the multimeter to the green ground wire of the stator.
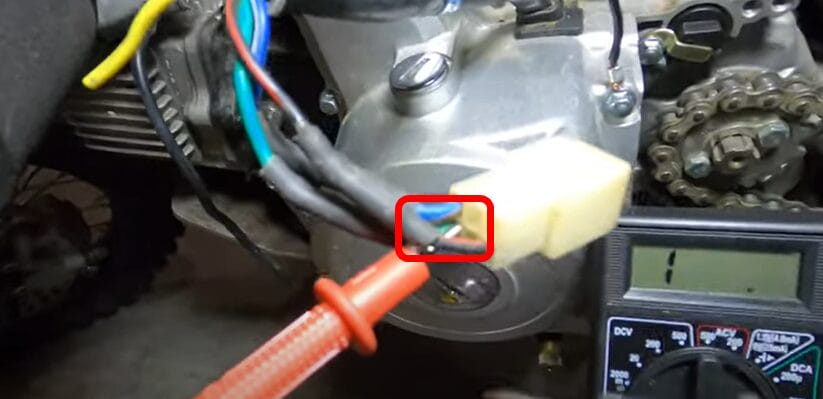
Then, touch the other multimeter lead to the frame or any grounded metal part.
A reading around 0.6 shows good continuity.
Step 4: Switching to AC Voltage
Change your multimeter setting to AC voltage, specifically to the 200 setting. This is essential for the next steps in testing the stator’s power output.
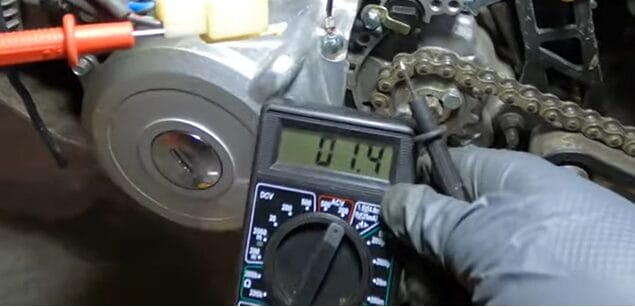
Step 5: Testing Main Power (Red and Black Wire)
Place one multimeter lead on the stator’s red and black wire. Ensure the other lead is grounded.
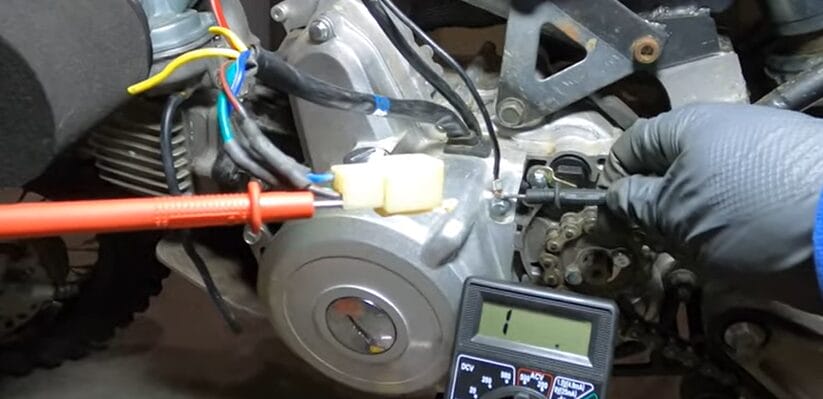
Step 6: Cranking the Bike
If your bike has an electric start, turn on the engine. A properly functioning stator should show around 50 volts on the multimeter.
Step 7: Checking the Blue Wire and Identifying Problems
Now, it’s time to test the blue wire. Repeat the previous step with the blue wire. If there’s no reading when you turn on the bike, it points to a problem with the stator.
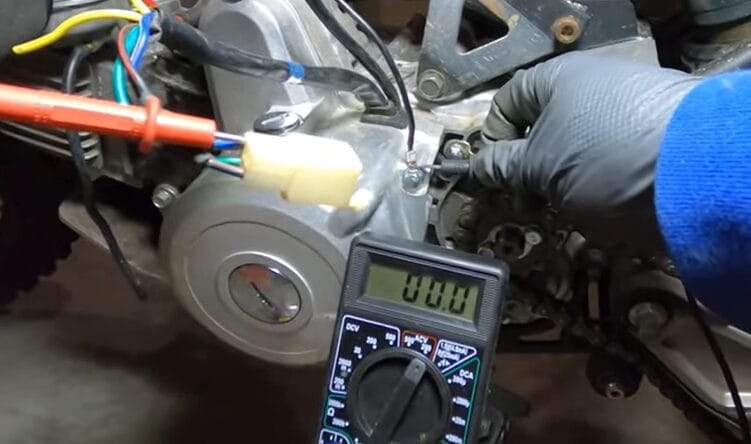
This could mean either the blue wire is broken or there’s an internal issue with the stator.
And there you have it! Testing a stator with a multimeter is straightforward once you get the hang of it.
Common Troubleshooting Scenarios in Stator Testing
Even with a solid guide, testing a stator with a multimeter can sometimes throw you curveballs.
Based on my personal experiences and those shared by fellow gearheads, I’ve compiled a list of common troubleshooting scenarios you might encounter.
| Troubleshooting Scenario | Problem | Solution |
|---|---|---|
| No Continuity Beep Heard | You’re checking for continuity, but there’s no beeping sound. | Ensure your multimeter is correctly set to the continuity setting. Inspect the stator coils and wiring for damage if set correctly but still not beep. |
| Inconsistent Readings | Multimeter readings are fluctuating or not stable. | Check for firm connections – ensure the multimeter probes are properly inserted into the stator sockets and that the probes and meter are in good condition. |
| Reading Doesn’t Match Manual Specifications | Resistance values are outside the range specified in your service manual. | Double-check the manual for your specific vehicle model. If discrepancies persist, the stator might be damaged. |
| False Positive Continuity Beeps | Continuity beeps when there shouldn’t be, indicating a possible short circuit. | Recheck you’re testing the correct points. If the issue continues, consider consulting a professional, as shorts can be complex. |
| Uncertain About Multimeter Settings | I’m unsure about the correct settings on the multimeter for the test. | Familiarize yourself with your multimeter’s manual. For resistance, use the Ω setting; for voltage, the V setting. Take your time to understand your tools. |
Remember, tackling each scenario with patience and precision is crucial. Safety first, and professional advice is always a good idea when in doubt. Happy troubleshooting!
Avoiding Common Pitfalls: Essential Tips for Accurate Stator Testing
Let’s talk about common mistakes to avoid when testing a stator with a multimeter. I’ve been there and done that, and let me tell you, a few simple missteps can throw you off track.
So, here’s what you need to watch out for:
- Incorrect Multimeter Setting: One time, I was all set to test a stator, but guess what? I had my multimeter set to DC voltage instead of AC. Always double-check that you’re on the right setting – for a stator, it’s usually AC voltage or ohms for continuity checks.
- Loose Connections: Ensure your multimeter leads are firmly connected to the stator wires. A loose connection can give you inaccurate readings, leading you down a rabbit hole of confusion.
- Ignoring the Ground Wire: Once, I forgot to test the ground wire for continuity—a big mistake. Always include the ground wire in your checks. It’s crucial to ensure the stator is functioning properly.
- Testing on a Running Engine: This is a no-no. Always perform these tests with the engine off. Not only is it safer, but it also gives you more accurate readings.
- Not Resetting Between Tests: After testing one component, I jumped straight to the next without resetting my multimeter. This can lead to erroneous readings. Always reset your multimeter between different tests.
- Forgetting Visual Inspection: Don’t just rely on your multimeter. A visual inspection can reveal issues like frayed wires or corrosion that your multimeter can’t pick up.
- Rushing Through the Process: Patience is key. Take your time, follow the steps carefully, and you’re more likely to get it right the first time.
Remember, everyone makes mistakes, but learning from them is what counts. Stay focused, be methodical, and you’ll be a stator-testing pro in no time!
RELATED What Does a CDI Box Do? (Guide)
Stator Maintenance: Keeping Your Bike’s Heart Healthy
The stator often gets overlooked in bike maintenance, but trust me, it’s the heart of your bike’s electrical system. Here’s what I’ve learned about keeping it in tip-top shape:
- Regular Visual Checks: I make it a habit to inspect the stator area every few months. Look for wear, tear, or damage, like frayed wires or corrosion. It’s all about catching issues before they become big problems.
- Cleaning the Stator Area: Dirt and debris are the enemies of a healthy stator. For every oil change, I give the stator area a gentle clean. Be careful not to use harsh chemicals – a mild cleaner and a soft cloth usually do the trick.
- Checking Connections: Loose or corroded connections can lead to stator problems. Every six months, I check to ensure all connections are tight and corrosion-free. A little bit of dielectric grease can help prevent corrosion.
- Monitoring the Battery Health: A failing battery can put extra strain on the stator. A battery tender is a great investment to keep it in good shape.
- Avoiding Overloading the Electrical System: Adding too many electrical accessories can overload the stator. I learned this the hard way. Stick to what your bike’s electrical system can handle.
- Regular Voltage Checks: About once a season, I check the charging system’s voltage output to ensure everything works as it should. This includes the stator’s output. It’s a simple check that can save a lot of headaches down the road.
- Professional Inspection: I take my bike in yearly for a professional inspection. They checked what I missed and ensured the stator and the charging system were healthy.
- Staying Informed: Finally, I always keep up with any model-specific information about my bike. Some models might have specific stator issues or maintenance tips, so staying informed is key.
Remember, a little maintenance goes a long way. Regular care of your stator keeps your rides smooth and saves you from unexpected breakdowns and costly repairs.
Frequently Asked Questions
- Can I Test the Stator Without Removing It?
- You can perform both static and dynamic tests without removing the stator. However, ensure the engine is off and cooled down before you start poking around.
- Is It Safe to Test the Stator Myself?
- Yes, it’s generally safe if you follow the instructions carefully and take the necessary precautions. If you’re uncomfortable, though, there’s no harm in seeking professional help.
- Are Stator Issues Common in Motorcycles?
- Yes. Stators are essential in motorcycles, and issues can arise, especially with aging or heavy usage.
- How Long Does a Typical Stator Last?
- A well-maintained stator can last long, often outliving the vehicle itself. However, its lifespan can be affected by usage, maintenance, and overall vehicle condition.
- How Do I Interpret Multimeter Readings for a Stator?
- In the static test, a healthy stator should show resistance values typically between 0.2Ω to 0.5Ω. In the dynamic test, look for around 25V at idle and up to 60V or more at higher RPMs. Always cross-check with your vehicle’s manual for specific values.
References
Organizations:
- SAE International (Society of Automotive Engineers). https://www.sae.org/
- ASE (National Institute for Automotive Service Excellence). https://www.ase.com/
Books:
- “Automotive Electrical and Engine Performance” by James D. Halderman. https://books.google.com/books/about/Automotive_Electrical_and_Engine_Perform.html?id=GQlW0AEACAAJ
- “The Motorbike Book” by DK Publishing. https://www.abebooks.com/9781405394406/Motorbike-Book-DK-1405394404/plp
Website Resources:
- AutoZone’s Repair Guides. https://www.autozone.com/diy/repair-guides
- MotorcycleMD. https://motorcyclemd.com/
Video References:
Slavsquad