18 min read
How to Wire Solar Panels (8 Steps and Tests)
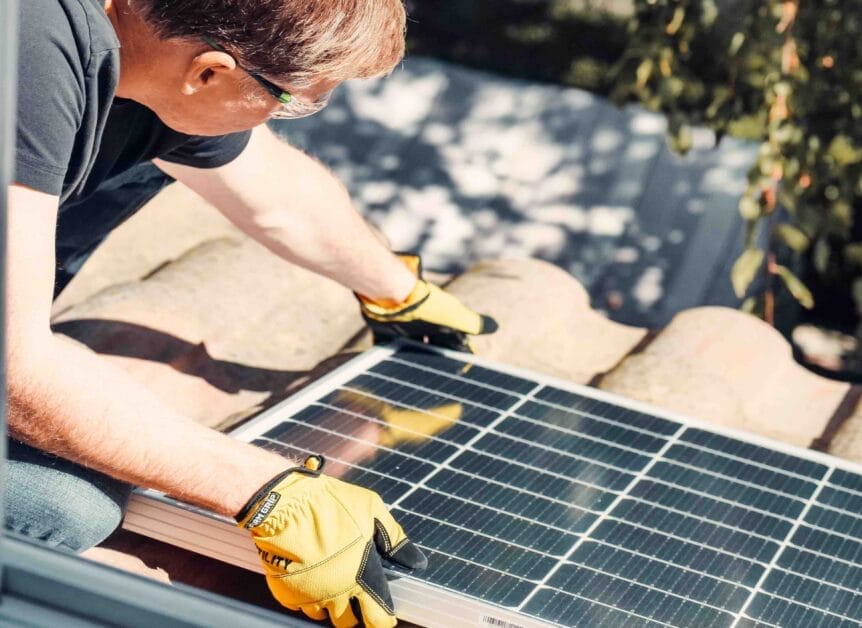
Wiring solar panels doesn’t require calling a professional if you follow our guide. This article covers every detail of wire solar panels, from showing how to do a simple setup to more sophisticated ones and adding multiple panels.
To wire a solar panel, you need a panel, the load, and DC wires as a minimum. But a charge controller, battery, inverter, and other components can make the system more useful. You can wire multiple panels in series, parallel, or a mixed setup.
When wiring in series, connect the opposite terminals; when wiring in parallel, connect the same ones in pairs. Then, connect the remaining leads to the load or via a charge controller.
I’ve also covered the pros and cons of series and parallel arrangements, how to test the setup, and some FAQs.
Requirements
The requirements for a minimal setup are few, but you will need extra items for a more sophisticated setup.
You will require the following items, tools, and materials:
| Essential Requirements | Extra Requirements | Tools and Materials |
| Solar panel Wires Load | Charge controller Rechargeable battery Resistor Capacitor Diode Transistor (PNP) Switch Multimeter | Screwdriver Wire stripper Crimper Wire connectors Soldering iron Electrical tape |
Functions
The items serve the functions described below. The information clarifies what each part or component does.
- A capacitor helps reduce the interruptions while the solar panel operates to provide a continuous electrical supply.
- A charge controller prevents the battery from overcharging.
- A diode ensures the current flows unidirectionally, i.e., only from the solar panel to the battery and load, not vice versa. Include one if you install a battery.
- An inverter to use AC appliances with your solar-powered system
- The load operates by consuming the electrical energy generated by the solar panel.
- A multimeter for testing the circuit
- A rechargeable battery allows you to store charge so that you can use the connected load at other times when there is no sunlight.
- A resistor limits the current flow through a circuit to prevent it from being higher.
- The solar panel converts sunlight into electrical energy.
- A switch controls the circuit to turn it on or off manually.
- A transistor can be used to detect the darkness level. It will only power the load when there is no sunlight, which can be useful to make a light switch on automatically.
RELATED Solar Panel Testing (3 Methods)
Wiring a Solar Panel in a Simple Setup
First, I will show how to wire a small solar panel to power an LED light in a simple setup.
All you will need, besides the solar panel, load, and wires, is a resistor. I recommend you use a red and black wire, as is customary.
Wiring Diagram
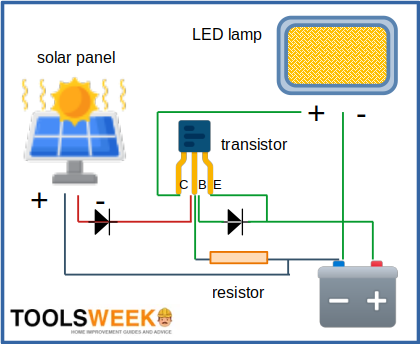
We will follow this wiring diagram:
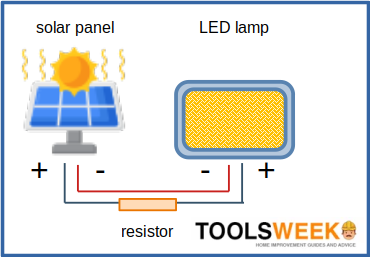
The load, in this case, is an LED. Follow the steps below.
Step 1: Cut and Strip the Wires
Cut the wires to the required length according to the length between the solar panel and the load.
Strip about half an inch of the insulation off the ends of the wires after cutting them.
The red wire will be used for the positive leg of the circuit, and the black wire for the negative one.
Step 2: Connect the LED
Connect the positive (red) wire to the LED’s positive leg and the negative (black) one to its negative leg.
You can splice the wires to the legs, but a better way is to solder them together.
Note that a different color scheme was used in the picture below. The colors themselves don’t matter. The important thing is to use a different color for each polarity so you can easily identify and distinguish between the two wires.
Step 3: Connect a Resistor
Connect a resistor to the LED’s positive leg, as shown below.

Step 4: Connect the Solar Panel
Connect the solar panel like how you connected the LED as the load.
Connect the positive wire to the positive terminal on the panel and the negative one to its negative terminal, as shown in the above picture on the right.
Wiring a Solar Panel in a More Sophisticated Setup
Now that you know how to wire a solar panel in a simple setup, adding extra parts and components for a more sophisticated one is just a matter of adding extra parts and components.
Wiring Diagrams
Here are two more wiring diagrams that utilize the extra requirements I listed earlier:
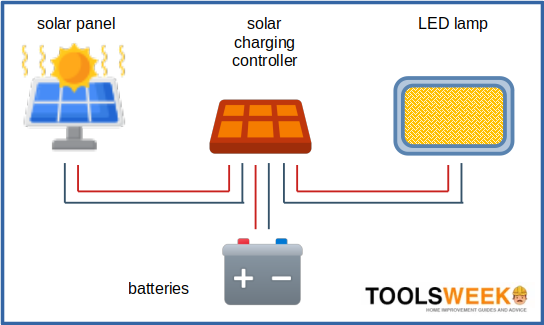
You can implement either of the two as per your needs. We will now focus on how to expand the system differently.
Adding More Panels and Batteries
Once you have a working solar-powered system setup, you can easily add more panels or batteries (or both) for more electrical charge and a higher capacity to operate more loads or longer periods.
There are two ways to add both – in series or parallel. This article is about wiring solar panels, so we will focus on wiring multiple solar panels together. The principle will be similar for adding more batteries.
Wiring Multiple Solar Panels Together
Before wiring multiple solar panels together, you must decide whether to wire them in series or parallel.
Wiring in parallel is more common and recommended because the system will continue functioning even if a panel fails or a wire is damaged. However, it will require hefty cables due to the higher current when combined.
Wiring in series should be treated as an alternative when you have a large setup and want to minimize the cables and current. Also, it’s suitable if you have only a few high-voltage panels to arrange a system with a high power output quickly. Higher power means faster battery charging. The biggest drawback, however, is that the system will perform poorly if a problem exists in the circuit.
The table below summarizes the key differences.
| Wiring | Voltage | Current | Basic Method | Suitability |
| Series wiring | Sum of voltage of all the panels | Remains the same | Connecting the opposite terminals together (adjacent when placed in a row or horizontally) | A large setup or limited number of high-voltage panels for higher power. Low amperage. Less reliable (dependent operation). High irradiance places |
| Parallel wiring | Remains the same | Combined | Connecting all the same terminals together (adjacent when placed in a ‘column’ or vertically) | A small setup Hefty cables due to high current More reliable (independent operation). Low irradiance places |
Technically, you can also have a mixed setup involving parallel and series wiring. You can arrange the system for a desired voltage or amperage. It will give the benefits of both arrangements and lessen the drawbacks. However, it is a complex setup best left for a separate article.
Also important is to ensure the following:
- You place the solar panels in a place with high irradiance (maximize the sunlight).
- You minimize the risk of shading.
- You use the right DC cables for the system’s total voltage and current.
- You store the charge in a set of good-quality batteries.
- You use a charge controller to control the charge output.
Terminals, Connectors, Combiners, and Extenders
When connecting a panel to the battery, whether you connect multiple solar panels in series or parallel, you only connect the same terminals, i.e., with the same polarity.
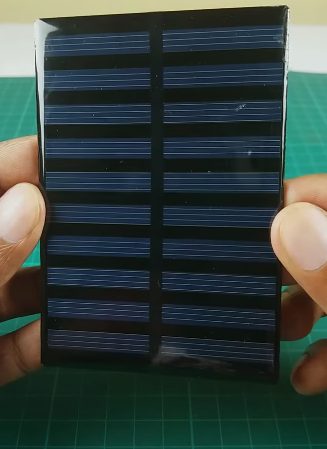
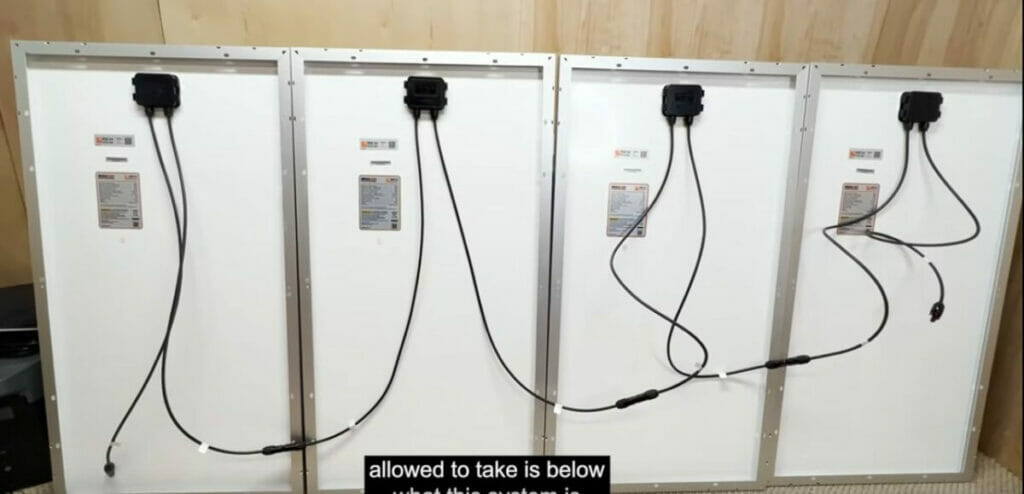
You will notice that every panel has a positive and negative lead coming off of it at the back, as shown below. In this case, the negative one is on the viewer’s left, and the positive one is on the right. They should have connectors on the end.

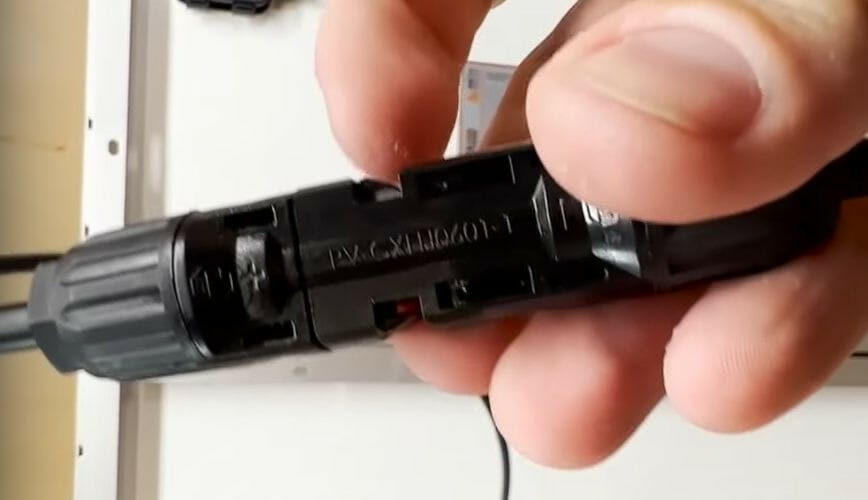
The connectors are of two types:
- A female connector at the end of the negative lead
- A male connector at the end of the positive lead (which may have a red ring on it)
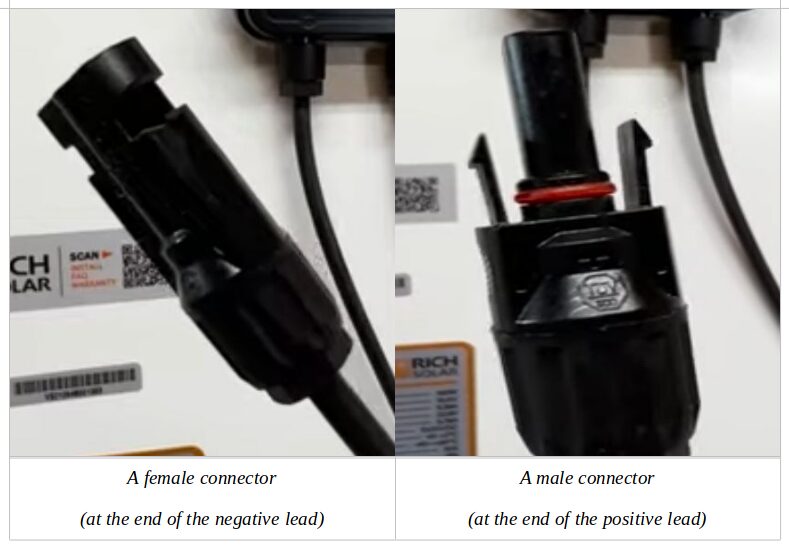
The connectors make it super easy to connect the right ones together.
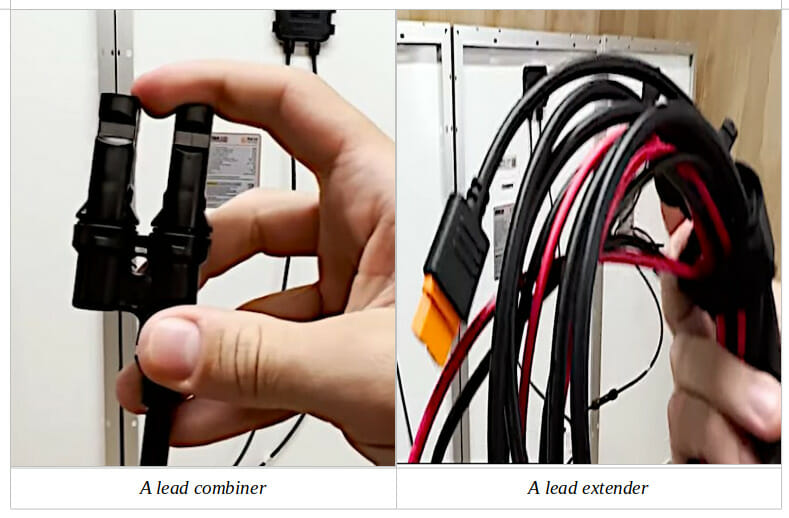
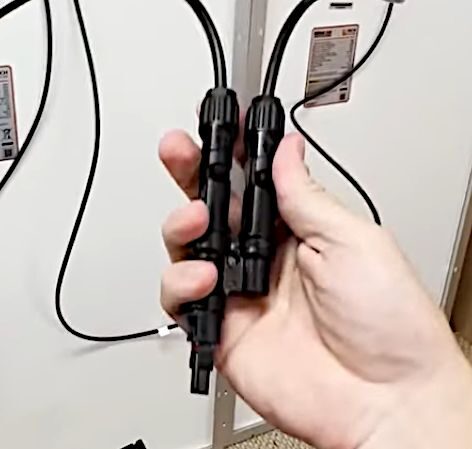
When wiring in parallel, you may need an additional type of connector to combine two leads, like the one shown below. They can be used to combine either two positive or negative ones at one or the other end.
Also, you will need an extender to extend a lead’s range.
Wiring Multiple Solar Panels in Parallel and Series
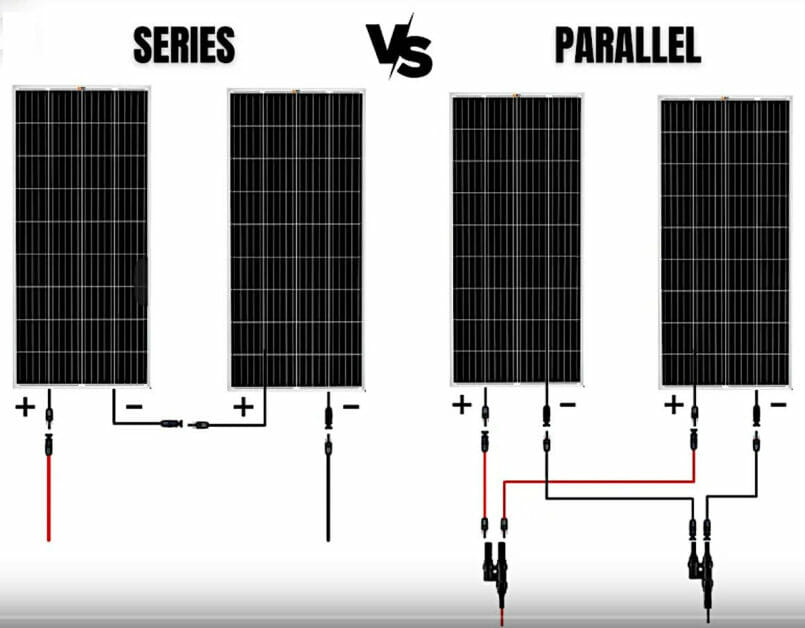
The wiring diagram below shows how the solar panels would look when wired in series and parallel.
Notice that in series, apart from the two end terminals, the opposite pairs from each adjacent panel are joined, whereas the same polarity terminals are joined when wiring in parallel.
Remember that you can only wire as many panels as the charge controller can handle. So, consider the total voltage and current of your solar panel formation.
- In a series formation, the total voltage will be the sum of each panel’s voltage, and the current will be the same through each.
- The voltage will remain the same in a parallel formation, but the current will increase.
Wiring Multiple Solar Panels in Series
The general method to wire multiple solar panels in series is to join the opposite polarity terminals together.
The terminals to join will be adjacent if placing the panels in a row or horizontally. The battery will then connect at the end to the remaining two terminals at the start and end of the series, which will be of different panels.
Here’s the procedure for wiring multiple solar panels in series in detail:
Step 1: Set the Panels in Order
Set the panels in a straight row. Start a new row if necessary.
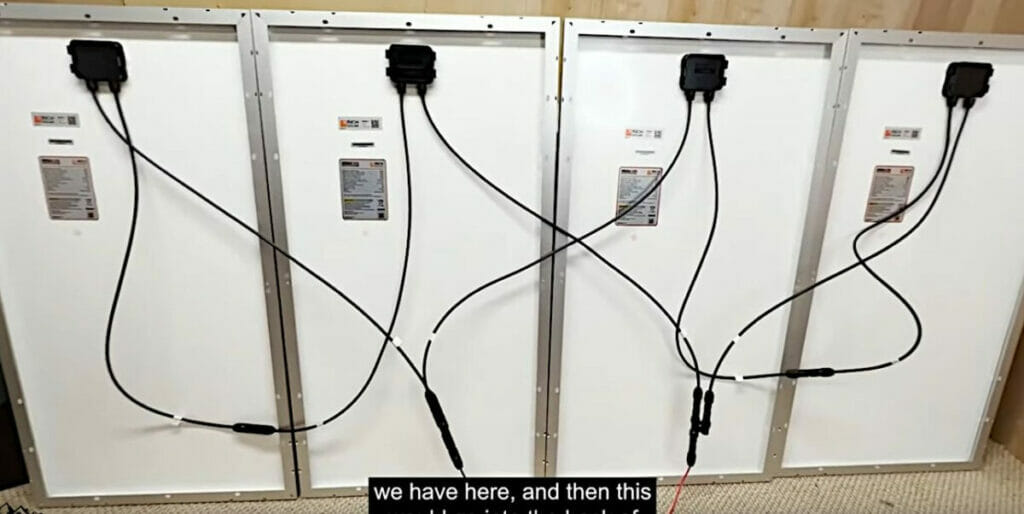
Step 2: Connect the Opposite Polarity Leads
Connect the leads of adjacent panels by simply inserting the male connector of one into the female connector of the other. You should hear a clicking sound when connected.
If, for example, you have 4 panels in a row, you should have 3 joins so far, as shown below, with only the two end leads remaining unconnected.
Step 3: Connect the Charge Controller
Connect the two remaining leads (one at each end of the row) to the charge controller.
If the battery is near one end, you may need to use an extender for the other end.
RELATED Solar Panel Testing (3 Methods)
Wiring Multiple Solar Panels in Parallel
The general method to wire multiple solar panels in parallel is to join all the same terminals together.
The terminals to join will be adjacent if the panels are placed vertically or in a columnar arrangement. You can connect the battery at the end to any pair of terminals, usually of the same panel and the one nearest the battery.
Here’s the procedure for wiring multiple solar panels in parallel in detail:
Step 1: Set the Panels in Order
Set the panels in a straight row. Start a new row if necessary.
Remember that you can only wire so many panels as the charge controller can handle. So, consider the total voltage (sum of each) and the current, which will be the same through each.
Step 2: Connect the Same Polarity Leads
Connect the leads of adjacent panels by connecting the same polarity leads together using combiners. You should hear a clicking sound when connected.
Step 3: Connect the Charge Controller
Connect one pair of leads from a panel to the charge controller.
You can optionally combine with another pair if you know the total voltage and current and what the charge controller can handle.
A mixed formation is also possible, as in the example below.
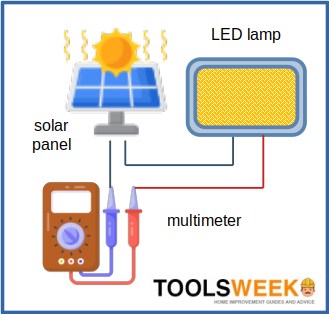
Testing the Solar Panel System Setup
Follow the steps below if you need to test the current in your solar panel system.
You will need these additional items: a multimeter.
Step 1: Set the Multimeter
Set the multimeter to measure (DC) current.
Step 2: Connect the Test Lead
Connect the solar panel’s positive wire to the long LED lead using an alligator clip.
Then, connect the multimeter’s red probe to the LED’s short lead and its black one to the black wire to form a series circuit, as shown below.
Step 3: Test an LED
Position the LED about one foot above the panel and turn it on. The LED should light up. If it doesn’t, recheck the wiring and the multimeter’s settings.
Step 4: Check the Current
Obtain a current reading on the multimeter.
It will show you exactly what current is passing through the LED. Check the LED’s specifications to see if this current is sufficient.
FAQs
How many solar panels can I wire together?
You can wire as many solar panels as you have space for and can afford.
The real questions should be how much output you need, whether you can store the extra charge, and what you will use the solar-powered system for. Consider all these issues and decide based on the available space, how much you can afford, how many batteries you have, and how much electrical power you need.
Can I mix different voltage panels?
You can mix different voltage panels, but using panels of the same type is better because they will be easier to work with. Decide whether you want a 12V, 24V, or higher system and stick to it.
Suppose you wired two 12V panels in series for a total voltage output of 24V. It’s technically possible to wire another 24V panel in parallel, but you now have a mixed setup that may become difficult to manage if it expands further.
Do the solar panels charge quicker in series or parallel?
A series arrangement would give a higher voltage output and potentially allow quicker charging if that’s what you’re after. But, consider the pros and cons of both arrangements.
What batteries would you recommend I use with my solar panels?
I covered this in another article. You can read it here.
You have several options for using a battery in your solar-powered system. They include regular lead-acid batteries of different types, lithium-ion batteries with more charging cycles and a longer lifespan, and flow batteries. In the table below, I’ve given a roundup of the differences between the three options available to help you decide.
| Battery Type | Charge-Discharge Cycles | Lifespan (in years) |
| Lead-Acid | 500-800 | 3-5 |
| Lithium-Ion | 300-15,000 | 8-10 |
| Flow | 15,000-20,000 | 15-25 |
Generally, go for a lead-acid battery if you have a small setup or budget. Otherwise, use a flow battery for the longest potential lifespan, which, as you may expect, will be the most expensive option, or a lithium-ion battery for a balance between the two.
Troubleshooting
Q1: Can I wire up solar panels all by myself?
A: Absolutely! With a dash of patience, a sprinkle of safety, and a good measure of this guide, you’ll harness the sun’s energy in no time. Remember, every big change starts with flipping a small switch!
Q3: Series or Parallel – which wiring setup should I go for?
A: It’s like choosing between a chocolate or a vanilla scoop; each has its flavor! Series wiring boosts your voltage, ideal for a high-powered performance. On the other hand, parallel wiring ups the current, keeping things flowing smoothly even if a panel decides to take a nap. Your choice would ride on your system’s appetite for power and the kind of solar banquet you aim for!
Q4: Can I mix and match different solar panels?
A: Mixing different voltage panels can be like blending different genres of music; it might work, but it’s tricky. Sticking to the same voltage panels is always harmonious, keeping the rhythm of your solar symphony in sync!
Q5: How do I keep my solar panels performing at their peak?
A: Ah, the secret to a long-lasting solar friendship! Keeping them clean, ensuring they bathe in maximum sunlight, and checking them for any wear and tear will keep the solar love strong. And, oh, a good wiring setup is like setting up a good foundation for a house; it holds everything together!
Q6: How do I protect my solar setup from the wrath of Mother Nature?
A: Mother Nature can throw a curveball, but we can catch it! Use sturdy mounts for your panel’s weatherproof wiring, and ensure all connections are snug and secure. Like a well-built cabin, a well-secured solar setup will weather the storms!
Q7: If I want to expand my solar setup, how should I prepare?
A: Dream big, start smart! Plan your initial setup with a little room for growth. Like planting a tree with enough space to sprawl, your solar setup should have the potential to spread its wings. A bit of foresight can lead to a forest of solar panels powering your dreams!
Q8: How do I test if my solar setup works as it should?
A: Test runs are the drum rolls before the grand performance! A multimeter is your backstage pass to see how electricity flows through your setup. Ensuring all connections are in harmony and your panels soak up the sun will set the stage for a stellar solar show!
Dive into this solar adventure with the heart of an explorer and the mind of an electrician. Each wire you connect is a step closer to a sun-powered haven. Remember, the sun is the star of this show, and you’re the director. Lights, Solar Panels, Action!
RELATED Solar Panel Testing (3 Methods)
References
Video References:
Off Grid Stores
SriTu Hobby