7 min read
How to Wire a Camper Trailer (Guide & Diagram)
In this article, I will help you start wiring a camper trailer and teach you some cool tricks!
Quick Summary: To wire a camper trailer, consider your power consumption first. Wire accordingly and place all switches and sockets where you need them. Arrange for a shore power connection, a 12V battery supply, and, optionally, either a generator or solar power.
I’ve included a chart of typical RV appliances and their power ratings, a table to help determine the safe wire gauge, tips to help plan your layout, and several wiring diagrams.
Read on for more details.
Before You Start Wiring
Before you start wiring a camper trailer, you should:
- Check the power consumption of the components, devices, and appliances you will use on the trailer.
- Determine the appropriate wire gauges based on the current draw and distances.
- Plan a suitable wiring layout for all the wires, switches, and outlets.
- Gather all the necessary tools and materials to do the wiring.
- Take the necessary safety precautions before handling the electrical work.
Checking Power Consumption
Checking the power consumption involves determining the wattage rating of each component, device, and appliance on the circuit.
Please make a list of them all, along with their wattage ratings. Then, add the total wattage to work out the total power consumption. You will need this information to use appropriate wires, switches, and outlets.
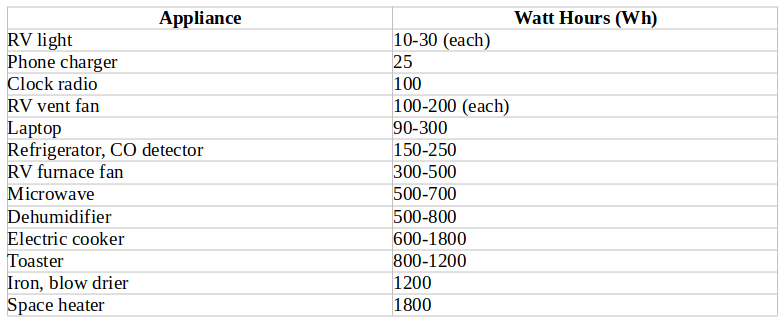
Besides the operating or running wattage, you must also allow for a current surge.
To know the total battery capacity you need (using 12V batteries), divide the total Wh amount by 12 to work out the amp-hours (Ah).
For example, if the total Wh is 1200-1500, you will need at least a 100-125 Ah battery.
Determine Wire Gauges
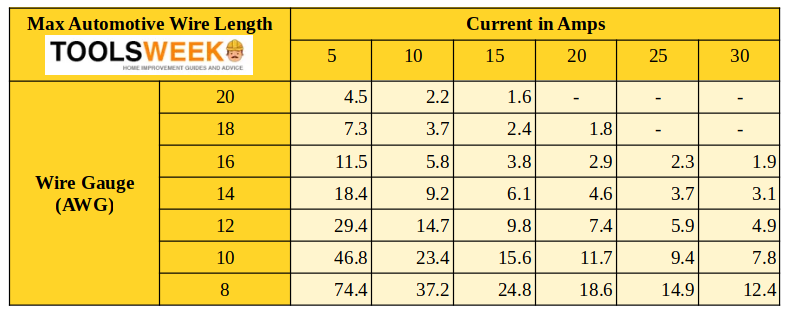
The wire gauges refer to the diameters to allow electrical current to pass through the wires safely.
A wire with a smaller gauge than required can overheat and burn, whereas using one that’s too large is unnecessary and costlier. You also need to consider the voltage drop, especially if the distances are long. Use the table below to determine the wire gauges. Usually, a 12 or 14-gauge wire is sufficient.
Planning Your Layout
I recommend you consider and incorporate the following in your layout planning:
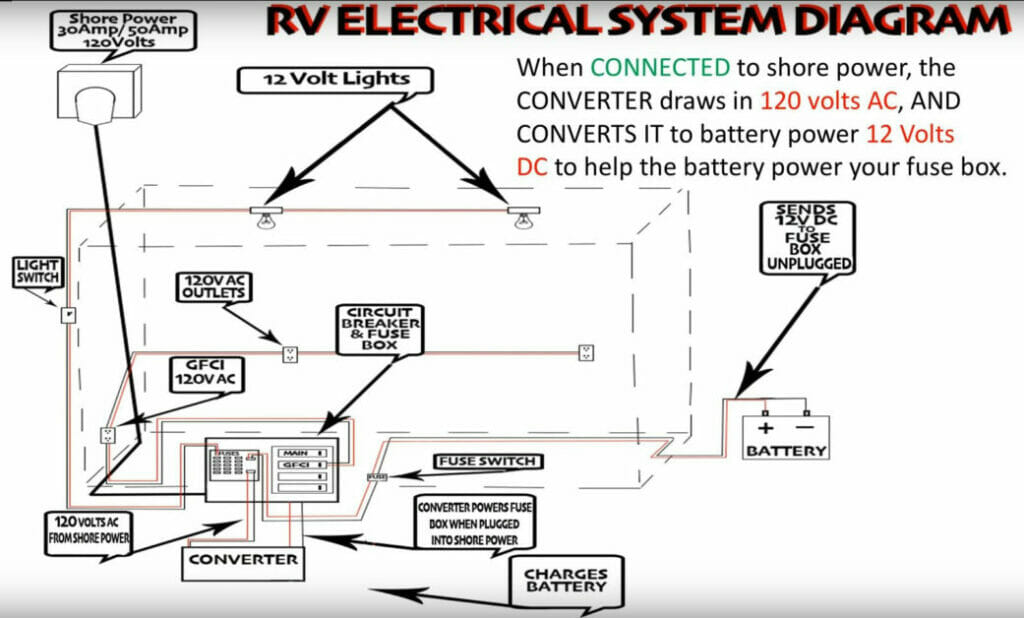
Consider all the above considerations and create a wiring diagram for your camper. Choose suitable spots for all the switches and outlets near your devices and outlets.
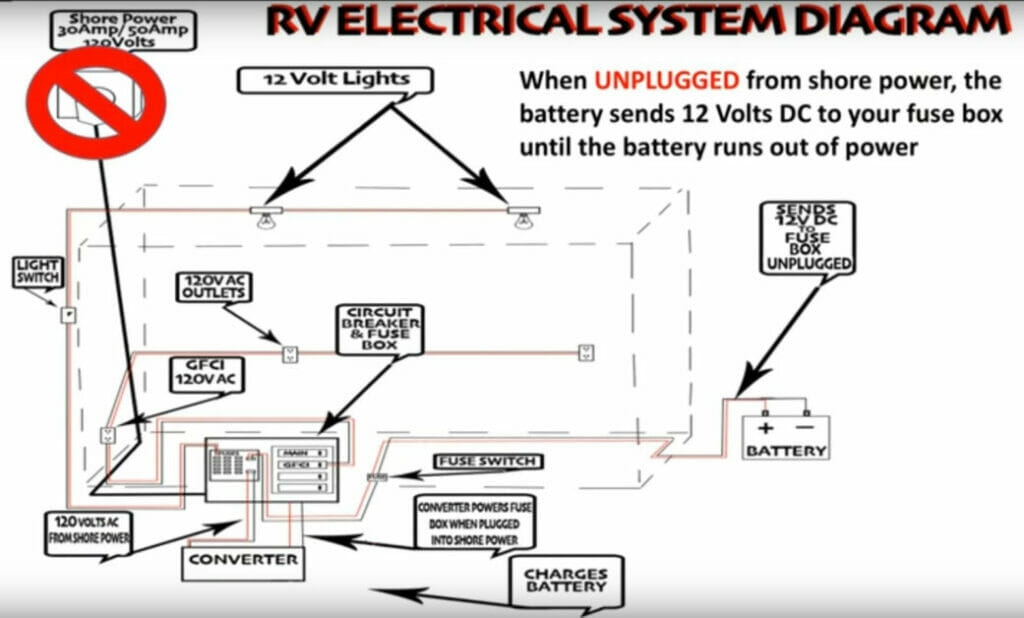
A wiring layout diagram will make it easier to follow while installing the switches and outlets and wiring everything. Here is a sample you can adjust for your particular camper trailer (when plugged and unplugged from shore power):
Power Sources
A 15A service can normally only operate one major appliance at a time. A 30A will allow to operate 2 or 3, whereas a 50A service is typical for large campers.
The DC (12V) system relies on a battery, battery charger, and a 12V socket (cigarette lighter receptacle. It is usually used for operating lights and basic accessories.
You have three main options for AC (110V) power to operate higher-powered accessories via regular electrical outlets:
- Shore power is usually only available if you’re near your home or a campsite equipped with an electricity supply for campers.
- Generator – As an example, an 1800W generator will roughly provide the equivalent of a 15A service. RVs can use a converter with a charge controller to convert the power to DC, for example, to charge the battery.
- Solar power with an inverter – Solar systems generate DC power. So, you will need an inverter instead to convert from DC to use with your AC appliances besides the solar panel.
The panel usually has 15- and 20-amp breakers, but high-powered appliances like air conditioners and heaters may require a higher amperage breaker.
Wiring Tools and Materials
Apart from the wires (normally 12 or 14-gauge), you will need:
- A wire cutter
- A wire crimper
- Wire connectors
- Electrical conduit
- Pliers
- Screwdriver
- Circuit breakers (generally 15-amp breakers for 14-gauge wires and 20-amp breakers for 12-gauge wires)
Safety Precautions
Turn off the power source while working on electrical wiring, switches, and outlets.
Also, wear appropriate safety gear when handling live wires, including gloves and goggles.
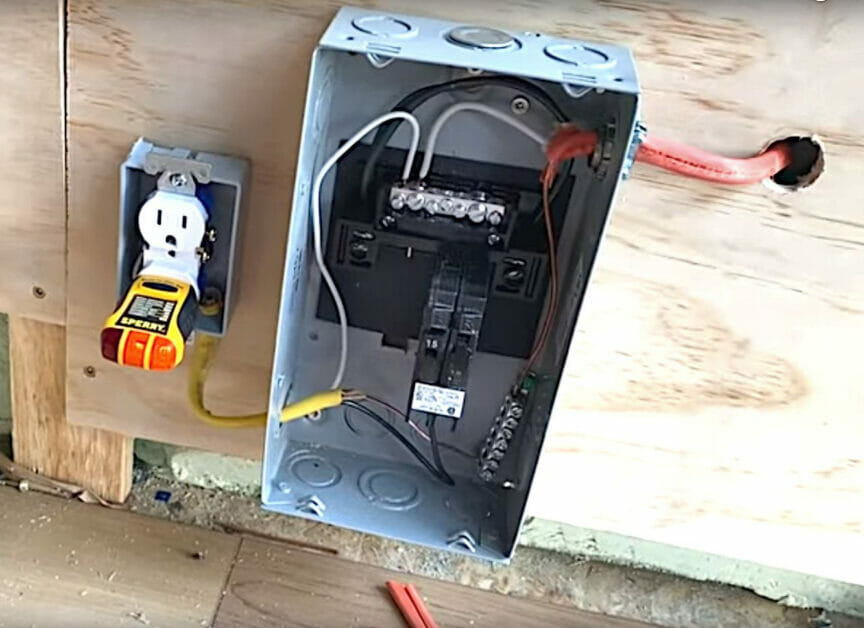
Installing Switches and Outlets
Wiring switches and outlets in an RV is similar to how we do the same in our houses.
Observe the following general principles:
- Connect only corresponding (same) wires (black to black, red to red, white to white, and bare/green to bare/green) when connecting the wires from the outlets to the wires coming to them.
- In an AC (110V) system, the black wire is the hot/live wire, the white one is the neutral wire, and the bare or green one is the ground wire.
- In a DC (usually 12V) system, the red wire is the positive (+) one, and the black wire is the negative (-) one.
- When wiring a switch, it will come in the positive leg. So, only connect the red wire to it if it’s a DC system or the black wire if it’s an AC system.
Connecting the Battery and Inverter
You can adapt the wiring setup shown below for demonstration purposes.
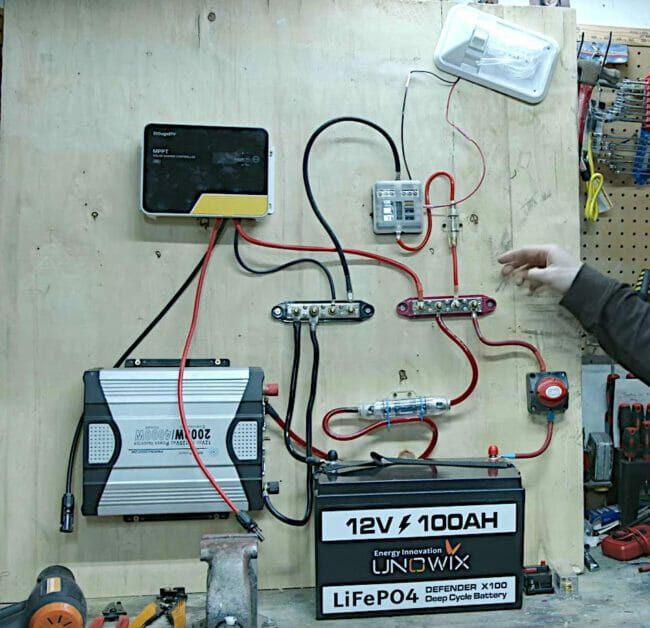
A bus bar is not essential, but it makes it easy to make multiple connections to the battery’s terminals.
The two wires hanging from the MPPT charge controller above the inverter connect to the solar panel, which is also optional but recommended.
Camper Lighting
Lighting is essential in a camper, and you can safely install many LED lights due to their low power consumption.
The wiring on them follows the same pattern mentioned above. If they are DC lights, connect the positive (red) wire from the battery to the positive terminal on the lighting fixture and the negative (black) wire to its negative terminal.
Apply the same procedure to all internal and external lighting.
Final Checks
The final checks after having wired a camper should include:
- Ensure all the wires are connected correctly.
- Inspect all the wire connections to ensure none of them are loose.
- If you rewired your existing wiring or installed used wires, check for signs of any damage. Conduct a continuity test if you suspect a weak path.
- Ensure all the electrical components, including the battery and appliances, are properly grounded.
References
Video References:
Brian Russell
DIY Cargo Trailer
Van Kookz