12 min read
How to Wire a Trailer Plug? (6 Essential Steps)
Wiring a trailer plug might seem hard, but I’m here to tell you it’s not as complicated as it looks. In fact, with the right tools and a little patience, you can do it yourself in no time. After all, why pay someone else for something you can easily accomplish alone?
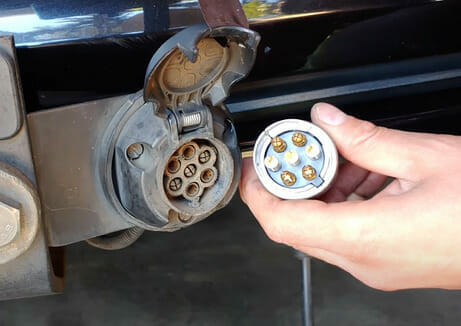
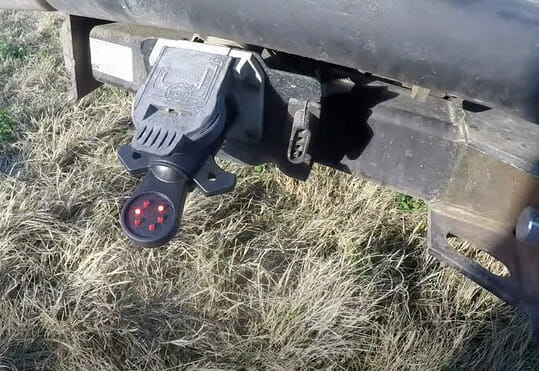
The 7-pin trailer plug is the most common. Not only do they handle the essentials like running lights, turn signals, and brake lights, but they also go the extra mile. Think of them like the all-stars of the trailer world: delivering that extra oomph with a 12V hot lead, electric brakes, and even those handy reverse lights.
Key takeaways: Wiring a 7-pin trailer plug is easy.
- Step 1: Collect all necessary tools for the wiring process.
- Step 2: Review wire colors and their functions.
- Step 3: Measure, cut, and strip the wire ends.
- Step 4: Connect each wire to its corresponding terminal on the plug.
- Step 5: Use heat-shrink tubing over connections to shield against corrosion.
- Step 6: After wiring, power on and test each function.
In this article, I’ll take you step by step through wiring a trailer plug. We’ll start with gathering the necessary tools and materials. Next is understanding your trailer’s wiring diagram – don’t worry if that sounds technical; I promise to simplify it.
Let’s dive in!
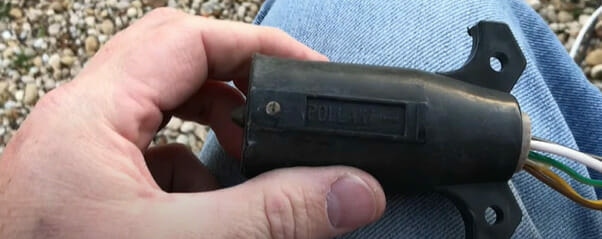
What Trailer Plug Do You Have?
A trailer plug is an electrical connector that lets your vehicle communicate with its towing trailer.
This handy little gadget comes in different shapes and sizes. The most common types you’ll come across are 4-way, 5-way, 6-way, and 7-way plugs. Each has its own specific use case:
It’s a universe full of different shapes, sizes and functions. You might be surprised by just how many types there are!
| Plug Type | Description |
|---|---|
| 4-Way Flat Connector | This guy is pretty common, especially for small trailers like bike trailers or utility trailers. With its four wires, it’s used to control basic lighting functions – think brake lights, tail lights, and turn signals. |
| 5-Way FlatConnector | You’ll find these on marine or boat trailers with surge brakes. |
| 6-Way Square Connector | Found mostly on pop-up campers or small travel trailers, they have two additional wires that allow for electric brakes and an auxiliary power supply. |
| 7-Way RV Blade Connector | Compared to American counterparts, this has some unique features, including reversing light functions and electronic stability controls. |
| 13-pin Euro Plug | The 13-pin Euro Plug is popular across Europe (hence the name). It takes up a notch from our 7-way friend with additional pins for reverse light, earth returns for contact units 1-8, and refrigerator. |
| Australian Style Plug | Compared to American counterparts, this has some unique features, including reversing light functions and electronic stability controls. |
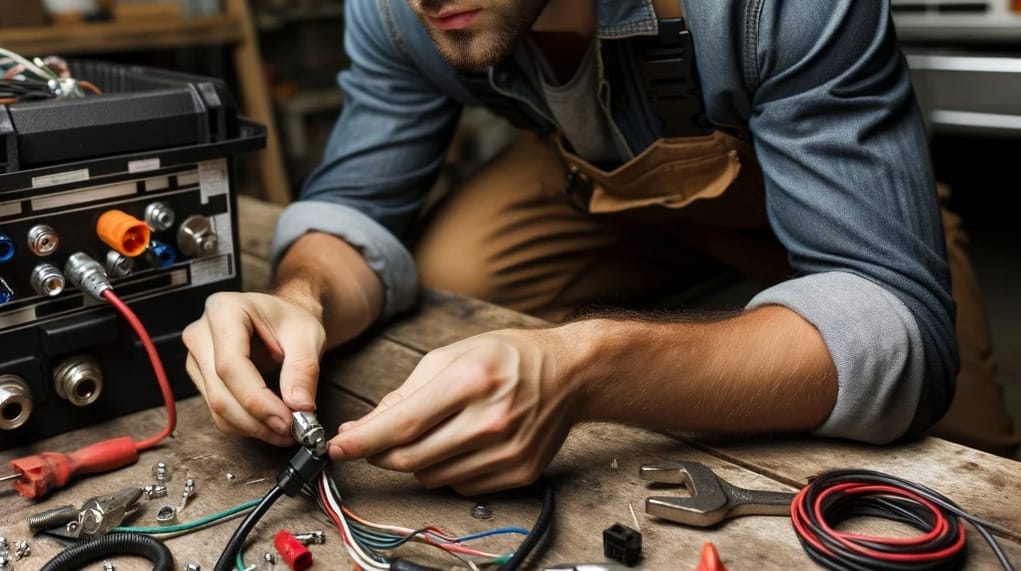
Materials and Tools Needed
Before we start, let’s ensure we have everything necessary to complete this job.
- 7-pin trailer plug: This is the key player in our wiring game. Don’t be fooled by its small size; it’s got a big responsibility.
- Wire cutter/stripper: It’ll help you cut wire lengths accurately and strip off insulation without damaging the wire underneath.
- Crimping tool: We’re discussing creating secure connections here, folks – no room for mistakes!
- Heat shrink tubing: protects those newly established connections against corrosion and physical damage.
Safety Precautions
Before we dive into the specifics of wiring a trailer plug, let’s discuss safety precautions. It’s crucial to prioritize safety when dealing with electricity.
- Disconnect Power: Before starting any work on your trailer plug. It’s essential to avoid any unexpected electrical shocks.
- Use Insulated Tools: Always opt for insulated tools and wear protective gear like gloves and safety glasses.
- Proper Environment: Ensure you’re working in a well-lit, dry space. Working in low light or damp conditions can increase the risk of accidents.
- Wire Handling: Knowing how to handle specific types of wires. Different wires have different purposes – battery wires should be handled differently from ground or tail light wires.
Step-by-Step Wiring Process
Let’s roll up our sleeves and dive in.
Step 1: Gather your Tools
Next up? Tools! Grab all the tools you need for this project.
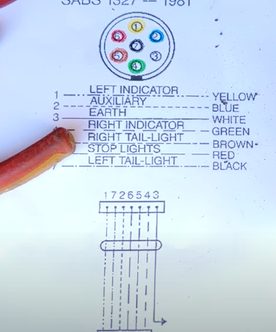
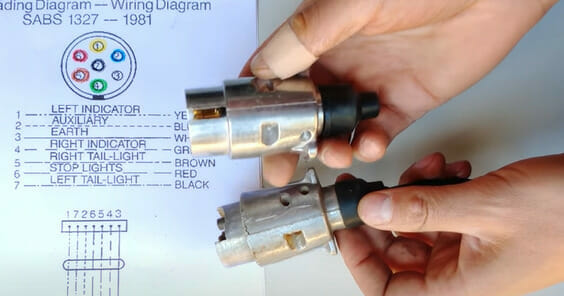
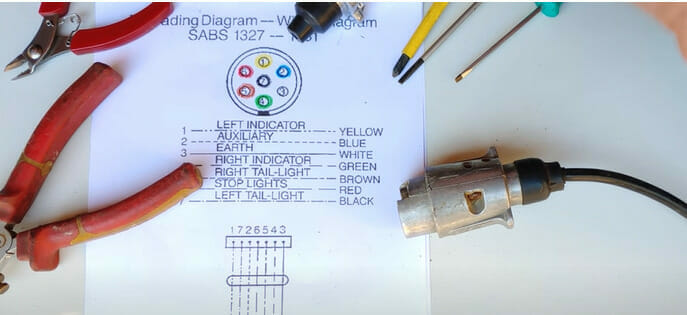
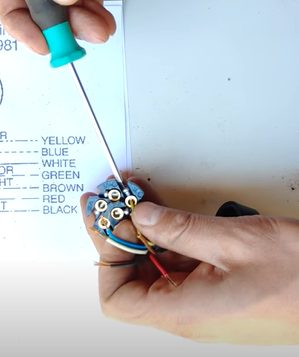
Step 2: Understand the Color Coding
Now, let’s talk wire colors because this part can get tricky. Generally speaking:
- White is ground
- Brown handles tail lights
- Yellow covers left turn/brake signals
- Green takes care of right turn/brake signals.
For larger plugs (6-way or 7-way), other functions come into play, like auxiliary power (black) and reverse lights (blue).
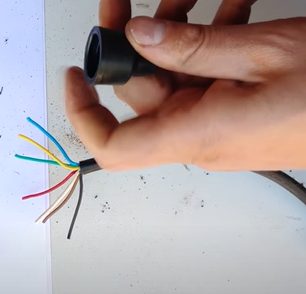
Step 3: Prepare the Wires
Measure and cut the wires to the necessary length, ensuring they are long enough to reach from the vehicle to the trailer comfortably.
Use the wire stripper to strip about half an inch of insulation from the ends of each wire, exposing the metal underneath.
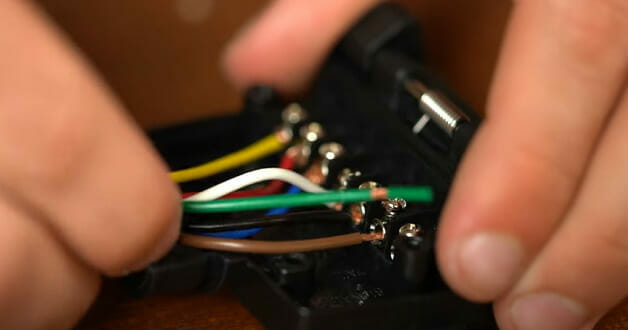
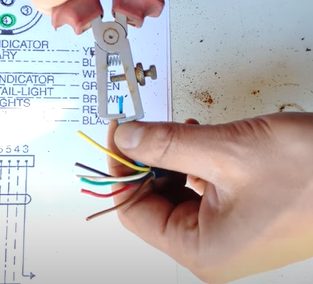
Step 4: Establish Connections
Onwards to the actual wiring process! Take each wire one at a time and strip back about half an inch of insulation using your stripping tool. Once exposed, insert each wire end into its corresponding terminal on the plug and crimp firmly but gently – you don’t want to crush those wires!

Step 5: Insulate and Protect
Slide heat shrink tubing over the crimped connections. This step provides added protection against elements and potential corrosion.
Step 6: Test the Connections
Once all wires are connected, reconnect the power source.
Test each function (brake lights, turn signals, etc.) to ensure they operate correctly. If there’s a malfunction, re-check the wiring connections and color codes.
Troubleshooting Common Issues
Sometimes, things can go wrong even when you’ve done everything right. Trailer plug wiring is no exception to this rule. But don’t worry! I’m here to help you troubleshoot some of the most common issues.
| Issue | Potential Cause | Solution/Check |
|---|---|---|
| No lights working | Problem with the ground connection. | Check the ground wire (usually white). Ensure it’s securely connected to the trailer frame. |
| Flickering lights | Poor power connection or damaged wires in the harness. | Examine each wire in the harness for damage or wear that might cause an inconsistent connection. |
| One light malfunctioning | Problem with the individual bulb or its circuitry. | Switch out the problematic bulb for a new one. |
| Rapid blinking of lights | There is a mismatch in bulb wattage between the vehicle and the trailer. | Ensure the bulb wattages between your vehicle and trailer match as closely as possible. |
| Erratic brakes/turn signals | Corrosion inside the connector components. | Examine the connector closely for any signs of corrosion and clean or replace it as necessary. |
Maintenance and Care
After successfully wiring your trailer plug, it’s crucial to maintain it properly. Proper care can extend the life of the trailer plug and ensure that it continues to function optimally.
Now, I’ll walk you through the steps necessary for maintaining this little piece of equipment.
| Maintenance Task | Description | Frequency |
|---|---|---|
| Regular Inspections | Check for wear, damage, rust, loose wires, or bent pins. These can cause future electrical issues. | Before each trip |
| Cleanliness | Be mindful of dampness, especially when driving in wet or near salty water. If corrosion is found (e.g., green on copper), use an anti-corrosion spray. | After each use |
| Moisture & Corrosion Check | Ensure the plug pins are aligned correctly and not bent out of shape. Straighten gently if required. | Monthly |
| Tighten Connections | Over time, connections might become loose. Tighten all screws and check the firmness of all wires. | Every 6 months |
| Wire Health Check | Examine wires for fraying, cuts, or other damages. Replace or repair compromised wires. | Every 6 months |
| Pin Alignment | If frequently exposed to rain or water, consider using waterproofing sprays or protective covers to shield the plug from the elements. | Quarterly |
| Waterproofing | If you are unsure about the health of your trailer plug or if you are facing consistent issues, seek the advice and services of a professional. | As needed, especially in rainy seasons |
| Electrical Testing | Use a trailer plug tester to check the functionality of each pin. This ensures each function (e.g., brake lights, turn signals) works correctly. | Twice a year |
Frequently Asked Questions
Why are there different types of trailer plugs?
- Different trailer plugs cater to various functionalities and regional standards, ensuring compatibility and versatility for diverse vehicles and trailers.
If I don’t have a crimping tool, are there alternative methods for secure connections?
- While a crimping tool is recommended for the most secure connection, some people use soldering or twist-on wire connectors, though these methods might not be as reliable.
Do all trailer plugs fit all trailers?
- No, it’s essential to identify the correct plug type for your trailer and vehicle. Using the wrong plug can lead to functionality issues and even safety concerns.
Why is the color coding for wires important?
- Color-coding standardizes the wiring process, ensuring that specific functions correlate with specific colors, reducing errors, and ensuring safety.
I followed all the steps but am still facing issues. Could it be a problem with my vehicle and not the trailer plug?
- Yes, sometimes the issue lies with the vehicle’s wiring or compatibility with the trailer plug. It’s essential to check both sides when troubleshooting.
Can frequent disconnecting and reconnecting of the trailer plug wear it out faster?
- Yes, frequent physical manipulation can lead to wear and tear. It’s crucial to handle plugs gently and ensure they’re protected when not in use.
Do I need to replace the entire trailer plug setup if a wire gets damaged?
- If a single wire is damaged, you can often replace or repair just that wire. However, a complete replacement might be more efficient if the plug is compromised or multiple wires are damaged.
What should I do if unsure about any step during installation?
- Always prioritize safety. If uncertain, seek assistance from a professional or someone experienced with trailer wiring.
References
Website Resources:
- etrailer.com – https://www.etrailer.com/Home
- The Trailer Parts Outlet – https://thetrailerpartsoutlet.com/
- RV.net forums – https://www.rv.net/forum/
Video Resources:
Outback Equipment
TheFritz423
ecologicaltime