10 min read
How to Wire a 3-Phase Motor (5 Steps)
The 6+1 terminals and 9 or 10 wires on a 3-phase induction motor can be confusing.
It’s not as easy as wiring a single-phase motor. However, this guide will show you how to find out how to connect the wires and follow the wiring procedure.
To wire a 3-phase motor, first, identify the wires and check the wiring diagram on the motor. 6 wires are from the motor, 1 for grounding if provided, and 3 (L1-3) from the power supply. Choose one of the two configurations (star or delta) and connect the wires to the terminals accordingly. Then, connect the ground wire to the grounding terminal, tuck the wires inside, and close the wiring compartment.
Read further for more details. I’ve included wiring diagrams and a table to help you choose which configuration to wire.
Wiring a 3-Phase Motor
A 3-phase induction motor is normally used in industrial settings where 3-phase power is available due to their high efficiency, compact design, lower vibrations, low maintenance requirement, greater longevity, and low cost.
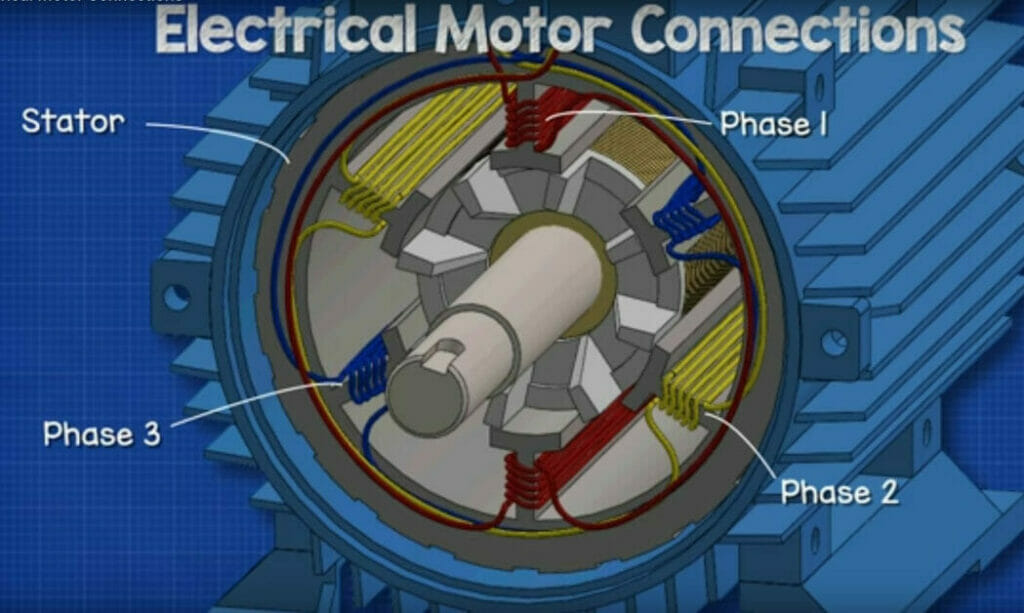
The AC current required to operate a 3-phase motor is carried by three conductors with the same frequency and amplitude but different phases. The current shift is 120°, so 3-phase motors have 3 windings per pole to generate the rotating magnetic field.
Learn more about 3-phase induction motors at the end.
Wiring Procedure
Step 1: Identify the Wires
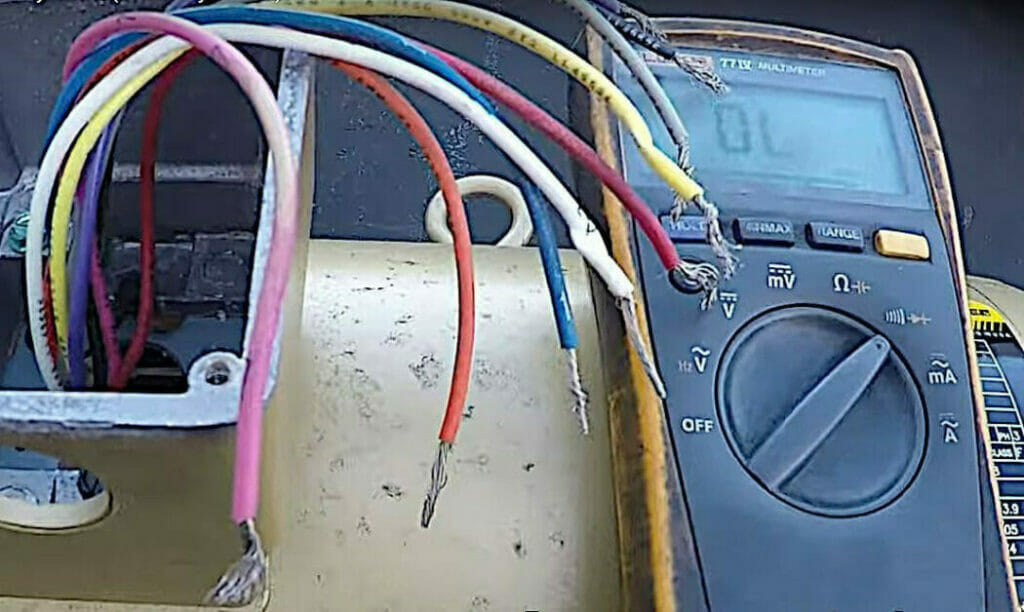
Identify and sort the 9 or 10 wires.
3 are power wires, and 6 or 7 come from the motor. The wires are color-coded, but some also have numbers written on them. Refer to the wiring diagram on the motor’s label.
Step 2: Choose a Configuration
Which configuration should you make?
Given the two possible configurations (delta and star), you might wonder which one to implement. I’ve given more details to help you decide at the end. Here, I will show where to connect the wires.
Connect the wires as indicated in one of the tables below, as you prefer:
- We make a delta connection by connecting the first coil’s starting end to the second coil’s finishing end, and so on. It forms a closed loop.
- We make a star connection by joining similar coil ends, either starting or finishing, and joining the other ends to the line wires.

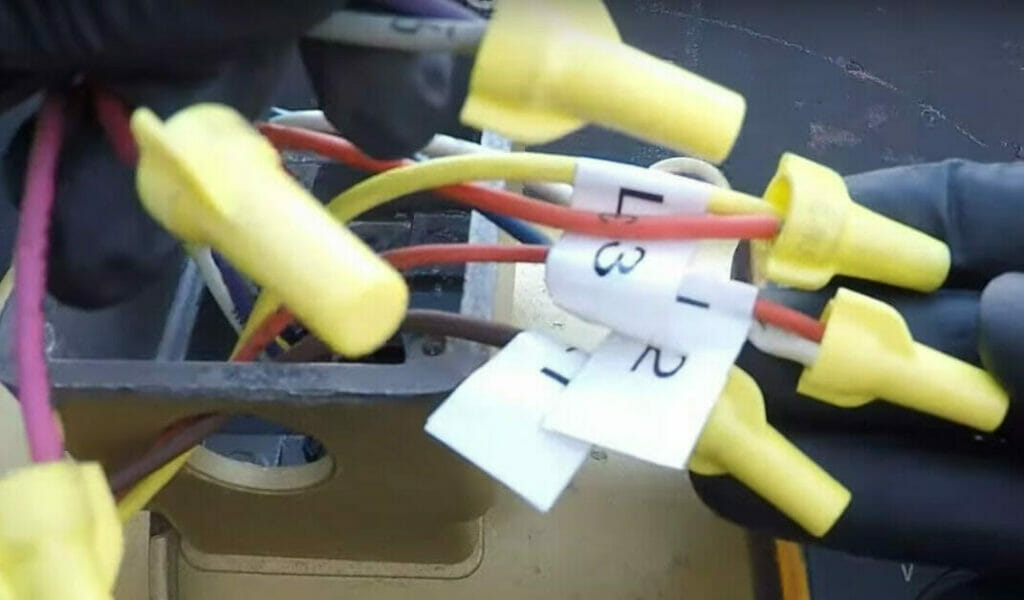
Step 3: Connect the Wires
A 3-phase motor has 6 terminal connections plus a ground connection.

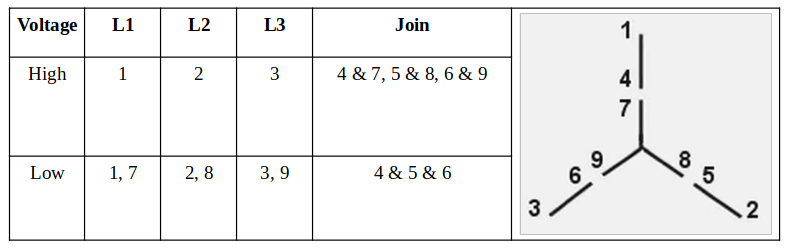
The 3-phase motor should have two wiring diagrams on its label, one for low and one for high voltage. It will show you how to connect the wires. Below is an example that uses the numbers 1 to 9, but the identifying codes may differ. Letters may be used instead or a combination of the two.

If there are no terminals to connect, combine the wires to be joined by holding them in parallel and twisting them clockwise with a wire connector, as in the example below.
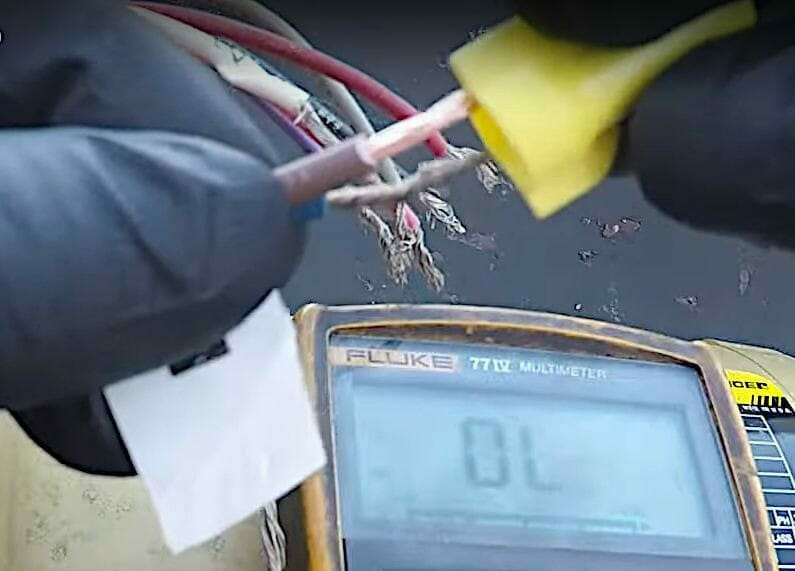
Combine all the wires as necessary according to the wiring diagram, the labels on the wires on their color coding, and your chosen configuration. Then, tuck the wires inside the wiring compartment and close it.
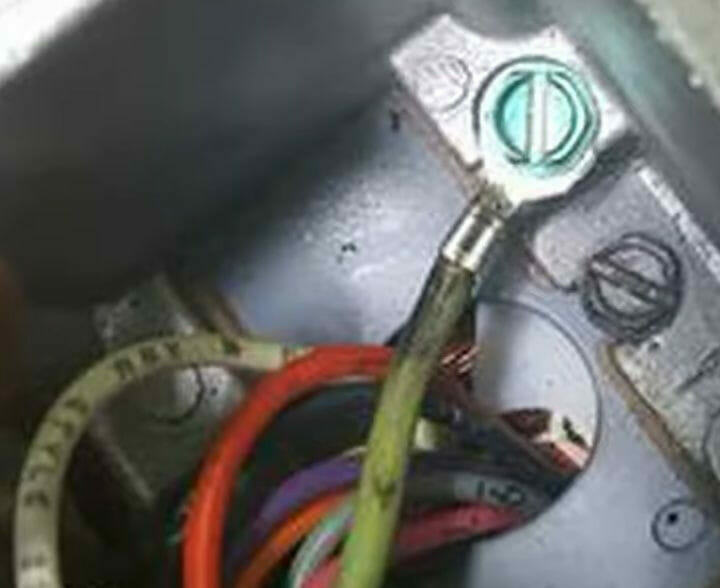
Step 4: Ground the Motor
If there is an additional green wire, bolt it onto the motor’s body to ground it.
Step 5: Attach the Power Wires
Attach the 3 power wires.
In this particular motor (shown below), they are coded as BOY: Brown for L1, Orange for L2, and Yellow for L3. Connect them as follows:
- Connect L1 to Terminal 1, L2 to Terminal 2, and L3 to Terminal 3.
More About 3-Phase Induction Motors
A key feature of 3-phase motors, which single-phase ones don’t have, is a revolving field in the air gap at a standstill. [Dekker, 2005]
It causes a locked rotor-torque and requires auxiliary winding or a start capacitor to produce the rotating field necessary to start.
Compared to single-phase motors, it requires less flux and less active material for a given breakdown torque, which makes it more efficient. The rotor current and losses are insignificant at no load. The power saving can be increased further by adding a 3-phase power factor controller.
More About Delta and Star Connections
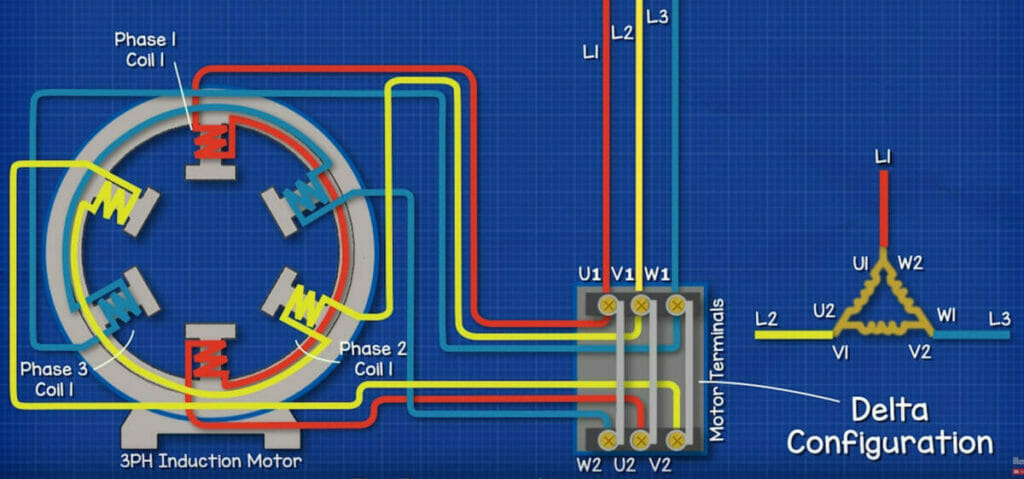
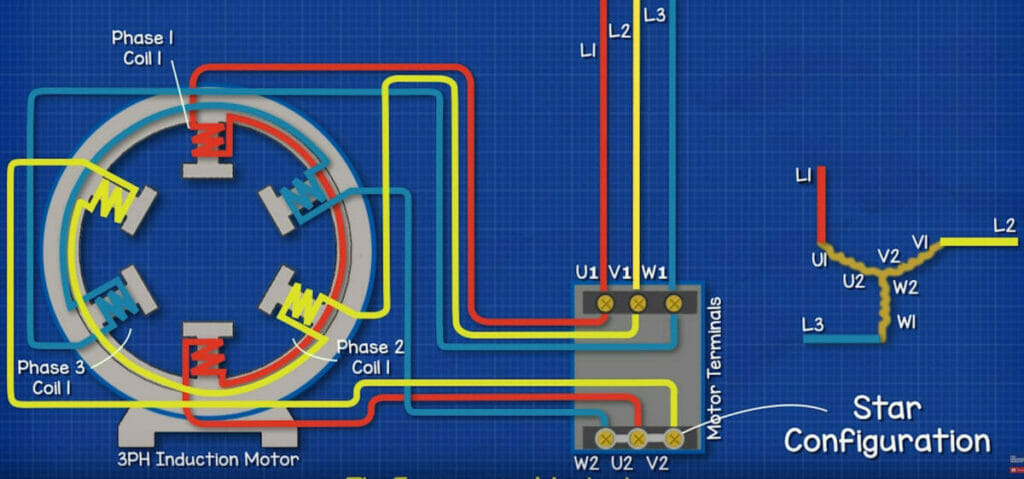
Here, we will use the labels {U1, V1, W1, U2, V2, W2, L1, L2, L3} to identify the wires according to the diagrams below.
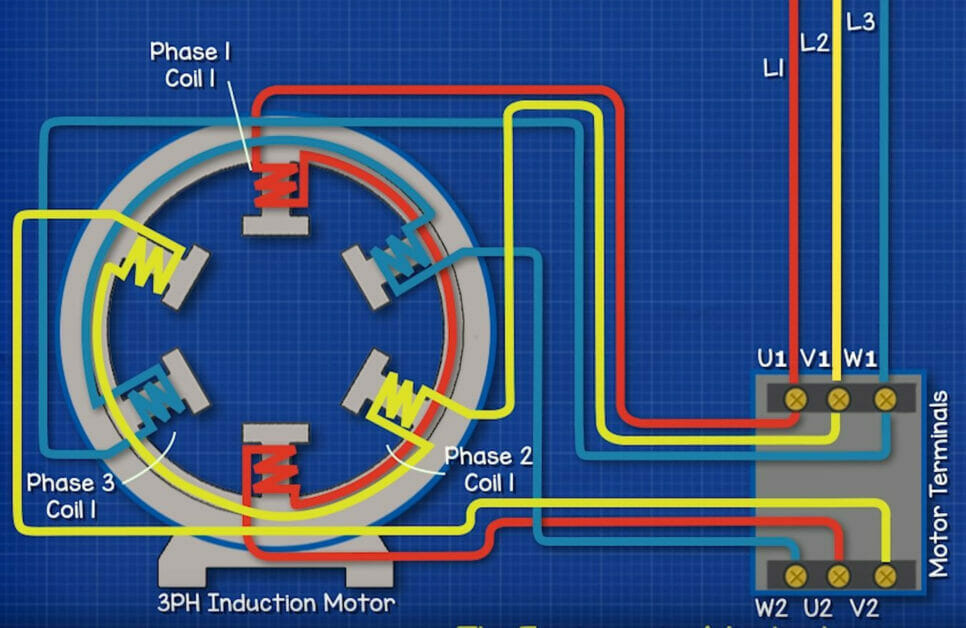
Delta Connection
In a delta configuration, you connect across the terminals as follows:
- U1 to W2
- V1 to U2
- W1 to V2
See the grey wires connecting these terminals.
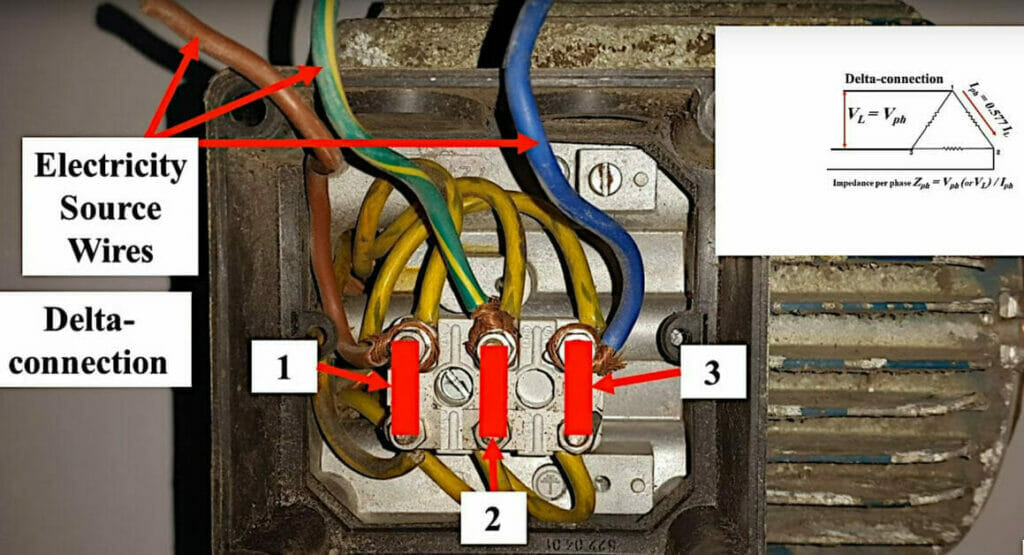
Here’s another view of a delta connection showing actual wires:
Star Connection
The electrons are shared between the phase terminals in a star (or wye) configuration.
We connect the following three terminals on one side only:
- W2 to U2 to V2 (see the grey wire connecting these terminals)
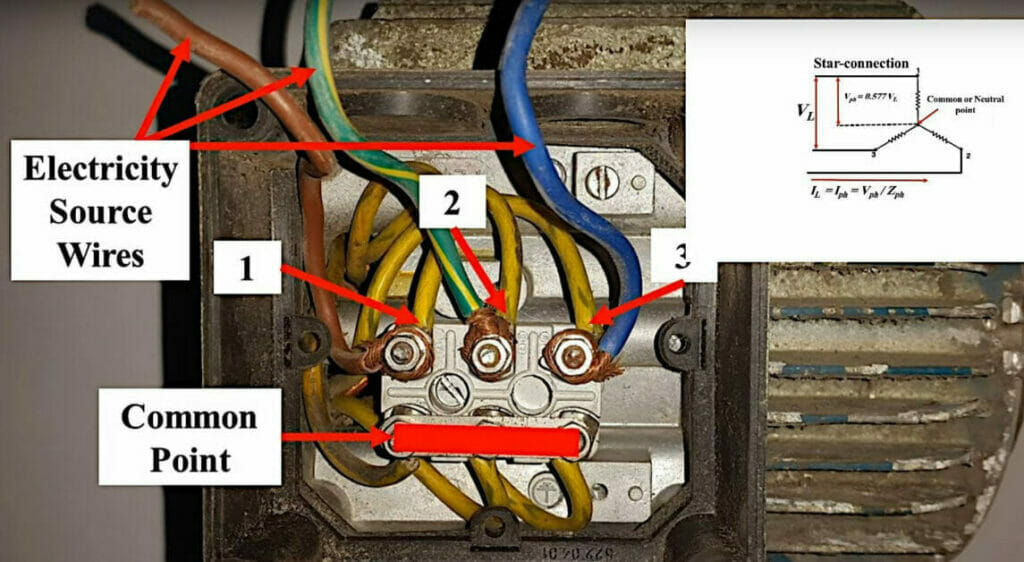
Here’s another view of a star connection showing the wires connected to a 3-phase motor’s terminals:
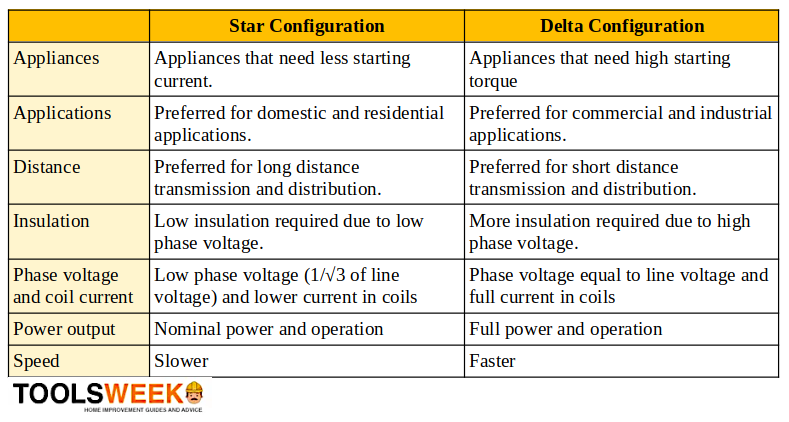
Which Configuration to Choose?
The table highlights some key differences if you’re unsure whether to adopt a delta or star configuration.
FAQ Section
- 3-phase motor sounds complex. Is it worth it? Absolutely! A 3-phase motor offers many benefits, like better efficiency, a more compact design, and a longer lifespan. It’s the superhero of motors in industrial settings.
- I see wires everywhere! How do I tell them apart? Don’t sweat it! Most wires are color-coded or numbered, making your life a bit easier. Check out that handy label on the motor; it’ll give you the roadmap.
- Star? Delta? Sounds like I’m navigating the galaxy! How do I choose? Great question! The star and delta configurations are just ways of connecting the motor’s wires. They have pros and cons, so check out the table towards the end to get the full scoop. The force is with you, always!
- I’ve got the configurations down, but where do I connect the wires? You’re in luck! The motor should have a wiring diagram right on its label. It’s like a treasure map for your wiring adventure. Follow it closely, and you’ll be golden.
- What’s this extra green wire for? Ah, the green machine! That’s your ground wire. It’s like the motor’s safety net. Bolt it onto the motor’s body, which will help keep everything safe and sound.
- Why are 3-phase motors so efficient? One word: Magic! Kidding. It’s science. A 3-phase motor uses a revolving field even when it’s standing still. This boosts it, making it more efficient than single-phase motors.
- Any pro tips for a newbie like me? Of course! Always double-check your connections, and when in doubt, consult the diagrams. And remember, every great adventure starts with a single wire!
References
Website Resources:
- Ali Emadi. Energy-efficient electric motors, 3rd edition. Marcel Dekker. 2005
Video References:
Engineering
The Engineering Mindset
Wayne’s Garage