9 min read
How to Use a Laser Level to Level Ground (11-Step Guide)

A laser level is valuable for most construction projects to ensure everything is precisely aligned and correct to avoid architectural issues. It allows you to save time and money because of how simple it is to set up and how fast and accurate it is to assess grades. You can use it indoors and outdoors, and today well cover specifically construction work such as leveling the ground.
In general, here are the steps to level the ground using a laser level:
- Turn the laser level on and give it time to self-level. On the ground, choose your preferred height.
- Put your measuring rod and laser detector together, and point the measuring rod toward it. Adjust the laser detector by moving it up and down.
- Tighten and attach the detector to the pole. Then pick a different point on the ground where the laser intercepts the height.
- Create a pile of soil or dirt to the desired height, or mark it with a stick or a paint spray.
- Repeat the process until the region is filled with reference points.
In this handy guide, let me tackle in more detail how to use it to level the ground for your construction project.
11 Steps to Level Ground Using a Laser Level (Detailed Guide)
This task may appear intimidating to beginning users of a laser level or rotary laser level. But you only need to take a few modest steps to get appropriate ground leveling, and the process is basic enough that even an unskilled user can figure it out. Here are the steps:
Step 1: Set up your tripod and laser level on a flat, stable surface

Step 2: Turn the laser level on
Step 3: If it’s self-adjusting, give it a few minutes to self-level
However, if your laser level is manual, you need to ensure the bubble is level. But if it’s not level, look for the tiny screws near the vial and adjust them until the bubble vial appears level.
Step 4: On the ground, choose your preferred height
Step 5: Measuring rod and Laser detector together
Put your measuring rod and laser detector together when you’ve found that point of height.
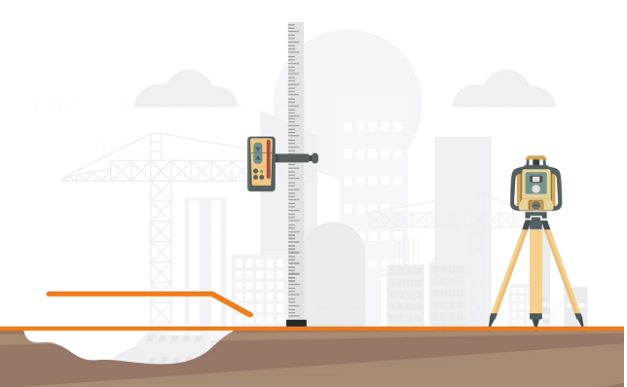
Step 6: Point the measuring rod toward it
Step 7: Adjust the laser detector by moving it up and down
Soon after, you’ll hear beeping, which indicates that the level has been discovered.
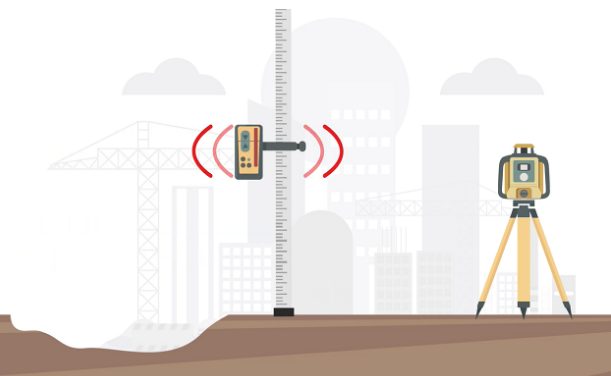
Step 8: Tighten and attach the detector to the pole
Your intended ground height is the bottom of the rod.
Step 9: Pick a different point on the ground
Pick a different point on the ground where the laser intercepts the height.
Step 10: Locate the Interception
When you’ve located the interception, you can either create a pile of soil or dirt to the desired height or mark it with a stick or spray paint.
Step 11: Repeat seven stages
Repeat the previous seven stages until you have many reference points to fill the area fully.

Note: Keep in mind that this isn’t a 5-minute job. Hence, it requires time and patience. You need to keep modifying and improving specific areas, but once your project is finished and perfectly aligned, you won’t regret investing in a laser level.
About Laser Levels
A laser level is a tool that may estimate if you’re working on a flat surface. You can use it for everything from hanging pictures on the wall to more involved construction work.
If you’re working on a renovation or construction job, knowing how to determine grade is crucial. It will ensure that the end surface is flat and that the structure is in good condition once the project is complete. The foundation will be safe if the grading is done correctly.
You can quickly determine this using a laser level.
Tips on Choosing a Laser Level
- Indoor Projects – several line lasers are ideal for aligning kitchen cabinets or framing photos in a smaller, enclosed space. For tile and brickwork, use a laser square. Also, dot or cross-line laser levels may be required for drywall work or to display horizontal and vertical lines on walls in an enclosed environment.
- Outdoor Projects – using merely the naked eye to see a laser outside can be challenging, if not impossible. Luckily, most modern laser levels come with red or green-tinted glasses or goggles, making seeing a laser beam outside a breeze. Moreover, uneven surfaces and long distances are suitable for rotary and line lasers with a pulse/detector feature.
- Take into consideration the room’s size and the distance the laser will travel. Low-RPM laser levels are bright and visible, but they don’t travel very far. In contrast, the laser is fainter at higher RPM settings, but it travels further.
- Consider the wall type you have. Pins or suction cups hold laser levels in place. On paneling or wallpaper, don’t use push pin laser levels.
- Determine the job’s stability. Indoor projects can benefit from the use of a manual laser level. For outdoor work with uneven terrain, you’ll need a self-leveling laser level.
Best Laser Level for Leveling a Ground

The rotary laser level has taken over as the ideal level for major projects and heavy works. It’ll save your money, time, and effort. Furthermore, rotary lasers can produce 360 degrees of light, displaying all levels inside or grading levels on the outside. With that, it can be helpful in projects as complex as creating an outdoor pool or deck and basic tasks like hanging something huge on the wall. Its beam is everywhere. Hence, you just need a detector or your keen eyes.
Setting Up a Rotary Laser Level
Setting up a laser level like the rotary laser level is simple. Follow these steps:
Step 1: Place the laser on a level surface with the tripod.
Step 2: Turn the rotary laser level “on.”
Step 3: Give it some self-leveling time before beginning to rotate.
Then, that’s it! It’s that simple to get started. Ensure that the tripod is level. But don’t worry, it doesn’t need to be completely level because the laser has its leveling system. When the rotary laser self-levels, it begins spinning a 360-degree laser beam.
That laser beam has a red on the RL-5HB that produces a horizontal, level beam that is accurate up to +/- 20 arc seconds at a distance of 1300 feet or 400 meters from the laser.
FAQs
What is the range of a laser level?
How do laser levels with self-leveling functions work?
A pendulum system and an internal magnet are used in a self-leveling laser. Regardless of the surrounding land or floor, the two systems operate together to ensure a level reading. Also, depending on the type of laser employed, the laser may project horizontal and vertical lines or a single dot upon a wall or feature.
How can I determine if the ground is level?
If you’re only leveling the ground with the laser level, set the receiver to your desired grade and check the dirt as you dump it and scatter it around. The receiver emits a beeping sound when it’s within an inch of reading the laser beam. If you have to lower the receiver, it beeps quickly. If the receiver needs to be raised, it beeps slowly. Then, when the receiver is fully aligned with the laser beam, it emits a firm beep.
How can I calibrate the laser levels?
Calibration is the first step after purchasing a rotary laser level. The calibration method will differ depending on the precise model you are buying. To get the most precise results from your device, make sure you follow its instructions.
Is it necessary to re-calibrate the laser level?
While the first calibration is critical, you should calibrate your self-leveling laser regularly. I recommend calibrating your laser level every six to twelve months. A variety of events can throw off calibration, so check your readings if they appear incorrect.
How can I know if a laser level is accurate?
The best way to assess the accuracy of a laser level is to test it on a surface on which you already have readings. When you use the level on that surface, you’ll be able to tell if the laser level is giving you an accurate measurement of the surface’s level.
Take a look at this article on how to use a laser level for grading.
References
(1) construction – https://www.sciencedirect.com/topics/earth-and-planetary-sciences/construction-industry
(2) surveying – https://link.springer.com/10.1007%2F0-387-30844-X_109
(3) landscaping – https://www.epa.gov/watersense/landscaping-tips
Video Reference