15 min read
How to Replace the Battery in a Honeywell Thermostat (6 Steps)
If you’re looking to replace the battery in a Honeywell thermostat, it’s a simple procedure.
Quick Summary: You change the battery in a Honeywell thermostat with these 6 steps:
🔌Step 1: Switch Off the Thermostat
🔧Step 2: Remove the Cover
🔋Step 3: Slide Out the Battery Compartment
🔄Step 4: Replace the Batteries:
🔒Step 5: Reinsert the Battery Compartment
🛠️Step 6: Put the Cover Back On
I’ll show you how to do it in more detail below. I’ve also included extracts from the manuals of a few selected series.
Honeywell Thermostats
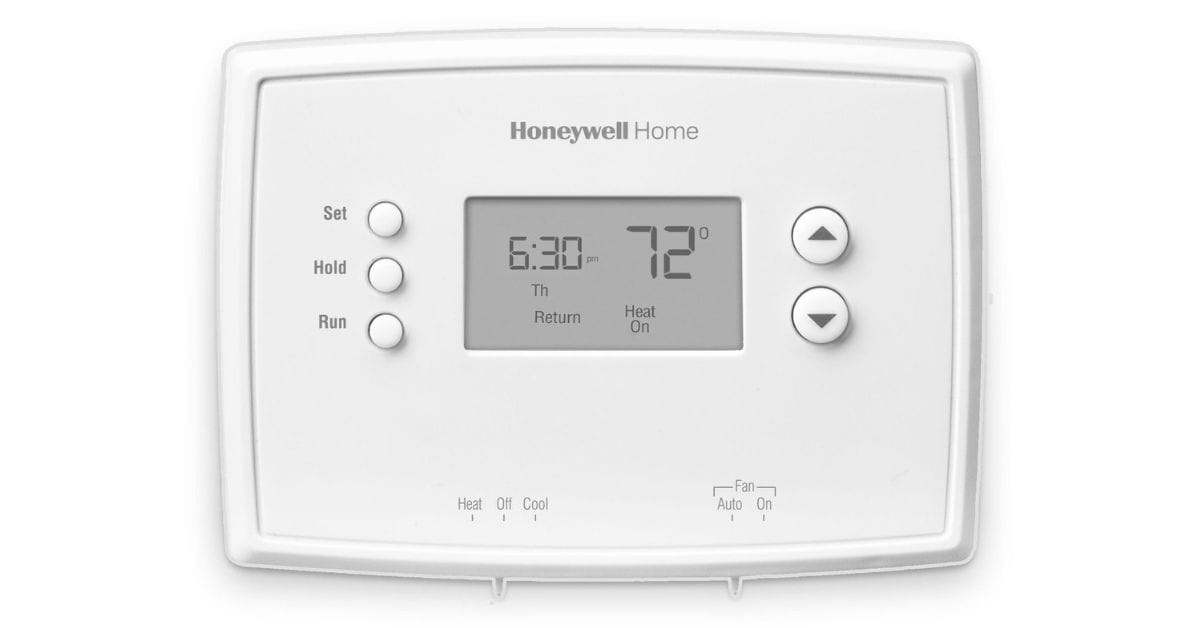
There are two types of Honeywell thermostats: programmable and non-programmable.
Programmable thermostats have a touchpad to control and set the temperature and an LED screen that gives temperature readouts.
The procedure below applies mainly to the programmable type. I’ve covered the other type where it’s mentioned as applying to the non-programmable type. There are also various models, but the procedure is the same.
Replacing the Battery in a Honeywell Thermostat
Only six steps are involved to replace the battery in a Honeywell thermostat.
Step 1: Switch Off the Thermostat
First things first, I always make sure to switch off the thermostat.
This one time, I forgot, and a small spark reminded me why this step is non-negotiable. Safety comes first, always.
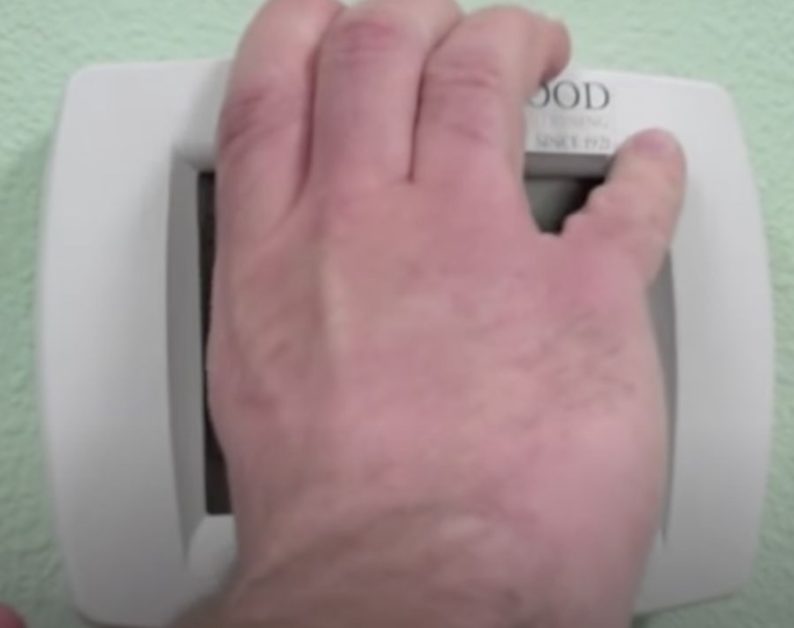
Step 2: Remove the Cover
Once it’s safely powered down, I gently remove the cover plate.
I remember a time when the cover of a programmable model seemed stuck. A bit of gentle wiggling instead of force did the trick.
Non-programmable ones can be trickier with their hidden tabs.
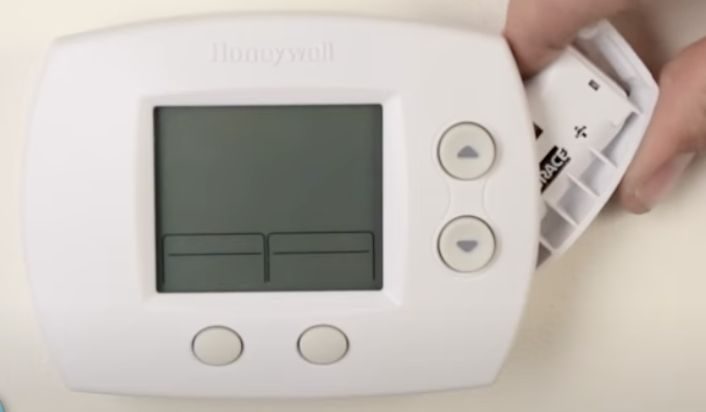
Step 3: Slide Out the Battery Compartment
This part can be sneaky. Once, I missed a small latch and ended up struggling for minutes.
It turns out a simple push on the tab was all it needed. Always look out for those little details.
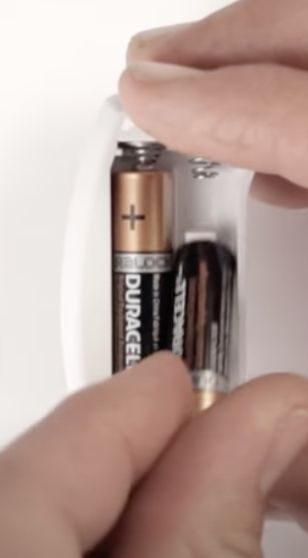
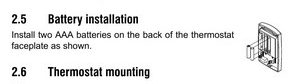
Step 4: Replace the Batteries
Inside, there are typically two or three AAA batteries.
I always replace all batteries at once to avoid any power inconsistencies.
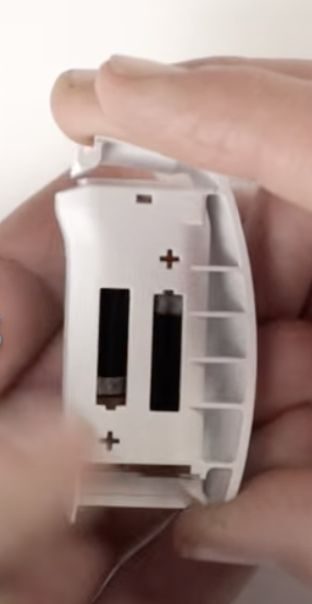
I learned the hard way that checking the polarity of new batteries is crucial. Once, I accidentally inserted them the wrong way around. The thermostat wouldn’t power on, leaving me puzzled for a bit.
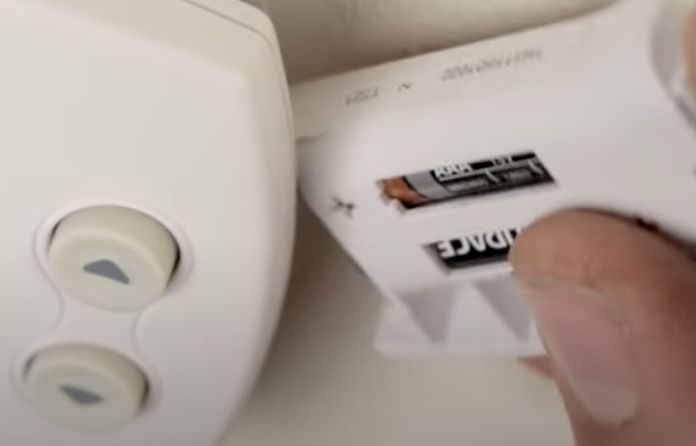
Step 5: Reinsert the Battery Compartment
Sliding the compartment back in place can be straightforward, but I’ve learned to ensure it clicks securely. There was an occasion when I didn’t align it properly, and the thermostat didn’t respond.
Step 6: Put the Cover Back On
Finally, reattaching the cover plate should be satisfying, but I didn’t align it correctly once, and it refused to click back into place. A little adjustment was all it needed.
Variant Models
Although the procedure to replace the batteries in a Honeywell thermostat is similar across all models, I’ve mentioned some variant models below to note some peculiarities.
8000 Series
The models in the 8000 series include TH8110U, TH8320U, and TH8321U.
This advanced series of programmable Honeywell thermostats have several features, including WiFi compatibility. The above procedure applies exactly to this type.
The extract below is from the manual for the TH8321U model.
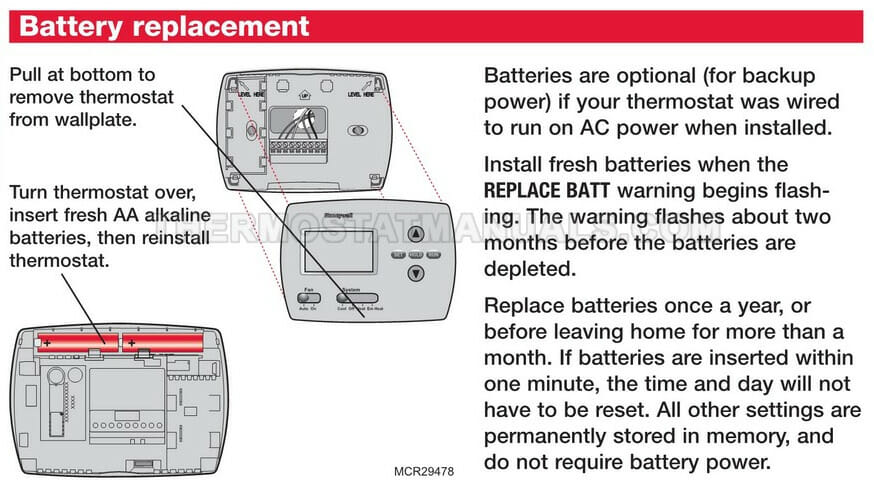
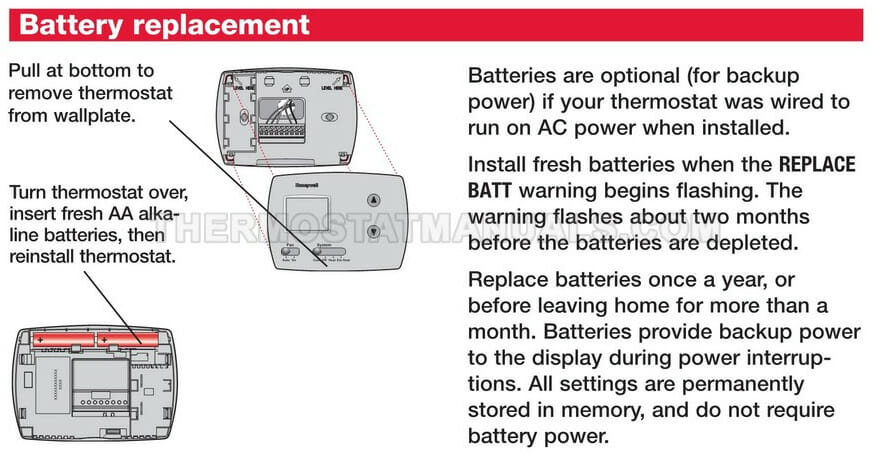
6000 Series
The models in the 6000 series include TH6110D, TH6220D, and TH6320U.
The battery compartment slides out from the side.
The extract below is from the manual for the TH6320U model.

5000 Series
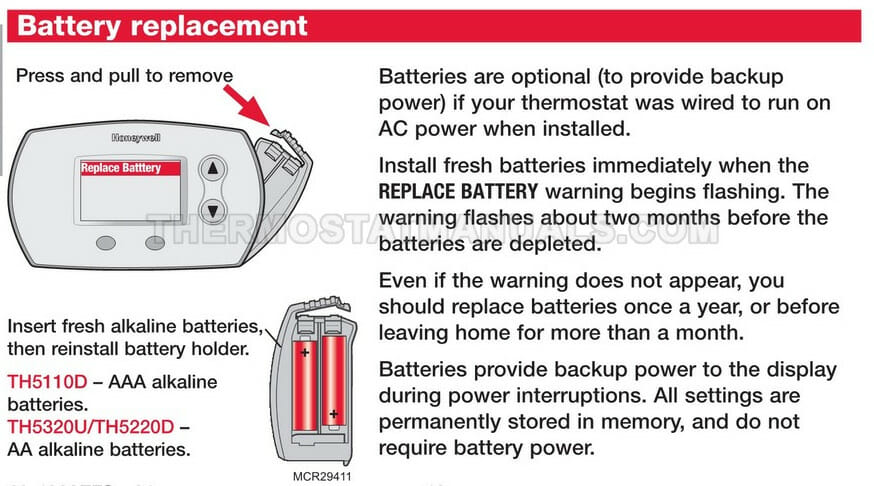
The models in the 5000 series include TH5110D, TH5220D, and TH5320U.
You don’t have to remove the cover plate if you have this type. Skip this step and go straight to sliding out of the battery compartment.
The extract below is from the manual for the TH5320U model.
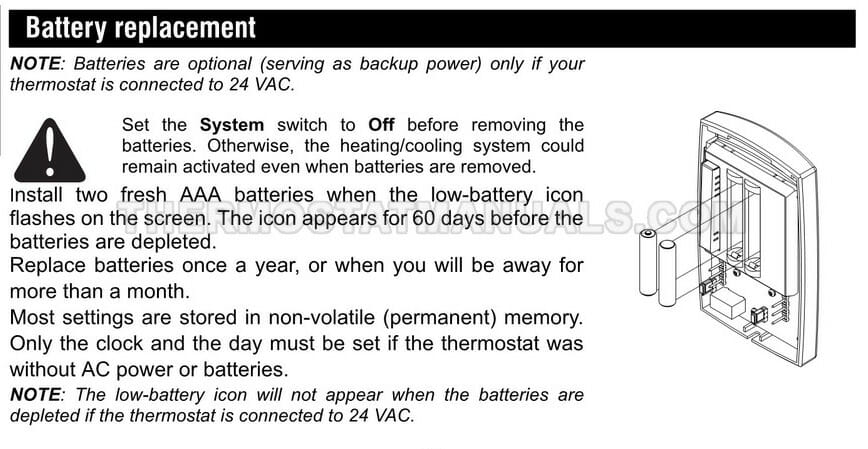
4000 Series
The models in the 4000 series include TH4210D and TH4110D.
They have a built-in compressor protection system.
It’s best to turn off the thermostat completely by switching off the circuit breaker. To remove the cover plate, push it from the bottom.
The extract below is from the manual for the TH4210D model.
3000 Series
The models in the 3000 series include TH3110D and TH3210D.
Like in the 4000 series, they have a built-in compressor protection system.
You might only need to replace the batteries in them once a year. When you do, turn off the thermostat completely by switching off the circuit breaker.
The extract below is from the manual for the TH3210D model.
2000 Series
The models in the 2000 series include TH1100DV, TH1110DV, TH1210DV, TH2110DV, and TH2210DV.
These are Honeywell’s budget thermostats. They must be switched off completely first before replacing the batteries. They take 2 AA batteries.
The extract below is from the manual for the TH2210D model.
Other Models
Honeywell also produces other models outside the above series. Two of them are:
Non-programmable models (e.g., RTH110B, RTH111B) – The batteries in them are generally simpler to replace.
Lyric Round (RCH9310WF) – This model has geofencing to control temperature based on location. Switch it off completely before replacing its batteries.
The extract below is from the manual for the CM707 model.

Troubleshooting Post-Battery Replacement in Honeywell Thermostats
So, you’ve replaced the batteries in your Honeywell thermostat, but what if things don’t go as smoothly as expected? Here’s a practical guide to troubleshooting common issues that may arise after a battery change:
- Thermostat Not Turning On:
- Check Battery Installation: First, ensure the batteries are correctly installed with proper polarity alignment. It sounds simple, but inverted battery installation is a common oversight.
- Firmly Reinsert the Compartment: Ensure the battery compartment is securely placed. A loose compartment can lead to poor contact and power issues.
- Blank or Flickering Display:
- Inspect Battery Quality: Use fresh, high-quality batteries. Sometimes, even new batteries can be defective or low on power.
- Reset the Thermostat: Look for a reset button or refer to the manual for reset instructions. A reset can often resolve display issues.
- Incorrect Temperature Readings:
- Wait It Out: Give your thermostat time to recalibrate after a battery change. It might display erratic temperatures during the first few minutes.
- Calibration Check: If the issue persists, you may need to recalibrate the thermostat manually. Consult the manual for calibration instructions.
- Thermostat Not Responding to Commands:
- Reboot the System: Sometimes, a simple reboot can fix responsiveness issues. Remove the batteries, wait for a minute, and then reinsert them.
- Check for Interference: Ensure there’s no interference from other wireless devices. Sometimes, electronic interference can affect thermostat functionality.
- Heating or Cooling System Not Starting:
- Inspect Wiring Connections: Loose or corroded wires can lead to system failures. Check the wiring, but turn off the power supply before doing so.
- Consult a Professional: If wiring and battery checks don’t resolve the issue, it might be time to call an HVAC professional for a detailed inspection.
- Frequent Battery Replacement Alerts:
- Battery Type Matters: Ensure you use the recommended battery type for your specific Honeywell model.
- System Check: Frequent battery replacement alerts can indicate a problem with the thermostat system, not just the batteries.
Avoiding Common Mistakes in Honeywell Thermostat Battery Replacement
Replacing the battery in a Honeywell thermostat is not just about getting the job done but doing it right. Here are some common pitfalls and how to steer clear of them:
- Forget to Turn Off the Power: Start by switching off the thermostat. For an extra layer of safety, turn off the main power or the circuit breaker. It’s a simple step but crucial for preventing short circuits or damage to the thermostat.
- Forceful Removal of the Cover: Be gentle when removing the cover plate. Pulling it too hard can damage the clips or the cover itself. A steady, controlled pull from the bottom corner usually does the trick.
- Incorrect Battery Placement: Pay close attention to the polarity of the batteries. Inserting them the wrong way can cause malfunctions. The compartment typically has clear + and – symbols, so line up your batteries accordingly.
- Using Old or Mixed Batteries: Always use new, fresh batteries of the same brand and type. Mixing old and new batteries or different brands can lead to inconsistent performance.
- Ignoring the Battery Compartment’s Alignment: Ensure it’s properly aligned when reinserting the battery compartment. Misalignment can prevent the thermostat from functioning correctly.
- Skipping the Reset Process: After replacing the batteries, resetting the thermostat is a good idea. This recalibrates the system and ensures it starts fresh with the new batteries.
- Neglecting the Thermostat’s Manual: Each Honeywell model might have its nuances. If in doubt, refer to the specific manual for your model. It’s the best guide to avoid any model-specific mistakes.
Essential Maintenance Tips for Honeywell Thermostats
Regular maintenance ensures your Honeywell thermostat continues functioning efficiently and its battery life is optimized. Here are some practical tips to keep your thermostat in top shape:
- Regular Cleaning: Dust and dirt can accumulate on and around your thermostat, potentially affecting its performance. Gently clean the device with a soft cloth or a brush. Avoid using water or liquid cleaners, which can seep into the device and cause damage.
- Check Battery Levels Periodically: Even if your thermostat doesn’t indicate a low battery, it’s wise to check the battery level regularly. This proactive approach can prevent unexpected power failures.
- Optimize Thermostat Placement: Ensure your thermostat is placed away from direct sunlight, drafts, doorways, windows, and heat sources. Incorrect placement can lead to inaccurate temperature readings and excessive battery usage.
- Update Thermostat Settings Seasonally: Adjust the settings according to the season. Efficient use of scheduling and temperature settings can reduce the burden on the thermostat, thereby extending battery life.
- Avoid Frequent Temperature Adjustments: Changing the temperature can cause your thermostat to work harder, which may drain the battery faster. Set a comfortable baseline temperature and make minor adjustments as needed.
- Inspect Wiring Regularly: Loose or corroded wiring can affect the thermostat’s functionality. If you notice any wiring issues, consider getting a professional to inspect and fix them.
- Use Quality Batteries: Always opt for high-quality batteries for replacements. They last longer and provide stable performance, ensuring your thermostat works reliably.
- Firmware Updates for Smart Thermostats: If you have a smart Honeywell thermostat, ensure its firmware is current. Manufacturers often release updates that improve efficiency and functionality.
By following these maintenance tips, you can enhance the longevity and performance of your Honeywell thermostat, ensuring it delivers optimal heating and cooling control.
Environmental Responsibility: Proper Disposal of Old Thermostat Batteries
When you replace the batteries in your Honeywell thermostat, it’s not just about keeping your home comfortable; it’s also about being environmentally responsible. Here’s how you can ensure the old batteries don’t harm the environment:
- Understand the Impact: Batteries contain chemicals like lead, mercury, and cadmium, which can be harmful if they end up in landfills. These chemicals can leach into the soil and water, posing a risk to wildlife and the environment.
- Locate Battery Recycling Facilities: Many communities have dedicated facilities for battery recycling. These facilities are equipped to handle and recycle batteries safely. Use online resources or contact local waste management services to find a recycling center near you.
- Retailer Take-Back Programs: Some stores offer take-back programs for used batteries. They collect and send them to appropriate recycling facilities. Check with electronics stores or home improvement centers in your area.
- Use Rechargeable Batteries: Consider using rechargeable batteries in your thermostat if compatible. They last longer and reduce the frequency of disposal, lessening the environmental burden.
- Follow Proper Storage Guidelines: Store used batteries in a cool, dry place, ideally in a non-conductive container. This prevents them from leaking or corroding before you can dispose of them properly.
- Spread Awareness: Encourage friends and family to recycle their batteries as well. The more people participate in responsible battery disposal, the greater the positive impact on the environment.
- Check Local Regulations: Some areas have specific regulations about battery disposal. Ensure you’re aware of and comply with these regulations to avoid penalties and ensure safe disposal.
By responsibly disposing of old batteries from your thermostat, you contribute to a cleaner, safer environment. It’s a small step, but the impact can be significant when multiplied across many households.
Staying Current: Latest Honeywell Thermostat Models
Honeywell continually innovates and introduces new thermostat models to enhance user comfort and efficiency. Let’s dive into some of the latest models and their standout features:
- Honeywell Home T9 Smart Thermostat: The T9 model leaps forward in thermostat technology. It comes with smart room sensors, offering improved efficiency in heating and cooling by focusing on the rooms you use the most. It’s compatible with most smart home systems and can be controlled via the Honeywell Home app.
- Honeywell Home T10 Pro Smart Thermostat: Building on the features of the T9, the T10 Pro offers advanced energy-saving capabilities and adaptive recovery, learning your heating and cooling cycles to optimize temperature control and reduce energy costs.
- Honeywell Home Wi-Fi 7-Day Programmable Thermostat (RTH6580WF): This model provides Wi-Fi connectivity for remote access and programming. It is ideal for those seeking to balance traditional thermostat functionality and modern connectivity.
- Honeywell Home Wi-Fi Color Touchscreen Programmable Thermostat (RTH9585WF): This thermostat boasts a full-color touchscreen display that is customizable to match your home decor or mood. It provides weather forecasts and offers energy usage reports, helping you monitor and manage your consumption.
When considering an upgrade or a new installation, these latest models from Honeywell offer a range of features suited to diverse needs, from simple programmability to advanced smart home integration. It’s important to review each model’s specific capabilities and compatibility to find the best fit for your home.
References
Organizations:
- ASHRAE (American Society of Heating, Refrigerating, and Air-Conditioning Engineers). https://www.ashrae.org/
- Honeywell Home. https://www.honeywellhome.com/
Books:
- “Electricity and Electronics for HVAC” by Rex Miller
- “Energy Management Handbook” by Steve Doty and Wayne C. Turner
Website Resources:
- Honeywell Home Support. https://www.honeywellhome.com/us/en/support/
- This Old House – How to Install a Thermostat. https://www.thisoldhouse.com/
- Energy.gov – Thermostats. https://www.energy.gov/energysaver/programmable-thermostats
Video References:
GreenwoodHeatingWA
Service Champions Plumbing, Heating & AC
Williams Plumbing & Heating