7 min read
How to Drill Out Lug Nut (4 Steps)
I’ll teach you how to drill out lug nuts from your car wheels in this article.
A lug nut may seize when a flat tire occurs and cannot be removed easily. In other cases, surface damage causes the lug nut’s flats to round off as you try to remove it. As someone that has worked as a mechanic, I have used a few tricks to remove rusted or seized lug nuts and bolts, which I will teach you. Knowing this will prevent the wheels from rotating.
Quick Summary: Follow this to drill out rusted or seized lug nuts:
- Drill and apply Penetrating Oil
- Apply a “Snug” Socket or a Lug Nut Extractor
- Use a 1/2-inch drive breaker bar that is 18-inch to 24-inch in length to loosen the nut
- Loosen the remaining lug nuts, jack up the car, appropriately support it, and remove all of the fasteners
I will go into detail in the following sections.
How to Remove a Non-Removable Lug Nut
Other than noted below, whether a lug nut is stripped, rounded off, or seized due to corrosion or overtightening, the removal procedure is usually the same.
Start with your vehicle on the ground, not on jack stands or elevated. Check that the transmission is in Park or gear and that the emergency brake is securely in place. These steps will prevent the wheels from rotating while you work to loosen the fasteners.
RELATED How to Use a Breaker Bar (Guide)
What You’ll Require
- Oil for Penetration – WD-40)
- Cordless power drill
- 7/64-inch and 5/64-inch cobalt drill bits
- Lubricant for drilling Safety
- Safety goggles
- 1/2-inch drive 6-point socket
- Set of lug nut extractors (optional)
- 1/2-inch drive breaker
- a 3-foot section of pipe or a floor jack
Step 1: Drill and Apply Penetrating Oil
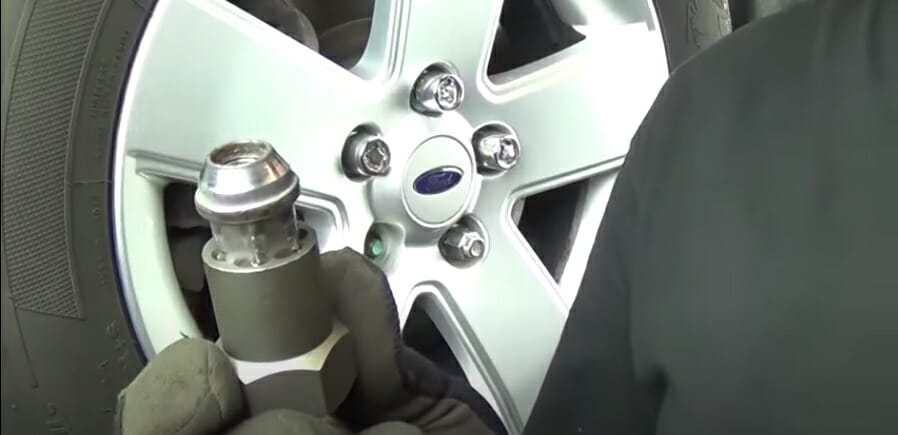
First, soak the nut and stud in the penetrating oil. Drilling the closed head of the lug nut could also help get the oil into the threads.
Top-quality drill bits, such as cobalt alloy steel drills in 5/64-inch and 7/64-inch diameters, will be required. Wear your protective goggles now. Dimple the center of the lug nut with a center punch and hammer.
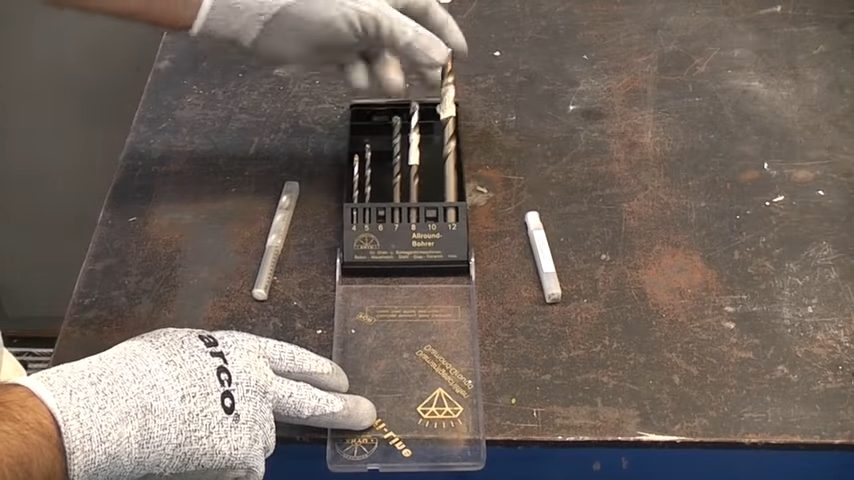
1. Start by drilling with the smallest drill bit. Wet the bit’s tip with the oil. Hold the drill motor firmly with both hands. Drill at a snail’s pace. Be careful not to flex the drill bit.
2. Stop drilling if the oil begins to smoke. To cool the hot bit, immerse it in water. Wipe away any remaining chips and re-apply oil to the bit and hole. Redo it until the bit breaks through to the top of the stud.
3. Repeat the drilling procedure with the 7/64-inch bit in the drill motor. Keep the drill motor securely in place because the bit may unexpectedly grab the hole and rotate the drill.
4. Add the WD-40 tube mixture in the hole and enclose it in a shop towel at the nut surface to trap any back spray. Squeeze some of this lube into the hole.
5. Spray WD-40 around the lug nut’s base. Add another splash to the hole and base of the nut the next morning.
Step 2: Apply a “Snug” Socket or a Lug Nut Extractor
Choose a 1/2-inch drive 6-point socket that best fits the lug nut or the bolt tightly — a deep socket may be necessary.
A seriously rusted fastener may well be worn down to the point where one size smaller socket (or smaller SAE similar to a metric nut) may be tapped on with a regular hammer.

If the lug nut or bolt head doesn’t accept a standard socket or has worn into a rounded shape, employ an extractor socket.
An appropriate lug nut extractor set, such as those made by Irwin (best) or ABN (good), can be bought online or from a reputable auto parts store.
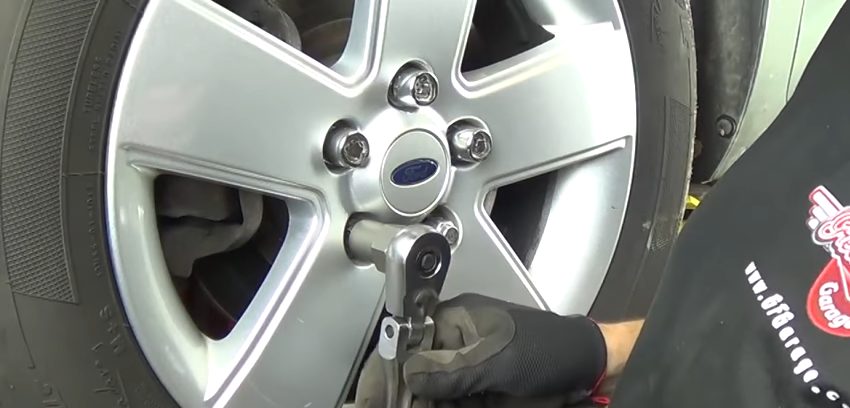
Step 3: Loosen with a Breaker Bar
Use a 1/2-inch drive breaker bar that is 18-inches to 24-inches in length.
Install it in the socket — the handle should extend horizontally so that it can be raised upward (if using a floor jack) or pressed downward to loosen the lug nut (if not a floor jack).
If You’re Using a Floor Jack
Put your floor jack underneath the breaker bar handle. Then, pump it up. Using this procedure, you can charge up to one-quarter of your vehicle’s weight in lbs of force. Maintain a safe distance because the bar will bend and want to spring off the nut or the floor jack’s lift pad.
If There is No Floor Jack
Slide a pipe over the breaker bar handle to apply significant force to it. To fit nicely, the pipe should be slightly larger than the breaker bar. Use a 3-foot pipe.
Place the breaker bar to the left of the lug nut at an upward angle of about 10°. To loosen the nut, push it downward. Step cautiously onto the pipe to apply force with your weight.
Grasp the side of your vehicle for support. If the bar and socket pop off the nut or it (the nut) abruptly breaks free, avoid slipping off the pipe.
RELATED How to Use a Breaker Bar (Guide)
Step 4: Complete Wheel Removal
Loosen the remaining lug nuts, jack up the car, appropriately support it, and remove all of the fasteners, followed by the wheel.
Fail-Safe -Lug Ripper
The final ditch removal method is possible with the help of a tool known as the Lug Ripper.
To use the tool, carefully follow the operating manual on a website. Failure to do so may result in the tool becoming unusable.

New Lug Nuts, Studs, and Bolts
After removing a rusted lug nut or bolt, replace all the fasteners in the bolt pattern. Substituting only the damaged fastener may cause an out-of-balance situation.
- Wheel studs with rusted or seized lug nuts should be thoroughly checked.
- To begin, clean the threads with a small wire brush.
- Examine the threads visually with a bright light. They should appear clean, smooth, and uniform.
- Replace the lug nut with the threads. It should be easy to turn on and off by hand.
Take a look at some of our related articles below.
Video References
Ultimate Handyman
Greenos Garage
Jim’s Jeeps