10 min read
How to Wire a Charging System on a Lawn Mower (6 Steps)

Wiring a charging system on a lawnmower might seem complicated, but you can do it easily, and I’ll teach you how.
I will show you the main electrical connection points and tell you what wire goes where with pictures. An extra guide is included specifically for rider lawnmowers.
When wiring a lawnmower, the main electrical connection points to identify are the ignition switch, battery, solenoid, starter, and alternator. Follow your particular lawnmower’s manual to check or connect all the wires. If rewiring, I suggest running the wires from the ignition switch to all the other components first, then wiring at each connection point.
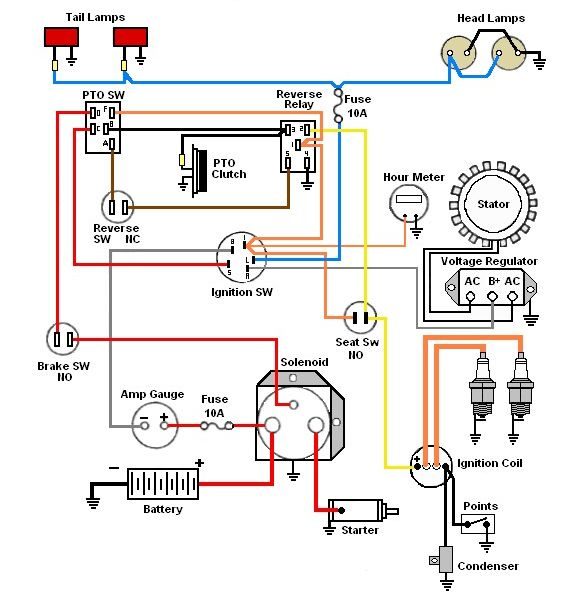
I’ve included a wiring diagram as a sample (refer to your own).
What it is and Why it’s Necessary
A charging system is necessary for a lawnmower because it is used in a remote location from an electrical power source.
It ensures the battery remains charged enough to start the mower and provide power in the event of an electric starter failure. Also, a lawnmower can wear out quickly without sufficient electrical power.
How the Lawnmower Battery Gets Charged
The lawnmower battery gets charged by the alternator while using the lawnmower.
The system also relies on a voltage regulator to control the voltage output to the battery and safely limit the starting amps. The generator field powers the cooling fan as well, but ensure it’s not left idle without a load to prevent overheating.
Requirements
Wiring a charging system on a lawnmower usually requires the following:
- A fuse box with three slots for power to go into the ignition switch, the starter relay, and to return from the ground to the wiring harness connector.
- Removing wires not being used in the charging system.
- Connecting the battery to the alternator to get charged.
- Minimizing the distances between all the connections, especially to reduce the wear and tear on the spark plug.
- Ensuring the coil and capacitor are compatible with the battery’s voltage.
You will need the following tools, materials, and instruments:
- Wire – Generally, a 10-gauge wire will do.
- Wire cutter
- Wire stripper
- Multimeter (or test light)
- Electrical tape
- Cable ties
- Soldering iron and solder (or crimp connectors) to connect the wires and components
Battery Recommendations
If you’re getting a new battery, I recommend that you:
- Buy one with a high Ah (ampere-hour) rating that will fit and is not too heavy, as it will last longer than a battery with a lower Ah rating.
- Use batteries with the same voltage if wiring in parallel (to avoid damaging the charging system). Note that the voltage will be higher if you connect multiple batteries in series, so consider this if you choose this arrangement instead.
Usually, a lawnmower’s battery is 6V or 12V. 6V batteries are common on riding lawnmowers, and 12V on the push-type.
Methods
There is more than one way to wire a charging system on a lawnmower.
An easy way is to buy a pre-wired system, but it will probably be expensive and not even fully compatible with your lawnmower. That’s why people choose to wire a lawnmower charging system themselves. It requires technical know-how, but you can do it without our easy-to-follow guide.
Wires
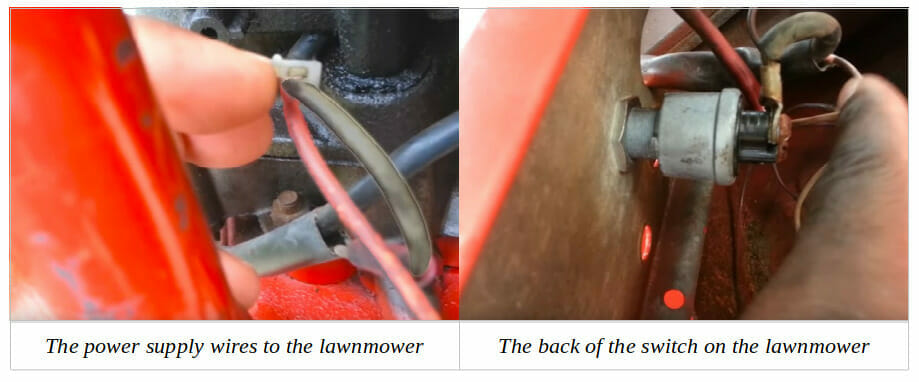
You will notice two wires connected to the lawnmower: a red one and a black one.
The red one is for DC power, and the black wire is for AC power.
The wires behind the white plastic part (in the picture on the left) are AC converted to DC via a diode that makes current flow in only one direction. The conversion takes place inside the wire itself.
The picture on the right below shows a view of the key switch from the inside. One side of the red wire, which has a diode (pointed at), goes to the battery’s positive terminal, and the other end connects to the stator or alternator.
Procedure for Wiring a Lawnmower Charging System
Step 1: Disconnect the Ground Wire
This step only applies if you’re rewiring or checking an existing lawnmower charging system.
First, disconnect the battery’s negative (black) cable from the battery before working on the charging system. It is to prevent a short circuit while working.
Step 2: Remove the Battery
This step only applies if disconnecting the battery to replace it.
Disconnect the positive (red) cable next and remove the battery. Using a wrench or spanner, you must remove a bolt holding the battery on both sides. Take the battery to a recycling center if it’s old or damaged.
Step 3: Unplug the Spark Plug Wire
Disconnect the spark plug wire from the spark plug; otherwise, there’s a risk of the mower starting unexpectedly.
Step 4: Reattach the Ground Wire
Attach one end of a cable tie to the battery’s negative terminal and the other to the land mower’s negative post via an empty slot on the multimeter’s case.
Tighten the connections at both ends.
Step 5: Attach the Battery’s Positive Wire
Attach the positive (red) cable to the battery’s positive (+) terminal and the positive terminal on the lawnmower.
Step 6: Test Before Using
Testing the charging system after rewiring before using it is always a good idea.
Check the current at the terminals using a multimeter set to measure current in amps (AC or DC). Connect the red probe to the positive terminal and the black one to the negative terminal for each pair of terminals. The voltage across the new battery’s terminals and the mower’s battery should be the same (at least 12 volts).
Some lawnmowers have a polarity light on them. It should light up if you wired the charging system correctly.
Wiring a Riding Lawnmower
Requirements: battery, solenoid, wires, engine with starter motor, ignition switch, 15-amp fuse
Wiring Points
You must wire at these points: ignition switch, solenoid, alternator, battery, and ground connections. Make sure you can positively locate them and identify the wires.
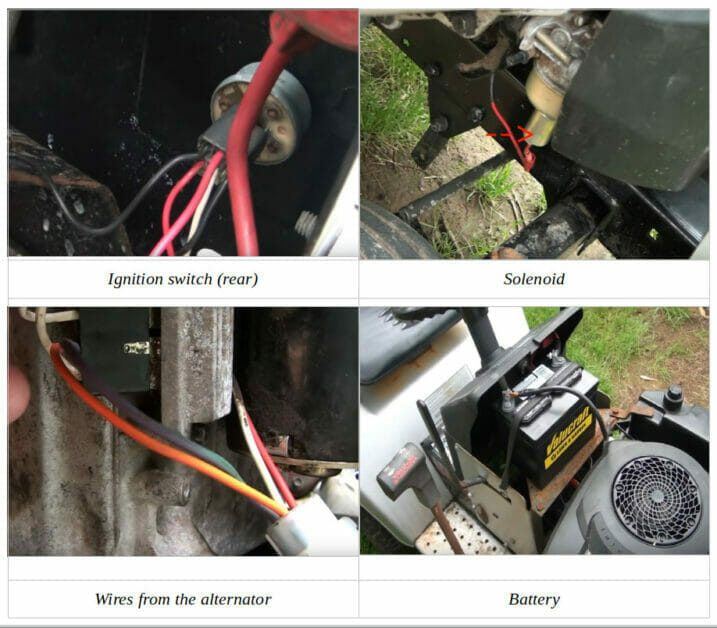
The two white wires from the alternator are under the flywheel (bottom left picture above). They are more clearly visible in the bottom right picture above. The other two wires (orange and black) pointed at are DC outputs from the rectifier. One can be used for running the lights if you have them, and the other connects to the battery’s positive terminal.
Step 1: Run the Wires
Run the wires from the ignition switch to the other components.
Refer to your riding lawnmower’s wiring diagram. This one is only a sample, which is for certain Craftsman Riding lawnmower models. Yours might differ a little.
Step 2: Ignition Switch Connections
The pins on the back of the ignition switch pins may be marked B, G, L, M, and S. They connect as follows (refer to your own lawnmower’s manual if it differs):
- B: To the battery
- G: To a ground
- L: To the lights
- M: To the magneto
- S: To the solenoid
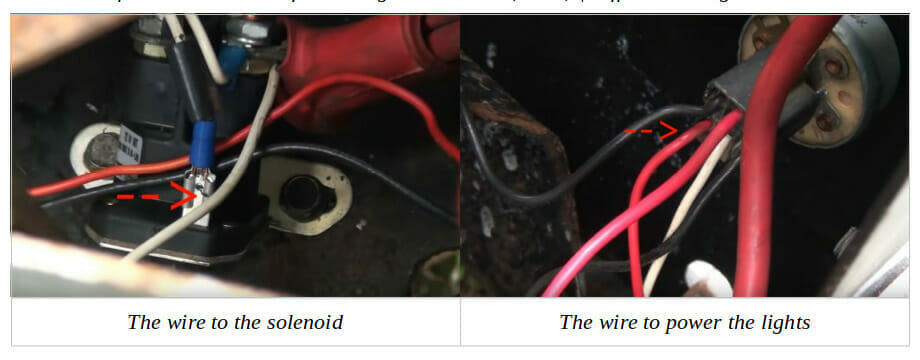
For example, the connection from the ignition switch to the solenoid is marked in the picture below (left). In this case, it’s a white wire with a blade connector and blue cap connected to the S pin. The other end is a white wire connected to the above solenoid under ‘wiring points.’ The wire marked on the right powers the lighting circuit so that the lights are powered electrically when the ignition switch is turned on.
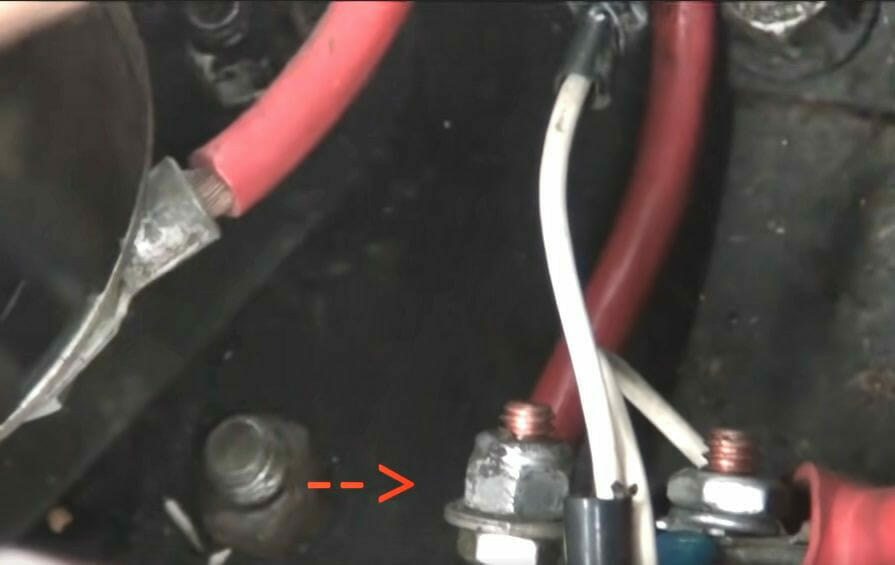
Step 3: Solenoid Connections
The main red cable marked in the picture below on the solenoid goes to the starter motor.
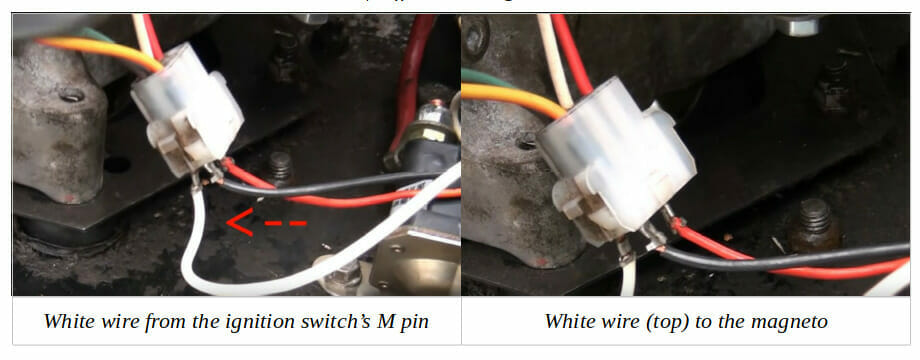
Step 4: Alternator Connections
In this case, the wire from the ignition switch’s M (magneto) pin is the white wire, which goes to the alternator’s connectors shown below (marked by an arrow). The white wire on the other side of this connection point goes directly to the magneto itself.
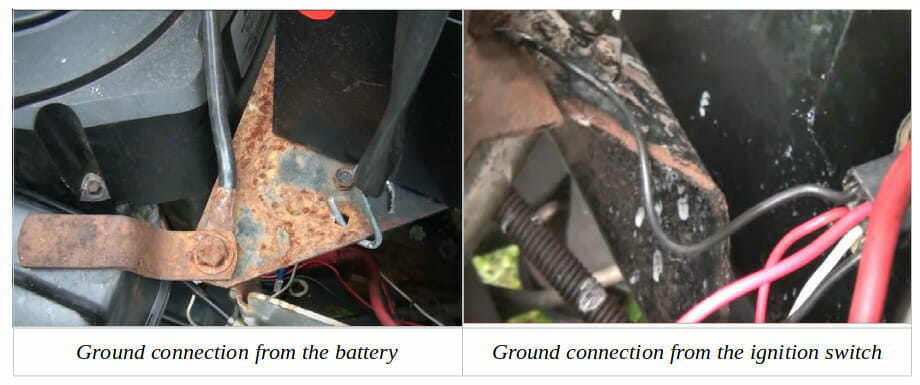
Step 5: The Ground Connections
You have to make two main ground connections on a riding lawnmower:
- The ground connection shown on the left below connects from that point to the battery’s negative (black) terminal.
- The ground connection shown on the right below connects from that point to the ground point of the ignition switch.
The wire to connect to the ground is black in both cases.
Step 6: Testing
Test the riding lawnmower to ensure everything works fine once the wiring is done.

Troubleshooting
Wiring and Connections
- Ensure all the ground and other connections are secure and clean.
- Ensure all crimped or soldered connections are secure and cover them with electrical tape.
- Look for any tear or break in the wires and replace them if necessary. Frayed wires can cause a short circuit. Always replace such damaged wires (observing the same configuration).
Battery
If the battery appears dead, hook it up to a battery charger or a vehicle and charge it through that. Then, replace it inside the lawnmower.
Stator
If you suspect the stator is not working properly, test it using a multimeter set to measure resistance.
Check the resistance levels between each of the three stator windings. They should all be within the manufacturer’s specifications. If any one of the readings is not within its range, replace the stator.
FAQs
How many volts should a lawnmower charging system show?
The lawnmower charging system should show a voltage of around 12-13 volts.
Can you charge a lawnmower battery using a car battery?
Yes. To do so, connect the two positive terminals and the car battery’s negative terminal to a metallic part of the lawnmower’s frame. Then, start the car and let it run for about 10-15 minutes. Disconnect the leads and start the lawnmower. It should have enough charge to start working. It is an easy way of quickly charging your lawnmower battery using a car battery.
References
Video References:
DIY OneForAll
Jeff’s Little Engine Service