8 min read
How to Test a 5-Wire MAF Sensor (4 Easy Steps)
A 5-wire MAF sensor is a common component in many vehicles and can often fail without warning. This guide will show you how to test one for malfunctions.
Testing a MAF sensor, whether 3-wire or 5-wire, involves first identifying the power connector, which should give a reading of approximately 12 volts, and the ground connector, which should give a reading of approximately one ohm, and then testing the signal wire according to the type of sensor.
I explain the process in more detail below.
The MAF Sensor
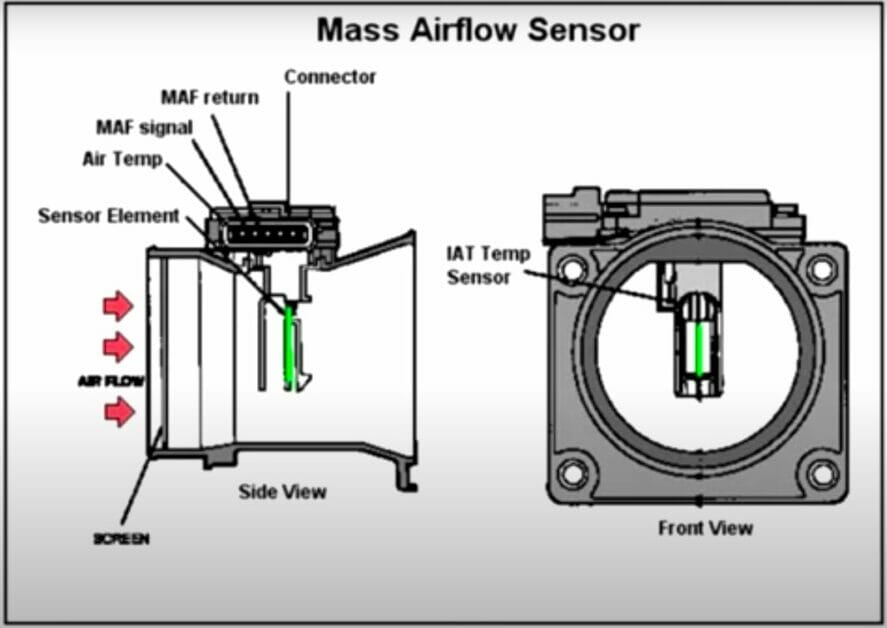
A MAF sensor senses the air entering an engine in terms of volume, density, and temperature.
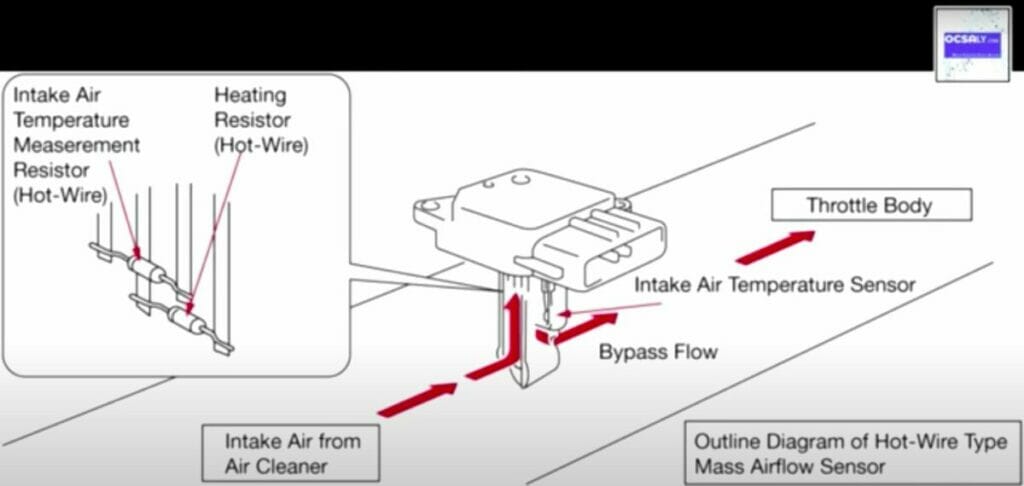
It has a film wire inside that reaches about 158°F (70°C) above the air temperature. The air inside cools down the hot film to determine the mass of air inside the intake.
Using this information and other inputs, the vehicle’s computer computes air-to-fuel ratio estimates, spark timing, and shift timing.
There are two types of sensors in a MAF: analog and digital. The analog type measures the DC voltage difference, whereas the digital type measures frequency, which may be either low frequency or high frequency. They are also distinguished by having either a hot film or a hot wire.
Location and Direction
The MAF sensor is usually located after the air filter box. It may be between this and the throttle body or inside the air filter’s casing. Check your vehicle’s manual if you’re unable to find it.
The MAF sensor operates in one particular direction only.
Situations to Test the MAF
You may need to test the MAF sensor if you notice any of the following symptoms:
- Fuel economy: Poor fuel economy compared to before.
- Engine issues: Engine light on, low engine power, engine running in fail-safe mode.
- Starting issues: Hard starting or not starting at all.
- General performance: Erratic performance compared to before.
- Other issues: Stalling when the gear is engaged, rough idle.
If the engine light is on, you should check the error code to know the actual problem. Follow the troubleshooting guide in your vehicle’s manual.
If the engine has a starting issue, unplug the MAF sensor and then restart the engine. If this fixes the issue, you probably need to replace the sensor.
If the problem is rough or poor idle, lightly tap the MAF sensor and connector and wiggle the wires while the car is parked and the engine is idle.
You will need to test it in all other situations, or if the MAF sensor is not operating properly.
Testing the MAF Sensor with a Diagram
If you have a wiring diagram, you can get information about which wire is which by looking at the three MAF sensor connectors.
The codes, colors, and connectors may be as follows, but yours may differ:
| Code | Color | Connector |
| SW | Black or brown | Ground |
| GE | Yellow or green | Signal |
| RT/WS | Red, red with white stripe, yellow, or yellow with black stripe | Power |
RELATED Knock Sensor Diagram
Testing the MAF Sensor without a Diagram
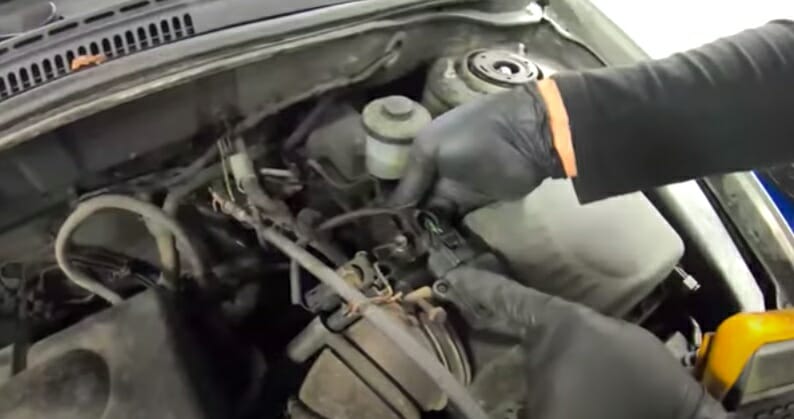
If you don’t have a wiring diagram, you will have to test the MAF sensor manually. Follow these steps to test the MAF sensor without a wiring diagram.
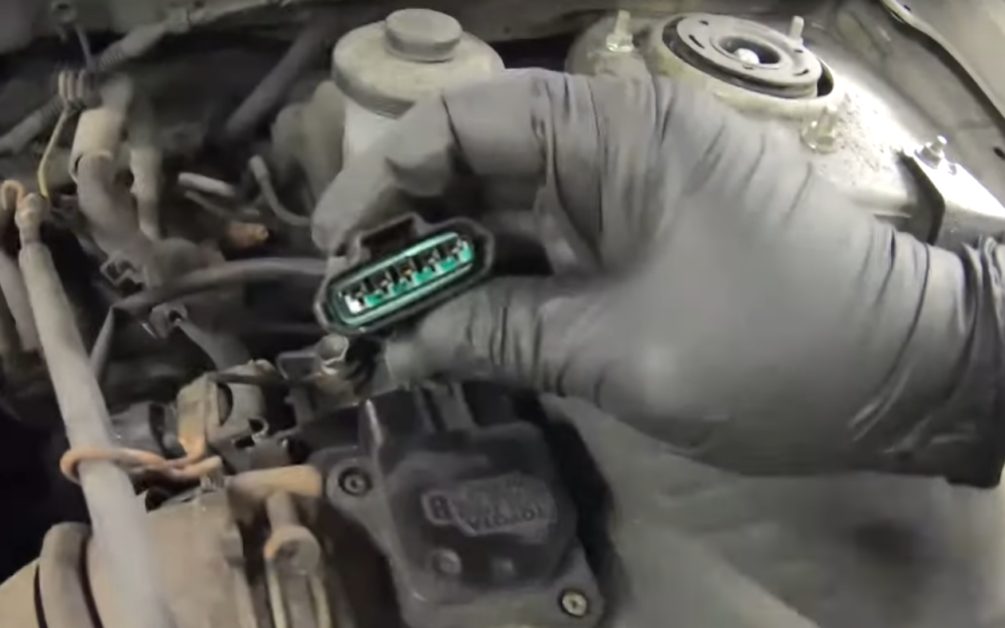
Step 1: Disconnect the Connector
Firstly, disconnect the connector. You will see five wire connectors inside. They include GROUND, VOLTAGE, and SIGNAL.
Step 2: Detect the Power Supply
Now set the multimeter to the DC volts position and turn the car’s ignition to the second position. We will check all three connectors in turn.
Note that most car sensors have a reference supply of 5 volts, but the MAF sensor needs 12 volts. One of the five has 12 volts, and one has 5 volts (for the intake air temperature sensor).
Put the multimeter’s red (positive) probe into each connector while holding the black (negative) probe to the ground, as shown below.
In this case, a reading of 12.02 volts was obtained for the first connector on the right (yellow with black stripes), but your situation may differ. Once you have detected the power supply, you can turn the ignition off.
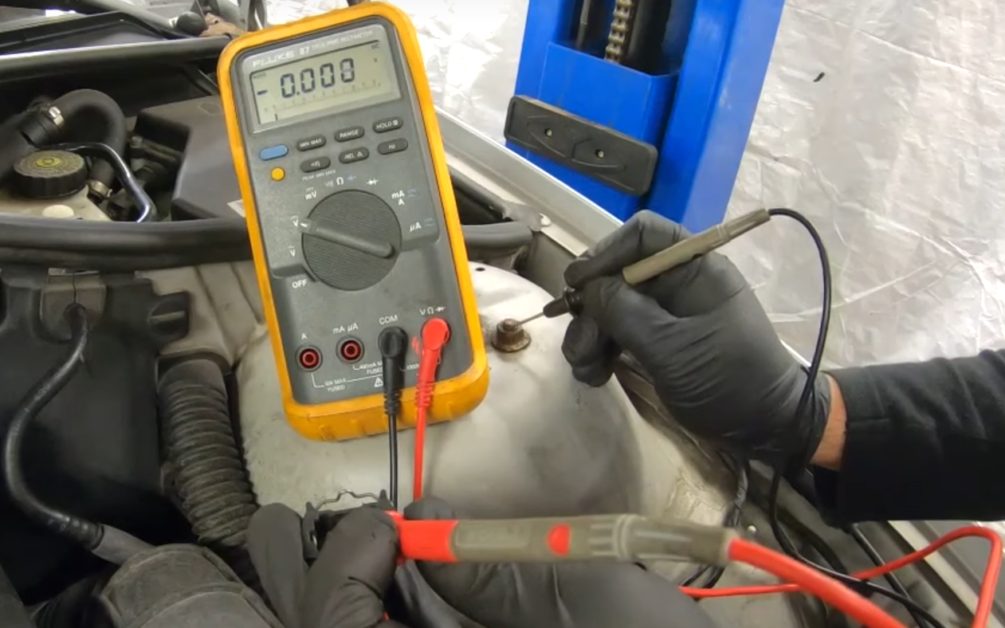
Step 3: Detect the Ground
We will now conduct a resistance test on the remaining two wires.
Set the multimeter to the ohms position to measure continuity. As before, place the red probe into each of the two connectors. You should get a reading of around one ohm. When you do, that will be the ground connector.
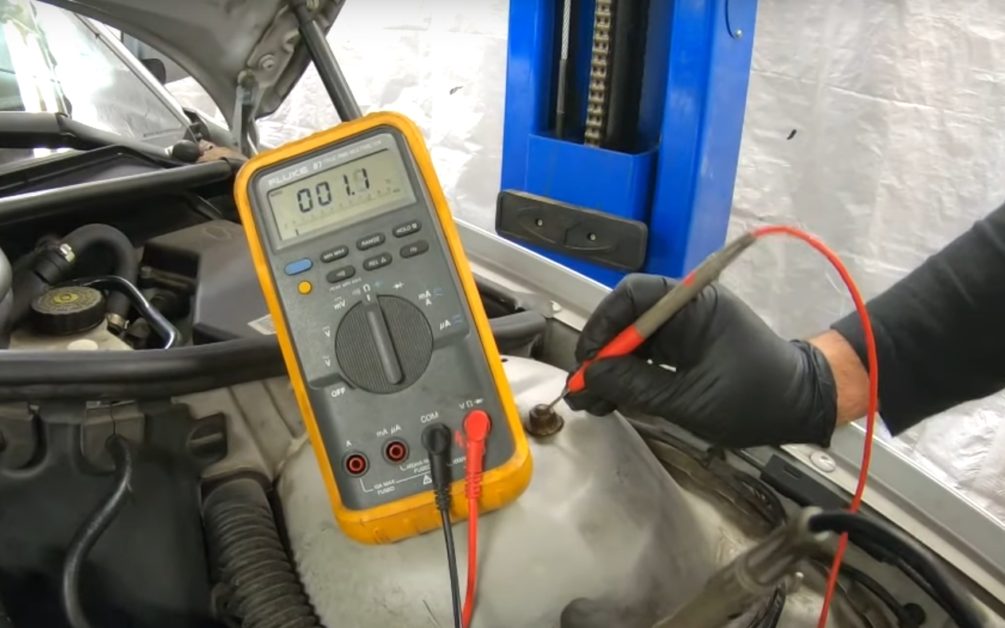
In this case, we obtained a reading of 1.1 ohms for the first connector on the left, with a brown wire. That is the ground connector.
Step 4: The Signal Wire
The remaining connector is the middle one, which must be the signal connector.
Still, we will confirm it. To do this, reconnect the plug back in place.

Before setting the multimeter up, we must know what kind of MAF sensor we’re dealing with, i.e., analog or digital. To find this out, you will need to scan the vehicle.
In your car’s vehicle information or data menu, look under ‘Air Flow Sensor.’
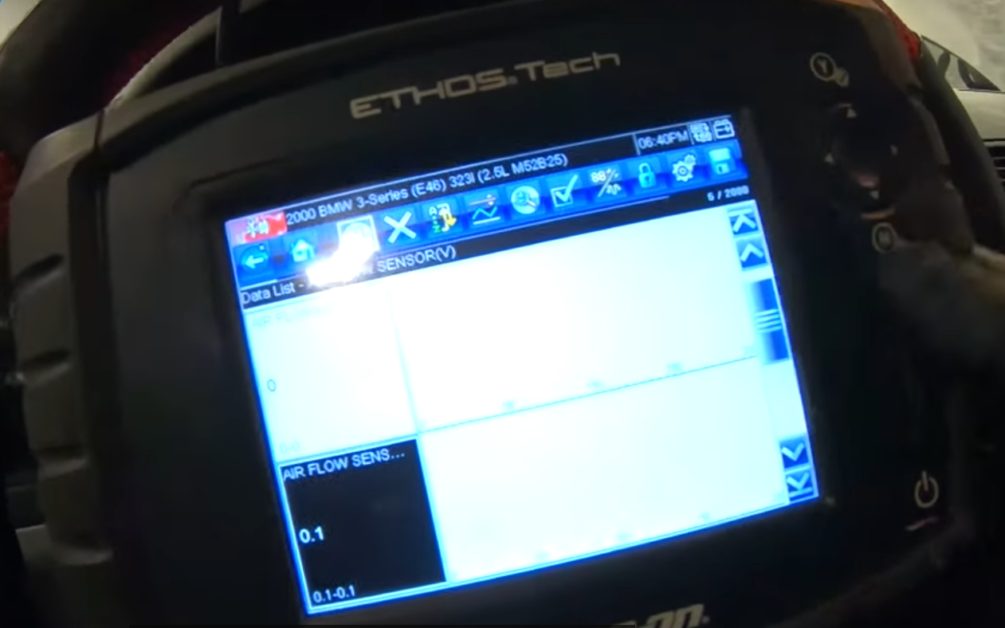
Start the car to obtain a reading. In the example below, the reading is 1.2, within the range of 0.8 to 1.3.
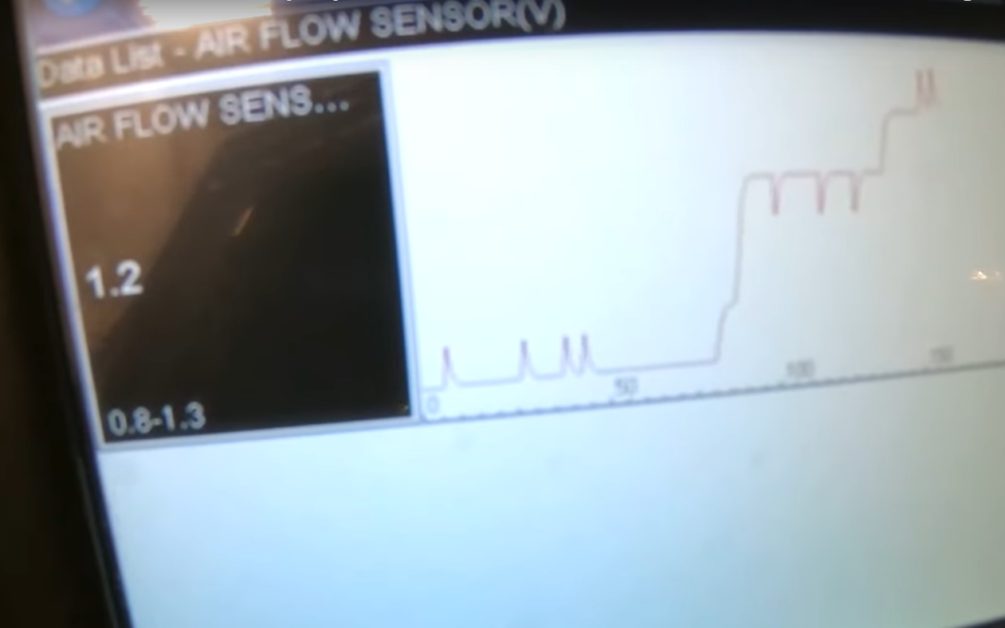
This information shows that it measures voltage difference, so it must be an analog type of MAF sensor.
With that confirmed, set the multimeter to measure DC voltage.
When starting the car, you should see the voltage change as you rev the engine. The faster it revs, the higher the voltage reading you get.
In the example below, we obtained a voltage reading up to a little higher than 1.925 volts.
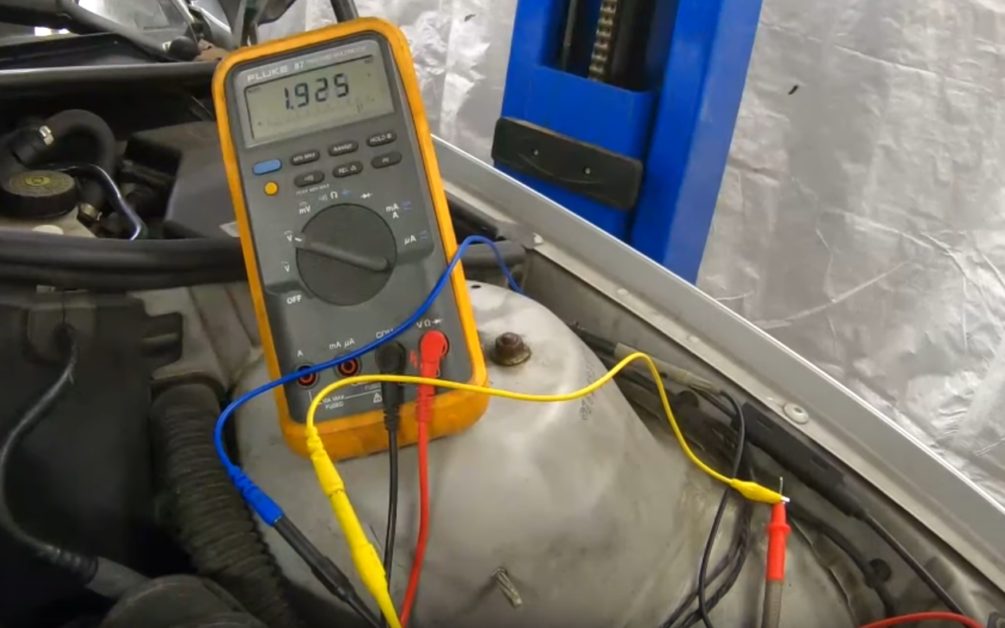
If the voltage does not change, the MAF sensor may be faulty. However, before dismissing it as faulty, tap on the sensor while the engine is idle and try again.
FAQs
What if I have a digital or frequency-type MAF sensor?
If you have a digital MAF sensor that measures high frequency, you will need a digital multimeter to measure frequency.
If the MAF sensor measures low frequency, you will need a digital multimeter to measure the vehicle’s speed in RPM. This gives a tachometer reading.
How do I clean the film of the MAF sensor?
You can easily clean the hot film of the MAF sensor because it is exposed, but you must use a mass airflow cleaner.
Any other cleaning solution could leave a residue above, preventing the MAF sensor from working properly. Cleaning it is important because dirty air can make the film dirty and prevent it from functioning. A plastic case protects the hot film types.
Video References
Gear Spec
OCSALY Academy