10 min read
How to Wire a Phone Jack (7 Steps)
Although landline phones and their jacks are less ubiquitous nowadays since the popularity of mobile phones, you may still find you need to wire one, but how?
To wire a phone jack on a traditional 4-wire phone cable, connect the colored wires to the corresponding terminals of the same color for each of the 2 lines.
For Line 1 of a cat 3 or 5 cable, connect the blue wire to the red terminal and the white-blue striped one to the green terminal.
For Line 2 of a cat 3 or 5 cable, connect the orange wire to the yellow terminal and the white-orange striped one to the black terminal.
Below are more detailed instructions with illustrations.
Landline Phone Cables
Present-Day Uses of Phone Jacks
Once popular with traditional landline phones, the need for wiring landline phone jacks has not gone.
The lines carry low-voltage electrical current, so you can utilize them without turning the power off, which makes them useful. You might need to wire one if, for instance:
- You have to extend the network for an additional phone jack hard-wired to the home telephone system.
- You must extend a wireless receiver’s range to a remote location for more transmitters.
- You have to replace the central cordless transmitter.
Types of Phone Cables
Traditional 4-wire phone cables comprised red, green, black, and yellow wires.
An alternative to using them is the Cat cable, which permits carrying data, as used for wired Ethernet or DSL connections.
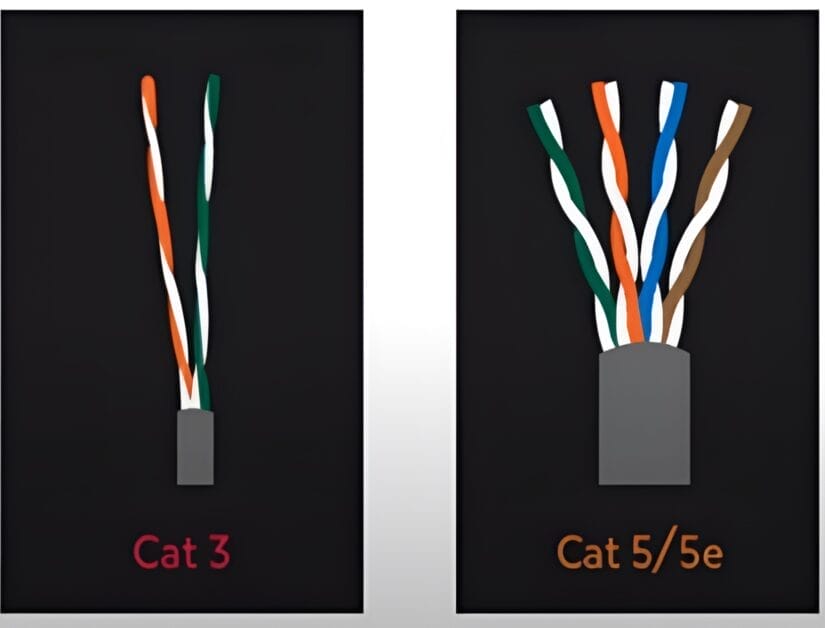
Cat-3 and Cat-5 cables have 8 wires, so 4 additional ones compared to the traditional phone cables.
Whichever cable you use, you must match the correct colored wires on the jack.
RELATED What Gauge is Cat 6 Wire?
Wiring a Phone Jack
Safety Precautions
Here are two important safety precautions to observe:
- Don’t use wet hands when working with electrical wires.
- Wear safety gloves.
Required Items
You will need the following tools and materials to wire a phone jack:
| Tools | Materials |
| Wire stripper Screwdriver Needle-nose pliers | Telephone jack Wood (or drywall) screws |
Follow the steps given below to wire a phone jack.
Step 1: Strip the Outer Sheathing
Strip about half an inch of the outer sheathing off the end of the phone cable’s 4 wires using a wire stripper. A traditional 4-wire cable normally fits the 10-gauge slot on a wire stripper.
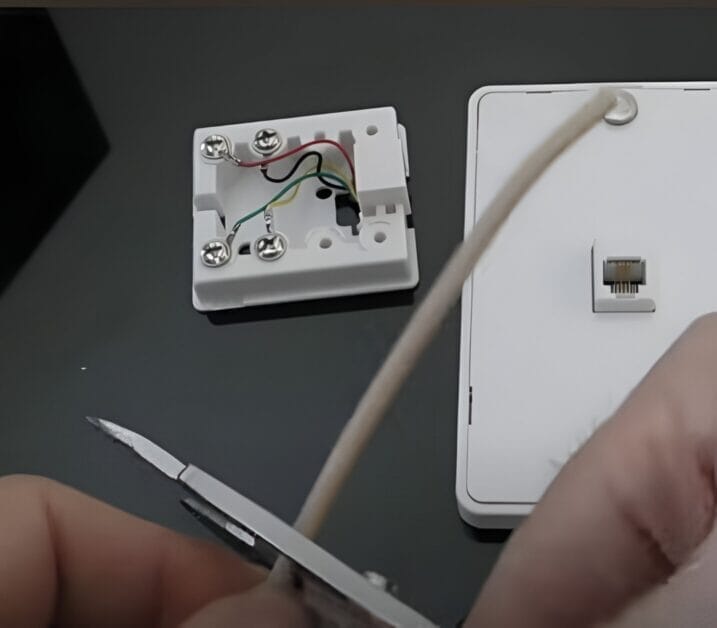
Carefully cut the sheathing around the cable without cutting the insulated wires inside by rotating the wire stripper. Pull the sheathing off from the end of the cable to expose the wires.
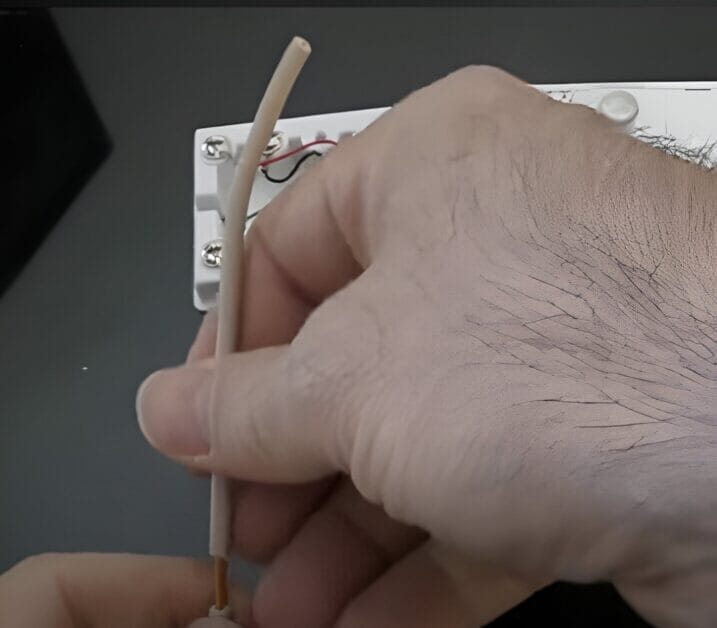
If the cable has a pull cord inside, pull it instead to strip the outer sheathing. Remove only a small portion of the sheathing using the wire stripper and pull to cut back around half an inch. Then, trim off the sheathing using a pair of pliers.
Step 2: Strip the Individual Wires
Untwist each wire in the phone cable to set them apart.
Strip about ¾” of the insulation from each wire using the 20- or 22-gauge slot on the wire stripper.
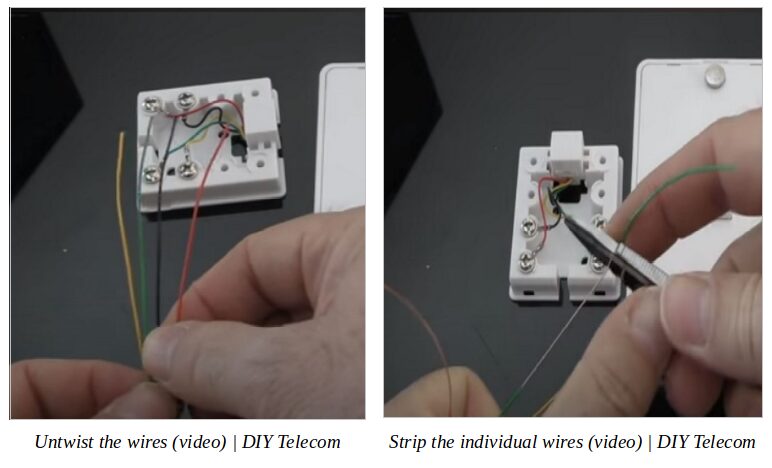
Usually, you will only need to strip two wires for a standard single-line phone jack.
But, you will need the second pair of wires if installing another line, such as a second phone line or fax.
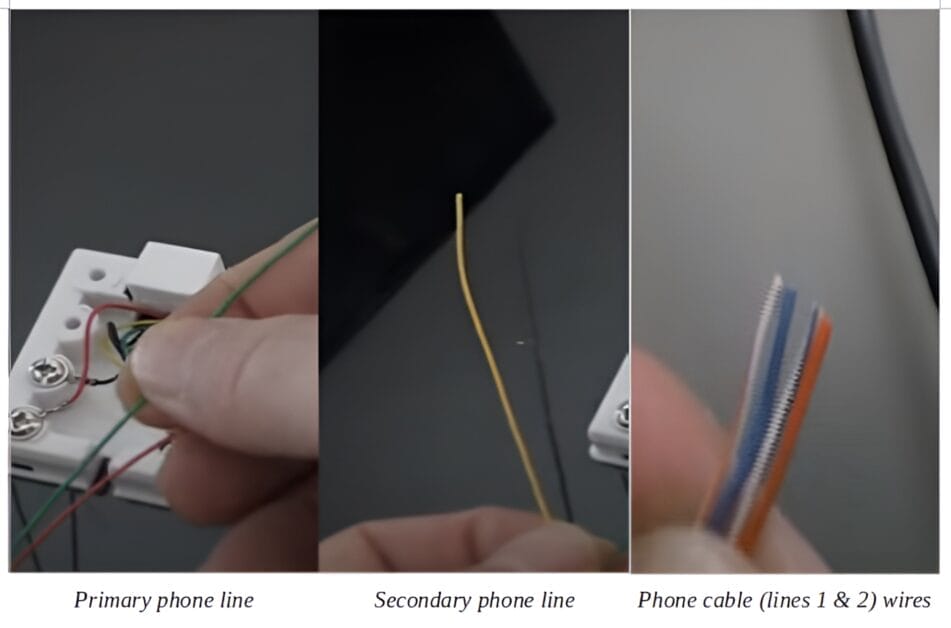
Step 3: Identify the Required Wires
Identify the required wires after stripping them.
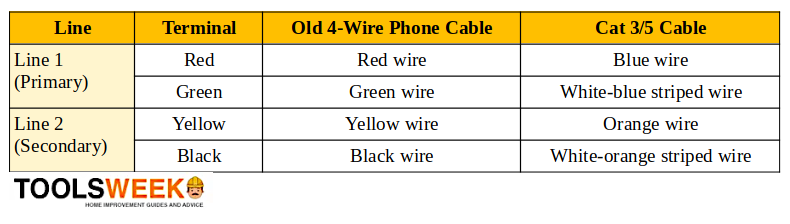
Refer to the table below for the color scheme according to the cable type.
| Old 4-Wire Phone Cable | Cat 3 or 5 Cable | |
| Line 1 (Primary) | red, green | blue and white-blue stripe |
| Line 2 (Secondary) | black, yellow | orange and white-orange stripe |
Step 4: Install the Mounting Plate
Install the phone jack’s mounting plate.
First, remove the phone jack cover, exposing the mounting plate and mounting screw holes. Then:
- If the phone cable runs inside the wall, thread it through the opening in the mounting plate while positioning the plate over the access hole.
- If the phone cable is surface mounted, insert it through a notch in the phone jack’s side.

Next, mount the plate to the wall (or molding or other fixture) using a screwdriver and the wood (or drywall) screws, depending on the type of wall surface.
Some phone jacks come with self-adhesive strips that can attach to the wall. Still, if the phone jack has screw holes, the installation will be strong if you use screws. Self-adhesive strips won’t last long.
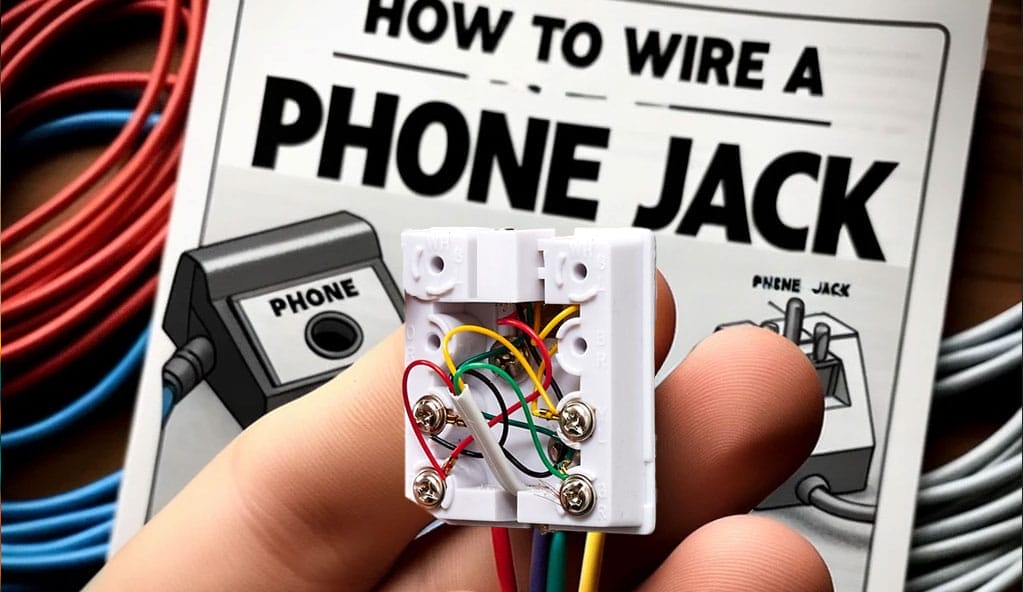
Step 5: Connect the Wires
Connect the phone cable’s wires to the matching screw terminals in the phone jack based on the corresponding colors of each cable.
So, for Line 1 (primary) in a 4-wire cable, it means connecting the green wire to the green terminal and the red one to the red terminal.
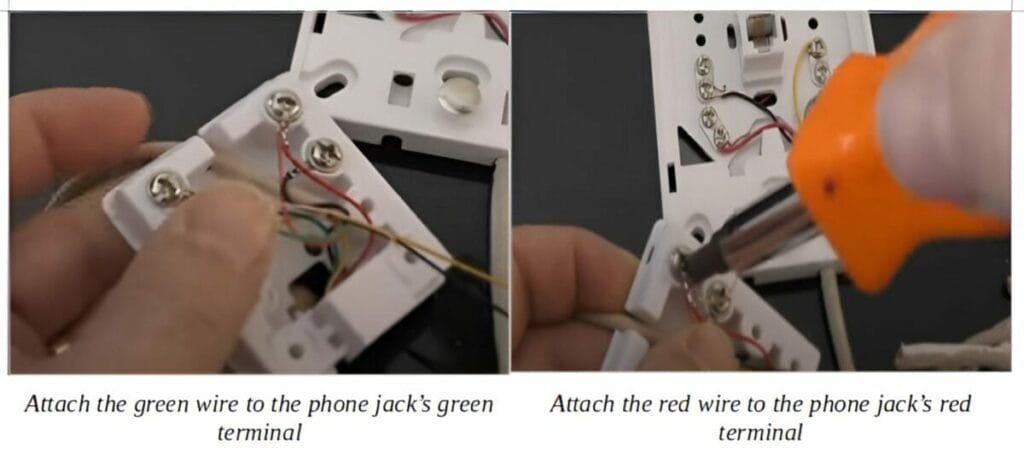
Similarly, for Line 2 (secondary) in a 4-wire cable, connect the yellow wire to the yellow terminal and the black one to the black terminal.
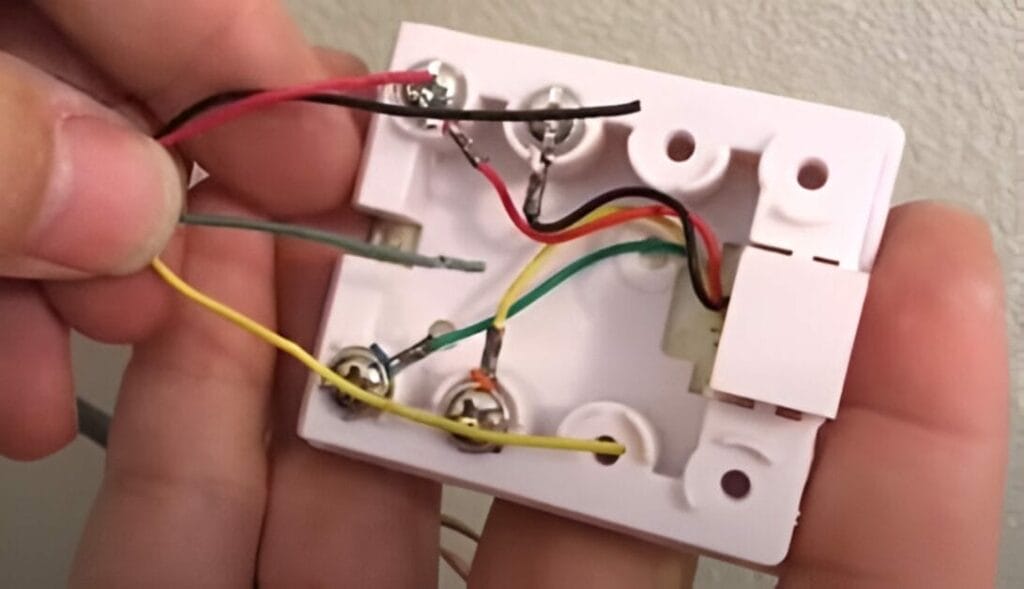
If it’s a Cat-3 or Cat-5 cable, connect the wires as follows:
For Line 1 (primary phone line), connect the blue wire to the red terminal and the white-blue striped wire to the green terminal.
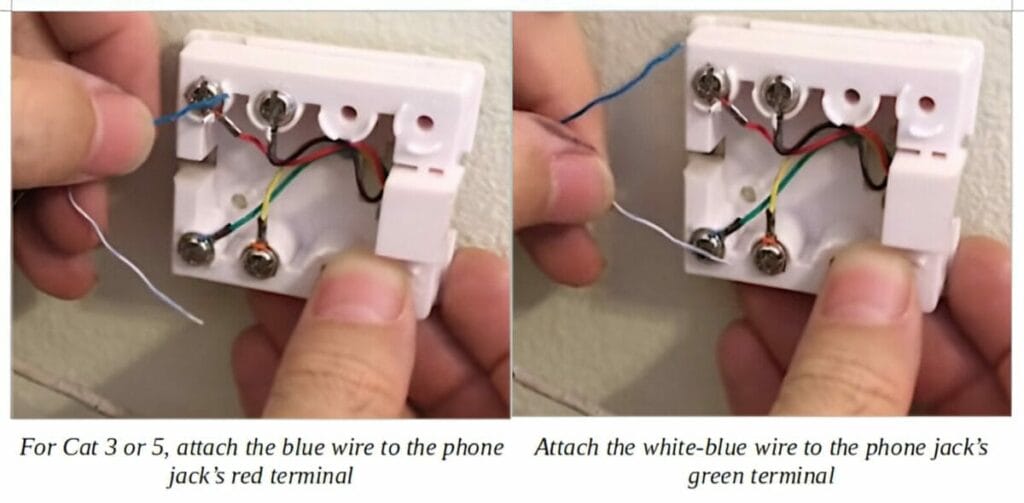
For Line 2 (secondary line) in a Cat-3 or Cat-5 cable, connect the orange wire to the yellow terminal and the white-orange striped wire to the black terminal.
Here’s a summary of the wire connections:
Step 6: Secure the Wires
Loosen each terminal screw using a screwdriver for securing the wires.
Wrap the conductor (forming a hook) around the screw in a clockwise direction using a pair of pliers. It will help the wire insulation to better connect with the screw terminal. It’s safer than leaving a part of the conductor extending out from the screw, which could cause a short circuit with other wires.
Do a final check to ensure all the wires are connected securely.
Step 7: Put the Cover Back On
Put the jack’s mounting plate’s front cover back on.
Secure the lid with a screw or snap it into place, depending on the plate’s mechanism.
Finally, plug a phone into the jack before using it to ensure you did the wiring properly and all is working well.
Frequently Asked Questions
Hey there, DIY enthusiasts! Ready to tackle some phone jack wiring questions? Let’s hammer out some answers together.
1. Why would I even bother with a landline these days?
- Well, buddy, even though smartphones are everywhere, landlines still have a place. They can be more reliable in emergencies; some people like that old-school connection.
2. I’ve got a bunch of different colored wires. Do they all get used?
- Not always! You’ll typically use just two wires for a basic single-line phone jack. But you might need the others if you’re going all out with multiple lines or advanced features.
3. How do I know which wire goes where?
- It’s all about matching colors, my friend! Red to red, green to green. And if you’re using those fancy Cat cables, blue goes to red, and white-blue stripe to green. Just think of it as paint by numbers but with wires!
4. Can I do this with the power on?
- Absolutely! Phone lines carry low voltage, so there’s no need to flip the breaker. But always remember, safety first! Wear those gloves, and keep things dry.
5. I did everything right, but my phone’s not working. What gives?
- First off, don’t sweat it! Double-check your connections and make sure those wires are snug. If everything looks good, the issue might be outside your house, like with the service provider.
6. Can I use these cables for my internet connection?
- Absolutely! Those Cat cables, like Cat-3 and Cat-5, are just what you need for wired Ethernet or DSL connections. They’re the multi-taskers of the cable world!
7. I’m considering switching to a Cat cable, but I have this old 4-wire cable. Can I mix and match?
- It’s best to stick with one type for consistency. If you’re upgrading, go all the way and replace those old cables with the new ones. Give your phone the best connection possible!
Alright, folks, I hope that clears things up. Remember, with the right tools and a can-do attitude, you’ve got this! And if you ever get stuck, there’s no shame in calling in a pro. Keep those DIY spirits high and happy wiring.
References
Website Resources:
- Single telephone jack port. https://www.amazon.in/NECABLES-Surface-Single-Telephone-Terminals/dp/B09GXHYXQD
Video References:
DIY Telecom
Niket Shah Plus
ViTech