11 min read
How to Wire a Dishwasher (2 Methods 3 & 9 Steps)
Wiring a dishwasher usually requires connecting a GFCI outlet or hardwiring.
If that sounds daunting, I’ve covered both methods in this article and explained which one would apply. Generally, a 120V dishwasher may or may not operate on a GFCI outlet, whereas a 240 one will more likely require hardwiring. I’ve also included a chart for the right circuit breaker and wire.
To connect a GFCI outlet to a dishwasher, connect the black hot wire to the brass screw terminal, the white neutral wire to the silver screw terminal, and the ground wire to the green one.
To hardwire a dishwasher, connect the same wires from the dishwasher and power supply cables, i.e., hot to hot and neutral to neutral, and put a twist-on wire cap over the joints. Then, ground the dishwasher by connecting the ground wire to the green terminal screw.
I’ve simplified the methods into 3 steps for connecting a GFCI outlet and 9 steps for hardwiring.
Checks, Requirements, and Safety Precautions
Power Requirement
An important thing to check before wiring a dishwasher is its power requirement.
A dishwasher typically consumes between 1,200 and 1,400 watts, but the wattage may range between 600 and 2,500 watts depending on how small, large, or old it is.
If it’s a small, compact, or energy-efficient dishwasher, the power consumption will be within the lower end of this range. It will be within the upper end if it’s large, feature-rich, older, or less energy-efficient.
The main electricity-consuming component inside the dishwasher is the heater. It typically uses more than 80% of the total power consumption. The motor consumes most of the remainder, while the drain pump only consumes a small proportion.
Some dishwashers mention this breakdown in the manual.
The power requirement will determine what type of wire and breaker you will need and whether it must be on a dedicated circuit. See the table below.
Voltage of Operation
The dishwasher’s voltage may be 110-120V or 220-240V, so you will have to wire accordingly, using a single-phase or three-phase supply, respectively.
- A dishwasher that operates at 110-120V requires a single-phase power supply (one phase wire, one neutral, and one ground).
- A dishwasher that operates at 220-240V requires a three-phase power supply (with two phase wires, one neutral, and one ground).
Use the chart below to know what circuit breaker and wire you need according to your dishwasher size. Check the wattage rating stated on it, the voltage requirement (120V or 240V), and then the corresponding column for the breaker (A) and wire (AWG) sizes.
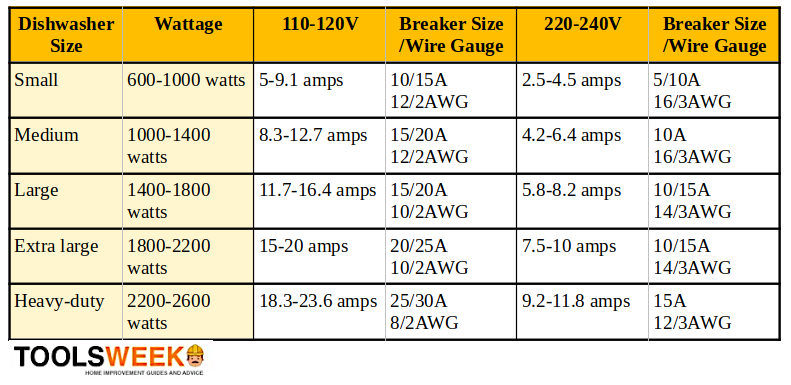
Note that we have not considered the voltage drop, so consider that if it’s a long run.
Check the Manual and Code
Check the dishwasher’s manual before wiring, as the wire colors and connections may vary from what is described here.
We will follow the typical scheme, which is black and red for hot, white for neutral, and bare copper or green/yellow for ground.
Also, your local regulations may require installing a switch within sight of the appliance, even if it’s hardwired, and for the dishwasher to be on a dedicated circuit.
Requirements
You will need the following:
- Tools: Screwdriver, wire stripper, pliers
- Materials: Wire caps or nuts (twist on), cable clamps, electrical tape
- Wire and circuit breaker: See the chart above under ‘Voltage’.
- Outlet: GFCI-protected (unless hardwiring)
Identify the circuit breaker in the main panel that controls the circuit on which you want to hardwire the dishwasher. Turn the circuit breaker off. Double-check using a tester to ensure the circuit has no power.
If the dishwasher doesn’t have a circuit, you must create one and install a new circuit breaker (but keep it switched off). Run the cable to a junction box behind the dishwasher (or an internal one if built-in).
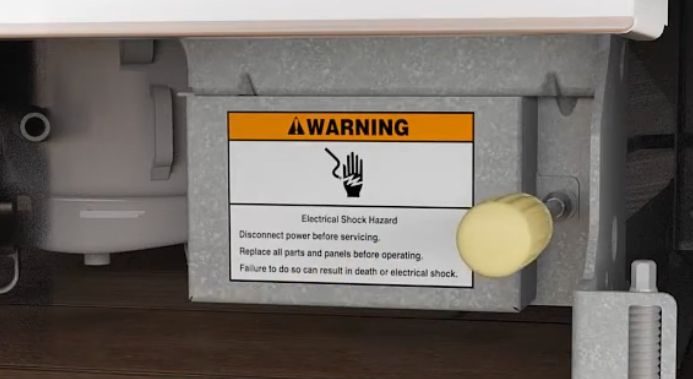
Safety Precautions
Shut the power off to the circuit before working on it.
Also, remove the dishwasher from its place and disconnect it from the water supply and drain hose.
GFCI or Hardwiring?
The wiring process is simpler than hardwiring if the manual states you can use an outlet on a shared or dedicated circuit.
You will only need to wire a GFCI-protected outlet and ground the appliance, which usually operates on 120V. We will assume it also requires a dedicated circuit.
Otherwise, you may need to hook the dishwasher directly to your main panel. It’s usually a 240V appliance if the manual recommends connecting it directly to the power source. It provides full access to the current required to perform efficiently and safely.
A downside of hardwiring is disconnecting the power to the entire circuit during maintenance. Removing the plug if it was not hardwired, i.e., plugged in, would be much easier.
We’ll go through the procedure in detail for both scenarios:
- Wiring an outlet to a dishwasher in 3 steps (GFCI outlet on a 120V dedicated circuit)
- Hardwiring a dishwasher in 9 steps (direct hardwiring on a 240V dedicated circuit)
Wiring a Dishwasher Outlet (3 Steps)
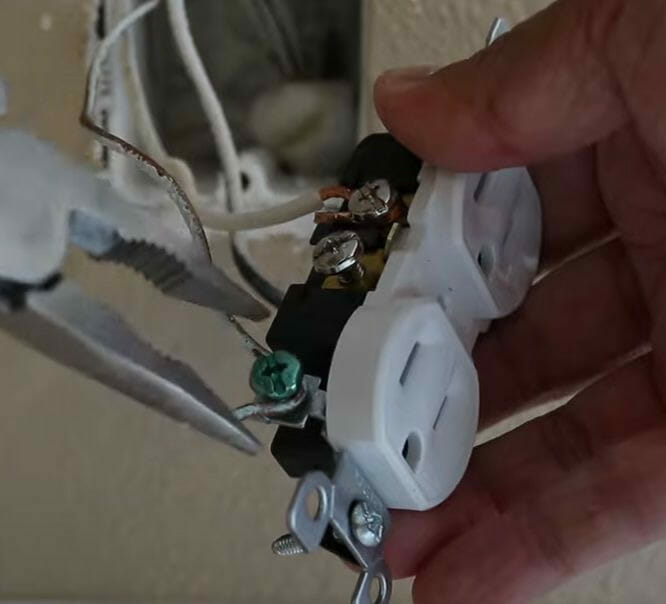
Step 1: Open the Outlet
This step only applies if you have a regular outlet behind the dishwasher, as you must replace it with a GFCI one.
Open the dishwasher outlet’s faceplate and remove the wires by loosening the terminal screws. You should now have a box with 3 wires sticking out (and no outlet).

Step 2: Connect the Wires
Connect the wires to the GFCI outlet’s terminals as follows:
- Connect the black wire to the brass screw on the terminal marked ‘Hot’ or ‘Black.’
- Connect the white wire to the silver screw on the terminal marked ‘Neutral’ or ‘White.’
- Connect the ground wire to the green screw on the terminal marked ‘GRD’ or ‘Ground.’
Use nose pliers to create a hook if you need to wrap a wire around its terminal. If the ground wire is bare copper, ensure it does not touch any other terminals.
Also, note that the power supply wires (black and white) are connected to the ‘Line’ row. You must not connect them to the other ‘Load’ row, which is not required for a dedicated circuit. If the GFCI terminal is new, the load terminals will probably be covered by tape.
Step 3: Attach the Outlet
Attach the GFCI outlet to the box when the wiring is done, and power the circuit by switching the circuit breaker back on and plugging in the dishwasher.
Hardwiring a Dishwasher (9 Steps)
Steps 1 and 2 only apply if the dishwasher doesn’t have its own built-in junction box.
Step 1: Drill a Hole
You may need to drill a hole in the back of one side of the cabinet where the dishwasher is located to route its wire to the junction box. It depends on where your dishwasher is located.
If this applies to you, drill a hole approximately ¾ of an inch in diameter. Sand the edges to make them smooth using medium-grit sandpaper.
Step 2: Run the Wires
Run the dishwasher’s wires through the hole you created in Step 1 to the junction box.
Pass them through the grommet at the bottom of the junction box to connect with those in the terminal box for the hardwire connection. Use cable clamps if necessary to keep the cables in place.
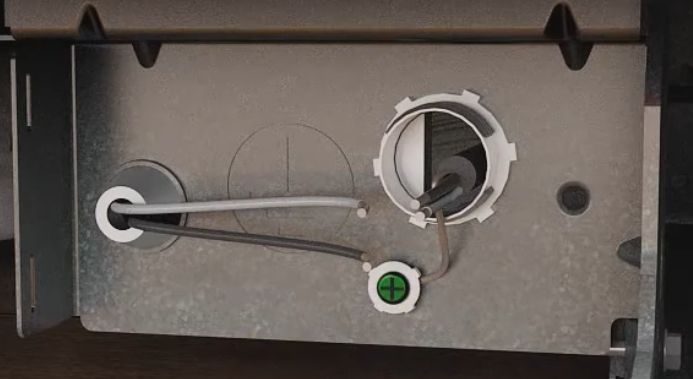
Step 3: Prepare the Junction Box
You can convert the outlet into one unless you already have a separate junction or terminal box behind the dishwasher.
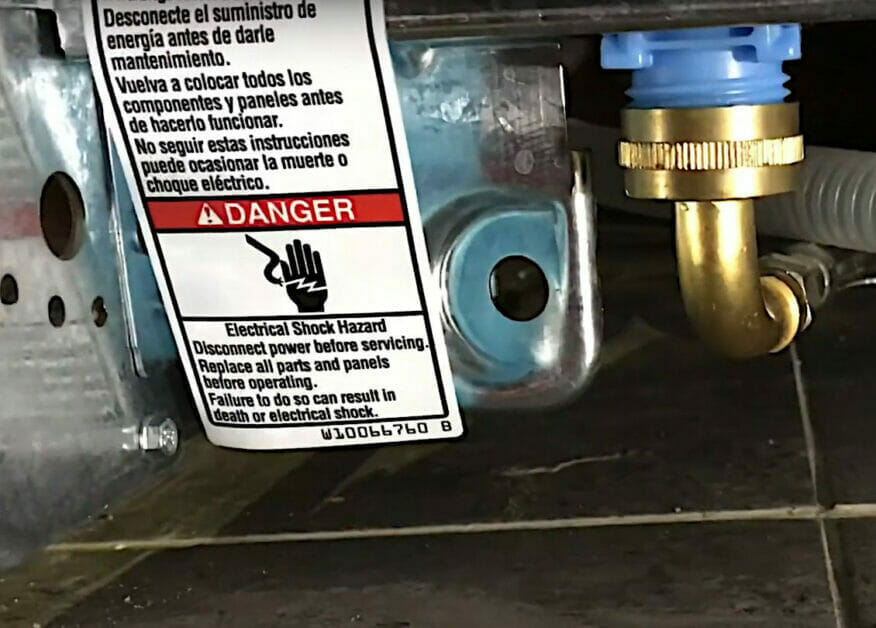
Some dishwashers come with a built-in terminal box like the one below. It should have points for all the connectors inside and a waterproof cover (instead of the faceplate).
Step 4: Strip the Wires
Strip approximately one inch off the ends of both cables’ wires, i.e., the one from the dishwasher and the panel.
Use a wire stripper. You won’t need to strip the ground wire if it’s bare copper (instead of a green or yellow insulation layer).
Step 5: Ground the Appliance

Ground the appliance by connecting the ground wire joint to a grounding connection.
The grounding connection can be a mounting screw on the junction box or another metal point.
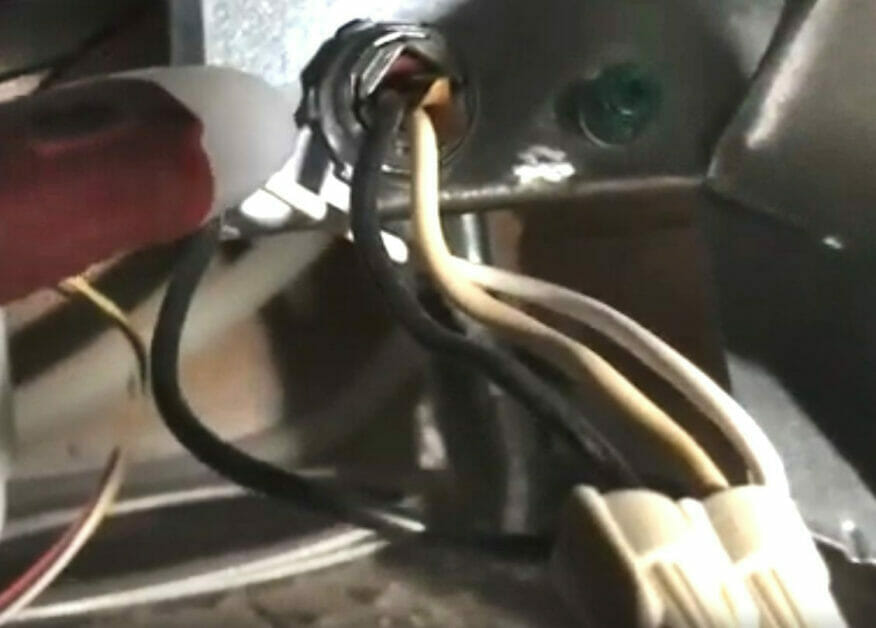
Step 6: Splice Corresponding Wires
Splice the other corresponding wires from both cables.
Splicing means to join the wires together. One easy way to do this is to twist the conductors around each other. Do it clockwise using pliers.
Only join the SAME wires, i.e., black to black, white to white, and ground to ground. If the two ground wires differ, it doesn’t matter. Join them together, as long as you’re sure they are both ground wires (bare copper, green, or yellow) and an extra short piece for the grounding connection.
If it’s a 240-volt dishwasher, you will also have extra red wires to join, which are hot like the black ones, to provide 3-phase power.
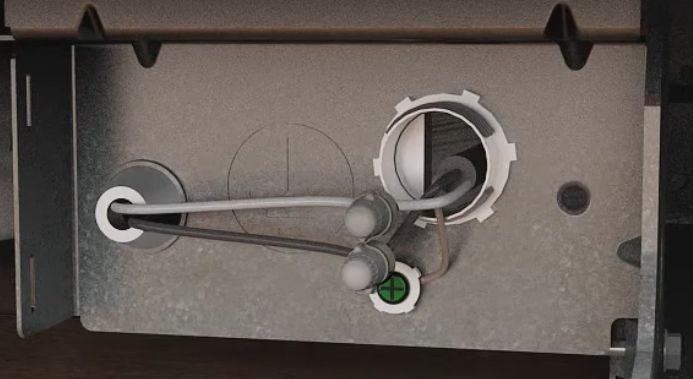
Another view of the three connections includes the grounding.
Step 7: Cap the Wire Joints
Cap each of the three wire joints using wire caps.
Step 8: Tuck the Wires
Tuck all the wires inside after joining and capping the same wires and grounding the appliance.
Step 9: Attach the Cover
Attach the cover to the junction or terminal box. Ensure all the nuts are tight.
You can now push the dishwasher back into place after reconnecting the water supply and drain hose.
References
Video References:
High Ridge Handyman
Homeguideinfo
TheRenderQ
W Service