8 min read
How to Measure DC Voltage with a Multimeter (Beginner’s Guide)
Hey there! You’ve come to the right place if you’re curious about measuring DC voltage with a multimeter.
I’m here to walk you through this essential skill step by step. Here’s how:
- Step 1: Set your multimeter to the appropriate voltage range; start higher and adjust if unsure.
- Step 2: Attach the red probe to the positive point and the black probe to the negative.
- Step 3: Check the display for the voltage reading; it should be close to the expected value of the power source.
- Step 4: Adjust the multimeter’s range when switching to batteries with different voltages for accurate readings.
In this guide, I’ll explain everything you need to know about measuring DC voltage. I’ll also share some handy troubleshooting tips. So, grab your multimeter, and let’s dive into the world of DC voltage measurement together!
What is DC Voltage?
Let’s break down what DC Voltage means in a way that’s easy to get. DC, or Direct Current Voltage, is about steady and consistent power flow. Think of it as the energy you get from batteries or solar panels.
In the grand scheme of things, you’ve got two main types of electrical energy – AC and DC. AC is the alternating current you get from your wall sockets, where the flow of electricity changes direction periodically. But DC? That’s your constant, one-direction flow, like what you’d get from a car battery or those rooftop solar panels.
And let me tell you, understanding the difference between these two is super important, especially when you’re tinkering with electrical projects. It helps you choose the right tools and use them as safely and effectively as possible.
So next time you’re powering up a project, remember the steady, reliable nature of DC voltage – it might be the perfect fit for your needs.
Essential Steps for Measuring DC Voltage Using a Digital Multimeter
If you’ve ever needed to measure the voltage of a battery or any DC (Direct Current) source, then knowing how to use a digital multimeter accurately is a must.
Step 1: Preparing the Multimeter
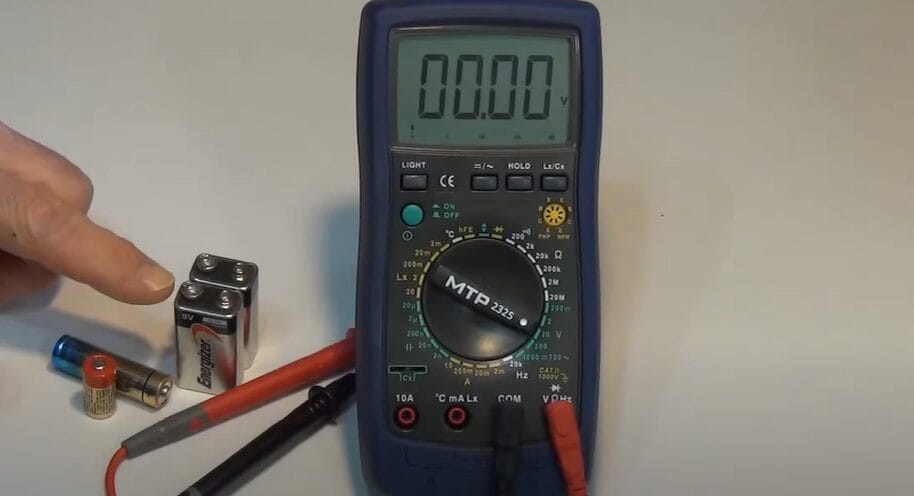
- Make sure the multimeter is set for voltage measurement. For instance, if you’re measuring a 9-volt battery, set the dial to a range that covers it – like 20 volts.
- Start higher and adjust as needed if you’re uncertain about the voltage.
Step 2: Connecting the Probes
- Connect the multimeter probes to your power source. Remember, red is for positive, and black is for negative.

- If the reading comes down negatively, switch them around.
Step 3: Reading the Voltage
- Observe the voltage reading. For a 9-volt battery, for instance, it should show something close to 9 volts.
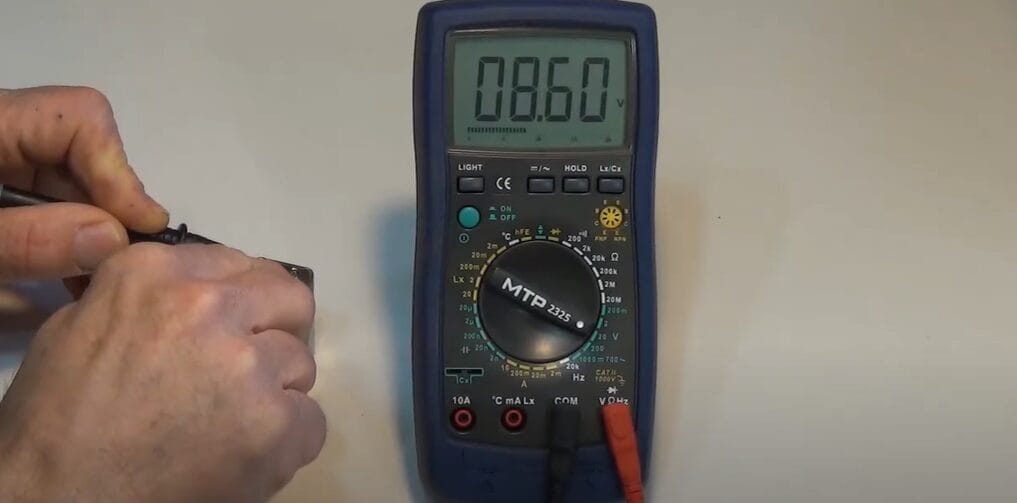
- The battery is slightly depleted if it’s a bit off, like 8.6 volts.
Step 4: Adjusting the Range for Different Batteries
- If you switch to a different type of battery, like a double-A, you might need to adjust the range.
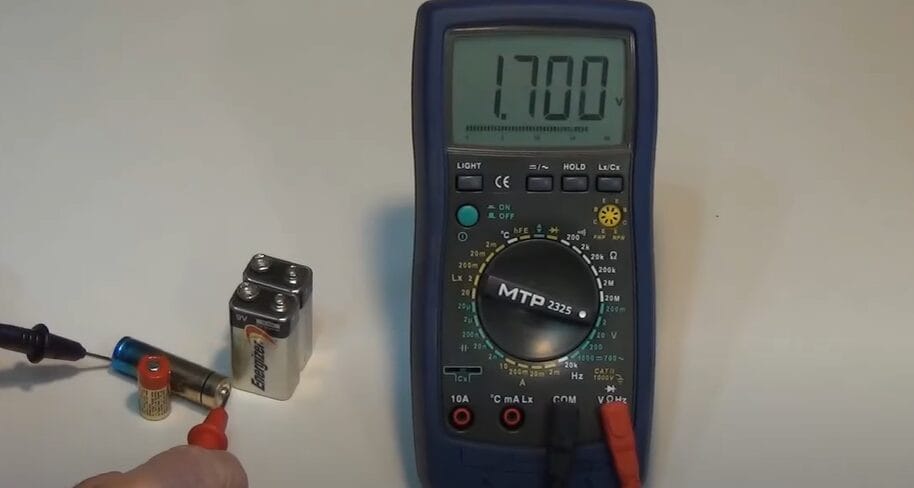
- I changed it to 2 volts for a 1.5-volt double-A battery.
And there you have it. Measuring DC voltage might seem daunting at first, but it’s a breeze with these steps. Remember, safety first, and always double-check your settings. Happy measuring!
Troubleshooting Tips for Measuring DC Voltage with a Multimeter
Let’s dive into some troubleshooting tips when measuring DC voltage with a multimeter – think of it a handy guide to avoid those little slip-ups that can happen to anyone.
| Problem | Troubleshooting Tips |
|---|---|
| Incorrect Dial Settings | Always double-check that the multimeter is set to DC voltage (‘V’ with a straight line). It’s easy to mistakenly set it to resistance or AC voltage, leading to nonsensical readings. |
| Improper Probe Connections | Ensure probes are fully inserted: black to COM and red to V Ω. Loose connections can cause erratic readings. |
| Misinterpretation of Readings | Don’t be alarmed by a negative reading; it’s likely due to reversed probes. Switch them around for an accurate reading. Positives should be on the higher potential point, and negatives should be on the lower. |
| Starting Voltage Setting | Begin with a higher voltage setting and then adjust downward if necessary, especially if the voltage range is unknown. This approach prevents blowing a fuse, a lesson I learned the hard way. |
| Condition of Probes | Regularly inspect the probes for damage or wear. Faulty probes not only give inaccurate readings but are also a safety risk. Replacing them when needed is essential for reliable and safe voltage measurements. |
| Understanding the Readings | Remember, the goal is to understand the meaning behind the reading in the context of your project. If something seems off, don’t hesitate to recheck your setup or start the measurement process again. Patience and attention to detail are key in these situations. |
Remember, measuring voltage isn’t just about getting a reading; it’s about understanding what that reading means in the context of your project.
Keeping Your Multimeter in Top Shape: Practical Maintenance Tips
Let’s chat about keeping your multimeter in great condition. Maintaining this tool is crucial, not just for its longevity but also for your safety and the accuracy of your readings. I’ve picked up a few tricks I’d love to share over the years.
Regular Cleaning is Key
- First things first, keep your multimeter clean. Dust, dirt, and grime can mess with the accuracy. I usually use a soft, dry cloth to wipe the exterior.
- Suppose you’re dealing with stubborn dirt; a bit of isopropyl alcohol on a cloth does wonders. Just avoid harsh chemicals that can damage the screen or casing.
Check Those Batteries
- Multimeters run on batteries, and we know what old batteries can do. They leak and corrode, which is bad news for any device.
- I check mine periodically and replace them if they run low or every year or so, even if they’re not dead. This proactive step saves a lot of grief later.
Probe Care
- Your probes are as important as the multimeter itself. I inspect mine regularly for any damage or wear.
- Frayed wires or damaged tips can lead to inaccurate readings or safety hazards. If you spot any damage, don’t hesitate to replace them.
Store It Right
- How you store your multimeter matters a lot. I keep mine in a case when not in use.
- This protects it from dust, moisture, and accidental drops. Even a dedicated drawer or shelf is better than leaving it open.
Avoid Overload
- Pushing your multimeter beyond its limits is asking for trouble. I always make sure not to exceed its voltage or current ratings. This not only prevents damage but also keeps you safe.
Calibration Checks
- For the pros out there, calibration is key. Even if you’re just a hobbyist, it’s good to know that your readings are accurate.
- Professional calibration is recommended every year or two, depending on how often you use it.
Gentle Use
- Lastly, handle your multimeter with care. Rough handling can mess up its internal components.
- I’ve learned this the hard way – dropping a multimeter can knock something loose inside, leading to frustrating inaccuracies.
Remember these; your multimeter will be a trusty companion for years.
Frequently Asked Questions
- What’s the Best Way to Measure Voltage in Sensitive Electronics?
- Use a digital multimeter with high input impedance, start with the highest voltage range, and reduce gradually. Ensure the device is off, if possible, to prevent damage.
- Can Multimeters Be Used to Diagnose All Types of Electrical Problems?
- While versatile, multimeters can’t diagnose complex circuit board faults, high-frequency signal issues, or digital circuit problems. Specialized tools may be needed for these tasks.
- How Do Environmental Factors Affect Multimeter Readings?
- High temperatures, humidity, and electromagnetic interference can affect readings. Use the multimeter in a controlled environment and protect it from extreme conditions.
- What’s the Lifespan of a Multimeter and How Does Usage Affect It?
- The lifespan varies based on quality, usage, and maintenance. A well-maintained multimeter can last over a decade, but harsh conditions and heavy use can shorten its life.
- Are There Special Considerations When Using a Multimeter on a Car Battery?
- Set the multimeter to the correct DC voltage range, connect probes correctly to the battery terminals, and be cautious of sparks due to explosive gases emitted by batteries.
References
Organizations:
- Institute of Electrical and Electronics Engineers (IEEE). https://www.ieee.org/
- National Association for Amateur Radio (ARRL). https://www.arrl.org/
Books:
- “The Art of Electronics” by Paul Horowitz and Winfield Hill. https://artofelectronics.net/
- “Practical Electronics for Inventors” by Paul Scherz and Simon Monk. https://www.barnesandnoble.com/w/practical-electronics-for-inventors-fourth-edition-paul-scherz/1124288626
Website Resources:
- All About Circuits. http://allaboutcircuits.com/
- Electronics Hub. http://electronicshub.org/
Video References:
1929fordhotrod