8 min read
How to Wire a GFCI Breaker (6 Easy Steps)

Wiring a GFCI circuit breaker is similar to how you would wire a regular (non-GFCI) one, except it has an extra wire attached directly.
If you’re unsure how or what the extra wire is, this guide will help you wire the GFCI breaker properly and safely. I’ve also covered where it would be used, where not to use it, and how to test the wiring. This article shows how to wire a single-pole GFCI circuit breaker.
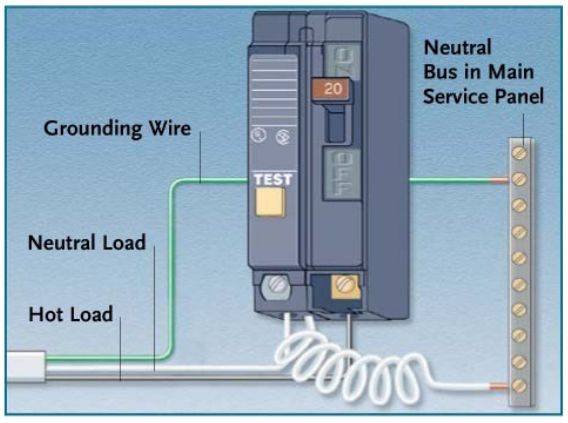
Wire a GFCI circuit breaker by connecting the hot wire from the circuit to the GFCI input and the neutral to its load neutral. Then, insert the breaker into position, connect the breaker’s pigtail to the neutral bar in the panel, and ground it.
Continue reading to learn how to wire a GFCI circuit breaker.
GFCI Circuit Breakers
A GFCI circuit breaker installed inside an electrical panel provides GFCI protection like GFCI outlets.
Although both functions are the same, their switching mechanisms are different. The switching mechanism of a GFCI breaker opens the ungrounded hot conductor, which is different from a GFCI outlet that also opens the grounded conductor. This is another key difference between a GFCI breaker and a GFCI outlet besides where each is located.
However, a GFCI breaker may be preferred when installing a GFCI outlet in a moist area of the home is not ideal. Some appliances, such as a hydromasage tub, specifically require a GFCI breaker.
It might be an option in other cases. For example, NEC 210.8(A)(1) requires bathroom GFCI protection. You can provide it by installing a GFCI outlet inside the bathroom or a GFCI breaker in the panel if an outlet is unnecessary.
Variant GFCI Breakers
Some GFCI breakers have dual AFCI/GFCI functions to provide both overcurrent and arcing protection.
Two-pole GFCI circuit breakers are also available to control two circuits simultaneously.
Wiring a GFCI Circuit Breaker
The procedure for wiring a GFCI breaker is similar to how you would attach a regular circuit breaker, except it comes with an extra white wire, typically coiled or pigtailed.
Requirements
- GFCI circuit breaker – A 30-amp single-pole GFCI circuit breaker is common, but it may have a different amperage rating and number of poles.
- Tools: screwdriver, pliers, wire stripper
- Wire: If installing new wiring, it’s usually 10- or 12-gauge wire, but it should match the circuit breaker and what the circuit will be used for.
- For testing: multimeter or voltmeter, electrical tester
- For safety: safety gloves, rubber mat, or slippers
Step 1: Safety Precautions
Take all necessary safety precautions before working inside the main electrical panel:
- Lay a rubber mat or wear rubber slippers.
- Only work with dry hands and tools.
- Turn the main power to the panel OFF before opening it.
- Check the power to ensure it is off.
- Wear safety gloves.
Step 2: Wire Connections
Make the wire connections for the circuit to be GFCI protected as follows:
- Connect the hot wire from the circuit directly to the GFCI input (brass terminal).
- Connect the white wire from the circuit to the GFCI breaker’s load neutral (silver terminal).
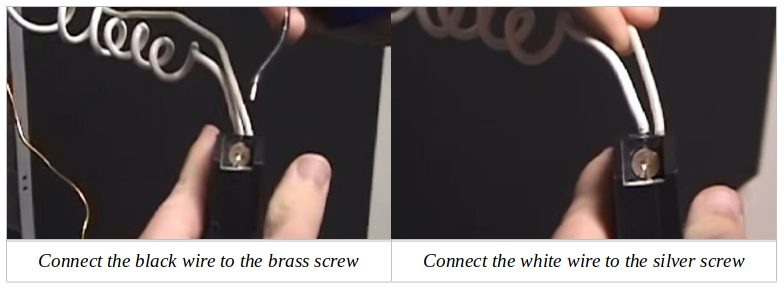
If you need to strip the wires first, strip about half an inch of the insulation off the conductors.
Step 3: Seat the Breaker
Seat the GFCI circuit breaker into its place inside the panel.
Do it the same as you would a regular breaker until you hear the click sound to confirm it is seated securely.
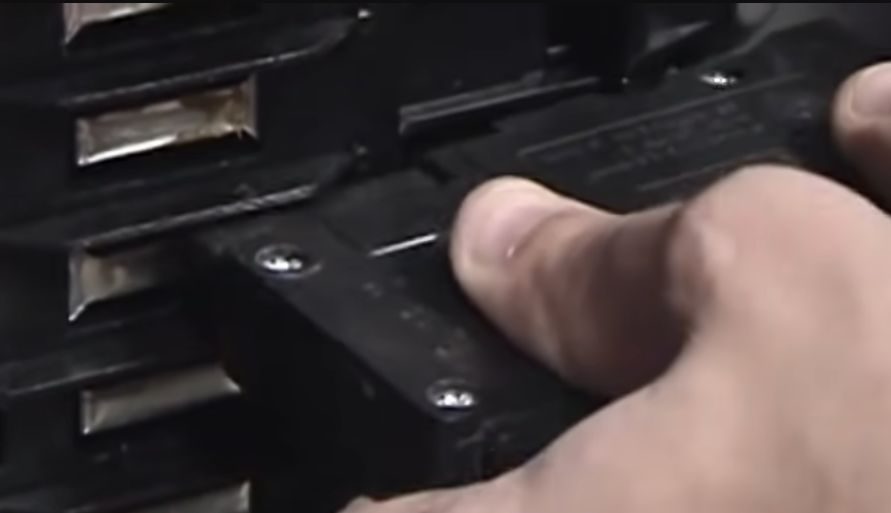
Step 4: Connect the Breaker’s Pigtail
Connect the built-in white (neutral pigtail or coiled) wire on the breaker to the panel’s neutral bar.
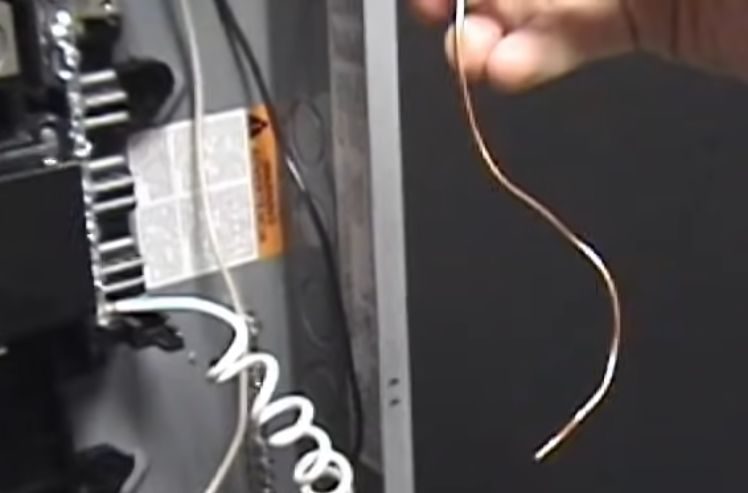
Step 5: Ground the GFCI Breaker
Ground the GFCI circuit breaker by connecting the outlet’s ground terminal to the ground bar in the panel.
Step 6: Secure All Connections
Ensure all four wire connections you made in steps 2, 4, and 5 are tight.
After testing, turn the main panel switch on and use your GFCI circuit breaker.
Testing a GFCI Circuit Breaker
You can test a GFCI circuit breaker similar to how you would test a GFCI outlet. They have two buttons on them:
- Press the T (Test) button to make the GFCI breaker trip. It does this by allowing a small current to bypass its toroid coil.
- Press the R (Reset) button to restore power to the GFCI breaker. If it doesn’t have a reset button, reset it by flipping the switch manually to the ON position.
The GFCI circuit breaker works fine if it performs as expected when pressing the T and R buttons.
Unsuitability of GFCI Breakers
Fire and Smoke Alarm Circuits
GFCI breakers should NOT be used for fire and smoke alarm circuits, as per the NFPA 72 National Fire Alarm Code, due to the possibility of ‘nuisance tripping’ falsely activating the alarm.
It could happen due to a minute trace of moisture somewhere along the circuit or if the cable run is long. Some GFCI breaker manufacturers recommend the cable run not exceed 250 ft.
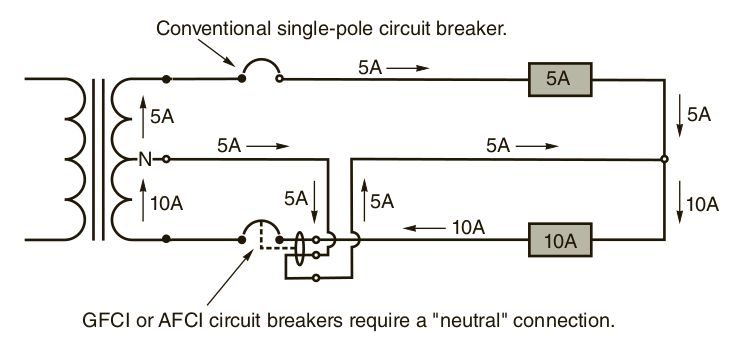
Improper Wiring
The diagram below shows an improper GFCI circuit breaker connection to highlight what type of wiring to avoid.
Don’t connect a (single-pole) GFCI breaker on a multiwire circuit unless specifically designed to share a neutral. As you can see, the current flowing in and out of the breaker is unbalanced by 5A. The difference in current would cause the breaker to trip immediately.
Consult your electrician, as a two-pole GFCI circuit breaker may serve you better.
FAQ Section: Dive Deeper into the World of GFCI Breakers!
Q: In terms of protection, how does a GFCI breaker differ from a standard circuit breaker?
A: Great deep dive! A standard circuit breaker protects against overloads and short circuits by shutting off when there’s too much current. A GFCI breaker, on the other hand, senses imbalances between the incoming and outgoing current, indicating a potential ground fault (like electricity escaping and possibly shocking someone). It then trips to prevent harm. It’s all about precision protection!
Q: Why does a GFCI breaker have a pigtail wire, and what’s its role?
A: Ah, the mysterious pigtail! This white wire connects to the neutral bar in the panel. The GFCI must monitor the balance between the hot and neutral wires, ensuring electricity isn’t leaking somewhere it shouldn’t.
Q: I’ve seen dual AFCI/GFCI breakers in the market. What’s the advantage?
A: Double the protection, double the fun! While GFCI focuses on ground faults, AFCI (Arc-Fault Circuit Interrupter) protects against arc faults, which can be fire hazards. Combining both in a single breaker means covering more safety bases in one go.
Q: In what situations should I avoid using a GFCI breaker?
A: GFCI breakers are champions, but not everywhere. They shouldn’t be used for fire and smoke alarm circuits because of potential nuisance tripping. Also, if you have a multiwire circuit with shared neutrals, ensure your GFCI breaker is designed for that; otherwise, you might face unwanted tripping.
Q: If my GFCI breaker keeps tripping frequently, what might be the reason?
A: Good catch! Frequent tripping can indicate a genuine ground fault, faulty appliances, or wiring issues. It’s also possible that the breaker itself is defective. It is best to consult an electrician to pinpoint the cause and ensure everything’s safe.
Q: How often should I test my GFCI breaker to ensure it’s still functioning correctly?
A: Stay ahead of the game! It’s a good practice to test your GFCI breakers once a month. Just press that ‘Test’ button and ensure it trips. Regular checks keep those safety muscles flexed!
References
Website Resources:
- Creative Homeowner. The ultimate guide to wiring: Complete Home projects. 8th Edition. Creative Homeowner. 2017
- Ray C. Mullin, Phil Simmons. Electrical Wiring Residential. Cengage Learning. 2018.
Video References:
Schneider Electric