4 min read
How to ReStyle a Goodwill Clock

What is it about Goodwill that inspires? Here’s my unsolicited theory: it’s like a reality design show. Every time you walk in the store, you’re presented with a limited amount of materials and you need to come up with something fabulous. At least that’s what kicks in when I cross the threshold. It becomes a creative challenge that really gets my juices pumping. As of late, I’ve been on a crazy Goodwill clock buying binge. It used to be that those old clocks scattered around the lamps and appliance shelves just obscured my view of the really good stuff. They were clutter and never caused me pause, —-until I saw delicious pages of artistic retro clocks over on Pinterest. I must say, clock designers of the 50’s and 60’s were extremely prolific, as well as artful. If you take a look, there are more than a few that can be knocked off with just a dab of DIY ingenuity.
Here’s a blurry image of the original, vintage clock that was my inspiration. As with all things DIY-DON’T BE AFRAID TO USE YOUR OWN IDEAS! Right off the bat I knew it would be difficult to create those perfectly tapered spikes, so I decided to improvise. Design adaptation is part of the fun. Believe me, I’ve gone crazy hunting down materials that are as close to the original as possible and it’s just not worth it. Besides the time and energy expended, you miss out on the best part-your unique spin.

Here we go:
Materials:
Goodwill clock $2.99
Package of wood shims $3.95
9 small floral hoops (Michaels @ .99 each)
wood stain
aqua paint
2 part epoxy (I LOVE the 5 minute stuff at the auto supply store for reattaching rear view mirrors)
foam brushes, toothpicks, lid to mix epoxy
lots of clamps

1. Stain the shims.

2. Spray prime the small hoops in a well ventilated area.

3. If I had aqua spray paint, I would have used that, but as it was, I had to brush on the aqua paint.

4. Determine how far down on the shims you want the hoops to be attached and mark each one with a pencil.

5. There’s no image of mixing up the epoxy, but I did that and then globbed it on the shim front and back using a toothpick and then clamped everything to dry.

Now, let me be perfectly honest with you. I ran out of my favorite epoxy and tried to substitute a 5 minute epoxy gel. IT DID NOT WORK AT ALL!! I waited and waited, but nothing. I hopped in my car, zipped over to Auto Zone and got the good stuff. It’s well worth it. I drove home, and re-applied the true 5 minute epoxy. Yes, that’s much better.

6. Next, it was time to attach the shims to the clock back. Look here, can you guess where I ran into another problem?

See where the hanging hole is positioned near the edge? Molded smack dab into the clock back!!! That section would prevent me from attaching a shim right at the 12:00 position. Now I had to figure out a way to attach another back piece to which the shims could be attached as well as having an open center to replace the batteries.
I don’t think I have a photo of this by itself, but the next size of floral hoop (Michaels) fit the back of the clock almost perfectly and was open in the center. I attached that, which you can see in the picture below. Needless to say, you have to be very flexible and adaptable as you’re working through a project like this. Some people like to have it exact, I rather enjoy the surprises and necessary adjustment aspects of projects like these. It has to be good for your brain too, all the problem solving that goes on.
After attaching the back ring:
7. Determine the placement of each shim around the clock. (Oh yeah, see the edge of that gray felt ball clock backround? Easy as pie!!)

8. Then, mix up your epoxy and get those shims glued on. Obviously, I had to put weight on top until the epoxy was set.

Afterthoughts:
I would paint the back side of everything one nice even color
I would not use gel epoxy
I may have trimmed down the edge of the back hoop so it wouldn’t show from the side
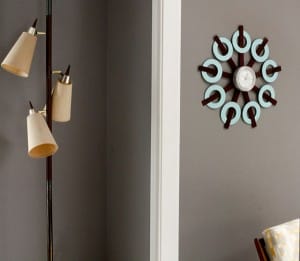
But, I love the way it turned out.


Just think of the possibilites!!!!!!