12 min read
Crack No More: How to Magically Fix Concrete in No Time (4 Steps)

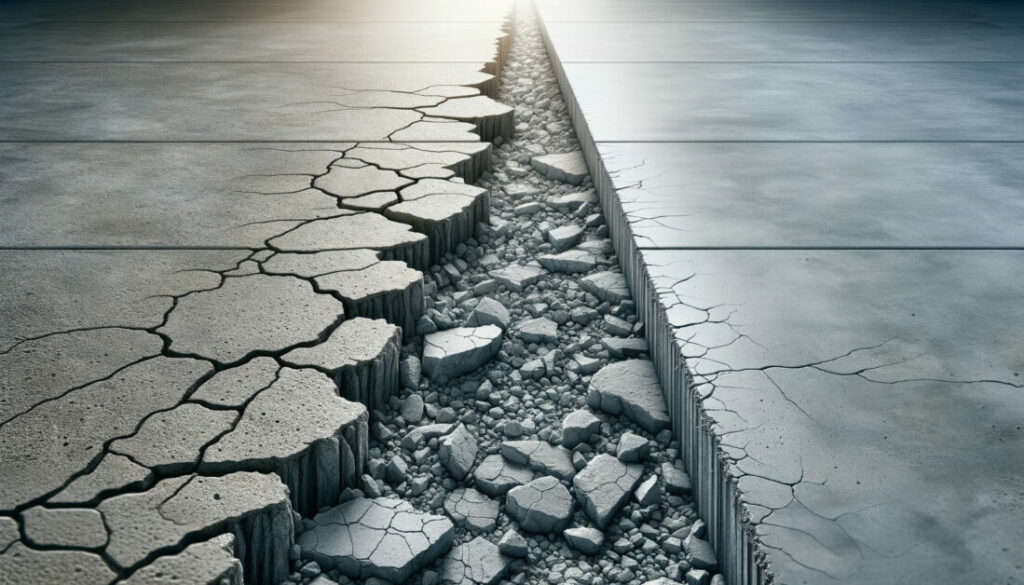
As a homeowner, there’s nothing more frustrating than seeing those unsightly cracks forming on your concrete driveway. It’s like watching your hard-earned investment slowly crumble away. But don’t despair; fixing these cracks is easier than you might think, and I’m here to guide you through it.
What we’ll cover:
- 🕵️♂️ Damage Evaluation
- 🧹 Area Preparation
- 🛠 Repair Application
- ⏳ Cure and Set
We’ll dive into the types of concrete driveway damage you might encounter and why it’s crucial to tackle these issues sooner rather than later. Remember, a small crack today could turn into a major repair job down the line.
Reasons for Concrete Repair
So now the big question is, why might your concrete need some love and care?
- Concrete Ages: Just like us, it does have a lifespan. The typical concrete lifespan for heavy-duty areas like driveways or sidewalks clocks is about 25-50 years. You might stretch it with repairs, but after some time, replacements are inevitable for that fresh, sturdy feel.
- Loose Concrete: It’s vital to clean off all loose debris, even if it means fetching your wire brush. And here’s a pro tip: Wet the existing concrete before starting the repair. It helps build bonds between the old and new concrete. I have found that a proper bonding agent enhances this process further.
- Environmental factors: All concrete has a certain “shelf-life.” The good, the bad, and the ugly – they all face cracks eventually. It might surprise you, but the weather is one of the sneaky culprits behind concrete damage. A hot day causes concrete to expand, and cool nights make it shrink back. This continuous cycle can lead to cracks in the long run.
- Chemical Damage: Concrete, known for its strength and durability, has its kryptonite in various chemicals. A common villain in this scenario is de-icing salt, frequently used in colder climates to melt ice on driveways and sidewalks. The salt dissolves in the melted ice, seeping into the porous concrete. When the temperature drops again, the solution freezes, expanding and causing micro-cracks in the concrete. Over time, these cracks can grow, compromising the integrity of the surface.
- Tree Roots: As trees grow, so do their roots, and they can sneak into any available space in search of nutrients and water. When these roots encounter a concrete driveway, they don’t back down; instead, they can cause the concrete to lift, crack, or buckle.
- Soil Movement: The stability of this soil is crucial, as any movement – be it from settlement, erosion, or other forms of displacement – can have a direct impact on the concrete above. When the soil beneath a driveway settles unevenly, it can lead to cracks and a condition known as slab settlement.
What You’ll Need
First things first, let’s talk about what you’ll need. Concrete repair does not necessarily demand an abundance of complex tools. Depending on the nature and extent of the damage, your toolkit can vary.
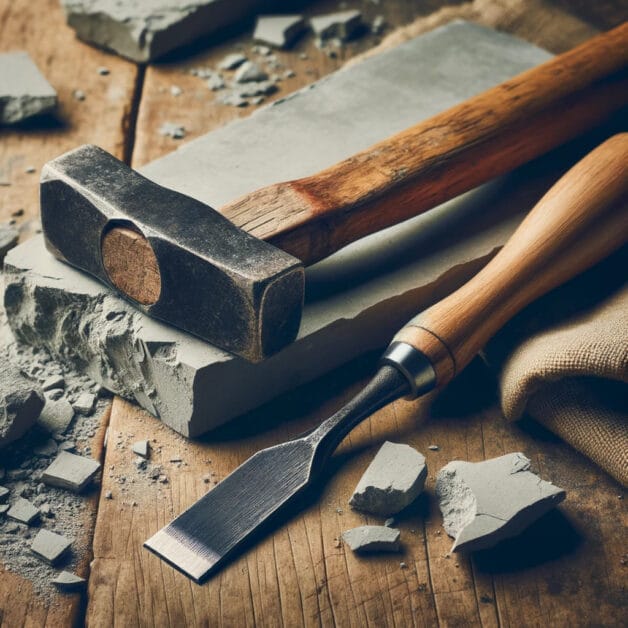
- Small cracks usually necessitate the basics – a chisel, a hammer, and patching mix or new concrete. You’d want a trowel thrown to spread the concrete into the crack. Simplicity is key here, folks.
- For bigger jobs, like dealing with more substantial cracks or uneven slabs, you’ll require more substantial tools – then you’ll most definitely need a cold chisel and an 8-pound sledgehammer.
- Don’t forget the protective goggles and gloves; safety should always be a priority.
- And, of course, the star of the show – the concrete repair product. Here’s a tip: self-leveling floor resurfacing can do wonders for interior floors.
- Oh, and this is just as important: don’t forget your high-grit sanding pad, a bucket of water, a taping trowel, a putty knife, and a roller.
Step by Step on How to Fix Concrete
We’re breaking down the process step by step, ensuring that by the end, you’ll be fixing up your concrete like a pro.
Step 1: Choose the Right Concrete Repair Product for Your Situation

Choosing the right product for concrete repair is crucial.
Opting for a concrete repair mix instead of regular concrete is essential for repairing concrete surfaces. You can easily find various products at local home improvement stores or online retailers.
The options include epoxy compounds, latex patching materials, and mortar mixes. The mortar mixes are particularly effective for filling larger cracks or fixing chipped edges.
On the other hand, epoxy compounds and latex patching materials are more suitable for mending narrower cracks in concrete, specifically those that are ⅛-inch wide or less.
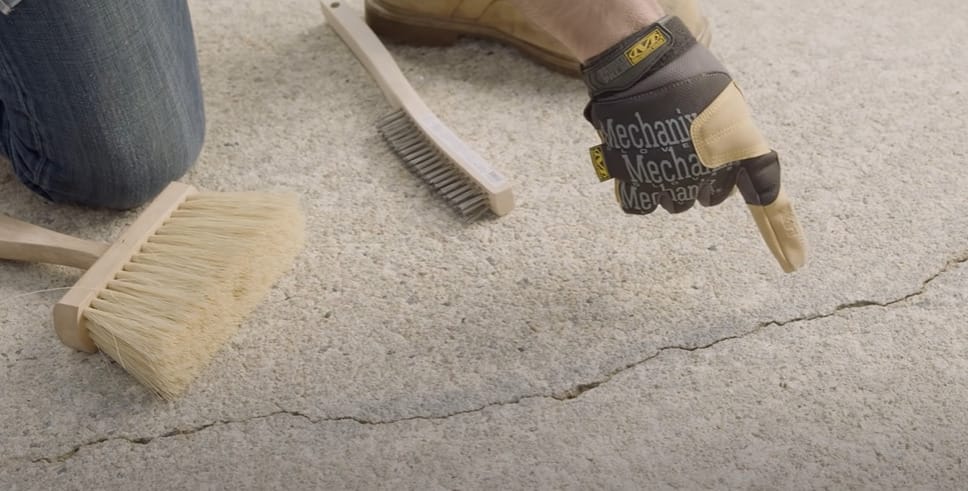
Step 2: Prepare the Cracked Area for Patching
Here comes the fun bit! Preparing the cracked area is crucial in this process.
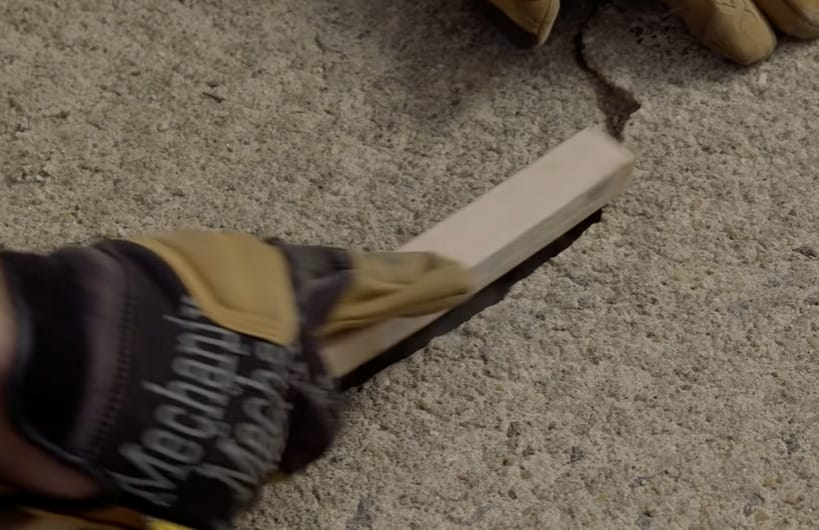
Step 1: Remove Crumbled and Cracked Areas

The first phase is to eliminate all those crumbled and cracked areas. Small areas? Not a problem.
A heavy-duty trowel should do the job just fine. But if we’re talking big, I’d recommend using a sled and cold chisel to break away those thin or loose edges.
Step 2: Clean the Area
After that, roll up your sleeves and start a sweep, vacuum, or even hose away the remaining debris. A solid base, my friends, is what we’re aiming for.
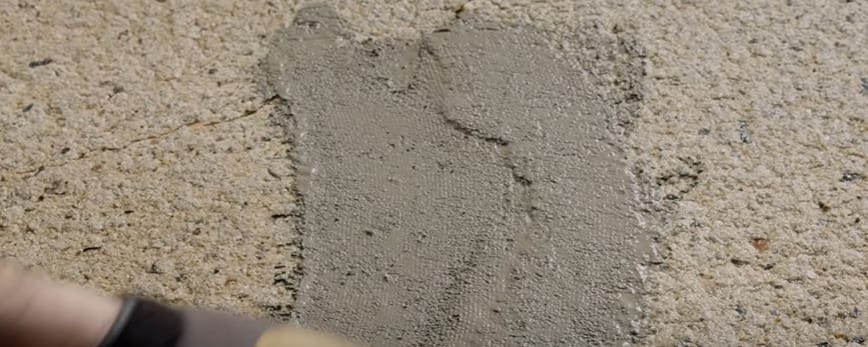
Step 3: Fix the Concrete Crack with Your Repair Product of Choice
Now comes the fun part – choosing your repair product. Whether it’s a minor imperfection or a bigger crack, different tools come into play.
Step 1: Mix and Apply the Patching Product
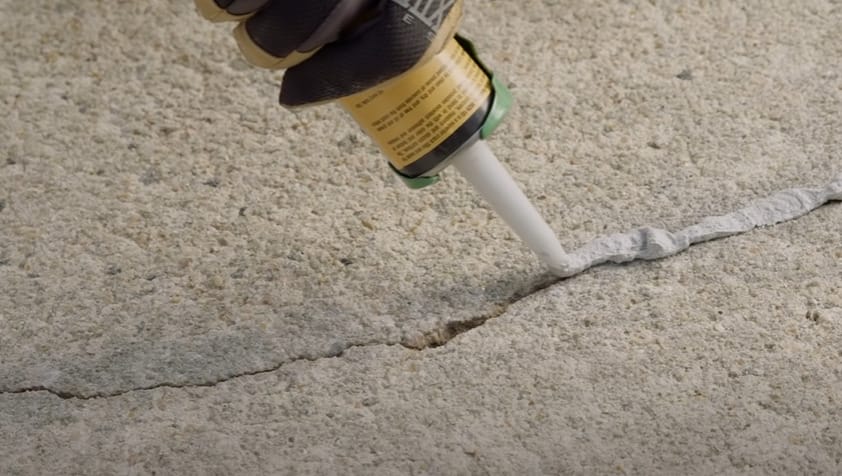
You see, most concrete cracks are about ⅛-inch wide or narrower. For these, merely whip up an epoxy or latex patching product – mixed as per the manufacturer’s specifications – and you’re ready.
Step 2: Texture the Surface
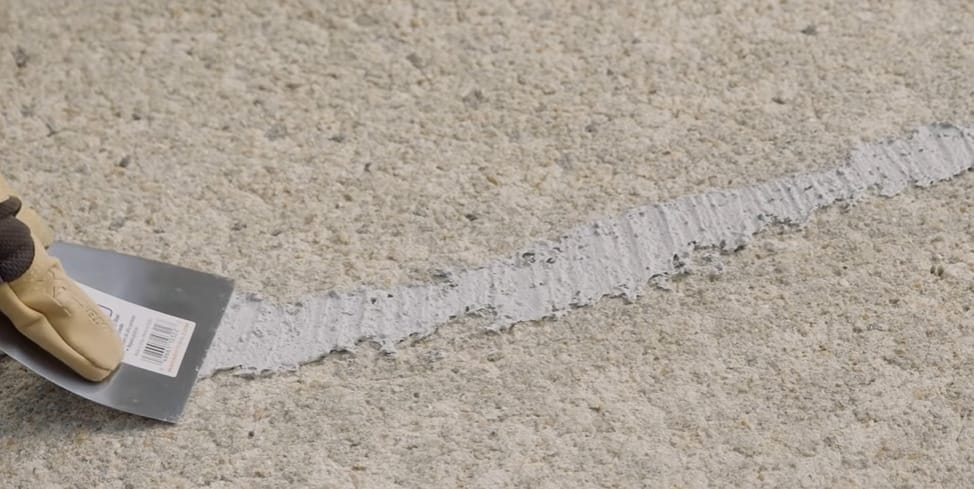
Application is a breeze with a mason’s trowel or a putty knife. Just force it into the crack and smooth the product level with the surrounding concrete. It’s that easy.
Step 4: Allow Time for Curing
So you’re done with the hard graft of patching up those bothersome cracks. But hold on, there’s a bit more. Your job isn’t over just yet. The next crucial step is to sit back and let the concrete cure – this is something you can’t rush.
Now comes the tough part– waiting. The exact time to throttle back depends on your concrete mix. Check the package instructions to know when your concrete will cure, and no, there’s no way to speed this up without messing up your hard work. If your concrete cures too fast or too slow, your end product quality takes a beating.
How to Prevent Cracks in Concrete
Fixing concrete cracks doesn’t have to be a daunting task. Armed with the right knowledge and tools, you can tackle it confidently.
- Solid Foundation: Ensure the soil is well-compacted to provide a stable base for the concrete. Avoid any shaky grounds.
- Right Concrete Mix: Opt for a moist mix that is not overly wet. A balanced mix is key to preventing cracks.
- Even Application: Take your time to spread the concrete evenly and provide a smooth finish. Patience pays off here.
- Control Joints: Use a groover to create control joints, allowing the concrete to expand and contract without random cracking.
- Proper Curing: Allow the concrete ample time to cure and gain strength. Keep it moist and let it cure slowly to ensure durability.
- Weather Protection: Protect your concrete from extreme weather conditions. Cover it during hot weather and postpone your project if temperatures are too low.
- Regular Maintenance: Keep an eye on your concrete and address any minor issues before they become major problems. Regular maintenance goes a long way.
- Use of Sealers: Apply a high-quality sealer to protect the concrete from water penetration, a major cause of cracks.
- Avoid Heavy Loads: Be mindful of the weight and pressure placed on the concrete. Avoid excessive loads that could cause cracking.
- Consult with Professionals: Don’t hesitate to consult with professionals when in doubt. They can provide expert advice tailored to your specific situation.
Maintenance Tips
Let’s kick things off and talk about maintaining your concrete surfaces to ensure they stand the test of time and continue to look fantastic.
- Regular Cleaning: Don’t let dirt and grime settle in! A good power wash every now and then can do wonders. Just ensure you’re using the right nozzle and pressure to avoid any damage to the concrete. An elbow grease and a proper cleaning agent will do the trick for stains. Remember, the sooner you tackle the stains, the better.
- Seal the Deal: Concrete is tough, but it’s not invincible. Applying a high-quality sealer every 2-3 years can protect it from weather, stains, and wear. It’s like giving your concrete a shield, helping it repel water, resist stains, and stand strong against UV rays.
- Mind the Cracks: Keep an eye out for cracks. They might seem small and harmless initially, but they can become big problems if left unchecked. If you spot any, clean them out and fill them up with a concrete crack filler. This helps to prevent water from getting in and causing further damage.
- Avoid Chemical Assault: Be mindful of the products you use on your concrete, especially in the winter. De-icing salts can eat away at the surface, causing spalling and cracks. Opt for safer alternatives like sand or kitty litter for traction. Your concrete will thank you.
- Trim the Greenery: If you’ve got trees or bushes near your concrete surfaces, keep them in check. Overgrown roots can cause cracking and lifting, so trim them back and monitor their growth.
- Level Things Out: If you notice any uneven surfaces or sinking, don’t wait around. This could be a sign of soil issues or a larger structural problem. Addressing it sooner rather than later can save you a lot of headaches and money down the road.
- Keep it Cool: Concrete and extreme heat can be a tricky combo. In a hot climate, keep your concrete shaded during peak heat hours. This can help to prevent thermal expansion and cracks.
Frequently Asked Questions
- How Long Do Concrete Repairs Typically Take?
- Time is of the essence. Most concrete repairs can be completed within a day, though larger or more complex jobs might take longer.
- Are There Cases Where Concrete Cannot Be Repaired?
- While many types of concrete damage are repairable, there are instances where replacement may be a more viable option.
- Is It More Cost-Effective To Repair Or Replace Damaged Concrete?
- The cost-effectiveness of repairing versus replacing concrete depends on the specific circumstances of the damage.
- How Does Weather Affect Concrete Repair?
- Weather conditions can significantly impact the success of concrete repair. Conducting repairs in mild, dry conditions is generally recommended, as extreme temperatures and moisture can affect the repair’s curing process and final strength.
- Are There Different Techniques For Repairing Horizontal vs. Vertical Surfaces?
- Yes, the approach to repairing horizontal surfaces like floors and driveways differs from vertical surfaces like walls. Gravity plays a role in the application of repair materials, and certain products are specifically designed for vertical use.
References
Organizations:
- American Concrete Institute (ACI). https://www.concrete.org/
- Portland Cement Association (PCA). https://www.cement.org/
Books:
- “Concrete Repair and Maintenance Illustrated: Problem Analysis; Repair Strategy; Techniques” by Peter H. Emmons. https://www.wiley.com/en-gb/exportProduct/pdf/9780876292860
- “Guide to Concrete Repair” by the U.S. Department of the Interior Bureau of Reclamation. https://www.usbr.gov/tsc/techreferences/mands/mands-pdfs/Guide2ConcreteRepair2015_Final.pdf
Website Resources:
- The Concrete Network. https://www.concretenetwork.com/
- HomeAdvisor. https://www.homeadvisor.com/
Video References:
Lowe’s Home Improvement