37 min read
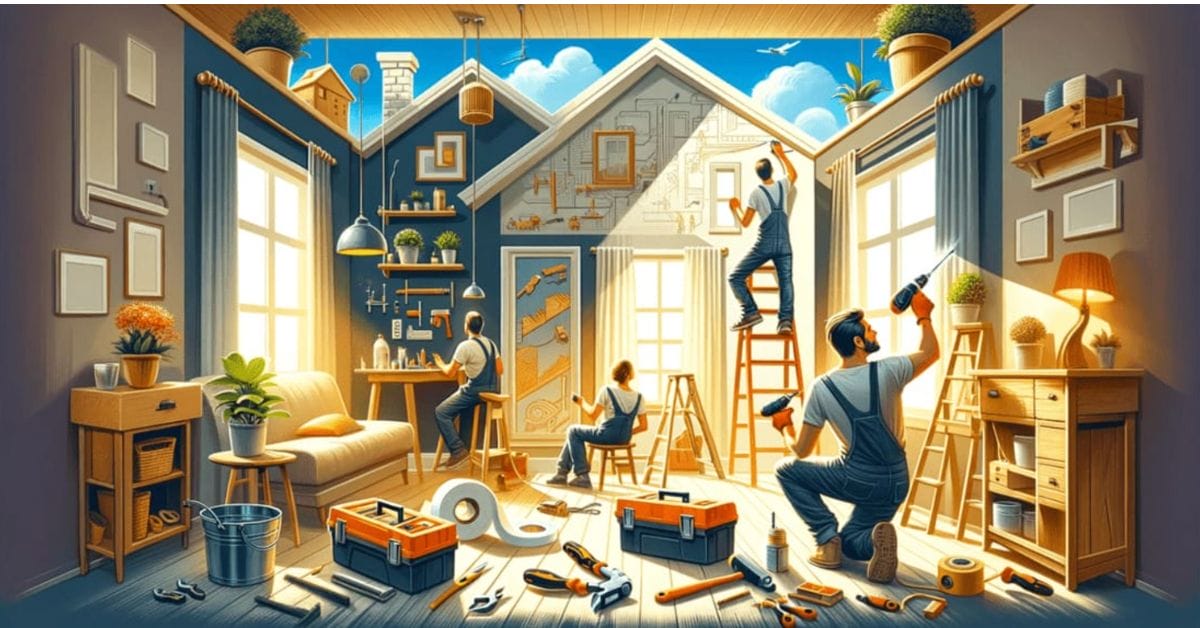
25 Home Repairs You Should Never Pay Someone Else to Do (Guide)
Alright, fellow homeowners, let’s talk DIY home repairs. You know, rolling up your sleeves and tackling those small fixes around the house. Why? Because it’s a game-changer.
Dive into some DIY fixes you can easily tackle around your home. It’s all about taking matters into your own hands and transforming your space with some know-how and elbow grease:
🔧 Swap out that dated light fixture for a bright new look.
💧 Drip no more – fixing a leaky faucet is simpler than you think.
🛠️ Time to re-caulk and get those edges looking sharp and sealed.
🔇 Say goodbye to those annoying squeaks underfoot with an easy fix.
💨 Boost your AC’s performance with some airflow improvements.
👇 More Home Repairs Below…
In this guide, I’m walking you through 25 household issues you can handle independently. But hold on – it’s not just about DIY. I’ll also spotlight those crucial moments when dialing up a pro is smarter.
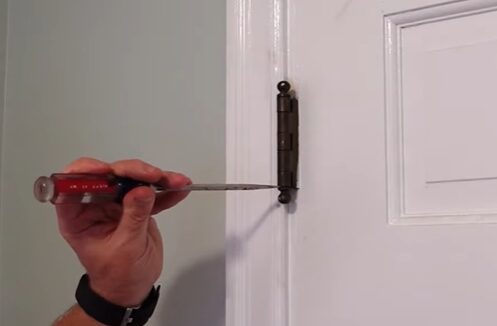
1. Silencing a Squeaky Door Hinge
You know what’s annoying? A squeaky door hinge that just won’t quit. But don’t worry; I’ve got a quick and easy solution for you. Now, as a part of our easy home repairs series, let’s dive right into fixing that noisy hinge.
Start by grabbing a hammer, a nail set, and petroleum jelly.
- Step 1: You’ll need to remove the hinge pin. Place the nail set on the bottom of the hinge pin and gently tap it with the hammer. As the pin comes out, be careful not to damage the door or hinge.
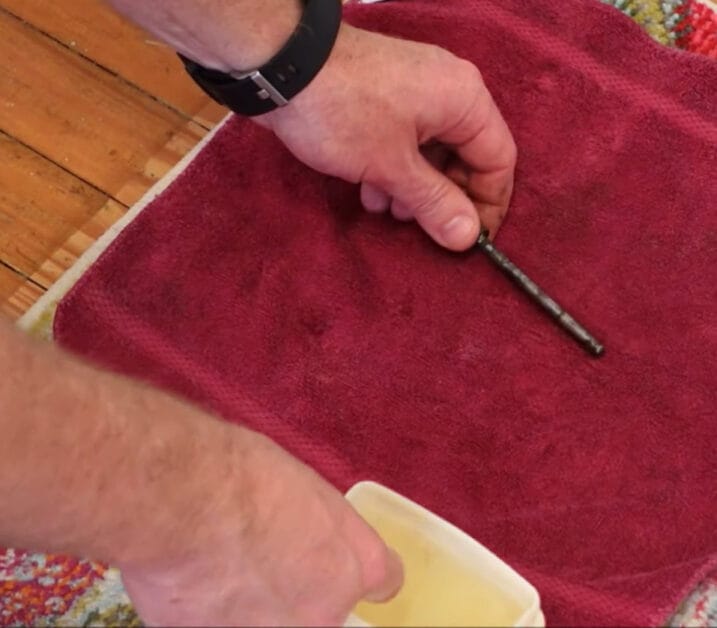
- Step 2: Once you have the hinge pin out, give it a light coating of petroleum jelly. Don’t be shy, but also don’t go overboard. Now, dab a little petroleum jelly into the top of the pin slot. Have you never heard of this method? It’s one of those awesome little tricks that can save the day.
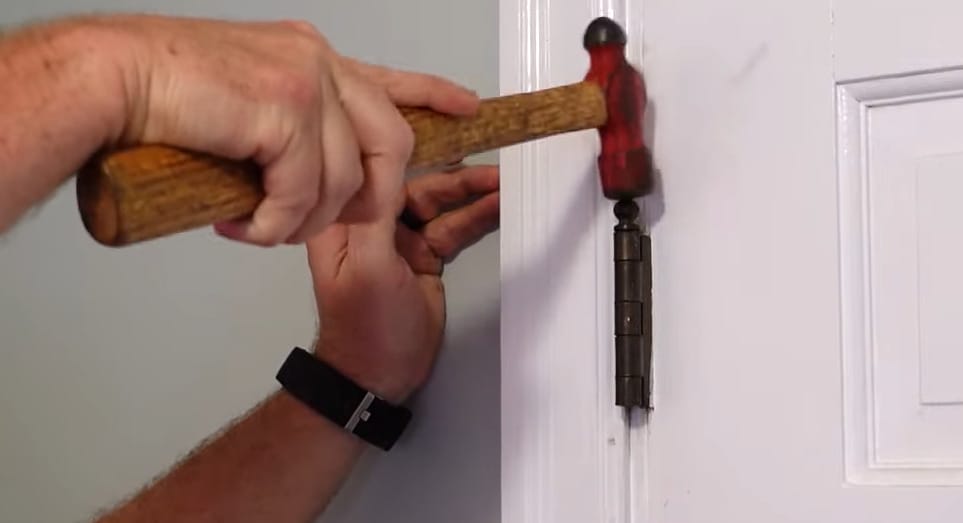
- Step 3: Reinsert the pin back into the hinge, wiping off any excess petroleum jelly. Finally, open and close the door several times to work the petroleum jelly into the hinge joints.
And just like that, you’ve silenced that pesky squeaky door hinge! See, easy home repairs don’t have to be complicated. You know what to do next time you run into a noisy hinge situation.
2. Replacing Aging Electrical Outlets

You know what’s interesting? As we get older, so do our homes! One part of our homes that we often forget to take care of is our electrical outlets. Have you ever thought about replacing them? No worries! Doing it yourself can be easier than you might think.
- Step 1: Turn off the power at the circuit breaker before you start. No one wants to get zapped.
- Step 2: Grab your trusty screwdriver and remove the cover plate from the old outlet. Unscrew the outlet itself and pull it out gently. You’ll see some wires connected to it – take note of their configuration.
- Step 3: Let’s use some wire stripper to remove about half an inch of insulation from the wires. Twist the ends of each wire with pliers to give them a clean finish, making it easier to connect them to the new outlet.
- Step 4: Alright, let’s install that shiny new outlet! Black wires go to brass screws, white wires go to silver screws, and green or bare wires go to green screws. This is crucial for the outlet to work properly and prevent any accidents. Tighten the screws, push the outlet back into place, and screw it securely.
- Step 5: Replace the cover plate, and don’t forget to turn the power back on at the circuit breaker! Finally, test your handiwork by plugging it into a device.
There you have it, folks! It takes a little patience, but replacing aging electrical outlets can be a breeze – not to mention a great way to save some cash. Keep an eye on your outlets, and don’t hesitate to give them a little TLC when needed.
3. Repairing Holes in Drywall
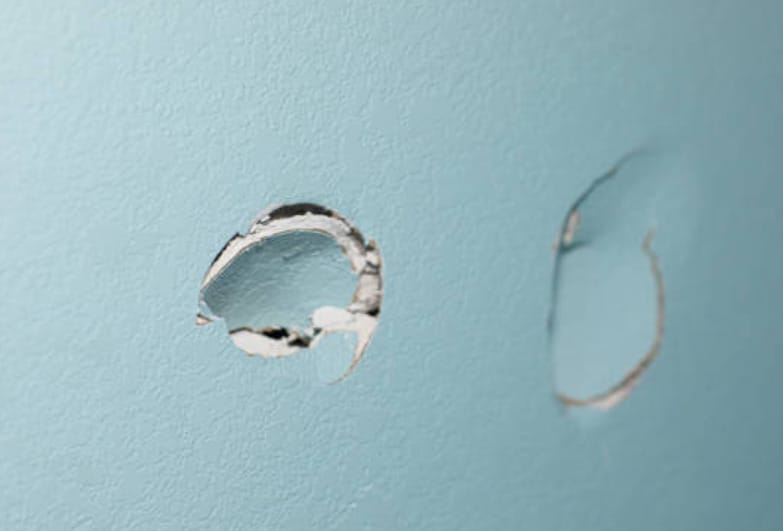
Let me tell you, fixing holes in drywall can be super easy! As a skill you’ll want to have in your easy home repairs arsenal, it won’t take much time to learn. So, let’s dive in!
Method 1: Grab some joint compound and a putty knife for a smooth finish. You only need to apply a thin coat of joint compound over the hole, let it dry, and voilà! Your wall is looking top-notch again.
Method 2: Here, you’ll want to use a peel-and-stick patch. Cover the hole entirely, apply joint compound, smooth it out, and let it dry. Once it’s dry, give it a little sand, and you’re all set!
See? Repairing holes in drywall doesn’t need to be a headache. Give these techniques a whirl, and those walls look pristine in no time!
4. Stopping a Running Toilet
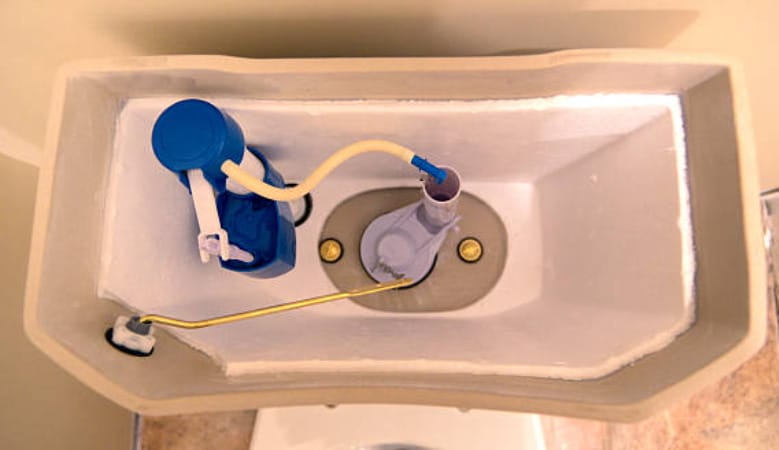
Have you ever dealt with a running toilet that just won’t quit? Don’t worry, I got you covered. Here’s a simple guide on how to end that annoying sound and prevent your water bill from skyrocketing.
First things first, let’s identify the problem. We’ll be looking at mainly two components in the toilet tank: the fill valve and the flapper. Make sure you have cutting pliers, rubber gloves, and replacement parts on hand, just in case.
- Step 1: Check the fill valve. It’s in charge of regulating the water level in your toilet tank. If the water keeps flowing, it’s time to adjust or replace it.
- Step 2: Examine the flapper. Located at the bottom of the tank, it seals the water. If it’s not closing properly, that’s what’s causing your running toilet issues.
Remember, acting fast when dealing with a running toilet is crucial. It’s not just a nuisance but also a waste of water. Give this toilet repair a try, and your home will thank you.
5. Troubleshooting Furnace Issues
If your furnace is acting up, fear not because I’m here to share some quick and easy home repair tips to help you get your furnace back in tip-top shape. Let’s dive right into it!
- Thermostat troubles: Sometimes, the issue isn’t with your furnace but your thermostat! Ensure it’s set to “heat” and at the right temperature. Give it a little bump to see if that kickstarts your furnace.
- Battery check: For battery-powered thermostats, dead batteries might be the culprit. Swap them out and see if your furnace comes back to life. Here’s a little tip: change your thermostat batteries for routine maintenance.
- Clean your filters: A dirty filter can cause your furnace to work harder. Keep it clean and change it every few months. Your furnace will thank you for it, I promise.
- Listen for strange noises: If your furnace is making clicking sounds but not turning on, it might be an internal issue. Be ready to call a professional if the simpler fixes don’t do the trick.
- Annual maintenance: As a general rule, I advise scheduling regular maintenance for your furnace. An expert can spot potential problems early and keep your system running smoothly.
So, whenever you encounter furnace issues, start with these easy home repairs first. You might save yourself some time and money, and who doesn’t love that? Remember, keeping your furnace well-maintained is the key to a cozy and comfortable home.
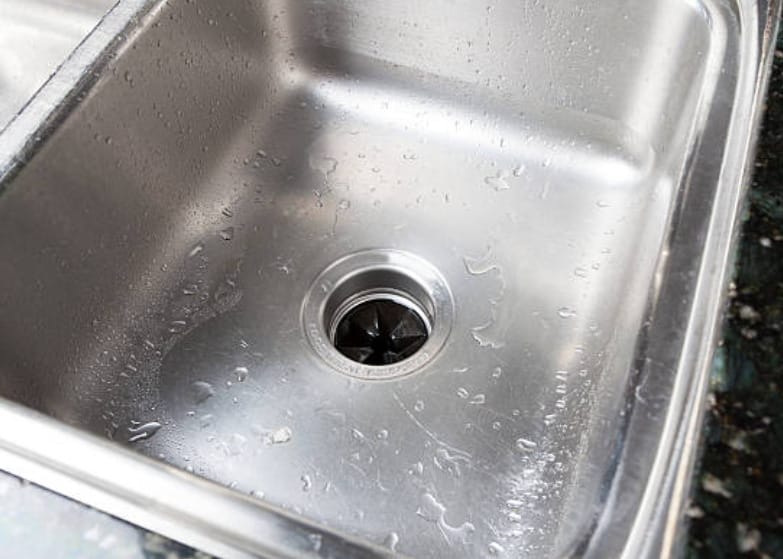
6. Opening a Clogged Drain
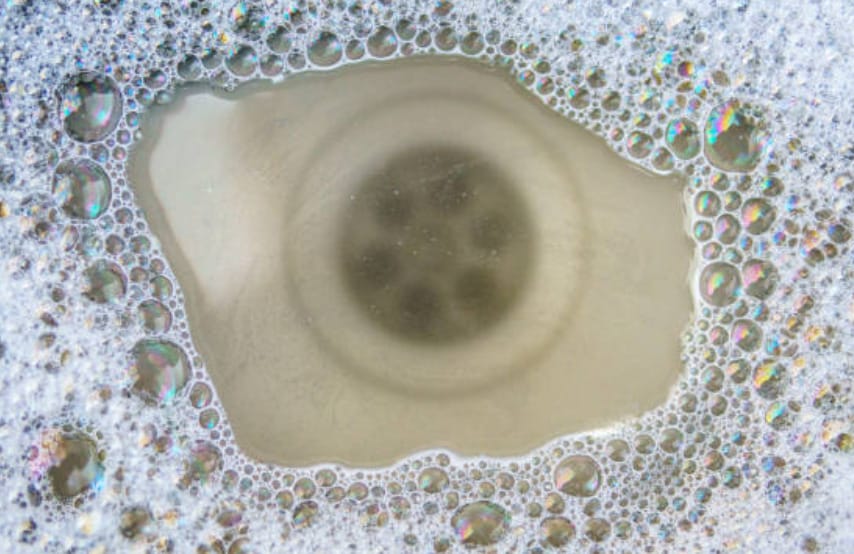
We’ve all been there–a clogged drain ruining our day. No worries! I’ve got a few quick tips to fix it in no time.
First, grab a handy plunger. Place it over the drain and give it a few good pushes. Sometimes, that’s all it takes to clear the blockage.
If the plunger doesn’t do the trick, it’s time to level up. Combine baking soda and vinegar in equal parts – a cup of each should do. Pour it down the drain and wait 10 minutes. Now, pour some boiling water to flush it all away.
For stubborn clogs, your best bet might be a drain snake. It’s a flexible cable that you can feed into the drain to reach the clog and break it up. Be gentle yet firm while using it; we don’t want to damage the pipes.
So, there you have it! There is no need to call in reinforcements–unclogging a drain is a simple fix you can handle yourself. Happy home repairing!
7. Unclogging the Garbage Disposal
So, you’ve found yourself in a situation where your garbage disposal is clogged and needs a quick and easy fix? Don’t worry, I’ve got your back! Here are some simple steps to get your disposal up and running again:
- Turn off the disposal: To avoid accidents, ensure the garbage disposal is off and unplugged before starting work.
- Peek inside with a flashlight: Look for any visible blockages or trapped items that may be causing the issue. Remove them with tongs or pliers (never use your bare hands).
- Manual reset: Find the reset button under your garbage disposal and push it to reset the device.
- Loosen the clog with an Allen wrench: If you still have one, insert an Allen wrench at the bottom of the unit and gently turn it both ways to help break up the debris.
- Natural cleaning solution: Try pouring a mix of baking soda and vinegar into the disposal as a safe cleaning solution for the plastic parts of your disposal.
- Remove the trap: If all else fails, you can remove the drain trap to clear any remaining debris. Just place a catch bucket underneath to avoid spills and messes!
- Test and reassemble: Once the clog is cleared, reassemble the garbage disposal, plug it in, and give it a test run to ensure it works properly.
And there you have it! Following these steps, you can easily unclog your garbage disposal and tackle those daily kitchen cleanup tasks.
8. Replacing Window Screens
Ah, window screens! They’re great for letting fresh air in while keeping pesky insects out. But sometimes, they can get damaged or worn out. Trust me, I know. So, let’s talk about how to replace them like a pro.
- Step 1: Remove the old screen by gently pushing on the screen’s edges. Pay attention to the spline, the rubber cord that holds the screen in place – you’ll need it later.
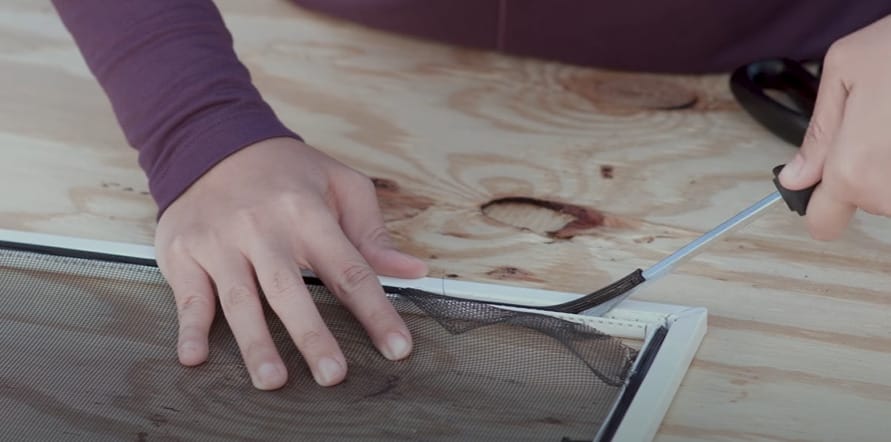
- Step 2: Measure and cut the new screen. Lay it over the frame, making sure it’s a bit larger than the opening. Use a utility knife to trim the excess screen, but don’t worry if it’s not perfect; we can always clean it up later.
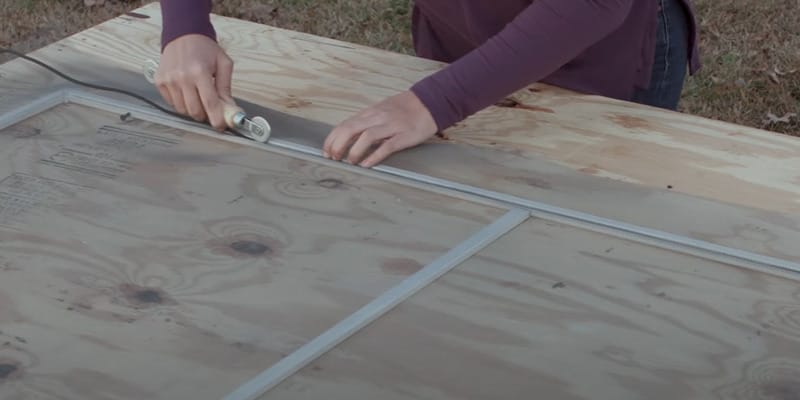
- Step 3: Grab that spline and press it into the frame’s groove with a screen roller. This magical tool will make your job a breeze! Work your way around the frame, keeping the screen taut.
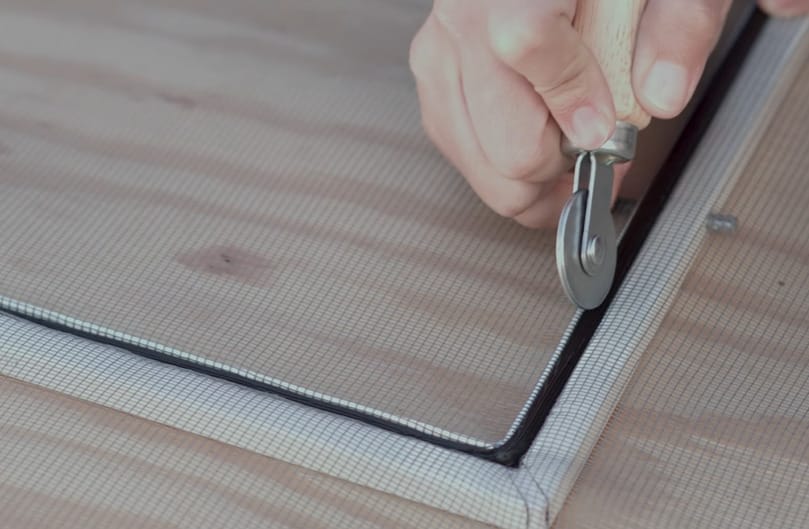
- Step 4: Trim the excess screen material. Now you have a brand new window screen!
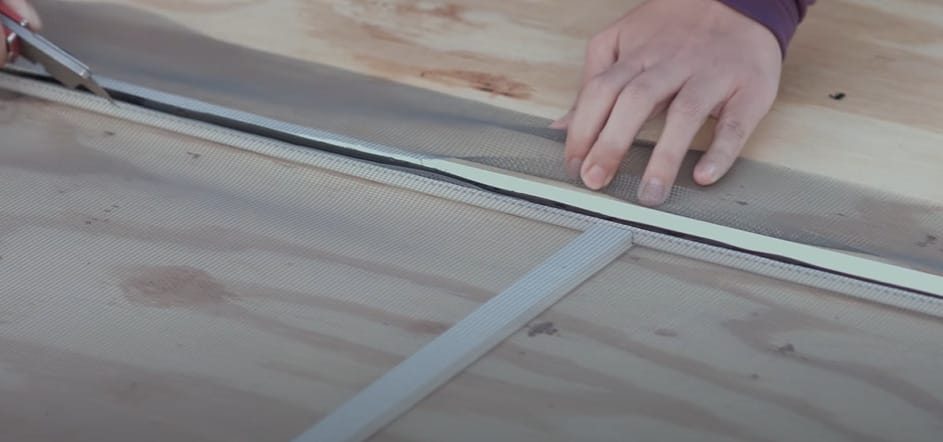
So there you have it! Replacing a window screen is a simple, cost-effective way to freshen your home’s look. Remember, all it takes is a few simple tools and patience. Happy repairing, my friends!
9. Lubricating Sticky Windows
We’ve all been there – trying to open a stubborn, sticky window. Luckily, I’ve got a quick and easy home repair for you! No need to call in the pros for this one.
First, let’s cover a common mistake: never use oil-based lubricants like WD-40 on your window tracks. This might provide a temporary fix, but those tracks will soon attract dust and grime, making your windows stickier.
Instead, here’s a simple solution to get those windows sliding with ease:
- Step 1: Grab a bucket of hot water and some vinegar or baby shampoo. Open the window as much as possible, and carefully wipe down the tracks and window frame to remove loose dirt and dust.
- Step 2: After cleaning the tracks, use a silicone-based lubricant. This type of lubricant won’t dry tacky or attract dirt.
- Step 3: Slide the window up and down a few times to distribute the lubricant evenly along the tracks.
That’s it! In just a few minutes, you’ve got smooth-sliding windows again. This easy home repair can be done whenever your windows become stubborn. And remember, keeping those window tracks clean can help prevent stickiness in the first place. Happy window-fixing!
10. Clean Faucet Aerators
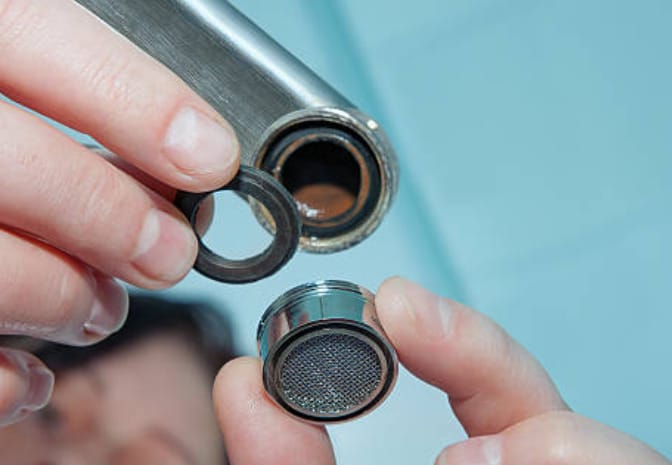
One of the often overlooked home repairs is cleaning your faucet aerators. Trust me, it’s easier than you think!
Aerators are crucial in the water flow of your bathroom and kitchen sinks. Over time, they can become clogged with mineral deposits and other debris, affecting the water pressure.
- Step 1: Remove the aerator from your faucet. Just grip it tightly and twist it counterclockwise. Have a clogged aerator? No worries, I’ve got your back!
- Step 2: Soak the aerator in vinegar overnight helps to break down any stubborn mineral buildup. After soaking, gently clean the aerator screen with a toothbrush or small brush.
If the buildup still persists after scrubbing, you may consider replacing the aerator. Take your old aerator to your local hardware store for a matching replacement.
By doing this easy home repair yourself, you’ll save money, improve water flow, and extend the life of your sink. Give yourself a pat on the back – you deserve it!
11. Switching Out an Old Light Fixture

When I want to give a room a quick makeover, one of my go-to moves is switching out an old light fixture. Trust me, it’s something you can do on your own!
- Step 1: Go to your electrical panel and turn off the power to the light fixture you’ll be working on. Once that’s done, set up a ladder or step stool to reach the fixture comfortably.
- Step 2: Gently remove any coverings or shades from the fixture. Then, loosen the screws holding the fixture to the ceiling and carefully lower it. You’ll see a bunch of wires connected to the fixture, but don’t worry – it’s not as intimidating as it seems.
- Step 3: Disconnect the wires by unscrewing the wire connectors or untwisting the wires. If there’s a grounding wire attached, make sure to disconnect that, too. With the wires disconnected, set your old fixture aside. Remove the old mounting hardware, if needed, and prepare to install your awesome new light fixture.
- Step 4: Attach the wires from your new fixture to the corresponding wires in the ceiling. Remember that colors matter: black or red to black or red, white to white, and green or bare to green or bare.
- Step 5: Once the wires are connected and secured with wire connectors, it’s time to attach your new fixture to the mounting plate and secure it with the provided hardware. Finally, insert the light bulbs and add finishing touches like shades or decorative screens.
And that’s it! See, I told you it was an easy home repair. With a few simple steps, you’ve transformed your space by changing an old light fixture. Give yourself a pat on the back – you’re officially a home repair pro in my book!
12. Fixing a Leaky Faucet
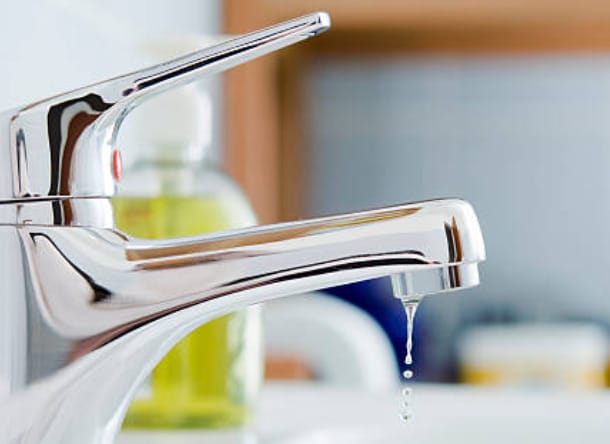
A leaky faucet is one of the most common household issues. Sure, it might not seem like a big deal at first, but the constant dripping can drive you crazy, wastewater, and even cause damage in the long run.
Luckily, with some knowledge and basic tools, you can easily tackle this fix yourself!
- Step 1: Cut off the water supply.
- Step 2: Take off the faucet handles and yank out the stem.
- Step 3: Swap out the old seat washer for a fresh one. And just like that, you’ve nailed it!
Well, that’s a quick rundown on how to fix a leaky faucet. I promise, once you’ve done it a couple of times, you’ll be a pro! Remember to be patient, follow instructions, and, most importantly, have fun with your easy home repairs!
13. Replacing Old Caulk
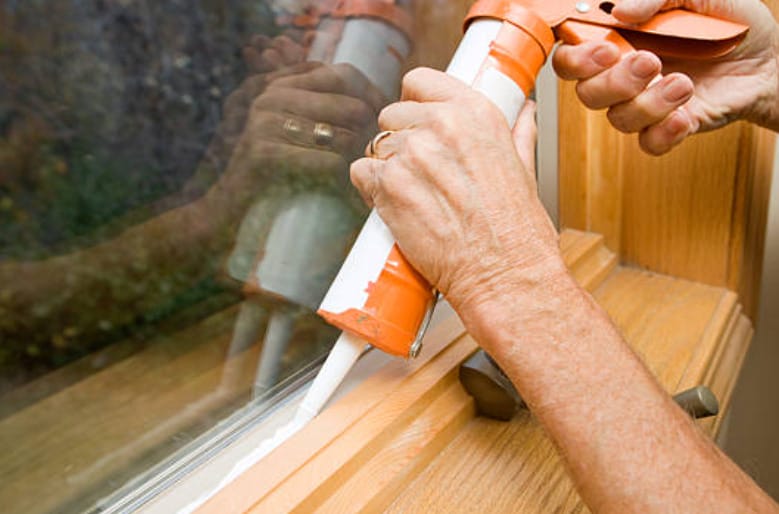
When talking about easy home repairs, one task that often goes unnoticed is replacing old caulk. Trust me, it’s much simpler than you might think!
Caulk is that handy material that seals joints and seams, keeping moisture out and giving your space a polished, finished look.
- Step 1: Remove the caulk by using the necessary tools: a caulk remover tool, some paper towels, rubbing alcohol, and maybe a toothbrush for cleaning those stubborn areas.
- Step 2: Remove the old caulk, take a damp cloth, and gently wipe off any residue. If needed, use some rubbing alcohol or a mild cleaning solution. It’s essential to have a clean surface for the new caulk to adhere properly.
- Step 3: Choose a waterproof caulking option suitable for your project and load it in a caulk gun. When applying the caulk, keep a steady hand and maintain a consistent bead size. Moving at a slow, even pace helps ensure a neat and clean finish. Don’t worry if it’s imperfect; we’ll smooth it out later.
- Step 4: After applying the caulk, you’ll want to smooth the bead to create a professional-looking result. You can use a caulk-smoothing tool or your finger (just wet it first). Gently run it along the bead, pressing down to create a smooth, slightly concave surface.
And there you have it! Replacing old caulk may not be the most glamorous home repair, but trust me, it can make a difference. So go ahead and give it a try!
14. Quieting a Squeaky Floor

You know that annoying sound when you walk across a squeaky floor? I’ve got great news for you. There are easy ways to fix that squeak and make your home more peaceful.
You’ll need to find the source of the squeak. Often, it’s caused by dried-out flooring lumber or wood rubbing against nails or other wood. So, look under your floor and see what you can discover.
A simple and effective fix is to lubricate the problem area. You can quickly squirt some powdered graphite lubricant on the squeaky spot, which will help reduce friction. It’s worth a try, and it’s a super easy fix!
Finally, if you’re still having trouble, try increasing your home’s humidity. Dry air can cause floorboards to squeak, so consider investing in a humidifier to help reduce those annoying noises.
There you have it! With DIY home repair magic, you can say goodbye to that pesky, squeaky floor and enjoy a more serene living space.
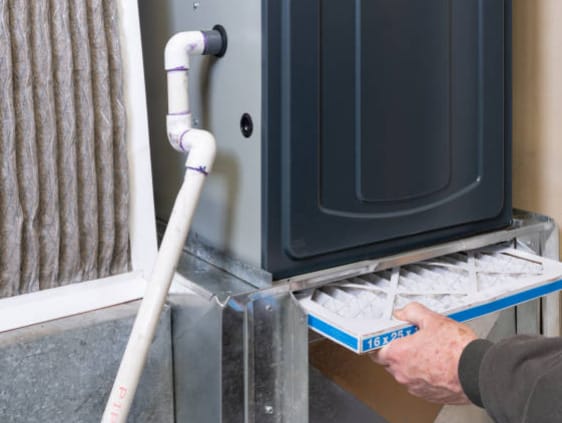
15. Improve Central AC Airflow
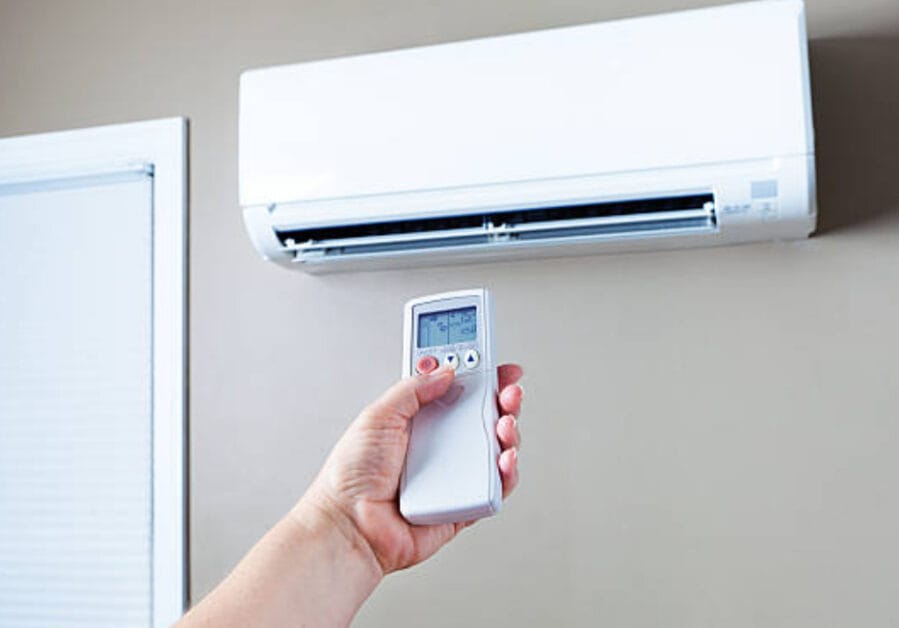
Let me tell you, folks, one easy home repair you can do is improve your central air conditioning’s airflow. I’ve seen many cases where homeowners complain about uneven cooling or weak airflow from their vents.
But worry not, my friends, as you can try a few simple solutions without breaking the bank.
Give your AC filters a good check. If they’re clogged or dirty, your AC has to work twice as hard to push air through. So, make sure you replace or clean them regularly.
Next, take a look at your vents and ducts. Ensure they’re not closed, blocked, or leaking. A quick inspection can save you a lot of trouble and help distribute cool air evenly through your home.
Another move is to clean your AC’s outdoor unit. Foliage, dirt, and debris can restrict airflow, so keep the area around your outdoor unit clean and clutter-free.
And last but not least, consider using fans to help circulate the cool air in your home. Standalone fans, ceiling fans, or even strategically placed box fans can work wonders, creating a comfortable environment.
There you have it! Here are a few easy tips to improve your Central AC airflow and make your home that perfect haven during those hot summer days.
16. Fill Driveway Cracks
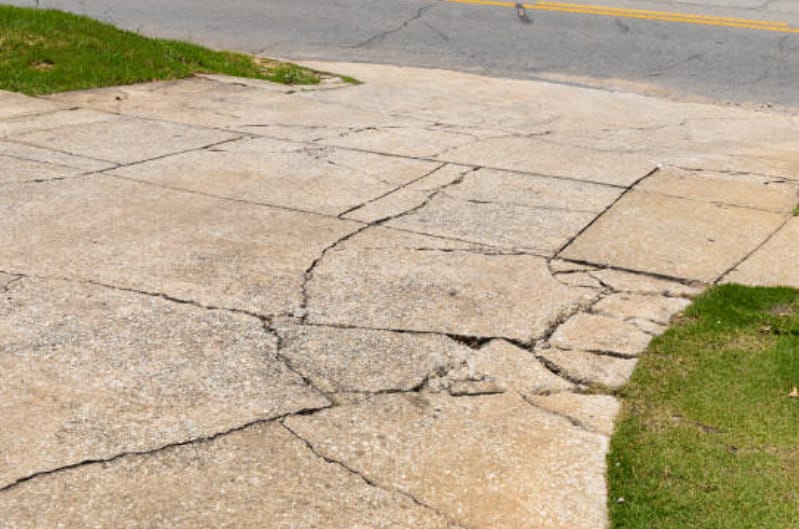
As I always say, attending to those pesky driveway cracks is crucial!
First, assess the overall condition of your driveway. You’re ready for repairs if there’s no significant shifting or settling. I’ve found that cleaning the driveway with a pressure washer is a great way to remove dirt and gunk. Wet it down to prevent the cleaner from drying too quickly.
Now, let’s move on to those cracks:
- Cracks up to ¼ inch: You can fix these shallow cracks by applying a sealant. These small cracks are likely caused by shrinkage while the driveway was curing.
- Deeper cracks: It’s important not to ignore deeper, larger cracks, as they could indicate a more serious issue. Clean these pesky cracks and tackle them with a filler or patching compound.
Remember that it’s not just about aesthetics here—filling driveway cracks can help prevent bigger problems. So, roll up your sleeves and get crackin’! Happy repairing!
17. Repainting Walls

Home repairs may seem intimidating, but repainting wall is a manageable task anyone can tackle. Let me share some easy steps to help you spruce up your space!
First off, the most important step is sanding. It’s essential to prepare your walls for a smooth, even finish.
- Dust and Clean: Wipe the walls down with a damp cloth to remove dust, dirt, or grease—any of these can negatively impact the paint’s adhesion.
- Repair: Check for cracks or imperfections and fix these with caulk or spackle. For larger holes, build up the filler in layers, giving each layer time to dry.
- Sanding: Use fine-grit sandpaper to carefully sand down the surface, making it as smooth as possible.
- Priming: If the surface is glossy or uneven, or if you’re painting over a dark color with a lighter shade, applying primer is crucial. This helps the paint adhere better, resulting in a more professional-looking finish.
Once your walls are prepped, grab your paintbrush, roller, and, of course, your paint, and let’s get going!
- Edges: Cut in along the edges of the wall, including corners and near the ceiling and baseboards. This helps you paint more precisely.
- Roller: Use a roller to paint your wall, working in a “W” pattern for consistent coverage. Be sure to overlap slightly to avoid lines or streaks.
Voilà! You’ve just mastered an easy, budget-friendly home repair that can refresh your space. Be proud of your DIY skills, and don’t be afraid to tackle other home repairs in the future!
18. Swapping Out a Regular Light Switch for a Dimmer Switch
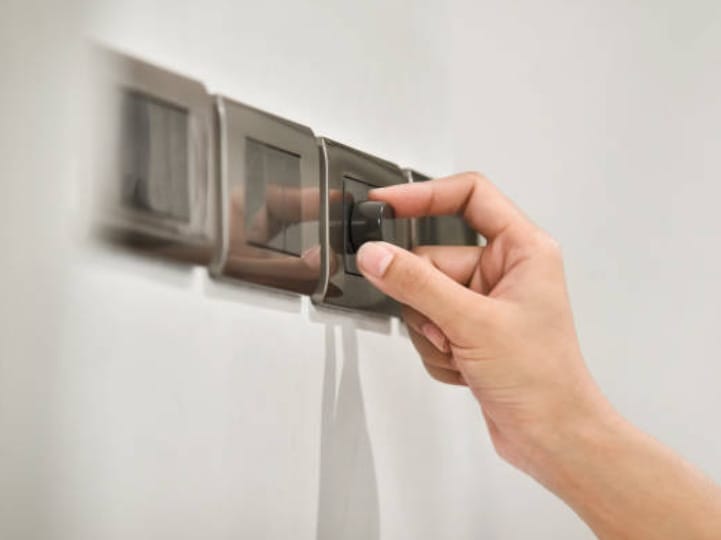
Have you ever thought about adding some flair to your room’s lighting? Well, I’ve got good news for you – it’s simpler than you think!
Always turn off the power to the room you’re working in by flipping the switch at your circuit breaker box. Check your outlets and light switches to ensure no electricity runs into the area.
- Step 1: Unscrew the switch plate and gently pull the switch out of the wall. Make sure to keep track of the wires connected to the switch!
- Step 2: Prepare the wires for your new dimmer switch. Typically, dimmer switches have 3 wires: green for ground, black for hot, and white for neutral. If needed, strip the ends of the wires and connect them to your new dimmer switch as per the instructions.
- Step 3: Carefully push the wires back into the wall and secure the dimmer switch in the electric box using the screws provided. Once everything’s snug and in place, reattach the switch plate.
Voila! Your custom lighting is now ready to go. Dim the lights to set the mood or brighten the room whenever you like. Enjoy your new atmosphere, and let your lighting creativity shine!
19. Fixing a Fridge That Isn’t Cooling
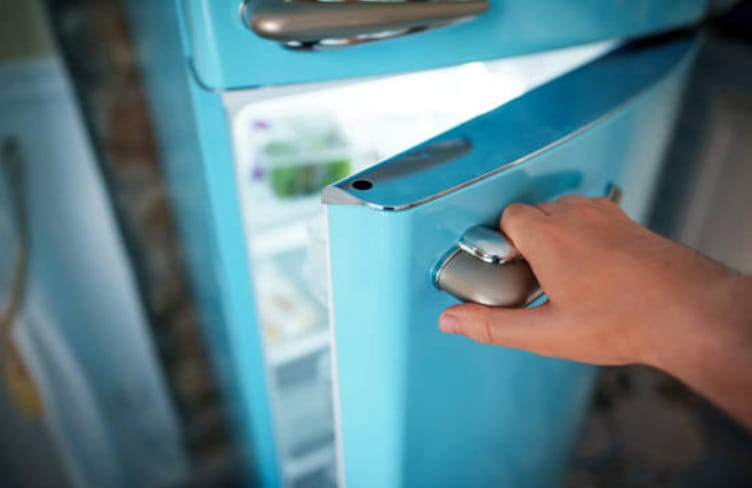
Let’s dive into one of the most common issues homeowners face: a fridge that’s not cooling. You know, when I find myself in this situation, I make sure to tackle the problem head-on. Here are a few easy home repairs to get that fridge back in working order.
- Check the power. Sometimes, the problem is as simple as a tripped circuit breaker or a loose plug. Look at those possible culprits if your fridge light isn’t coming on.
- Inspect the evaporator fan. You might be dealing with a stuck or broken evaporator fan if you hear the compressor running, but the fridge isn’t getting cold. A squealing or chirping noise often indicates an issue with the fan, and it’s usually louder when you open the freezer door.
- Unblock those vents! Blocked air vents can cause poor circulation, resulting in uneven cooling. Ensure nothing obstructs those vents in the fridge and freezer compartments.
- Defrosting system failure. Sometimes, those pesky frost-clogged evaporator coils can’t absorb heat efficiently. If that’s the problem, you might need to address a defrost system issue to get your fridge cooling properly again.
- Possible compressor issues. The compressor is the heart of your fridge’s cooling system. It might be time to check that vital component if all else fails. If the compressor has given up, consulting a professional for further assistance is a good idea.
Remember, I believe in you, and you’ve got this! Happy repairing!
20. Patching Leaky Gutters
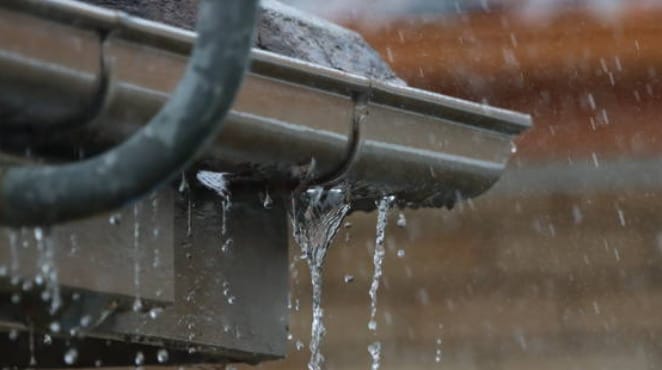
We’ve all been there – a rainstorm hits, and suddenly, you notice water dripping from your gutters. Don’t worry, I got your back! Let me share some quick tips on patching leaky gutters like a champ!
First thing, grab a ladder and inspect the gutters. You might find holes, rust, or loose connections. Make sure to clean the area. Once it’s dry, rough it up a bit with an abrasive pad so the repair material sticks better.
Now, there are a few easy fixes you can try yourself:
- Step 1: Apply a layer of roofing cement over the hole or leak. This works great for small holes and cracks.
- Step 2: Using a gutter sealant is an excellent option if the leak is at the seams.
- Step 3: You might need a piece of metal flashing for larger holes. Cut it to size and use roofing cement or gutter sealant to attach it over the hole.
- Step 4: Sometimes, leaky gutters are caused by sagging. Installing or adjusting gutter hangers can fix the issue.
Remember, safety comes first! If you’re not comfortable working on a ladder, call a professional. Now, go and enjoy your leak-free gutters and keep your home safe from water damage!
21. Reviving Dying Grass
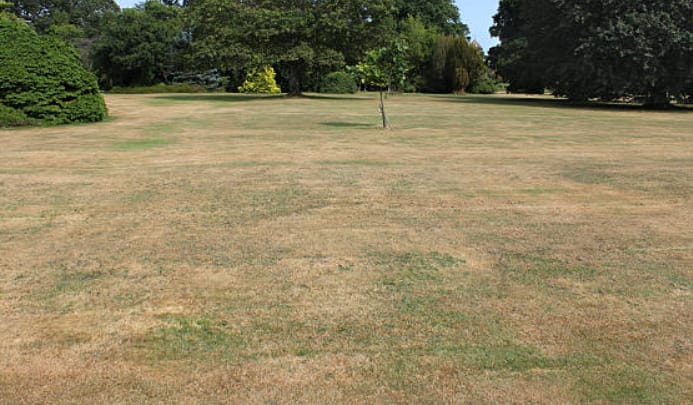
Have you ever had a lawn that looks like it’s on its last breath? Don’t worry! I’m here to help you with easy home repairs to revive dying grass. Just follow these simple steps and watch your lawn spring back to life!
- Step 1: Grab a rake and remove all the dead grass from your lawn. Don’t be shy! Raking the area helps clean up dead grass and loosens the soil, allowing for better water penetration and aeration.
- Step 2: Aerate the soil. Trust me, this step matters! Aeration can be done using a simple garden fork, or if you’ve got a bigger lawn, you may want to rent a mechanical aerator. Aerating the soil increases oxygen flow; who doesn’t like to breathe?
- Step 3: Invest in some quality grass seed or sod. It’s important to use the right type of grass for your lawn’s specific needs. Spend a few extra minutes reading the directions on the package. Your lawn will thank you for it!
- Step 4: Spread the seed! Sprinkle the grass seed evenly over the dead and bare spots. You could use a seed spreader or even your hands for distribution. Just remember to use the recommended rate as stated on the package.
Lastly, embrace a little patience. Water the area daily until the grass is well-established. Soon enough, you’ll be the proud owner of a lush, green lawn!
22. Repairing a Decaying Deck
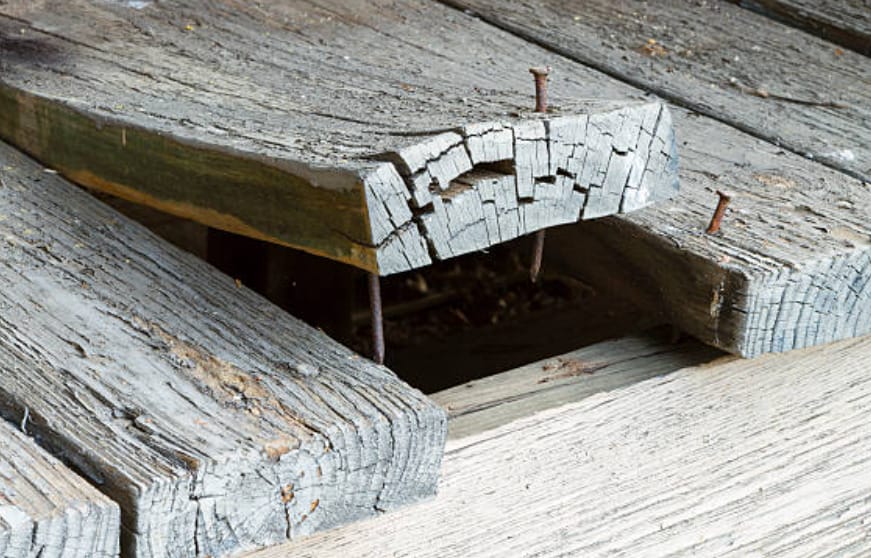
One easy home repair that can make a huge difference in your outdoor space is deck restoration. If you’ve noticed your deck is starting to decay or showing signs of wear and tear, there’s no need to panic.
I will share some simple steps you can take to give your deck a fresh lease on life without breaking the bank.
- Step 1: Inspect your deck thoroughly to identify damaged or rotting boards. Once you’ve located the problem areas, it’s time to remove and replace them.
- Step 2: To remove nails or screws from damaged boards, be careful and patient, as you don’t want to cause additional damage. After removing damaged boards, replace them with new wood, ensuring you secure them properly to your deck’s structure.
See? Repairing a decaying deck is not as daunting as it seems. With time, effort, and tools, you can restore your deck to its former glory and enjoy your outdoor space again!
23. Patching Ceiling Cracks
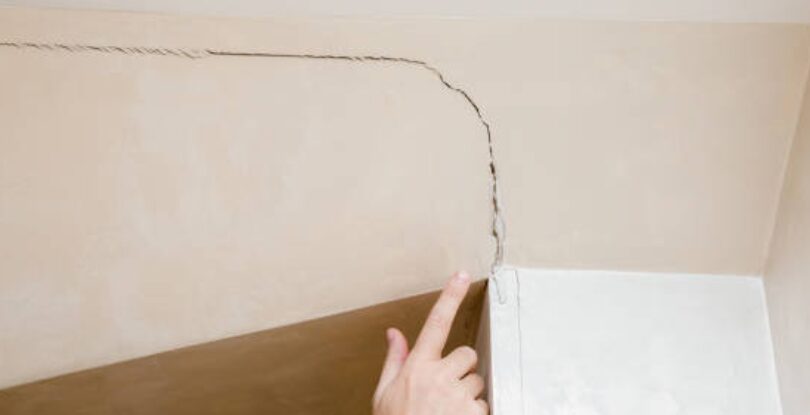
Man, have I seen my fair share of ceiling cracks? Luckily, repairing them is a piece of cake. With a few simple steps, your ceiling looks as good as new.
You only need a putty knife, some drywall mud, mesh or paper tape, and some primer and paint to start.
- Step 1: Grab your putty knife and scrape away any loose material around the crack. You want a clean surface to work with, trust me.
- Step 2: Spread a thin layer of drywall mud over the crack. You don’t need to go overboard with the mud; just enough to fill the gap. Smooth the mud out with your trusty putty knife.
- Step 3: Place a piece of mesh or paper tape over the crack, pressing it firmly into the drywall mud. Apply another layer of mud over the tape, feathering the edges so it blends seamlessly with the surrounding ceiling.
- Step 4: Give the mud some time to dry. You may need to apply a second or third coat to achieve a smooth finish. Sand the area gently once it’s dry, careful not to damage the tape.
- Step 5: Apply a coat of primer over the patched area, followed by a fresh coat of paint to match the rest of the ceiling. And there you have it! Your ceiling crack is now history.
Remember, patching ceiling cracks is an easy and budget-friendly home repair that anyone can tackle. So go on, show that ceiling who’s boss!
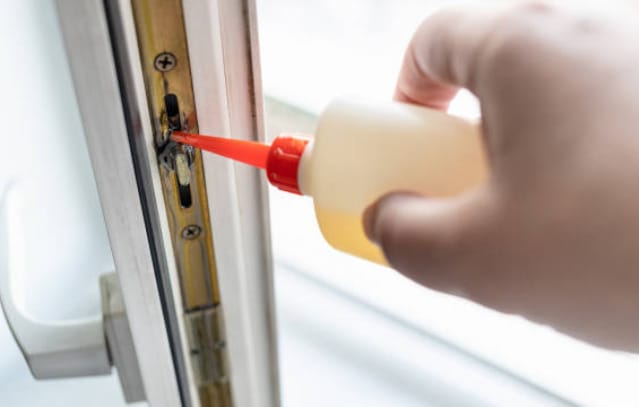
24. Weatherproofing Drafty Windows and Doors
Hey folks! I’ve got a quick and easy makeover tip for you – tackling those pesky drafty windows and doors in your home! This will not only keep your home cozy, but it’ll also save you some money on energy bills. Let’s dive right in!
- Step 1: Lock them up! Believe it or not, locking your windows and closing up the space that air leaks through is essential for winterizing your home. It’s a simple yet effective first step.
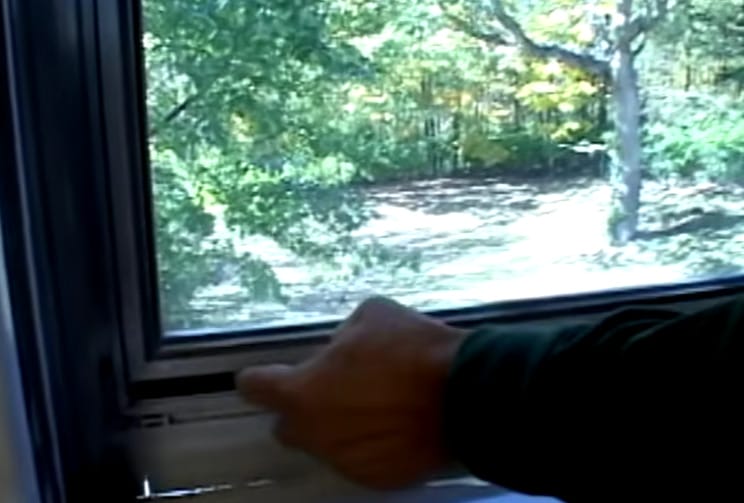
- Step 2: Weatherstripping to the rescue! Adding weatherstrips around doors and windows is an affordable way to seal drafts.
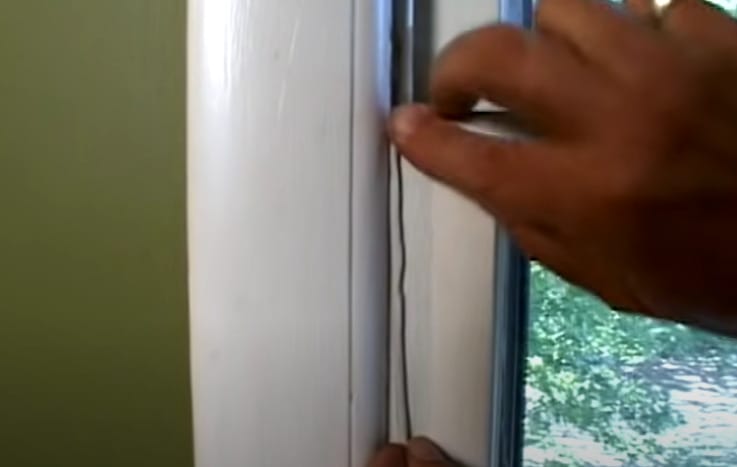
Video | Columbia Water and Light
Bean bag sock snake, anyone? These bad boys are not just for drafty doors. They’ve now evolved to help you with drafty windows, too. Just place them around the windows and feel the difference!
And there you have it! With these tips, you’ll have a draft-free home in no time. Now, go forth and conquer those drafts!
25. Fixing Those Pesky Leaky Pipes
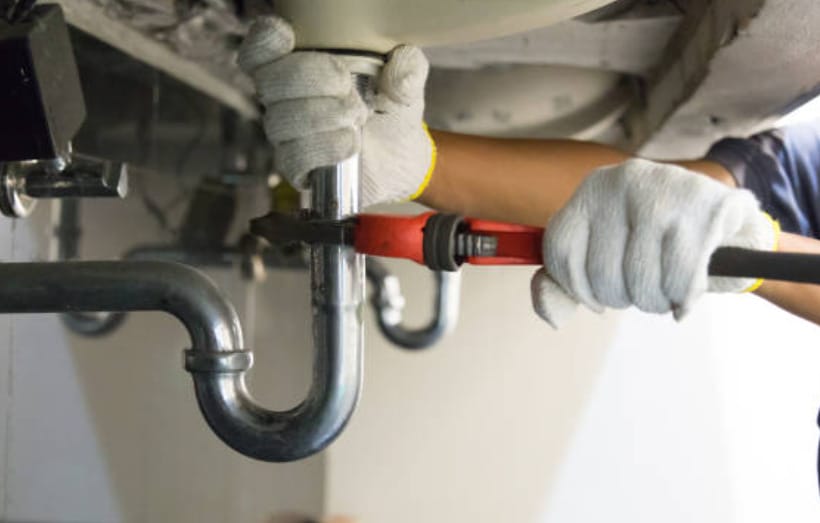
Do you know what’s worse than a leaky faucet? A leaky pipe under your sink! But don’t worry, and I’ve got your back. Let me walk you through the steps to fix that leaky pipe yourself without calling a professional.
- Step 1: You’ll want to shut off the water to the area where the leak occurs. It’s usually found under your sink or near the source of the leak.
- Step 2: Locate the leak – It sounds obvious, but sometimes, the water dripping downpipes can make it tricky to pinpoint. So, grab a flashlight and follow the water to find that pesky leak!
- Step 3: You’ll need to dry the pipe and surrounding area. A clean, dry rag should do the trick. Drying the pipe will also help to create a better seal when you apply the repair.
- Step 4: Apply pipe repair tape or compound – These products are designed to seal leaks in pipes temporarily. You’ll want to follow the manufacturer’s instructions, but generally, you’ll wrap the tape around the leaking area a few times or apply the compound with a putty knife.
- Step 5: Sometimes, a loose connection is the culprit, so grab your trusty wrench and gently tighten the connections. Be careful not to overtighten, or you might cause more damage.
- Step 6: With your repair in place, it’s time to turn the water back on and check for leaks. If everything looks good, give yourself a well-deserved pat on the back for being a DIY pipe-fixing superhero!
And there you have it! You’ve just unclogged and repaired a leaky pipe all by yourself. Great job, and remember, I’m always here to help you tackle those easy home repairs.
Knowing When to Call in the Pros
Alright, DIY enthusiasts, let’s get real for a minute. We all love the thrill of fixing things ourselves, but knowing when to hand the reins to a pro is crucial. There’s no shame in it – safety and expertise come first.
If you’re diving into a project and hit a snag that’s beyond your skill set, or if the job requires specialized tools and know-how (think major electrical work, structural changes, or complex plumbing), that’s your cue to call in the experts.
Also, if there’s a risk of voiding warranties or insurance policies or permits are required, it’s time to get on the phone with a licensed professional.
Remember, DIY is about being smart and resourceful, not just about doing it all yourself. Knowing when to seek professional help is as important as confidently swinging that hammer.
Cost Comparison Breakdown
Alright, let’s break it down with some cost comparisons. Rolling up your sleeves for these DIY home repairs can mean serious savings. We’re talking real money that stays in your pocket, not professionals’ hands.
Here’s a table illustrating the cost comparison between DIY and hiring a professional for common home repairs. Please note these are estimated costs and can vary based on location, the extent of the repair, and the cost of materials.
| Home Repair Task | DIY Cost Estimate | Professional Cost Estimate |
|---|---|---|
| Patching Drywall | $20 – $50 | $150 – $300 |
| Painting a Room | $100 – $200 | $300 – $800 |
| Fixing a Leaky Faucet | $10 – $30 | $100 – $200 |
| Unclogging a Drain | $15 – $25 | $100 – $250 |
| Replacing Electrical Outlet | $5 – $15 | $75 – $150 |
| Replacing a Light Fixture | $20 – $100 | $150 – $300 |
| Repairing a Running Toilet | $5 – $20 | $100 – $200 |
| Replacing Window Screens | $15 – $50 | $50 – $150 per screen |
| Lubricating Sticky Windows | $5 – $10 | $50 – $100 per window |
| Cleaning Faucet Aerators | $0 – $5 | $50 – $100 |
| Caulking a Bathtub | $10 – $30 | $100 – $250 |
| Repairing Squeaky Floors | $10 – $50 | $200 – $500 |
| Filling Driveway Cracks | $15 – $50 | $100 – $300 |
| Installing a Dimmer Switch | $10 – $25 | $75 – $150 |
| Patching Leaky Gutters | $10 – $30 | $100 – $250 |
The bottom line? Each repair you do yourself could save you anywhere from 50% to 75% of the cost of hiring a pro. It’s not just about saving cash; it’s about gaining skills, confidence, and the satisfaction of keeping your home in tip-top shape on your own terms.
References
Organizations:
- Plumbing-Heating-Cooling Contractors Association. https://www.phccweb.org/
- National Electrical Manufacturers Association. https://www.nema.org/
Books:
- “Complete Do-It-Yourself Manual” by Family Handyman. https://www.barnesandnoble.com/w/the-complete-do-it-yourself-manual-newly-updated-family-handyman/1133241792
- Black & Decker Complete Guide to Wiring. https://www.barnesandnoble.com/w/black-decker-the-complete-guide-to-wiring-updated-8th-edition-cool-springs-press/1141325337
- “The Lawn Bible” by David R. Mellor. https://www.barnesandnoble.com/w/the-lawn-bible-david-mellor/1115865958
Website Resources:
- This Old House. https://www.thisoldhouse.com/
- Energy Star. https://www.energystar.gov/
Video References:
Columbia Water and Light
The Home Depot
Fix it Flip