8 min read
How to Drill Marble (6-Step Guide)
Hey there, DIY enthusiasts! You’ve probably found yourself staring at a beautiful piece of marble, wondering, “How the heck do I drill into this without turning it into a pile of expensive dust?” Well, worry no more!
In general, to drill a hole on a marble surface:
- Step 1: You’ll need a drill bit suited for marble—diamond-tipped ones are top-notch for precision. Don’t forget the power drill and some water for cooling purposes.
- Step 2: Decide where you want your hole and mark it.
- Step 3: Fit your drill with the marble-appropriate bit, ensuring you’re not in hammer mode.
- Step 4: Periodically cool the drill bit in water to prevent overheating, which can damage both the bit and the marble.
- Step 5: Continue with the steps above until you achieve a clean hole. Patience is key; let the bit do the work.
- Step 6: If you encounter a different material behind the marble, switch to a bit that’s suited for that material to finish off.
We’ll discuss the tools you need, the technique that works, and all the tips and tricks to get the job done right. So, grab your drill, and let’s make some marble magic happen!
Steps on How to Drill Marble
Drilling into marble might seem daunting at first—after all, it’s a material synonymous with beauty and durability. The key lies in the right tools, techniques, and patience.
From selecting the ideal drill bit to keeping it cool and finishing with precision, you’ll learn how to tackle this task confidently. Let’s get started and turn that daunting task into a DIY triumph.
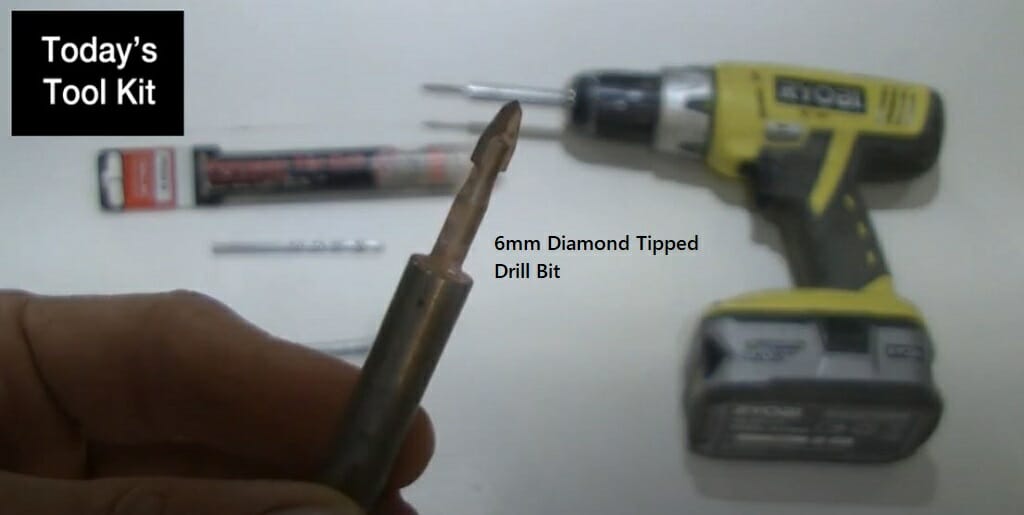
Step 1 – Prepare Your Toolkit
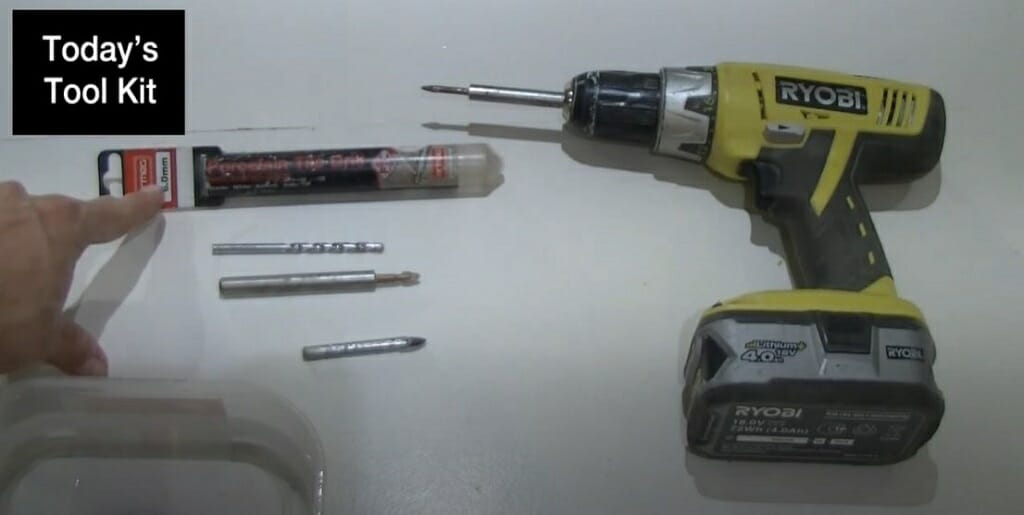
For precision, you’ll need a 6mm porcelain tile drill bit, specifically one with a diamond ground tip. This prevents the drill bit from wandering as you start drilling.
Also, include a standard 6mm masonry drill bit after you’ve penetrated the marble, a power drill, water for cooling the drill bit, and, optionally, a dustpan to catch debris.
Step 2 – Marking Your Marble
Start by making a precise mark on the marble where you want to drill. This ensures your drill doesn’t slip and you drill exactly where needed.
So, place the drill bit on the marked position and slowly scratch a small dimple on the tile’s surface.
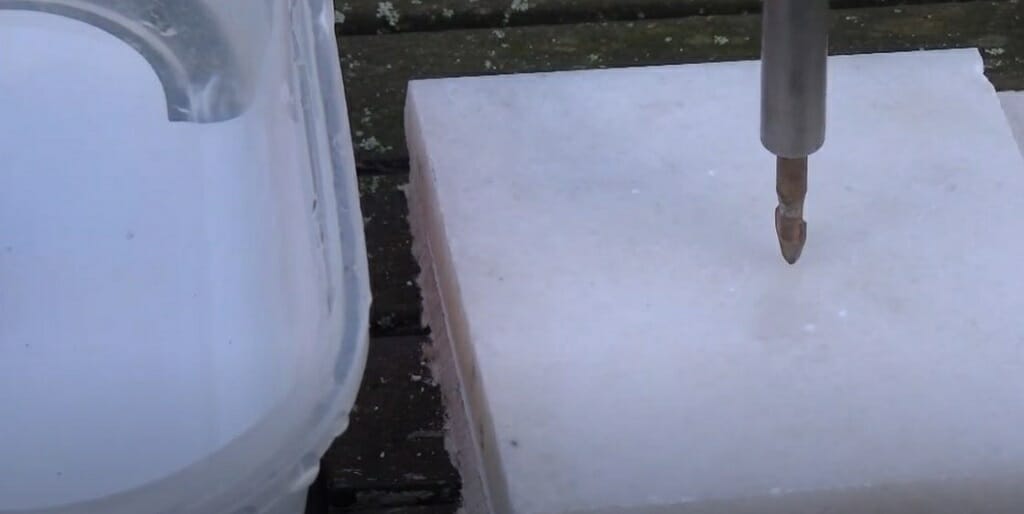
Step 3 – Drilling Process
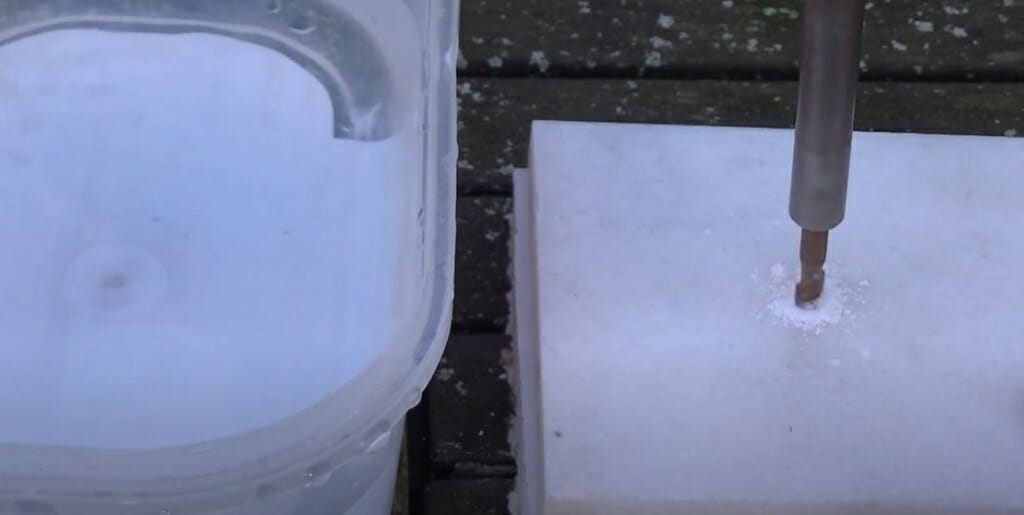
Attach the porcelain tile drill bit to your drill. Make sure the drill is set to non-hammer action. Begin drilling at the marked spot. Apply steady pressure without forcing the drill too much.
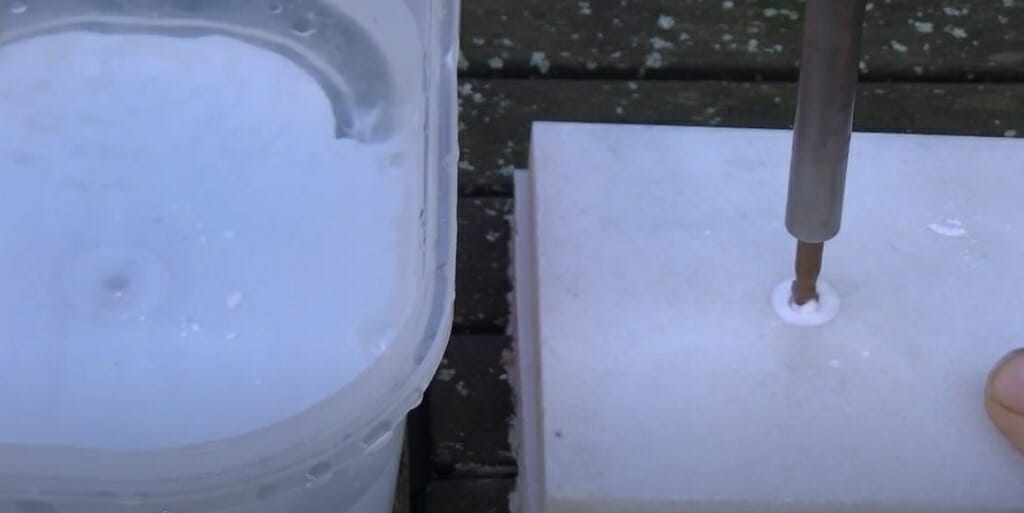
Step 4 – Keeping the Drill Bit Cool
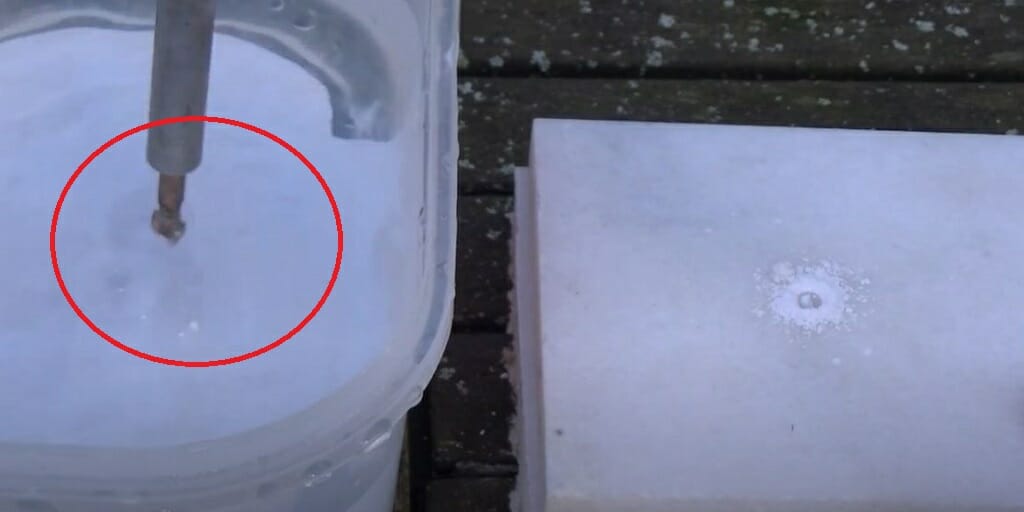
Periodically dip the drill bit into a container of water to prevent overheating. Overheating can damage both the bit and the marble. You’ll know it’s working when you hear a fizz as the hot drill bit touches the water.
Step 5 – Completing the Hole
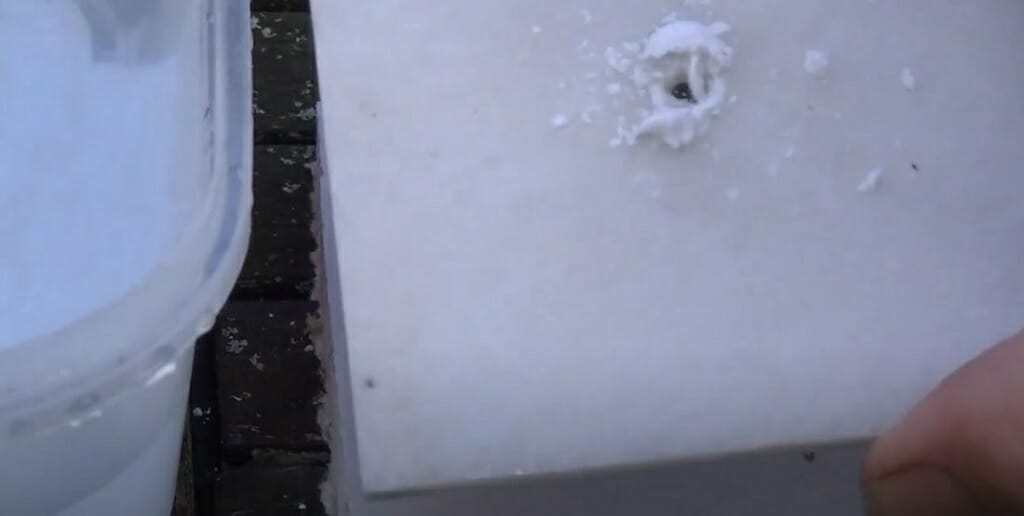
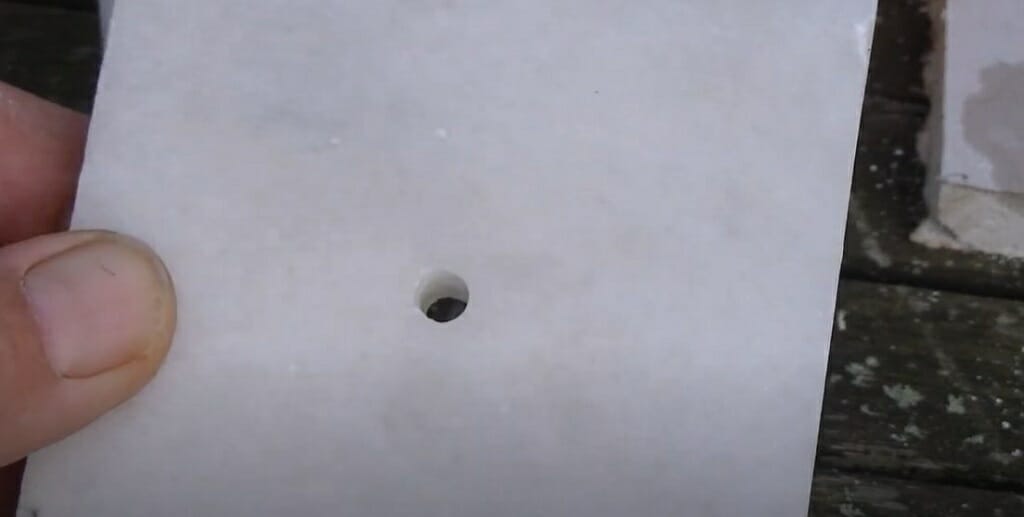
Continue drilling, with periodic cooling, until you break through the marble. You should end up with a clean, precise hole.
Step 6 – Switch Drill Bits
Once you’ve drilled through the marble, switch to the standard masonry drill bit if you’re reaching another material behind it to avoid damaging your porcelain bit.
Quality drill bits make a difference. While you can find cheaper options, ensuring your bit is kept cool and is of good quality will prevent disintegration and ensure a clean job.
Marble Drilling Troubleshooting Guide: Overcoming Common Hiccups
Sometimes, even with the best prep, things can go sideways. That’s part of the fun.
Let’s tackle those common hiccups you might encounter and get you back on track. Here’s my troubleshooting guide, laid out easily for you:
| Problem | Solution |
|---|---|
| Bit Stuck | Turn off the drill and wiggle the bit free. Use water for lubrication. |
| Chipping | Start drilling slowly with the correct bit. Sand any chips away. |
| No Progress | Use a sharp, correct bit—no hammer setting. Apply light pressure and cool with water. |
| Overheating | Dip the bit in water regularly to keep it cool. |
| Uneven Holes | Keep the drill steady and straight. |
| Bit Breaks | Use high-quality bits, and don’t force the drill. |
| Dust Control | Use water to minimize dust or vacuum it up. |
Remember, every project has bumps, but they’re all part of the journey. Follow these tips, and you’ll be drilling through marble like butter. Happy drilling!
Maintenance Tips for Drill Bits
Keeping your drill bits maintained, especially after dancing through marble, is crucial for ensuring they stay sharp, efficient, and ready for your next project. Here’s how to extend the life of your drill bits:
- Clean After Use
- Wipe down with a clean cloth.
- Use a soft brush and soapy water for tough residue.
- Ensure they are dry before storing.
- Proper Storage
- Keep bits in a cool, dry place.
- Use their original case or a dedicated storage solution to keep them organized and protected.
- Monitor for Wear
- Regularly check edges for dullness or damage.
- Replace bits that show significant wear to avoid damage to your materials and ensure efficient drilling.
- Lubrication
- As per the manufacturer’s guidelines, apply lubrication to compatible bits to reduce wear and tear.
- Routine Check-Ups
- Periodically inspect your drill bits for cracks, bends, or blunt edges.
- Maintaining your bits will ensure smoother drilling and longer tool life.
Follow these tips, and your drill bits will remain in excellent condition, making every drilling job a breeze.
Frequently Asked Questions
- Can I Drill Marble Without a Diamond-Tipped Bit?
- While you could, I wouldn’t recommend it. Diamond-tipped bits are the way to go for a clean, smooth job. Using anything less just doesn’t cut it—literally.
- How Do I Keep The Drill Bit From Overheating?
- Keep it cool, folks. A little water goes a long way. Dip the bit in water frequently to prevent overheating. Think of it like giving your bit a quick spa moment.
- Is There a Way to Prevent Marble Chipping?
- Absolutely. Start your drilling with a gentle touch and go slow. Consider using tape where you’re drilling to help reduce the risk of chipping. Precision and patience are your friends.
- What’s the Best Way to Mark My Drilling Spot?
- Use a marker or a piece of tape. It’s visible, precise, and won’t slip away as you start drilling. It’s like putting a bullseye on your project.
- Can I Use a Standard Drill?
- Sure, a standard drill works, but make sure it’s got the guts for the job. No hammer action, though—keep it smooth and steady.
- How Deep Can I Drill Into Marble?
- You can go as deep as you need to, but remember, the deeper you go, the more careful you should be. Keep that bit cool, and take it slow.
- What Safety Gear Do I Need?
- Safety first! Goggles to protect your peepers, gloves to keep your hands safe, and a dust mask wouldn’t hurt. You’re not just drilling; you’re being smart.
- How Do I Clean Up After Drilling?
- A vacuum or a damp cloth will do the trick. Keep your workspace neat, how we like it.
Resources
Organizations
- The Marble Institute of America (MIA) – https://www.naturalstoneinstitute.org/
- The American Society of Civil Engineers (ASCE) – https://www.asce.org/
Books
- “Setting Tile” by Michael Byrne – https://books.google.com/books/about/Setting_Tile.html?id=7D0tmGCY9yQC
- “The Complete Illustrated Guide to Furniture & Cabinet Construction” by Andy Rae – https://books.google.com/books/about/The_Complete_Illustrated_Guide_to_Furnit.html?id=r5aKpwAACAAJ
Website Resources
- This Old House – https://www.thisoldhouse.com/
Video References
Charlie DIYte