6 min read
Multimeter Blown Fuse (Guide to Why and How to Repair)
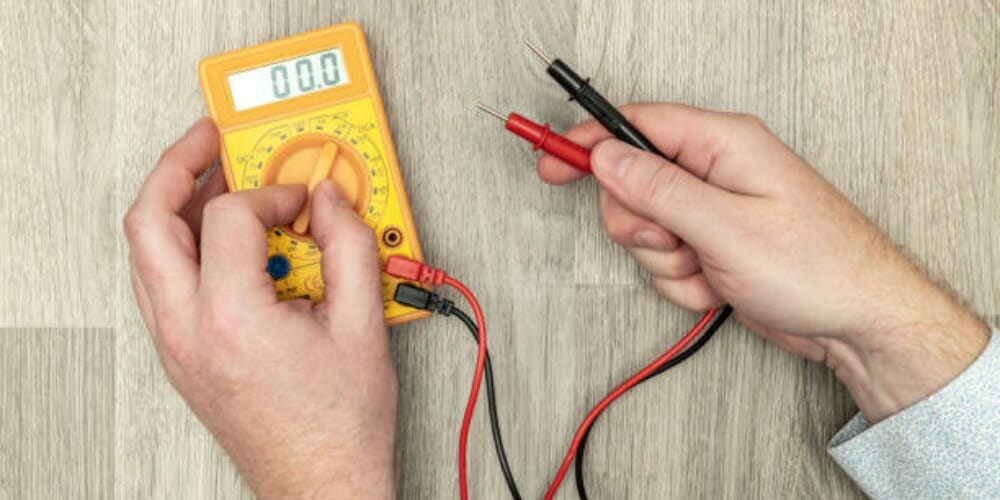
A digital multimeter is, to a large extent, an easy-to-use device. However, when you are not an electrician or an electronics technician, things could go wrong – which is quite normal. You don’t have to beat yourself up too much. It happens all the time. One of the things that could go wrong with your digital multimeter or an analog one is a blown fuse.
In short, if you measure current inaccurately when your meter is set to amp mode can cause your fuse to blow. The fuse can also blow if you measure voltage while the multimeter is still set for measuring current.
So, if you suspect that you are dealing with a blown fuse and don’t know how to proceed, you wouldn’t have landed a better place than here. Here, we will talk about all things about multimeter-blown fuses.
First Things First; Why Did the Digital Multimeter Fuse Blow?
The fuse on a digital multimeter is a safety feature that prevents the meter from being damaged in the event of an electrical overload. The fuse can blow for several reasons.
A multimeter has two ports for positive leads. One port measures voltage and the other measures current. The voltage measuring port has high resistance while the current measuring port has low resistance. So, if you set the lead to the voltage function it will make it have high resistance. In such cases, your multimeter fuse won’t blow even if you set it for measuring current. This occurs since energy is depleted because of the high resistance. (1)
However, if you set the leads to the current function it can create the opposite reaction, which will cause the fuse to blow. Because of this, you have to be careful while you measure the current. Measuring the current in parallel, in maximum cases, can cause an immediate blow of the fuse since the ammeter has nearly zero resistance.
Measuring your current inaccurately is not the only thing that will blow the fuse. This can also happen if you set the multimeter for measuring current and you attempt to measure voltage. In such cases, the resistance is low which lets the current flow in your multimeter’s direction.
In short, if you measure current inaccurately when your meter is set to amp mode can cause your fuse to blow. The fuse can also blow if you measure voltage while the multimeter is still set for measuring current.
Basic Information about Digital Multimeters
A digital multimeter has three parts: ports, display, and selection knob. You use the selection knob to set the digital multimeter for various resistance, current, and voltage readings. Many digital multimeter brands have illuminated displays for enhanced reading, particularly in low-light conditions.
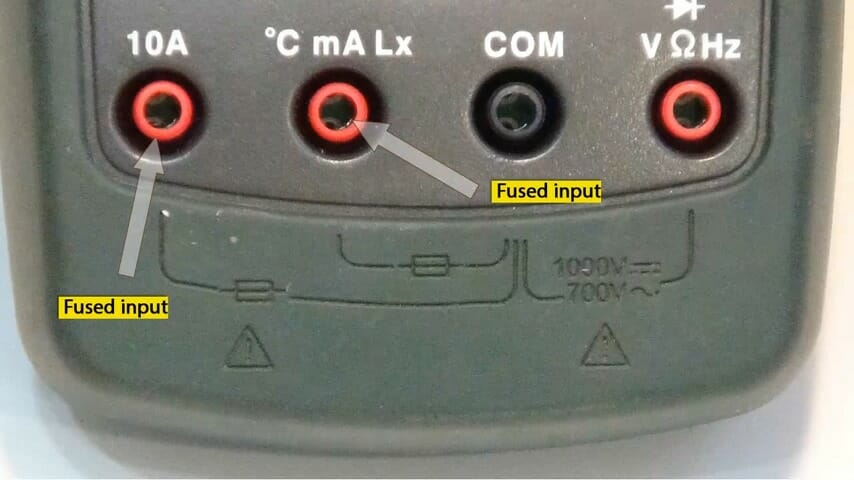
At the front of the unit, there are two ports.
- COM – The common port that connects to the ground or the circuit’s negative. The COM port is black.
- 10A – You use this port when measuring big currents.
- mAVΩ – it’s the port you plug the red lead. It’s the port you should use to measure current, voltage, and resistance.
Now that you know what goes into what as far as the multimeter ports are concerned, how do you determine if you are dealing with a multimeter blown fuse?
Identifying a Fuse Blown Case
Blown fuses are a common problem among all multimeter brands. Besides causing equipment damage, blown fuses could result in personal injuries. In such cases, your level of know-how will determine your safety and how you move forward. Many multimeter brands and related devices come with impressive safety features. Nevertheless, understanding their limitations and knowing how to avoid potential dangers is highly advisable.
A continuity test comes in handy when you need to check the fuse to determine if it has blown. A continuity test shows if two things are electrically linked. Electric current flows freely from one to the other if there is continuity. The absence of continuity means there is a disconnect somewhere along the circuit. You could be staring at a possible multimeter-blown fuse.
My Multimeter Fuse is Blown – What Next?
If it’s blown, you need to replace it. Don’t worry; it’s something you could do on your own. Of the utmost importance is to replace the fuse blown with the one suggested by the manufacturer of your digital multimeter.
Follow these steps to change the fuse on your digital multimeter;
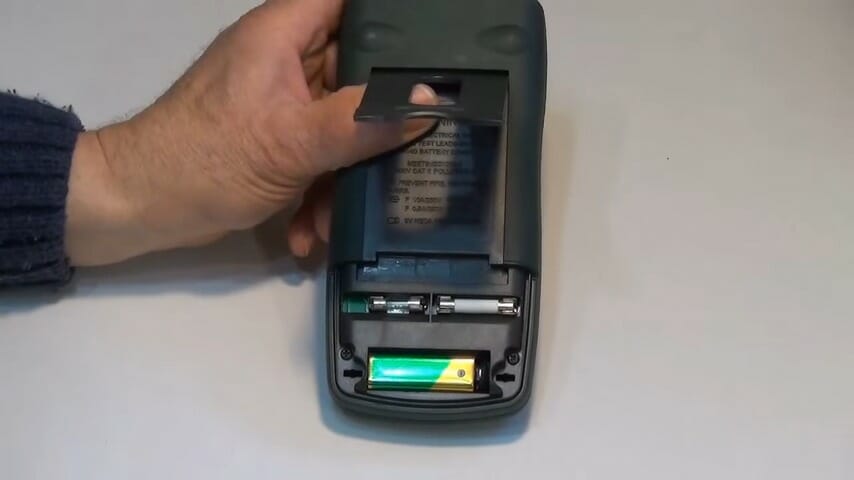
- Get your mini screwdriver and begin removing screws on your multimeter. Remove the battery plate as well as the battery.
- Can you see the two screws behind the battery plate? Remove them.
- Slowly, lift the multimeter face slightly.
- There are hooks towards the bottom edge of the multimeter face. Apply little force on the multimeter face; slide it sideways to disengage the hooks.
- You’ve successfully disengaged the hooks if you can remove the digital multimeter face easily. By now, you are looking at the inside of your digital multimeter.
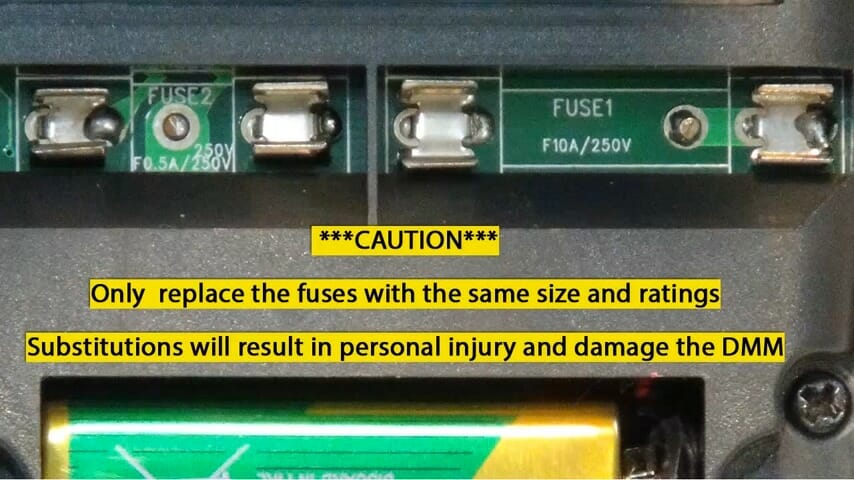
- Lift the multimeter blown fuse gently and allow it to pop out.
- Replace the fuse blown with the right one. For instance, if the multimeter blown fuse is 200mA, the replacement should be 200mA.
- That’s it. Now, reassemble your digital multimeter and check fuse functionality using a continuity test to determine that all is well.
Having sufficient knowledge of using a multimeter goes a long way in preventing cases of blown fuses. Pay attention each time you use a multimeter to avoid making mistakes that could give you problems.
Wrapping Up
To this end, you have basic information about multimeter ports (and their uses). You also know why your multimeter fuse could blow up and how to prevent it from happening. As you’ve seen, a continuity test can help you check the fuse to determine if it’s blown. Lastly, you’ve learned how to replace a blown multimeter fuse – something quite straightforward. It should be something doable moving forward, and we hope you feel confident about it after reading this article. (2)
Take a look at some of our related articles below.
- How to use a Cen-Tech digital multimeter to check voltage
- How to measure amps with a multimeter
- How to measure DC voltage with a multimeter
References
(1) energy – https://www.britannica.com/science/energy
(2) article – https://www.indeed.com/career-advice/career-development/how-to-write-articles