9 min read
How to Wire a Shunt Trip Breaker (4-Step Guide)
Today, we’re tackling a cool project with a critical safety feature in your electrical setup. I will walk you through “How to Wire a Shunt Trip Breaker.”
You might ask, “What exactly is a shunt trip breaker?” It’s a specialized device designed to automatically cut off power in certain scenarios, such as during a fire or when an electrical fault is detected.
Unfortunately, many people don’t take the time to learn this small fix and spend hundreds on electricians for such a small installation. Overall, wiring a shunt trip breaker is quite simple and direct.
- Step 1: Get familiar with your shunt trip breaker’s wiring schematic. It’s crucial for a safe and correct installation.
- Step 2: Find the two screws on the shunt trip unit – these are where you’ll connect your control circuit wires.
- Step 3: Attach the control circuit wires to these screws. Remember, with AC voltage, it doesn’t matter which wire goes on which screw.
- Step 4: Finally, apply 120, 208, or 240 volts AC across the wires, and voilà, the breaker will trip, activating the safety feature.
I’m here to guide you through every step of the process, making it easy and understandable, even if you’re not a seasoned electrician. So, grab your tools, roll up your sleeves, and dive into this project together.
Tools and Materials
Let’s get our ducks in a row before wiring that shunt tripbreaker.
- Compatible Shunt Trip Attachment: Make sure it fits your current circuit breaker model. If not, consider getting a new breaker.
- Emergency Stop Switch (Optional): This is what you need to add a kill-switch button. It’s a great safety addition.
- Screwdrivers: A variety of sizes and types. You never know which one you’ll need, so having an assortment is best.
- Shunt Trip Wiring Diagram: This is your guide. It is always handy to have by your side for reference.
- Safety Gear:
- Insulated Gloves: Essential for protecting against electrical shocks.
- Eye Protection: Safety first! You want to keep your eyes safe from any unexpected sparks.
With this list, you’re well-equipped to get started on wiring that shunt trip breaker safely and efficiently. Remember, preparation is key in any DIY project!
4-Step Guide on How to Wire a Shunt Trip Breaker
Let’s dive into how you can wire a shunt trip on a breaker – specifically, one with a 1021 suffix. This little suffix tells us we’re dealing with a 120, 208, or 240-volt AC shunt trip, which is pretty standard stuff but crucial to get right.
Step 1: Studying the Wiring Diagram
Before we get our hands dirty with connecting this bad boy to your safety control system or switch, it’s crucial to get into the wiring schematic of your shunt trip breaker. Trust me, this step is the heart of our installation, so we’ve got to tackle it with care and attention.
Look at this clear wiring diagram:
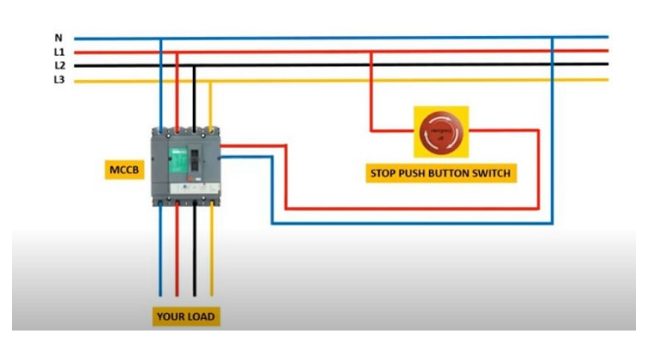
Here’s the thing – different systems have their own unique designs. So, before you jump in, take a moment to study those charts that came with your switch, emergency control system, or the shunt trip itself. It’s like getting to know the playbook before the big game.
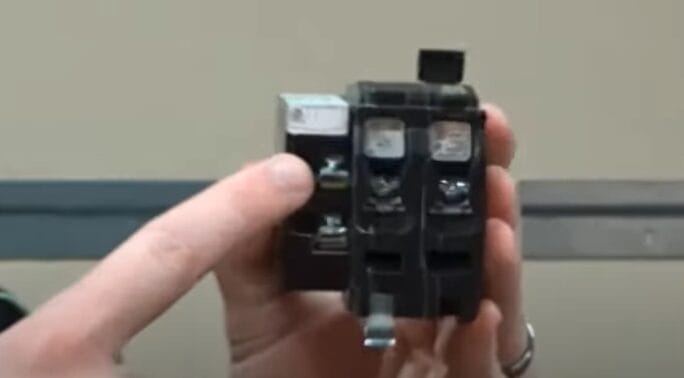
Step 2: Find the Right Screws on the Shunt Trip
You have to locate the two screws on the shunt trip. These are your connection points for the wires coming from your control circuit.
Step 3: Connecting the Wires
Now, grab those control circuit wires. You’re going to attach them to those screws you just found.
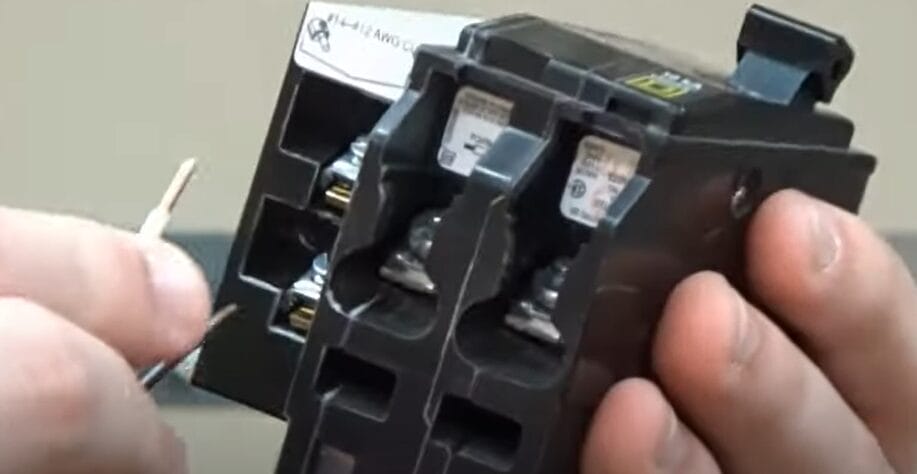
The cool part about AC voltage is that it doesn’t matter which wire goes where – you can attach either wire to either terminal. This takes some guesswork out of the equation, which I always appreciate.
Step 4: Triggering the Breaker
Alright, the final step is where everything comes together. After you’ve connected your wires, the moment you apply 120, 208, or 240 volts AC across these wires, the breaker will trip.

This is an essential safety feature, ensuring that the breaker cuts the power if there’s any issue, preventing potential hazards. It’s a simple yet effective mechanism that keeps everything in check.
And there you have it! Wiring a shunt trip isn’t too complicated, but ensuring your electrical setup is safe and sound is critical. Always remember to follow safety protocols; if you’re ever in doubt, don’t hesitate to contact a pro. Happy wiring, and stay safe out there!
Safety Precautions for Wiring a Shunt Trip Breaker
Regarding electrical work like wiring a shunt trip breaker, safety isn’t just a suggestion – it’s an absolute must. I’ve seen and experienced enough to know that taking shortcuts with safety can lead to some serious hazards.
So, let’s walk through some essential safety precautions:
- Turn Off the Power: This is rule number one, always. Before you even think about starting, make sure the main power supply is off.
- Use Insulated Tools: Always use tools with insulated handles. Electricity can be unforgiving, and you don’t want to discover a short the hard way.
- Wear Protective Gear: Safety glasses and insulated gloves are your best friends here. They protect you from sparks and accidental shocks.
- Verify Your Equipment: Before you begin, double-check your breaker, wires, and accessories. Faulty equipment is not just a nuisance; it can be dangerous. There was a time I neglected to check a wire’s insulation, which almost led to a short circuit.
- Work in a Well-Lit Area: Good lighting is crucial. You need to see what you’re doing clearly.
- Stay Dry: Never work on electrical components in wet conditions. Water and electricity are a lethal mix. I always ensure my work area is dry, and I pick a sunny day if I’m working outdoors.
- Follow the Instructions: Stick to the wiring diagram and manufacturer’s instructions. Even if you think you know better, these guidelines exist for a reason. Deviating from them can lead to unsafe installations.
- Avoid Working Alone: If possible, have someone with you. They can help if something goes wrong or even hand you tools. Plus, having a second pair of eyes on your work is always good.
- Regular Breaks: Don’t underestimate the power of fatigue. Working tired can lead to mistakes, so take regular breaks, especially during long installations.
- Know Your Limits: If unsure or uncomfortable with any part of the process, don’t hesitate to call a professional. There’s no shame in it. I’ve called in experts when a job was outside my comfort zone and never regretted it.
Remember, safety in electrical work isn’t just about preventing shocks; it’s about ensuring you can go about your day safely after the job is done. Stay safe, and take care!
Troubleshooting Tips for Wiring a Shunt Trip Breaker
Let’s dive into some troubleshooting tips for wiring a shunt trip breaker. Over my years of hands-on work, I’ve run into a few hiccups myself, and I’ve learned that being prepared can save you a lot of time and headaches.
| Common Problem | Description and Solution |
|---|---|
| Incorrect Wiring | If the breaker isn’t working, recheck your wiring against the diagram. Misplacing the neutral and live wires is a common mistake. |
| Incompatible Breaker and Accessory | Ensure that the shunt trip accessory is compatible with your breaker model. If not, you might need a different model. |
| Tripping Without Cause | This could indicate a short circuit. Inspect for any wire fragments or connections that might cause a short. |
| Improper Grounding | Check that your system is grounded correctly according to local electrical codes. Improper grounding can lead to erratic breaker behavior. |
| Faulty Shunt Trip Accessory | If all else seems fine, the accessory itself might be defective. Consider replacing it to see if that resolves the issue. |
| Overlooked Safety Measures | Double-check that you’ve followed all safety protocols, including turning off the main power before starting. |
| Lack of Proper Tools | Use the correct tools to ensure proper installation and avoid unnecessary complications. |
Remember, these tips are based on common issues and solutions I’ve encountered in my experience. Consulting a professional is always wise if you’re ever in doubt. Stay safe, and good luck with your installation!
Frequently Asked Questions
- Why Should You Install a Shunt Trip Breaker?
- It is always the best choice to safeguard your home from disasters. A shunt trip breaker enables you to trip the breaker manually at any time or automatically during a surge, minimizing injury and equipment damage in emergencies.
- How Does a Shunt Trip Breaker Function?
- When power is given to the shunt trip pins, a circuit breaker’s additional shunt trip device breaks the power supply mechanically. The shunt trip requires an additional power source because the breaker does not power it.
- When Should You Install a Shunt Trip Breaker?
- The shunt trip breaker is typically found in business kitchens, elevators, and offices since it is necessary. ANSI/ASME CSD-1 uses this device in commercial kitchens, whereas elevators and escalators adhere to ASME A17.
References
Organizations:
- National Fire Protection Association (NFPA). https://www.nfpa.org/en
- Institute of Electrical and Electronics Engineers (IEEE). https://www.ieee.org/
- Occupational Safety and Health Administration (OSHA). https://www.osha.gov/
Books:
- “Electrical Wiring Commercial” by Ray C. Mullin and Phil Simmons. https://www.abebooks.com/book-search/title/electrical-wiring-commercial/author/ray-mullin/
- “The Electrician’s Trade Demystified” by David Herres. https://www.abebooks.com/9780071818872/Electricians-Trade-Demystified-Herres-David-0071818871/plp
Website Resources:
- Underwriters Laboratories (UL). http://ul.com/
- Electrical Safety Foundation International (ESFI). http://esfi.org/
- Schneider Electric. http://schneider-electric.com/
Video References:
INDO TECH ELECTRICAL
Schneider Electric