10 min read
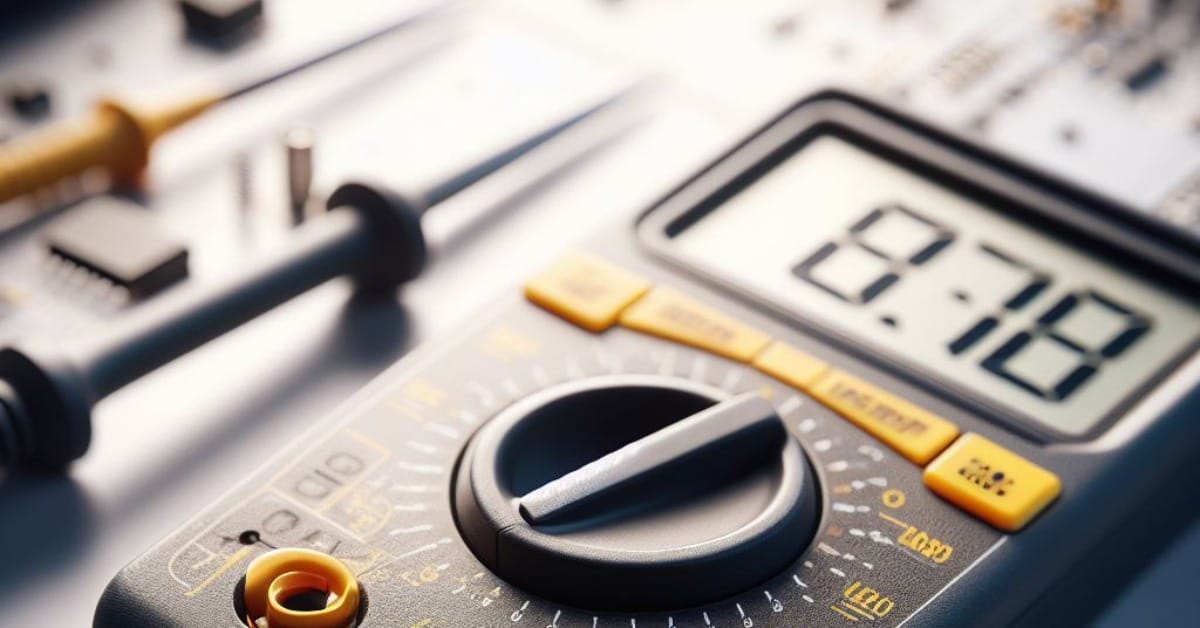
How to Read Ohms on a Multimeter (3 Step Guide)
If figuring out how to read ohms on a multimeter has been on your mind, you’ve landed in the perfect spot!
Quick Summary: Here’s a quick rundown on how to get those ohm readings right with your multimeter, broken down into three easy steps:
🔍 Step 1: Identifying the Scale – Spot the right symbols and numbers on your multimeter.
📈 Step 2: Understanding the Resistance Value – Learn what the numbers on your multimeter mean.
🔧 Step 3: Checking the Range – Confirm you’re in the correct range for an accurate reading.
This article will demystify multimeters and their knack for measuring resistance. We’ll start from the basics and gradually upgrade to advanced troubleshooting techniques. Get ready to tackle those ohm readings like a pro!
Understanding Ohms and Multimeters
Let’s clear up some confusion about ohms and multimeters. First, ohms are measurement units that help us understand the resistance in a circuit.
This tells you how much a device will slow down the flow of electricity. And the tool for measuring this? That’d be our trusted multimeter.
A multimeter isn’t just about measuring resistance; it’s way more versatile than that. It combines three different tools: the ohm meter, voltmeter, and amp meter. So, you only need your handy multimeter instead of juggling three different gadgets.
Now that we better understand ohms and multimeters let’s explore different techniques to read ohms on a multimeter. Stay tuned. We’re just getting started.
Reading Ohms: Navigating the Digital Display
This step is critical in understanding how to read ohms. Mainly, what you’re looking for here is the resistance value.
Step 1: Identifying the Scale
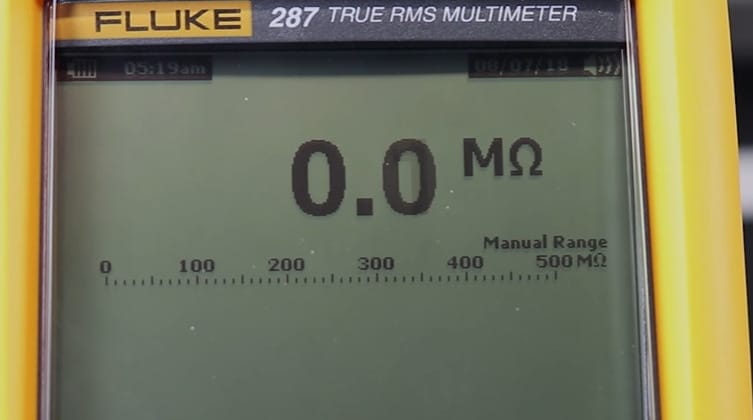
- First up, check out the display for the omega symbol (Ω), which stands for ohms. If there’s a ‘K’ or ‘M’ in front of it, you’re in the kilo-ohm (KΩ) or mega-ohm (MΩ) range.
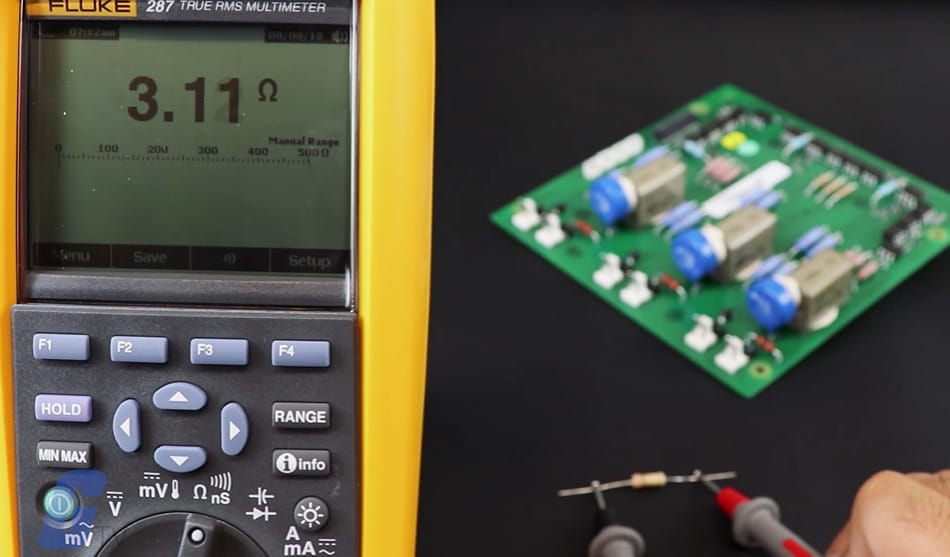
- For instance, 3.4 on the display with just an omega symbol is 3.4 ohms. But if it says ‘3.4K’ before the omega, you’re looking at 3.4 kilo-ohms or 3400 ohms.
Step 2: Understanding the Resistance Value
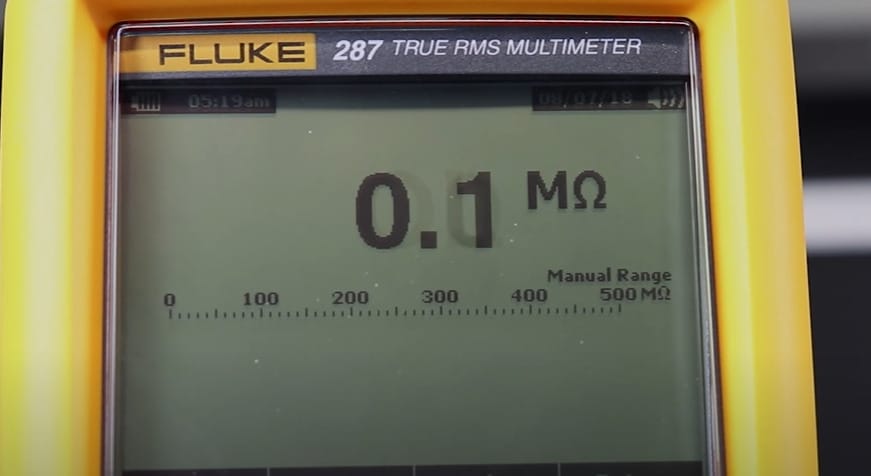
- The numbers on the display show how much a material or device resists electric current. The higher the number, the more resistance it has, meaning it needs more oomph to integrate into a circuit.
Step 3: Checking the Range
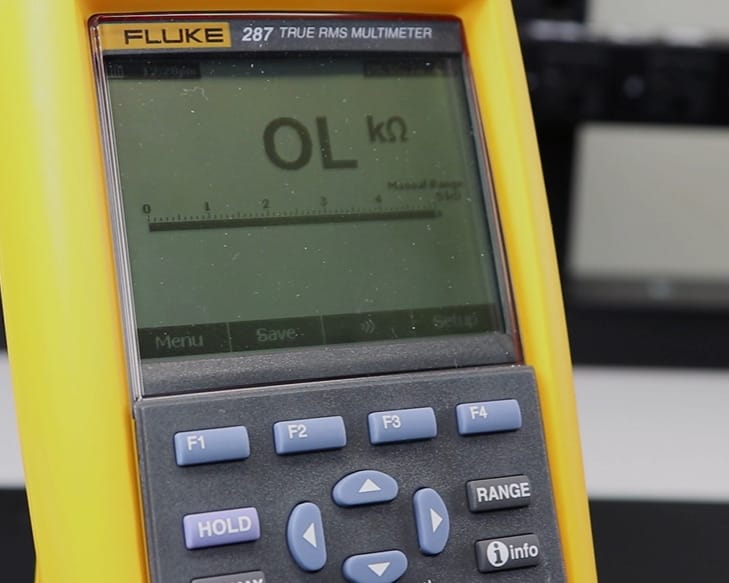
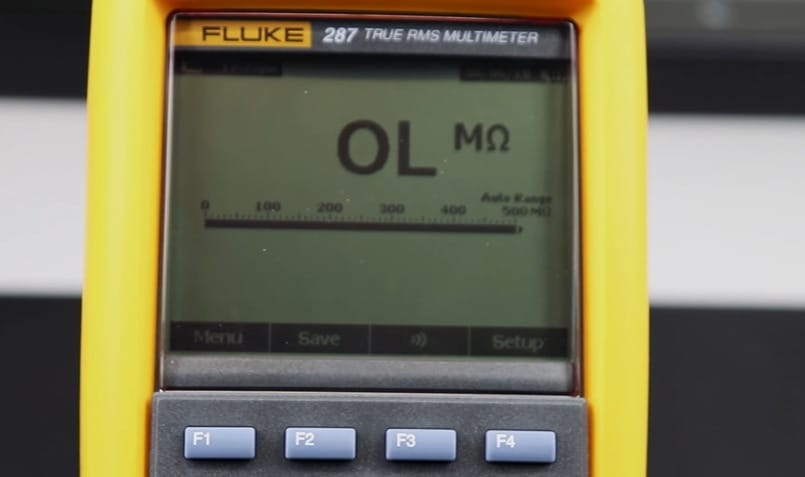
- If you spot dashed lines or ‘1’ or ‘OL’ (which stands for over-the-loop) on the display, your range setting is too low. For meters without an auto-range feature, you’ll need to adjust the range manually until you get a proper reading.
There you go. There are three simple steps to get those ohm readings right!
How to Test Ohms with a Multimeter
This will walk you through how to test ohms with a multimeter. Ensuring we take each step cautiously can help us get an accurate measurement and stay safe. Let’s dive into the steps!
Step 1: Precautions
- Before I even touch my multimeter, safety is my number one priority. I always wear safety glasses and thoroughly read through the manual. You’ve got to respect electricity and the tools you use with it.
Step 2: Turn OFF the Circuit
- This is crucial. I always turn off the circuit I’m working on. It’s not just about preventing interference with the test; it’s about keeping safe.
Step 3: Set the Multimeter

- I set my multimeter to the ohm symbol (Ω). If I’m unsure about the resistance I’ll encounter, I use an auto-ranging multimeter, which figures out the range. Handy, right?
Step 4: Check Multimeter Accuracy
- Accuracy is key. I always quickly check to ensure my multimeter is reading correctly. Often, the issue is not with the tool but how we use it.
Step 5: Connect Probes to the Circuit
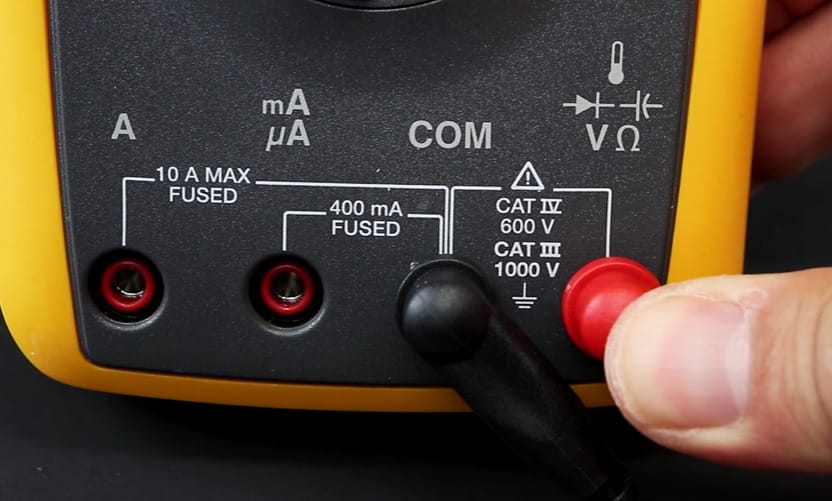
- Time to connect the probes. I stick to the color code – black to COM and red to the Voltage-Ohm jack. Keeping the polarity right is super important.
Step 6: Compare Multimeter Reading
- Here’s where the magic happens. I compare the reading on the multimeter to what I expect from the circuit.
- If I see a ‘K’ or ‘M’ next to the omega symbol, I know I’m dealing with kilo-ohms or mega-ohms.
- And remember, higher numbers mean more resistance. If the display shows ‘OL’ or dashed lines, that’s my cue to adjust the range, especially if I use a manual multimeter.
Troubleshooting Tips for Reading Ohms on a Multimeter
Hey there, DIY enthusiasts! Let’s dive into some nifty tips to ensure your journey with a multimeter is smooth sailing. Even the handiest among us can hit a snag or two, so here’s how to troubleshoot common issues:
| Common Issue | Possible Cause | Advanced Troubleshooting Tip |
|---|---|---|
| Inaccurate Readings | Loose connections or wrong measurement scale | Always, and I mean always, ensure those connections are snug as a bug. A loose wire can throw off your whole game. Double-check that your multimeter is dialed into the right scale. I learned this when a simple oversight led to some head-scratching results. If you’re not sure, the manual is your best friend. |
| ‘OL’ or Overload | Resistance too high for the range | Here’s the thing about ‘OL’ – it’s telling you the resistance is too high for the setting. I switch to a higher resistance range, and if the multimeter has auto-ranging (a real lifesaver), I let it do its magic. |
| Zero Reading | Possible short circuit | Once, while working on a vintage amplifier, a zero reading led me to discover a hidden short. Using the continuity setting, I traced the issue to a small, overlooked connection. It’s like being a detective but with circuits! |
| Fluctuating Readings | Dirty or corroded component | A bit of cleaning goes a long way. I always use a gentle electrical contact cleaner and a soft brush. And remember to let it dry completely before you test it again. You’d be surprised how often this solves the problem. |
| No Reading | Dead battery or faulty test leads | First things first – check the battery. It’s a simple step that’s easy to overlook. Then, give those test leads a once-over. I’ve had my share of worn-out leads, and replacing them often does the trick. Also, ensure they’re plugged in – it’s a common mishap. |
| Consistently High Readings | Calibration issue | This can scream a calibration issue. I’ve had to recalibrate my multimeter a few times, especially after heavy use. For the tech-savvy, the manual might guide you through it, but professional calibration is usually the best route. |
| Intermittent Readings | Loose internal connections can be the culprit, like when mine took a tumble off the workbench. | This usually calls for a professional touch. |
| Unstable Readings in Certain Modes | Mode switch issues | A bit of contact cleaner can work wonders, but sometimes, it’s a sign to get some professional help. |
Remember, it’s important to understand electronic components and safety well when dealing with advanced issues. If you’re ever in doubt, it’s best to seek professional help rather than risk damage to the multimeter or the circuit you’re testing.
Frequently Asked Questions
- Can I Measure The Resistance Of A Live Circuit?
- Hold up there, safety first! Always make sure the circuit is powered off before measuring resistance. Measuring a live circuit can damage your multimeter and, more importantly, it’s a safety hazard.
- How Often Should I Calibrate My Multimeter?
- Aim to calibrate your multimeter once a year, especially if you’re using it regularly. Keeping it calibrated means keeping it accurate, and that’s what counts.
- Can A Multimeter Be Used To Measure Both AC And DC Resistance?
- Resistance isn’t about AC or DC – it’s a constant value. So, whether it’s an AC or DC circuit, your multimeter’s ohm setting is ready to measure resistance.
- Is It Possible To Damage A Multimeter By Using The Wrong Settings?
- So, it’s crucial to understand what you’re measuring and set your multimeter accordingly. Using the wrong setting, especially on a high-energy circuit, can harm your multimeter and be a safety risk.
- What’s The Difference Between Auto-Range and Manual-Range Multimeters?
- Auto-range multimeters automatically adjust to the resistance range of whatever you’re testing. It’s like having a smart assistant doing the guesswork for you. Manual-range multimeters, on the other hand, require you to select the range yourself. They’re great for learning the ropes but need a bit more know-how.
- Can Environmental Factors Affect My Multimeter Readings?
- You bet they can! Temperature, humidity, and even electromagnetic fields can influence your readings. Use your multimeter in a stable environment, away from extreme conditions, for the most accurate results. It’s all about creating the right setting for your electronic endeavors.
- How Can I Check If My Multimeter Is Working Properly Before Measuring Ohms?
- Before diving into any measurements, check quickly to ensure your multimeter is in good working order. Set it to the resistance setting and touch the two probes together. If it reads close to zero, your meter is ready to go. If not, it might be time for new batteries or a checkup.
References
Organizations:
- Applied Electrical Metrology Group at NIST. https://www.nist.gov/pml/quantum-measurement-division/applied-electrical-metrology
Books:
- “How To Use A Digital Multimeter” by Matt Alvin
- Getting the Most from Your Multimeter
Website Resources:
- Digital Ohmmeter – How it Works, Applications, & Advantages. https://www.electricity-magnetism.org/digital-ohmmeter/
Video References:
GalcoTV