4 min read
How to Megger Test a 3-Phase Motor (5 Steps)
In this article, I’ll teach you how to test a 3-phase motor with a megger in a few minutes.
An Ohm meter and a DC generator constitute a megger. The insulation resistance of the electrical equipment is tested using a megger. Being an experienced handyman, I regularly need to test 3-phase motors with a merger, and ill teach you what I’ve learned below. The quality of the insulation is a crucial consideration in electrical equipment. Electrical device insulation properties will fluctuate depending on several factors, including ambient conditions, temperature, and time. To assess the insulation quality, a megger tests a wire by exposing it to a high DC voltage for a predetermined time.
In general, the process of testing a 3-phase motor with a megger is easy:
- Turn off the motor’s power source by flipping the circuit breaker
- Set the megger to Ohms and then check the leads to check electrical continuity
- Test the insulation of the motor
- Note the readings
- If the motor’s insulation and winding tests yield remarkably similar and high readings, the motor is in perfect shape.
I will cover more detail below.
How to test a 3-Phase Motor with a Megger
Step 1: Preliminaries
We need to consider a few things before using a megger for testing:
- The megger’s leads must be examined for any issues. Proper electrical continuity between the leads is required.
- While the megger is turned on, we must connect both leads to test the electrical continuity of the device.
- Also, examine the device’s dress wiring.
- Before testing, confirm that all connections are complete.
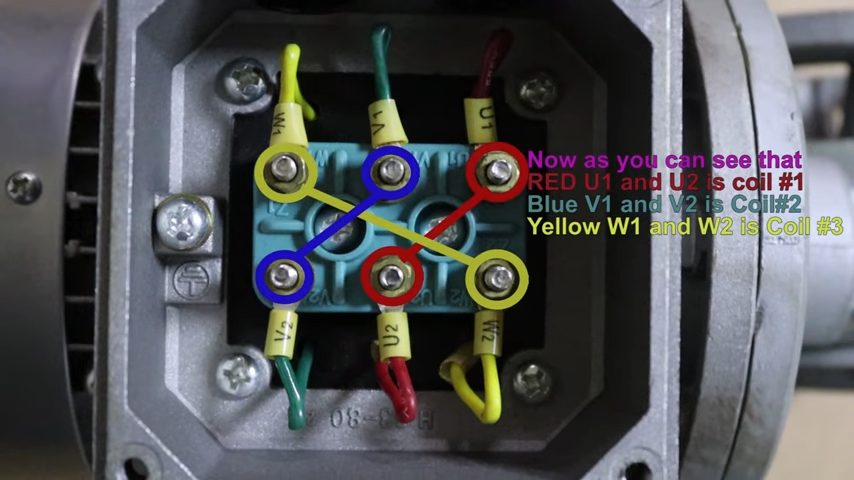
- Verify whether the three-phase motor is linked to the delta, and disconnect the links if so.
- Then, remove the cover to expose the terminals or connections.
Step 2: Turn Off the Motor’s Power Source by Flipping the Circuit Breaker
I recommend you either completely unplug the power line from the breaker box after turning it off or that you have a helper to monitor the situation to ensure the circuit breaker doesn’t get flipped while you are megging the motor. If no one can watch the circuit breaker, cover it with red warning tape and enclose the breaker box in yellow caution tape.
Step 3: Motor Winding Resistance Test
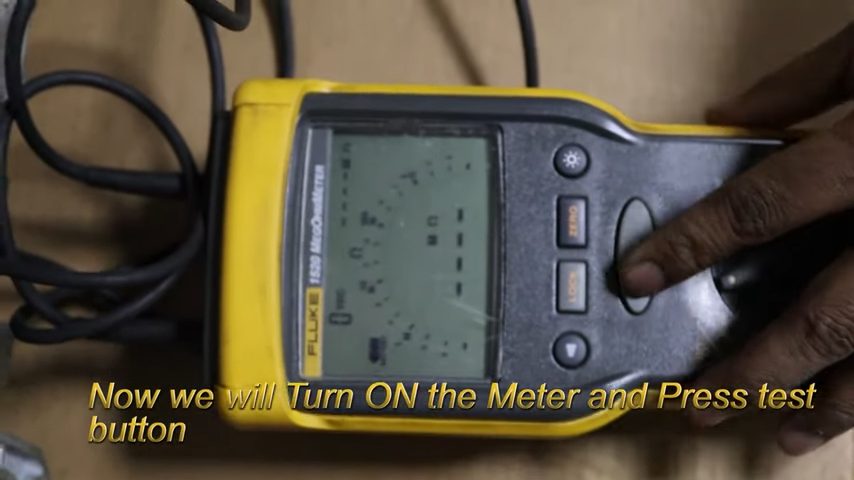
A megger would also have a rotary selector like a multimeter, so set it to Ohms and then check the leads to check electrical continuity.
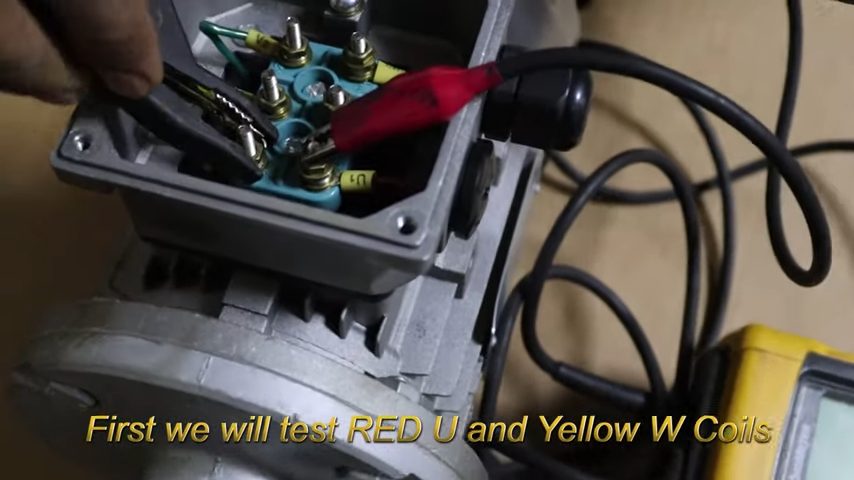
To measure the resistance of the windings from the phase-to-phase terminal, you need to connect the probe to the motor. Check the two ends of the first, second, and third windings.
To do this, attach the probe to the first winding, and check its two ends with the other probe. Repeat the process for the second and third windings. You must turn on the megger testing as we proceed.
For the motor to pass this test, all the windings must display high and almost equal values.
Step 4: Motor Insulation Resistance Test
To perform this testing adjustment, the megger setting for voltage and the voltage level must be higher than 250V.
Connect one megger probe to the motor’s earth connection. To test the insulating resistance to the earth, attach the second probe to the first winding and measure the value.
Repeat these steps for the second and third windings; everything is in order if all the measurements are nearly identical. The insulating resistance between the windings should then be checked.
Step 5: Deductions from The Readings
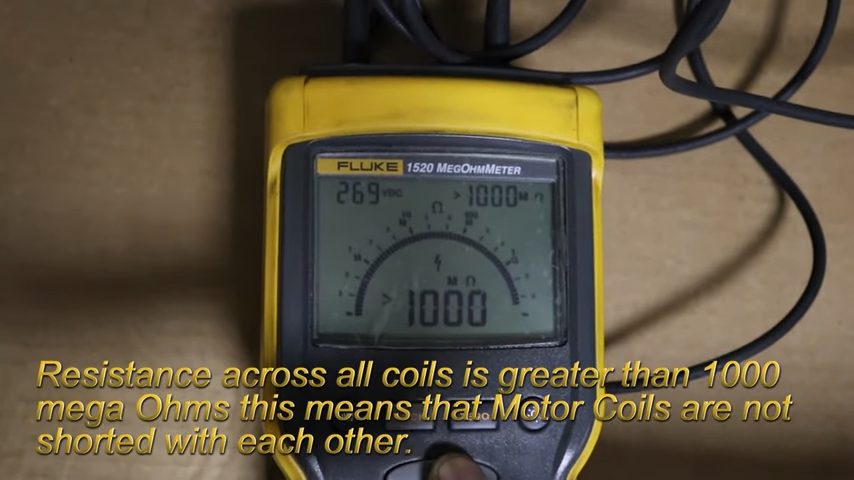
If the readings for the three windings of the motor’s insulation resistance are almost identical, the motor is in decent health. The meter will read zero if the probes are connected to the same winding. (1)
Therefore, if the motor’s insulation and winding tests yield remarkably similar and high readings, the motor is in perfect shape. (2)
Take a look at some of our related articles below.
- How to wire inverter to RV breaker box
- How to test a fan motor with a multimeter
- How to test blower motor with multimeter
References
(1) health – https://www.britannica.com/topic/health
(2) shape – https://99designs.com/blog/tips/meaning-of-shapes/
Video References