10 min read
Where to Connect Ground Wire Car Battery (Ultimate Guide)
Alright, folks, let’s dive into the world of car maintenance, specifically about connecting the ground (negative) wire of your car’s battery.
This might come up when installing a new battery or just tinkering around. Understanding why and where this wire connects is key to keeping your car’s electrical system running smoothly.
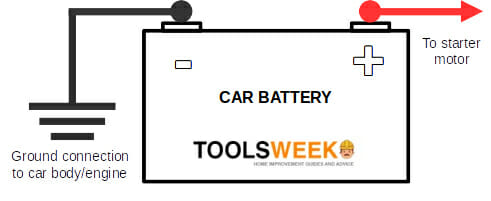
So, where does this ground wire go? It is connected to a bare metallic part of the car’s engine or chassis under a ground return system. It provides a complete, closed circuit to allow the car’s electronics to operate.
By the end of this article, you’ll know where to connect that ground wire and the why behind it. So, let’s roll up our sleeves and get down to business.
Where to Connect the Ground Wire
Let’s get into the nitty-gritty of where to hook up that ground wire on your car’s battery. It’s not just about plugging it in anywhere; you’ve got to find the right spot.
Typically, you’ll attach this wire to a metallic part of your car’s engine or chassis. This isn’t just a random choice; it’s crucial for the health of your car’s electrical system.
So, here’s the deal: your car’s electrical system is a closed loop. It means that the negative terminal of your battery needs to be connected directly to a solid, unpainted metal part of your engine or chassis.
This connection point is critical. I usually look for a spot where the metal is bare – no paint, no rust – because that’s where you get the best connection.
For everything to work smoothly, this loop needs to be uninterrupted. That’s where the ground wire comes in. It acts as a bridge, completing this circuit and allowing your car’s gadgets to function properly.
Ground Return System
Think of it as the unsung hero of your car’s electrical setup. When you connect the battery, the positive wire is your main player, bringing in the power.
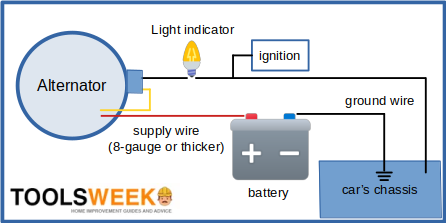
But the negative wire? It’s like the trusty sidekick, returning the used electricity back to the battery. This return is typically made through the car’s chassis, making the entire frame part of the electrical circuit.
But here’s an interesting twist: some special vehicles, like petrol tankers, use an “insulated return” system. That means they don’t rely on the vehicle’s body as a ground point. It’s a two-wire system, more complex but necessary for their specific needs.

Always make sure you’re connecting to the right ground polarity. Get this wrong, and you could end up frying some of the electronic components in your car.
So, that’s the lowdown on grounding your car’s battery. It’s all about finding that perfect, bare metal spot and making a solid, clean connection. Get this right, and you’re setting up your car for electrical success. Let’s keep those wheels rolling smoothly, folks!
Different Types of Grounds
In car maintenance, understanding the different types of grounds is like knowing your way around a toolbox – essential. You’ve got your electrical ground, chassis ground, and engine ground. Each plays a unique role in keeping your car’s electrical system in check.
The negative terminal of your car’s battery can be connected to two main types of grounds in a ground return system. You’re hooking it up to a bare metallic engine part or the chassis. It’s a crucial choice because this is where your car’s electrical circuit completes itself.
The chassis, the car’s body or frame, often serves as the electrical ground. This means it’s the main player in completing the circuit for all those electrical components and accessories you’ve got inside your car. I’ve seen this setup in action numerous times, and it’s fascinating how the entire frame becomes an integral part of the electrical system.
Then there’s the engine ground. It’s more specific, like how a “transmission ground” connects the starter to the chassis. These terms might sound technical, but it all makes sense once you get your hands dirty in the engine bay.
Although this article focuses mainly on chassis ground, much of what we talk about here applies to engine ground, too. It’s all about ensuring your car’s electrical system has a solid foundation – a reliable ground connection.
When to Connect the Ground Wire
Let’s get down to business with one of the most crucial aspects of battery maintenance – knowing when to connect that ground wire. Trust me, this is as vital as knowing where to connect it because getting the timing wrong could lead to a short circuit, and nobody wants that.
Here’s a simple way to remember the order of operations:
| First | Second |
|---|---|
| When connecting a battery | Positive terminal |
| When disconnecting a battery | Negative terminal |
Think of it like: ‘PiN’ to connect and ‘NiP’ to disconnect. It’s a handy mnemonic here in Toolsweek. So, always remember, the ground (negative) wire gets connected last when you’re hooking up the battery, but it’s the first you take off when disconnecting.
Now, here’s a little trick I’ve learned along the way. Once you’ve connected your cables, dab some petroleum jelly on the terminals. This little step can slow down corrosion, keeping your connections cleaner and more reliable for longer.
So, remember this table next time you’re working on your battery. It’s a straightforward guide that can save you a lot of headaches. Remember, it’s all about doing things in the right order.
Good and Bad Ground Points
The car’s chassis is large, so how do you tell which points would provide a good ground connection?
An ideal ground point is provided by one that has the following:
- Bare metal – This is where the magic happens for a ground connection. Bare metal allows those electromagnetic waves to move freely, completing the circuit without fuss. It’s all about keeping that electrical resistance as low as possible.
- No paint or insulator – These are roadblocks in your circuit. Paint or any insulating material creates a barrier, making the current’s flow tough. It’s like trying to run through a crowded street – not very effective.
- No rust or corrosion – They’re the enemies of a good ground connection. Even a little rust can mess up the conductivity, so keeping your ground points clean and rust-free is crucial.
Most of the time, the best ground point is the one the factory sets. They knew what they were doing when they picked it. But, like everything else, it needs a bit of TLC. Look for rust or corrosion, and clean it up if you find any.
Ground and Battery Checks
Let’s roll up our sleeves and dive into some essential ground and battery checks. These are like the vital signs for your car’s electrical health. We will cover three key checks:
- Testing the battery’s voltage level
- Checking the quality of the ground connection
- More thorough checking of the chassis ground for high-resistance areas
Testing the Battery’s Voltage Level

Let’s kick off with testing the battery’s voltage. Grab your voltmeter and connect the red probe to the positive terminal and the black one to a metal part of the engine or chassis.
A healthy battery should show at least 12.6 volts, ideally a bit more, like around 13.5 volts. It might struggle to crank the engine below this, especially under 12.2 volts. But a slightly lower voltage can still be okay if the battery’s amperage is up to snuff.
Checking the Ground Connection

Next up, we need to take a good look at the ground connection. This is super important because a shaky ground connection can lead to all sorts of problems, like your car not starting or electrical glitches.
Ensure the connection is tight and secure, and watch for any signs of damage or wear on the ground wire. Rust or corrosion around this area is a big red flag. If you spot any, clean it up, and maybe slap on some petroleum jelly to prevent future corrosion.
Thorough Checking of the Chassis Ground
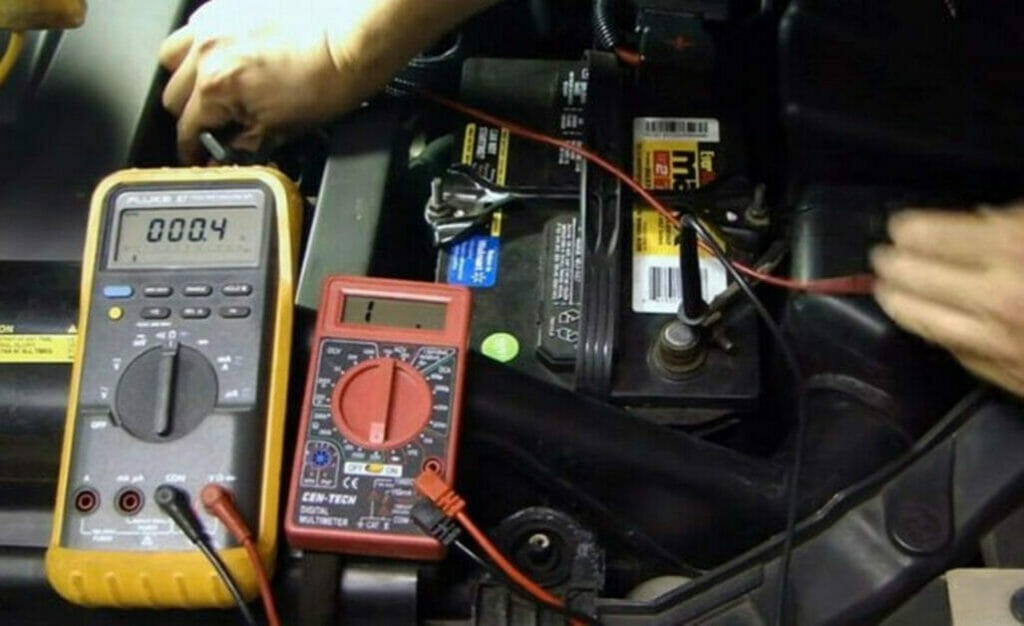
Now, for the chassis ground check. This one’s a bit more in-depth. You’ll need your voltmeter or multimeter set to DC volts. Before you start, turn off the ignition and make sure the car is neutral.
Connect the black probe to the negative terminal of your battery and the red probe to a clean, non-painted spot on the chassis. Fire up the engine and watch that voltmeter. The voltage shouldn’t be over 0.2 volts. Anything higher means you’ve got resistance in there.
But don’t stop at just one spot. Move that red probe around different chassis points. If you notice a big difference in voltage readings between two spots, you’ve likely found a high-resistance area.
That’s your cue to inspect closer for any issues like loose connectors, broken wires, or the usual suspects – rust and corrosion.
So there you have it. Keeping on top of these checks will help ensure your car’s electrical system runs smoothly. Remember, it’s all about the details and ensuring everything is right. Let’s keep those wheels turning and those electrons flowing!
References
Organizations:
- The Institute of Electrical and Electronics Engineers (IEEE). https://www.ieee.org/
- The Society of Automotive Engineers (SAE International). https://www.sae.org/
Books:
- “Automotive Wiring and Electrical Systems” by Tony Candela. https://books.google.com/books/about/Automotive_Wiring_and_Electrical_Systems.html?id=myi2QmV5RmUC
- “Hillier’s Fundamentals of Motor Vehicle Technology: Book 1” by V.A.W. Hillier and Peter Coombes. https://books.google.com/books/about/Hillier_s_Fundamentals_of_Motor_Vehicle.html?id=DoYaRsNFlEYC
Website Resources:
- Battery University. http://batteryuniversity.com/
- Autoshop101. http://autoshop101.com/
- All About Circuits. http://allaboutcircuits.com/
- AA1Car Automotive Diagnostic Help Center. http://aa1car.com/
- Gomog.com. https://www.gomog.com/
Video References:
electronicsNmore