10 min read
How to Wire a Voltage Regulator to an Alternator
If your vehicle’s alternator has a constantly higher or lower than the normal output voltage, you may need to rewire the voltage regulator.
A voltage regulator is an internal component in newer alternators, in which case you will not need to rewire it but either repair or replace it. But if your voltage regulator is external to the alternator and electromechanical (not electronic) and it fails to regulate the voltage properly, then you will have to rewire it.
I’ll show you how you can do this.
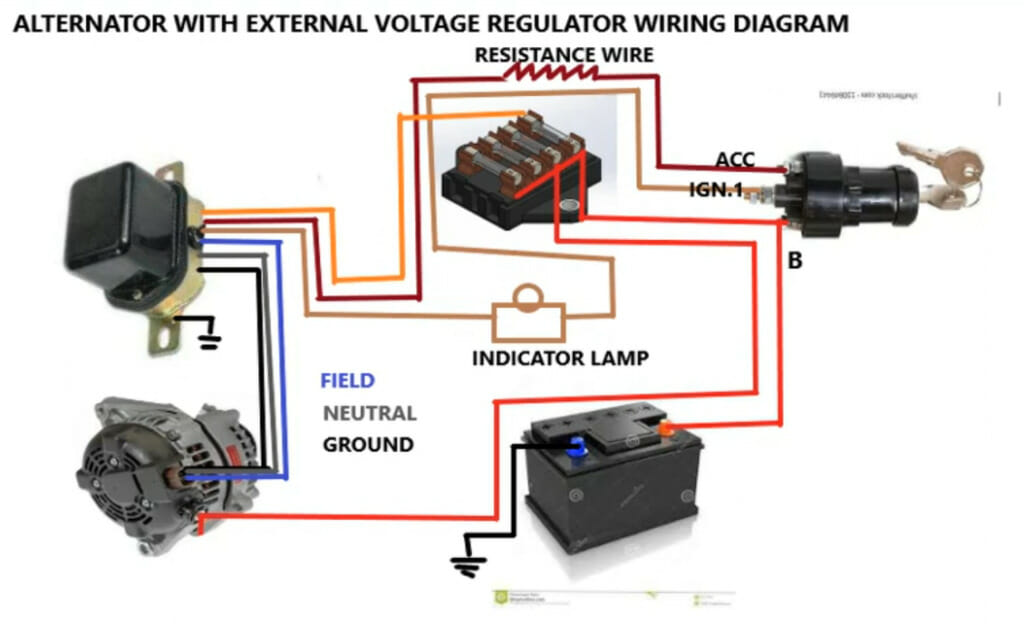
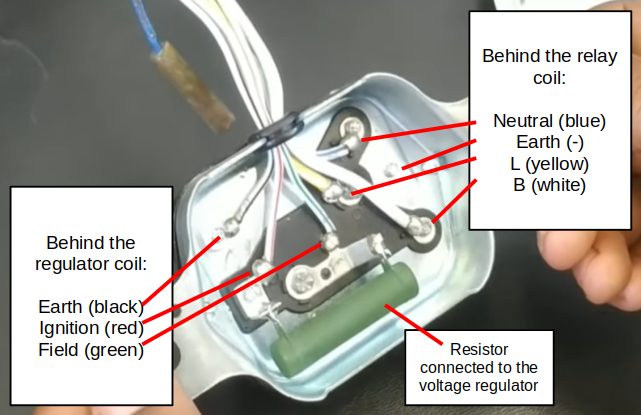
You will have to understand the wiring diagram for this (see the table below). Also, see under ‘Identifying the Wiring’ and Step 4 to know what wire goes where. When connecting the voltage regulator to the alternator, it is usually the blue wire to the terminal that might also be marked ‘F’.
| Location | Color | Type | Code | Terminal Contact | Connection |
| Under the regulator coil | Red | Ignition | IG | Stationary (normally closed) | Ignition switch |
| Green | Field wire | F | Moveable | Alternator | |
| Black | Earth/Ground | E | Open (normally) | Casing (grounding) | |
| Under the relay coil | – | Earth/Ground | E | Stationary (normally closed) | |
| Blue | Alternator’s stator | N | Stationary | Source for the relay | |
| Yellow | (Moveable) | L | Moveable | Regulator coil | |
| White | Positive battery sensor | B | Open (normally) | Battery |
Understanding the Wiring
Before we get to wiring the voltage regulator (top left in the picture above), you should identify the wiring.
The wiring system of an alternator is complex because it is connected to several components. Make sure you are able to positively identify its terminals and wires first. See under Step 4 below for details and/or consult your vehicle’s technical manual.
Wiring a Voltage Regulator
Here are the steps for wiring a voltage regulator:
Step 1: Detach the Battery
Remove the power (black and red) cables from the battery’s terminals with a wrench.
This will detach the battery so that the regulator is not supplied with power. You can now safely proceed to work on the regulator.
Step 2: Locate the Voltage Regulator
With the battery detached, first, locate the voltage regulator.
But before touching any part of the engine, also ensure that it is cool so that you can work on it safely. The voltage regulator is usually either above or to the side of the alternator.
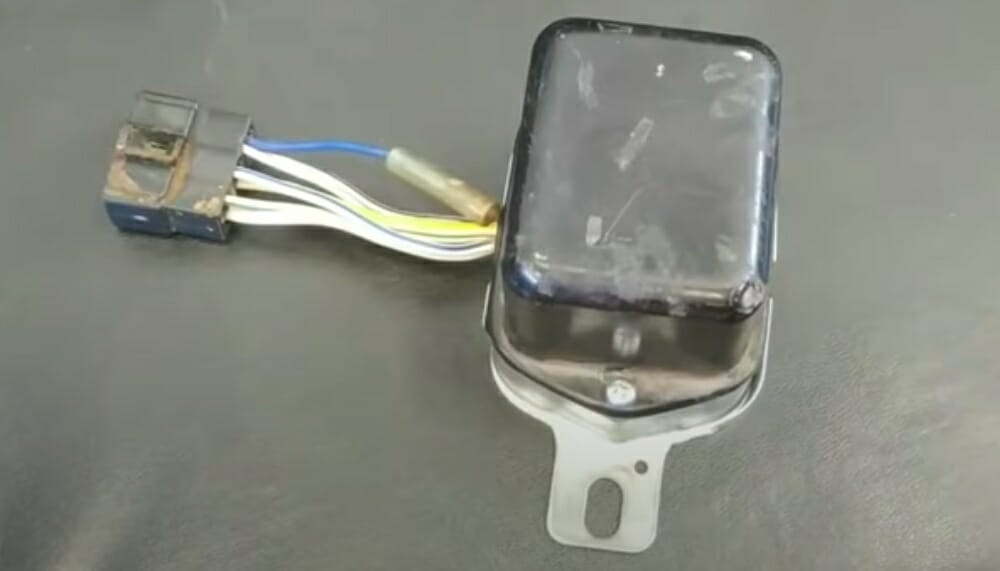
Step 3: Open the Voltage Regulator’s Socket
Attached to the back of the voltage regulator, you will see a socket for multiple wires.
There will actually be four sockets in a single housing. It is typically a rectangular, plastic one.
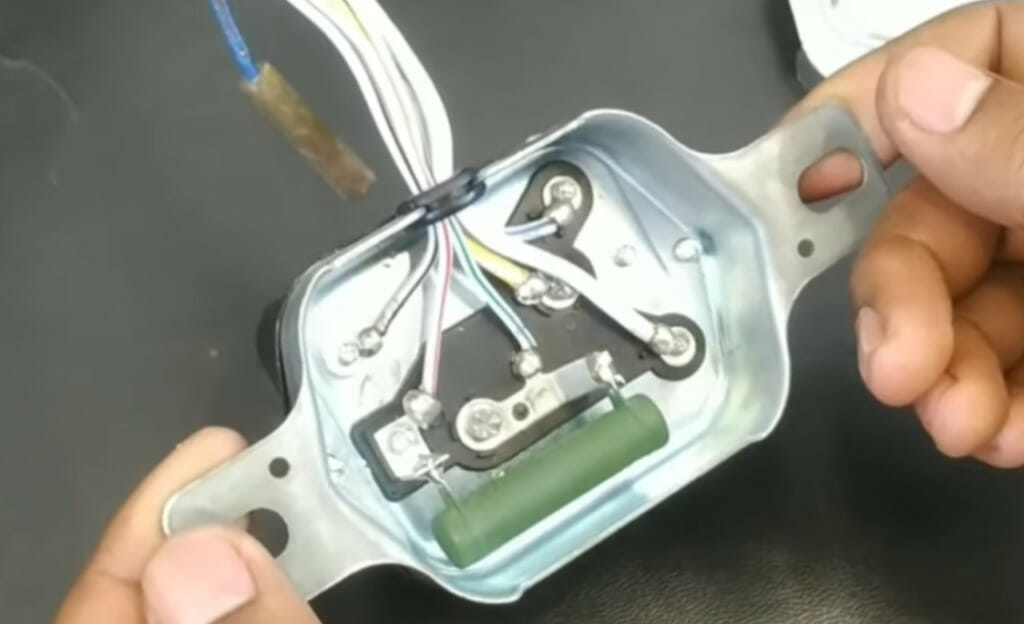
Step 4: Note the Wiring Scheme
Note the wiring scheme, which is normally as follows:
Behind the regulator coil:
- The black wire connects to the earth terminal.
- The red wire connects to the ignition terminal.
- The green wire connects to the field terminal.
Behind the relay coil:
- The blue wire connects to the neutral terminal.
- The yellow wire connects to the L terminal.
- The white wire connects to the battery sensor terminal.
This information is summarised in the table (scroll above) and illustrated in the picture below.
The above applies to electromechanical voltage regulators. If you have an electronic regulator, it uses semiconductors instead, as there are no moving parts.
Step 5: Insert the Wires

Insert the wires according to the wiring scheme for your vehicle.
Whether you’re replacing a certain wire or wiring for the first time or replacing the voltage regulator after a repair or with a new one, the wiring must be done according to the wiring scheme used by your vehicle. If in doubt, consult your vehicle’s manual.
If there are any extra wires that are not being used, you can simply tape their ends so that they remain inactive.
Step 6: Connect the Fuse Box
After the wiring is in place, connect the fuse box to the regulator’s switch.
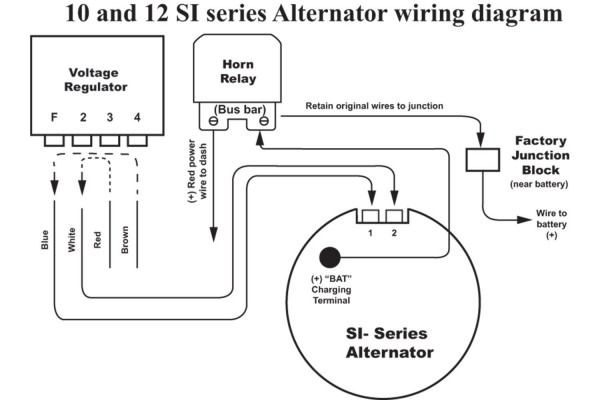
Connecting the Voltage Regulator to the Alternator
The voltage regulator is connected to the ‘alternator field excitation circuit’ to control the flow of current. (1)
When connecting the voltage regulator to the alternator, note these wires:
- The exciter wire, which turns the voltage regulator on, is connected to the alternator’s L terminal. It is required to generate the voltage for the alternator to function.
- The smaller positive and negative cables connect to the battery’s terminals. See under ‘Final Check’ below to reconnect the battery.
In addition, you may see a ‘battery charging wire’, which charges the battery, and an ‘ignition input wire’, which connects from the alternator to the ignition switch to turn the voltage regulator on.
Usually, there are up to four wires altogether, and they are normally color-coded. Usually, the blue wire is the field wire, which goes to the alternator; the white one goes to the alternator’s stator; the red wire is attached to the positive battery sensor; and the brown wire connects with the ignition.
If it’s a 2-wire alternator, it will have 3 wires. Connect the positive wire to the battery, and the other two must be grounded. In a 3-wire alternator, the additional fourth wire is for detecting voltage in the ignition system.
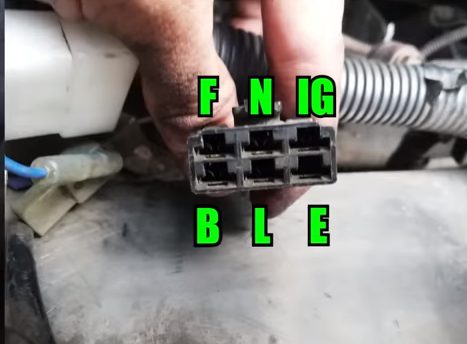
Some alternators are marked with letters. If the alternator is marked with ‘F’ (field) and ‘R’ (reference/sense), then connect ‘F’ on the alternator to ‘1’ on the regulator, and ‘R’ to ‘2’. If you see one marked with ‘S’, it should be connected to the ‘B+’ circuit using a jumper wire.
Final Check
Finally, we will reconnect the battery and check the voltage regulator.
When the voltage regulator is wired and connected to the alternator, you can reconnect the voltage regulator to the vehicle’s battery. Connect the red cable to the battery’s positive (+) terminal and the black cable to its negative (-) terminal.
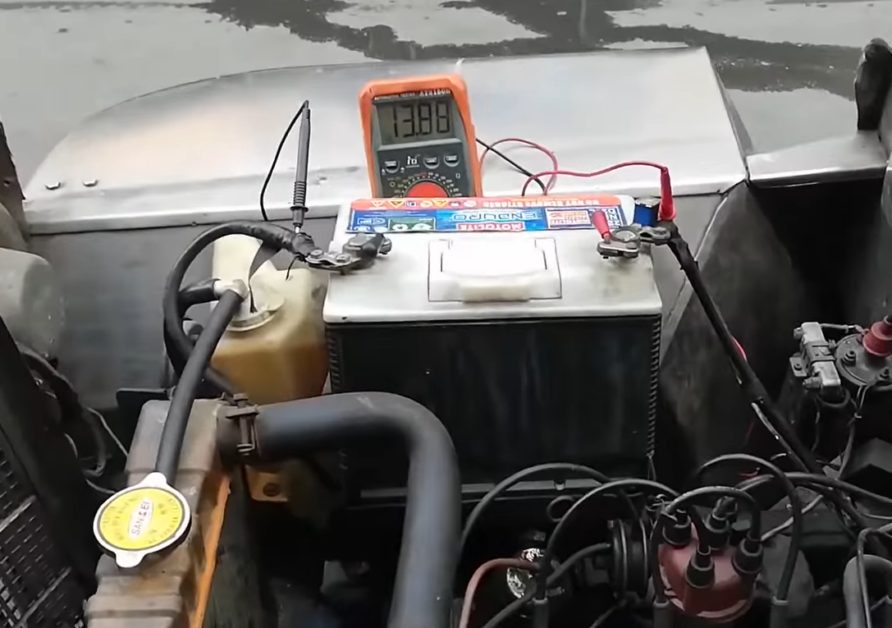
To ensure the voltage regulator and alternator are working properly, you should check the voltage output.
When the vehicle is idle, the voltage reading should be around 12 volts. When you step on the gas pedal to increase the engine’s RPM, the voltage level will increase. But it should not normally exceed (or be under) 13.5-14.8 volts. In the picture above, the reading of 13.88 volts is within this range, so the voltage regulator is likely working normally.
Why Voltage Regulators are Used
The Alternator
An alternator, which generates electricity in your vehicle while you drive it and also keeps the battery charged, is usually a maintenance-free component.
The stator and rotor play a role in generating electricity, and a rectifier converts AC into DC. The voltage regulator then works to stabilize the voltage level according to the needs of the various electrical components in the car that run on electricity.
The Voltage Regulator
The voltage regulator inside the alternator is an electronic circuit that regulates the alternator’s voltage.
It regulates the amount of voltage supplied to a vehicle to ensure its battery and other electrical components receive current at a consistent voltage. It does this by either machine sensing (the voltage at the alternator) or battery sensing (the voltage at the battery). It regulates the voltage by controlling the current supplied to the rotor field winding, which alters the magnetic field strength and, thereby, the output voltage. (2)
If the voltage gets higher or lower than its normal range, the regulator readjusts or stabilizes it so that it remains within this range. The voltage level may increase or decrease depending on the speed at which the alternator rotates. In a 12-volt system, the upper limit is usually between 13.5 and 14.8 volts. Check your vehicle’s owner’s manual for the exact tolerance.
The electrical components in your vehicle, including the battery, lights, wipers, fans, etc., thus depend on it. Without a voltage regulator, the voltage level will be unstable, and if, for instance, it gets too high, the fuse can blow.
Signs of a Defective Voltage Regulator
If you’re replacing an existing voltage regulator, you can look out for certain signs to know if it is defective. Common signs are:
- Headlights: The headlights flicker, dim, or don’t work at all.
- Emergency lights: The emergency lights don’t work properly or at all.
- Battery: Electrical components drain the battery too easily, you find that you need to add water to the battery too often, or you notice growing corrosion around the battery’s terminals.
- Electrical components: Damage to other electrical components.
- Engine: The engine operates erratically.
If you test the voltage across the battery terminals while the engine is running and you get a voltage reading higher than 13.5-14.8 volts, the voltage regulator might be failing in its function. On a hot day, the charging voltage will be a little lower than usual. But even if you get a very low or no voltage output in this condition, the voltage regulator might be bad.
If you experience one or more of the above issues, you might need to replace the voltage regulator. If you don’t do this early enough, it could lead to other related problems, such as having to replace the spark plugs.
However, before you suspect the voltage regulator itself, also check to ensure all the electrical connections are tight, the battery and battery cables are good, and the drive belt is not worn.
References
(1)V. A. W. Hillier & David R. Rogers. Hillier’s fundamentals of motor vehicle technology. 5th edition. Nelson Thornes. 2007.
(2) Allan Bonnick & Derek Newbold. A practical approach to motor vehicle engineering and maintenance. Third edition. Elsevier. 2011.
Video References
Chef Truck Mechanic
The AbJ Garage