19 min read
How to Trace a Broken Electrical Wire in a Wall? (6 Steps)
In this article, you’ll learn several ways to trace a broken wire in a wall, mostly without damaging it.
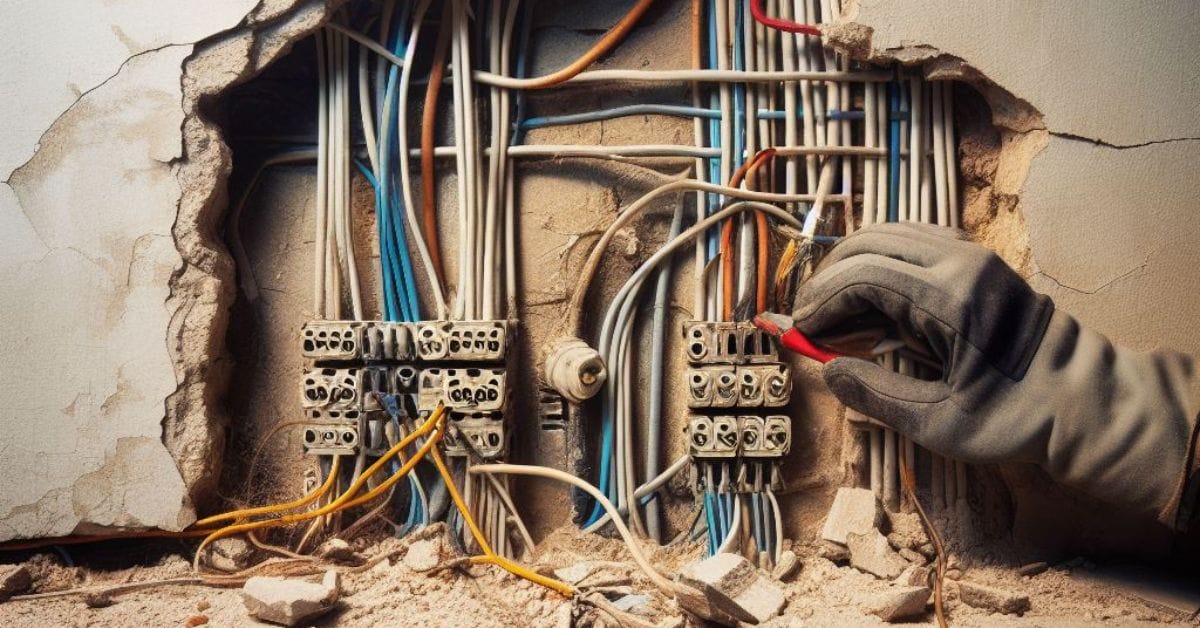
Leaving a broken electrical wire in a wall, ceiling, or floor is never safe. A broken wire might electrify parts of your house and start an electrical fire. You should trace the broken wire and fix it immediately to avoid this. Some instruments could also be used for wires in the ceiling or under the floor.
Quick Summary: To trace a broken electrical wire in a wall:
- Locate the broken wire using an outlet voltage tester or a tone cable tracer, and refer to your home wiring diagram.
- Turn the power off to the area you will work on if necessary.
- Optionally, do a visual inspection with or without an inspection camera by opening the wall.
- Trace the breakage spot using a signal cable tracer (recommended).
- Repair the broken wire.
- Retest the wire for continuity.
I will cover the above steps in detail below. I assume the break is confirmed or highly suspected, so you’re not checking for a break and tracing the broken wire inside a wall.
Prerequisites and Requirements
Safety
If you suspect a broken electrical wire in a wall in your house, the first thing to do is to switch off the power to the circuit.
This is especially important if, for instance, striking a nail or screwing into the wall caused the wire to break. You must replace the broken section of the wiring.
I also recommend you wear protective gear (goggles and gloves) while working with electrical wires and take the following additional safety measures:
- Don’t touch exposed wires unless you’re sure they don’t have power.
- Inspect the area for water or moisture.
- Conduct this task in a well-lit area.
Other Causes
You may suspect a wire is broken if you notice any of the following:
- An electrical outlet stops working.
- The light flickers, it dims, or it fails to work.
- The circuit breaker trips frequently.
- You hear a strange noise inside the wall, such as buzzing or crackling.
- You sense the smell of sparks or burning from a particular wall patch.
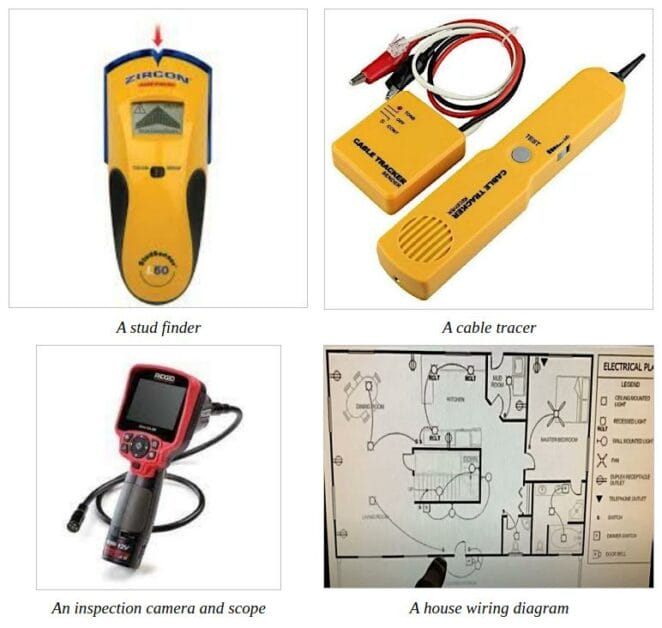
Instruments
Several instruments are available that you can use to trace a broken electrical wire in a wall.
The most commonly used ones are a stud finder, a cable tracer, and an inspection camera. You can also use an outlet (or voltage) tester and refer to your house wiring diagram if you have one, so I’ve included them under instruments.
Tools and Materials
You may need the following additional tools and materials for this task depending on your particular situation:
- Screwdriver
- A wire cutter and stripper
- Flashlight
- Electrical tape
- Wire snake or fish tape
General Procedure
The following procedure will apply generally regardless of which instrument you use or technique you apply:
- Step 1: Locate the site of the break.
- Step 2: Turn the power off to your working area.
- Step 3: Do a visual inspection
- Step 4: Trace the wire
- Step 5: Repair the broken wire
- Step 6: Retest the wire
Special Techniques
There are 2 specific methods you can use to trace a broken wire in a wall:
- The direct ground method involves attaching the plug or alligator clips to the hot and neutral wires to the circuit.
- The remote ground method is preferred for optimum signal strength and to avoid cancellation effects caused by the direct method, but it will trip GFCI outlets.
This article shows how to apply the direct ground method.
Tracing a Broken Electrical Wire in a Wall Using a Cable Tracer
We will apply the direct ground method using a signal cable tracer to demonstrate how to trace a broken electrical wire in a wall.
Depending on your situation, you can work with either an energized or de-energized circuit. Only work with an energized one if you consider it safe. Otherwise, turn the power off, as recommended above, under the safety precautions.
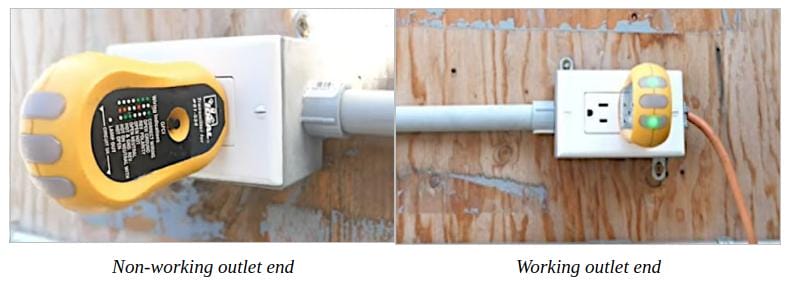
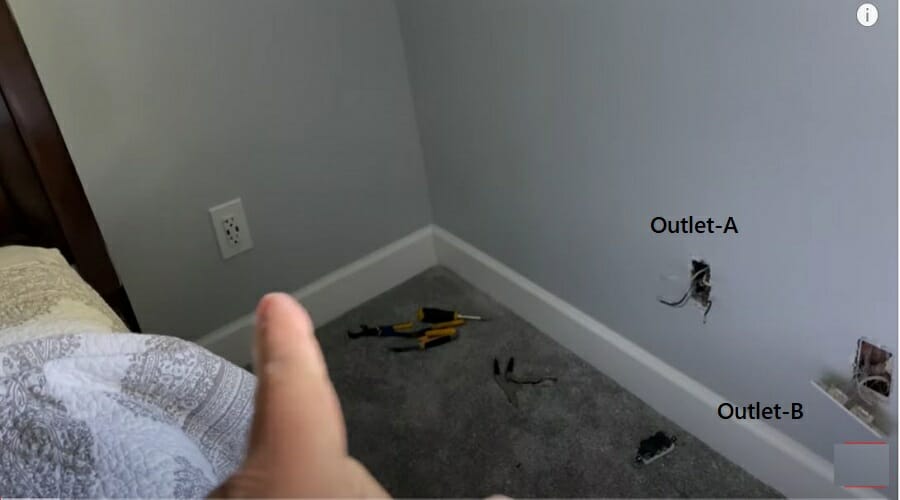
We have 2 electrical outlets connected via a PVC pipe to demonstrate this method, shown below in the first step.
Step 1: Locate the Site of the Break
A circuit or outlet tester was plugged into each one in turn.
The one on the right shows a green light at each end, so it’s working fine, but the one on the left isn’t working. It means there’s a break someone along the line.
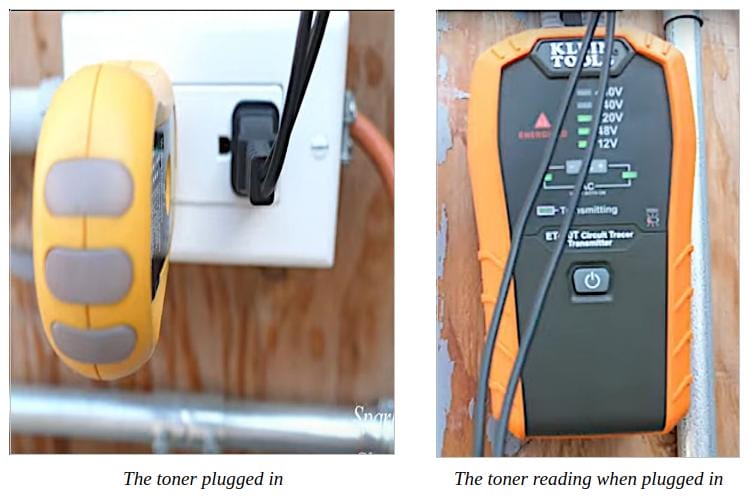
After inserting the toner into the working outlet, it should show a voltage rating of 120V, as shown below.
If the cable’s path is unclear or passes through more than one wall or room in your situation, you may need to refer to your home’s wiring diagram to know which outlets are on the same circuit.
Below is an example of a home wiring diagram. It could give a clearer indication of how the electrical wires pass through the walls. For instance, you’ll know whether the wires travel in a vertical or a horizontal line.
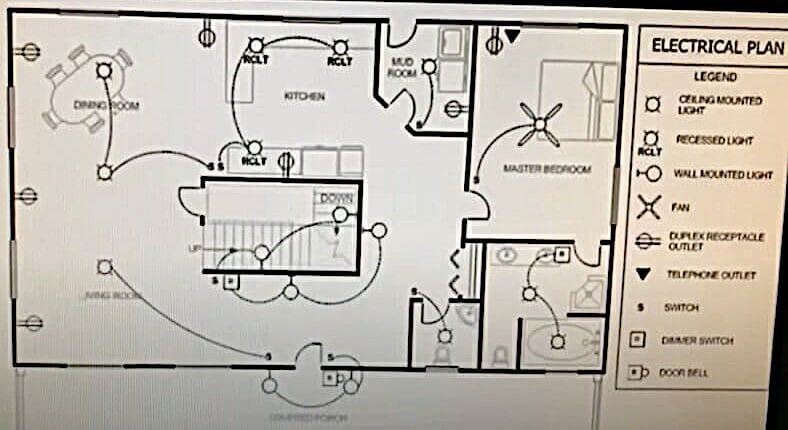
Locate the two outlets for the broken wires with the help of the wiring diagram.
At first, understanding the wiring diagram might be a little tricky, but you’ll get it eventually. After all, you only need to know the two connected outlets and the direction of the wires between them.
Identify the electrical wiring path in the wall and cross-check with the wiring diagram.
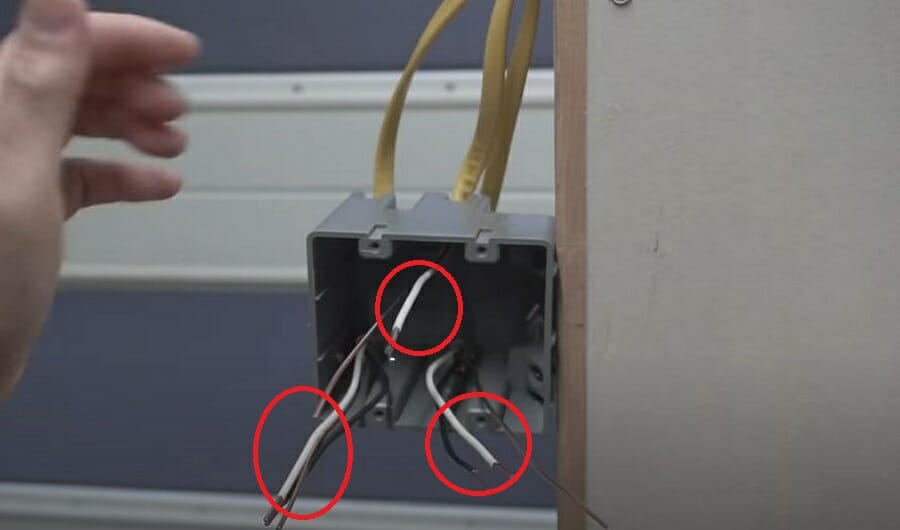
If you open the two connected outlets, you will see three sets of wires in each – a black hot wire, a white neutral wire, and a bare copper wire (ground).
By grouping them appropriately, you won’t mistakenly check two different wires. You can also check the continuity of these wires individually and replace the broken wire, but this article shows how to pinpoint the exact point of breakage.
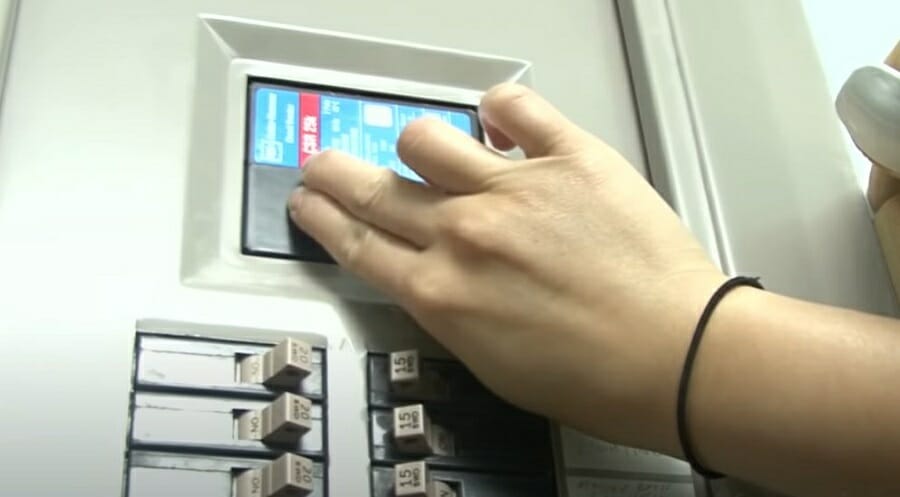
Step 2: Turn the Power Off
Some cable tracers cannot be used with live wires, as they can get damaged.
In that case, cut off the main power before tracing or turn off the respective circuit breaker. You must also turn the power off if you face a dangerous situation and the broken wire is causing a sound or smell (see the causes above).
We will keep the power on in our case so we can use the cable tracer while plugged in at one end of the broken wire.
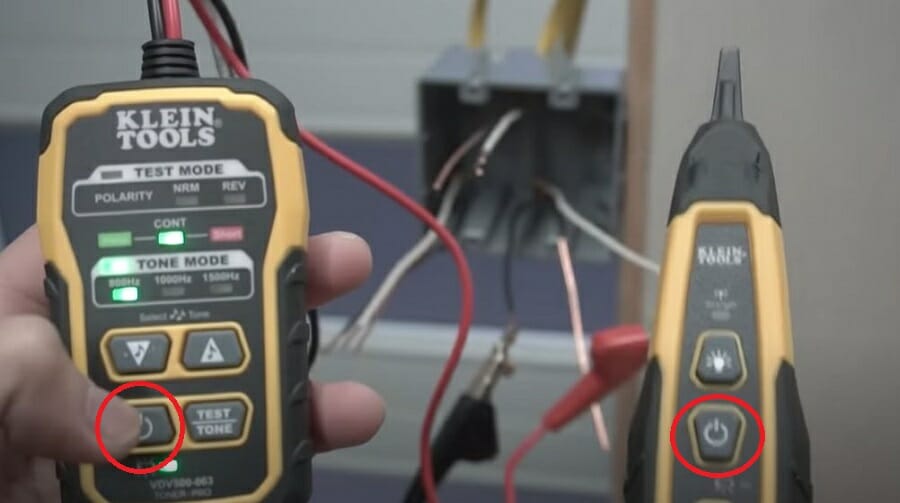
If you cut off the power, attach the cable tracer’s alligator clips to the hot, neutral wires. Then, turn on the toner and probe. The picture below shows a tone cable tracer connected to 2 wires from an outlet.
Step 3: Do a Visual Inspection
Turn off the power before proceeding.
Create an opening in the wall and remove its covering. You can only do a visual inspection if you can access the wires, which means opening the wall at the breakage site. Skip this step if you can’t do that.
You can use a scope camera to minimize the damage (see the end of this article), but you will have to open the wall anyway, eventually, if you decide to replace only a portion of the wire inside the wall.
Ensure the area is well-lit while doing the visual inspection. Check for loose connections, worn insulation, and, of course, breaks. The next step will help if you don’t notice a problem or to confirm one.
Step 5: Trace the Wire
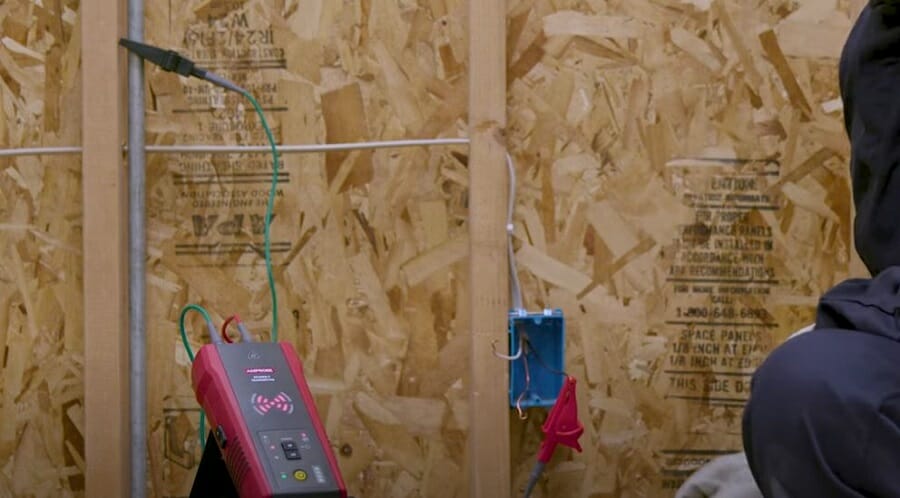
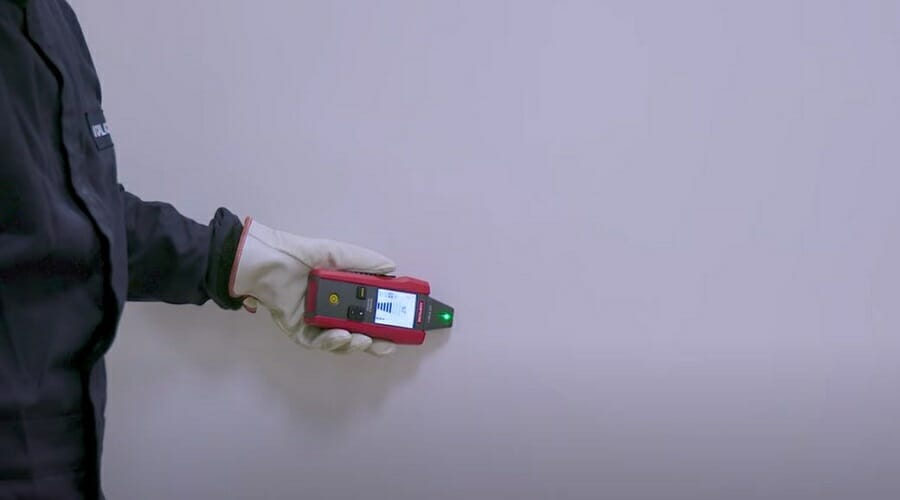
Start with the probe close to the working outlet.
Choose an appropriate sensitivity level according to the site characteristics, such as wall thickness and depth, usually from 1 to 8. It should show close to 100% signal strength.
In the demonstration below, the signal was 99% when 6” away from it at level 5 sensitivity.
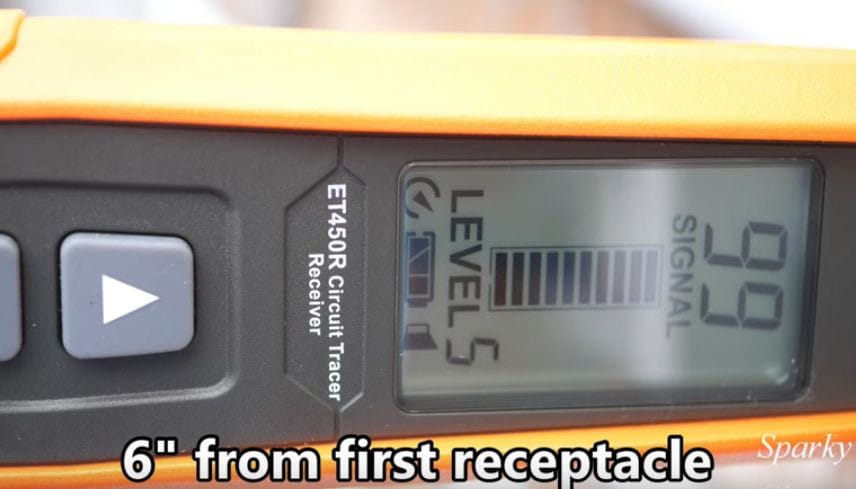
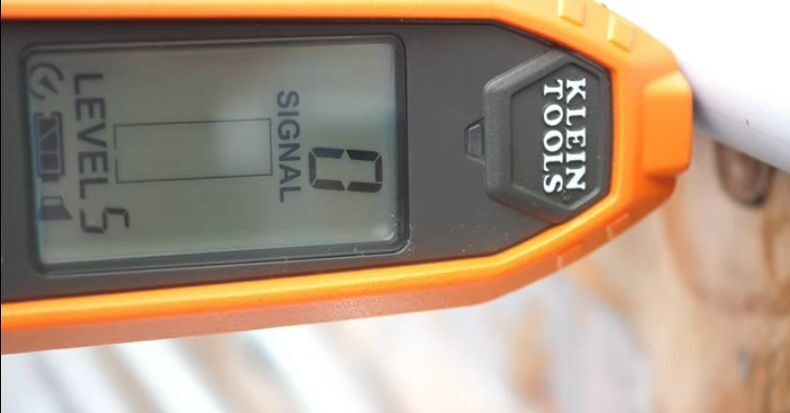
The technique involves slowly moving along the cable towards the other end and monitoring the signal strength, which will start falling.
You will locate the breakage site when the signal strength shows 0%, as shown below.
Using a tone cable tracer, you can bring the probe near or on the wire at the other end and identify the broken wire.
It will be the one that fails to emit a tone. You can remove and replace the wire if easy or use the above signal tracer method to identify the exact breakage spot.
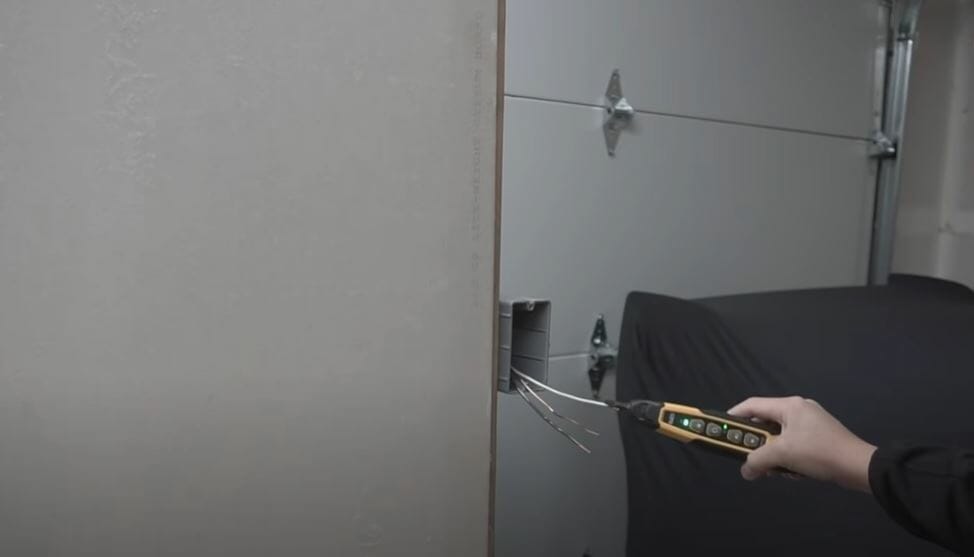
However, to get a rough idea of where the breakage spot is, move the probe along the wire’s path if you know it. It is most likely to be the place where the tone is the weakest or absent.
Step 6: Repair the Broken Wire
Only proceed to repair the broken wire while the power is turned off.
Cut out the damaged section, strip the wire ends, and splice the wires. If the damaged section is too long for splicing, attach a wire to cover the distance and splice at both ends.
A continuity test can confirm if the wire was repaired successfully. Otherwise, the only solution would be to replace the whole wire.
More About Cable Tracers
Using a Signal Cable Tracer
A cable tracer (or locator) is an ideal tool for the job and better than a stud finder because it is dedicated to tracing cables.
There are two types of cable tracers you can use: a tone and a signal cable tracer.
- When navigating the probe alongside the correct wire path, a cable tracer emits a tone.
- A signal cable tracer displays a strong signal when navigating the probe alongside the correct wire path.
We used a signal cable trace above, but I also showed an alternative way using a tone cable tracer. I will now give more details about both options.
If the signal strength is between 50-75, it indicates properly connected wires. If it falls to zero, it indicates a break, as I showed in Step 5.
Using a Tone Cable Tracer
A tone cable tracer has three parts: a toner (transmitter), a probe (receiver), and a pair of alligator clips.
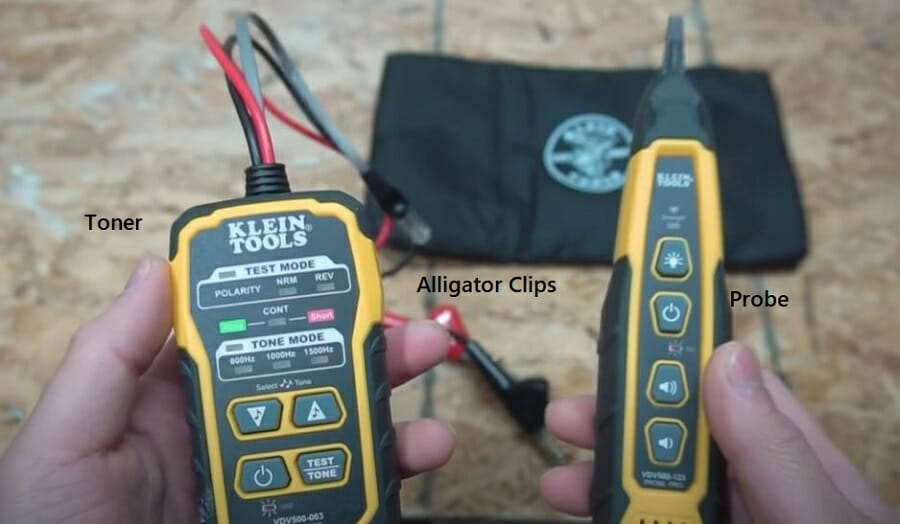
Plug the toner into a working electrical outlet on the circuit.
The toner grabs the signal that comes from the probe, and the probe is used to detect the wires. The alligator clips connect to the wires you want to check.
Other Useful Instruments to Trace Broken Wires
Here, I will mention some other useful instruments you can use to trace broken electrical wires in walls besides a cable tracer.
Using a Magnetic Stud Finder
Stud finders are one of the most common and simplest tools to trace electrical wires. There are magnetic stud finders and electronic ones. We’ll look at the magnetic type first.
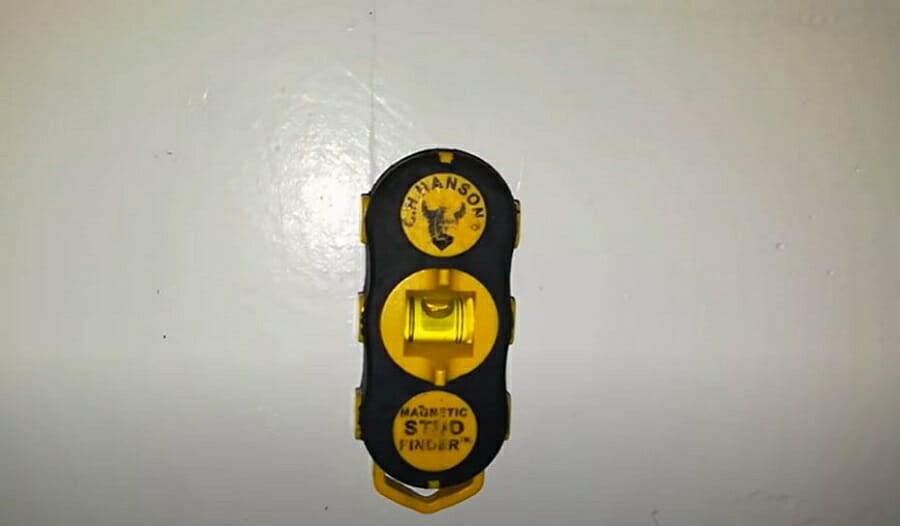
Magnetic stud finders can detect metal nails.
If you can detect a nail close to an electrical wire (inside the wall), it may have caused the broken wire. To check it properly:
- Locate the suspected wiring line.
- Identify the wall area in which the suspected wire runs.
- Check for any metal nails using the magnetic stud finder (parallel to the suspected wire’s path).
Note that a magnetic stud finder is not the best way to check for broken wires since it only detects metal nails. After detecting one, you’ll have to use another method to further inspect that location’s wiring.
Using an Electronic Stud Finder
Unlike magnetic stud finders, electronic stud finders can detect metal nails and broken wires, making them better devices than magnetic stud finders.
Here are a few simple steps to apply when using an electronic stud finder:
- Locate the suspected wiring line.
- Figure out the wall area in which the suspected wire runs.
- Check for any broken wires using the electronic stud finder.
If you detect a broken wire in the wall, access that area and confirm the issue.
Tracing a Broken Electrical Wire in a Wall Using an Inspection Camera
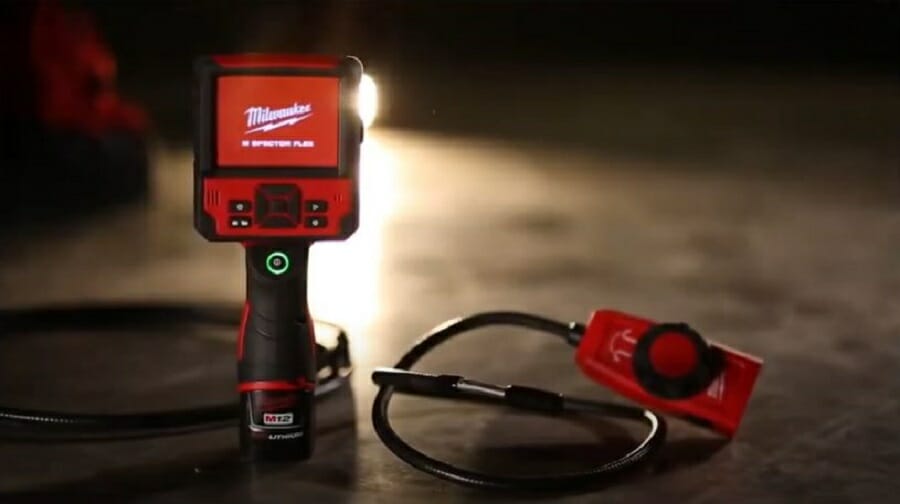
This can be a useful instrument to trace broken electrical wires if you’re willing to create a hole in the wall for visual inspection.
These devices come with a tiny camera connected to a flexible pipe. The flexible pipe allows you to maneuver around the camera inside the wall.
All you need to do is find a hole and insert the camera and the pipe. If you cannot find a hole, drill a new one suitable for an inspection camera’s size.

Guide the camera alongside the wires. Check the screen for any broken wires.
Even though this method is quite simple, there are a few disadvantages to it:
- You won’t be able to find a hole every time.
- Drilling a new hole will damage your wall.
- Navigating the camera inside the wall won’t be easy.
That’s why I didn’t use it above. Most inspection cameras come with a small light. So you can inspect the dark areas without much trouble.
FAQs
What Is the First Step in Tracing a Broken Electrical Wire?
The first step is to locate the site of the break. This can be done using an outlet or voltage tester, a tone cable tracer, and referring to your home’s wiring diagram. Ensure the power is turned off in the area you’re working on.
Is It Safe to Trace a Broken Wire Myself?
Yes, it can be safe if you take the necessary precautions. Always turn off the power to the circuit, wear protective gear like goggles and gloves, and ensure the area is dry and well-lit. If you’re inexperienced with electrical work, it’s advisable to consult a professional.
Can I Trace a Wire Without Opening the Wall?
You can use instruments like a cable tracer or a stud finder to trace the wire without opening the wall. However, opening the wall might be necessary for a thorough inspection or repair.
What Tools Do I Need to Trace and Repair a Broken Wire?
You might need a screwdriver, wire cutter and stripper, flashlight, electrical tape, and a wire snake or fish tape, depending on the situation.
How Do I Know If the Wire Is Successfully Repaired?
After repairing the wire, retest it for continuity to ensure it’s functioning correctly. If the repair is unsuccessful, replacing the entire wire might be necessary.
What Are the Signs of a Broken Electrical Wire in a Wall?
Signs include an electrical outlet not working, flickering or dim lights, frequent tripping of the circuit breaker, strange noises like buzzing or crackling inside the wall, and the smell of sparks or burning from a specific wall area.
Can I Use an Inspection Camera to Trace a Wire?
Yes, an inspection camera can be useful, especially if you’re willing to drill a small hole in the wall for a visual inspection. It allows you to check for broken wires without causing significant damage to the wall.
What Are the Differences Between a Tone and a Signal Cable Tracer?
When navigating the probe alongside the correct wire path, a cable tracer emits a tone. A signal cable tracer displays a signal strength, with a drop to zero indicating a break.
What Should I Do If I Suspect a Nail or Screw Has Damaged a Wire?
If a nail or screw is suspected to have caused wire damage, use a magnetic stud finder to locate metal nails near the wire’s path. Further inspection of the wiring at that location is necessary if a nail is detected.
Is It Necessary to Replace the Entire Wire If It’s Broken?
Not always. If the damaged section is small, you can splice the wires after removing the damaged part. However, replacing the entire wire might be the only solution if the damaged section is too long or inaccessible.
References
Website Resources:
- Inspection camera. https://www.leaktools.com/ridgid-inspection-camera-monitor-and-scope.html
Video References:
Sparky Channel
Extech Instruments
Review Tube
RANDOMFIX
DaxXxu MiX Collection
DailyElectrician
Fix This House
Pilot Jon
Amprobe Test Tools