9 min read
How to Test Wall Outlet with Multimeter (5 Easy Steps)
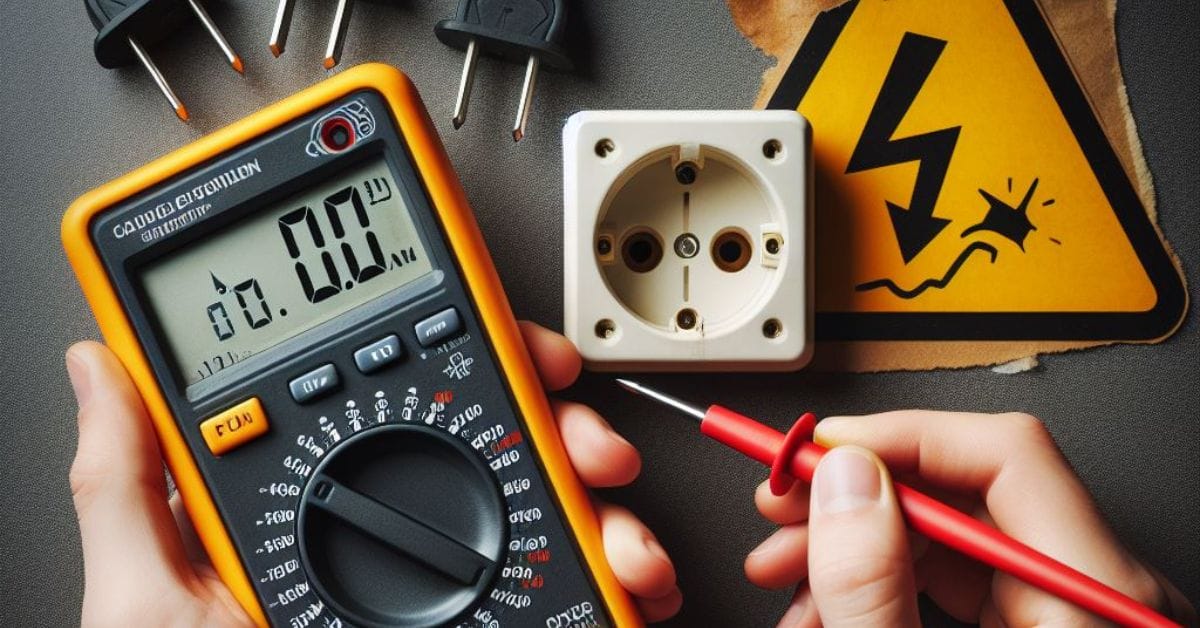
Ever wonder why that wall outlet isn’t powering up your gadgets or why your lights flicker? Well, it might be down to some tricky issues with your wall outlets, and I’m here to tell you a digital multimeter is your new best friend in figuring it all out.
Here’s the lowdown on how to test those outlets:
- Step 1 – Know Your Outlet: Start by getting familiar with the three slots on your outlet.
- Step 2 – Set Your Multimeter: Grab your multimeter and dial it to AC Volts
- Step 3 – Check Your Main Panel: You’ve got to ensure everything is on.
- Step 4 – Voltage Test Time: Test those voltages.
- Step 5 – Look for Reversed Wiring: Sniff out any reversed wiring.
I will go into more detail below.
Steps for Testing Wall Outlet with Multimeter
Step 1 – Understand the 3 Outlet Slots
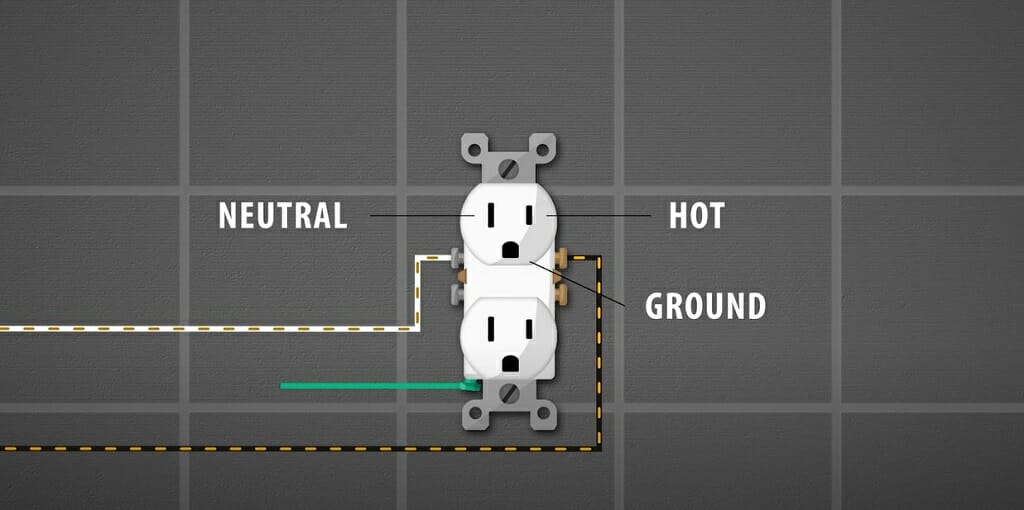
First things first, let’s get acquainted with your wall outlet. Your outlet has three slots:
- The small one on the right is your hot wire buddy
- The larger one on the left is the neutral,
- And that round guy at the bottom is your ground.
Step 2 – Setting Up Your Multimeter
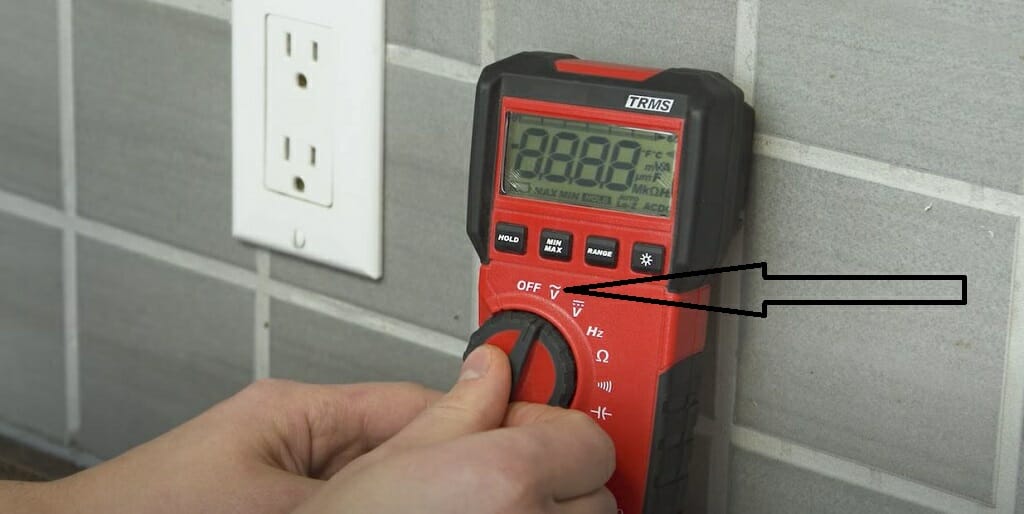
Next, it’s time to prep your multimeter. Switch it to the AC Volts setting.
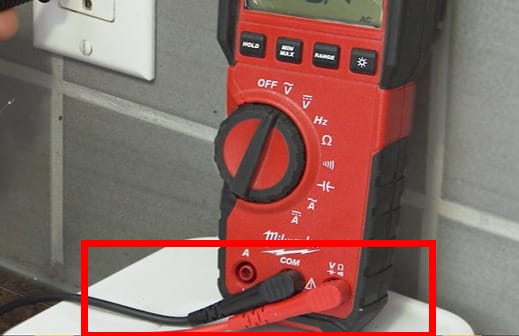
Plug the black probe into the COM port and the red one into the VΩ port. Now, power it up, and you’re ready to rock!
Step 3 – Check the Main Panel
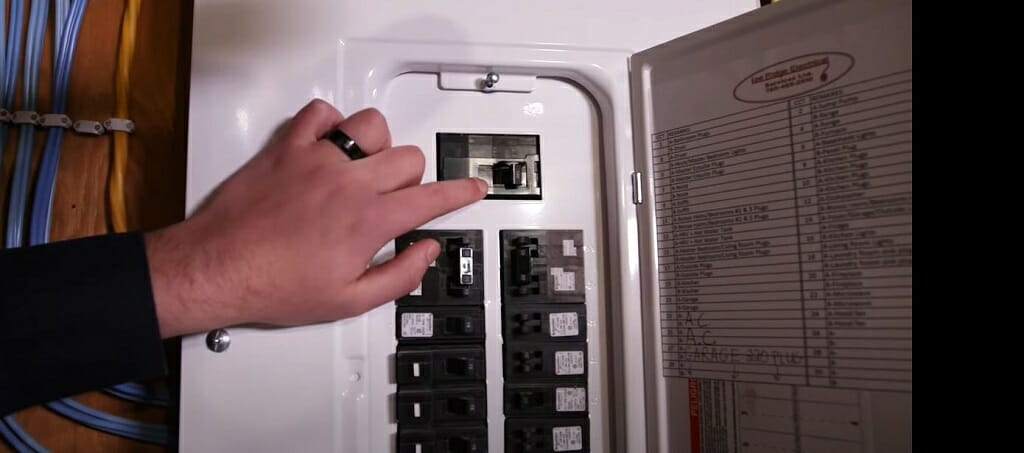
Before testing, take a quick trip to your main electrical panel. Make sure your main breaker and the outlet’s circuit breaker are ON. Your testing is like starting a car without the keys if they’re off.
Step 4 – Voltage Testing – Hot and Neutral
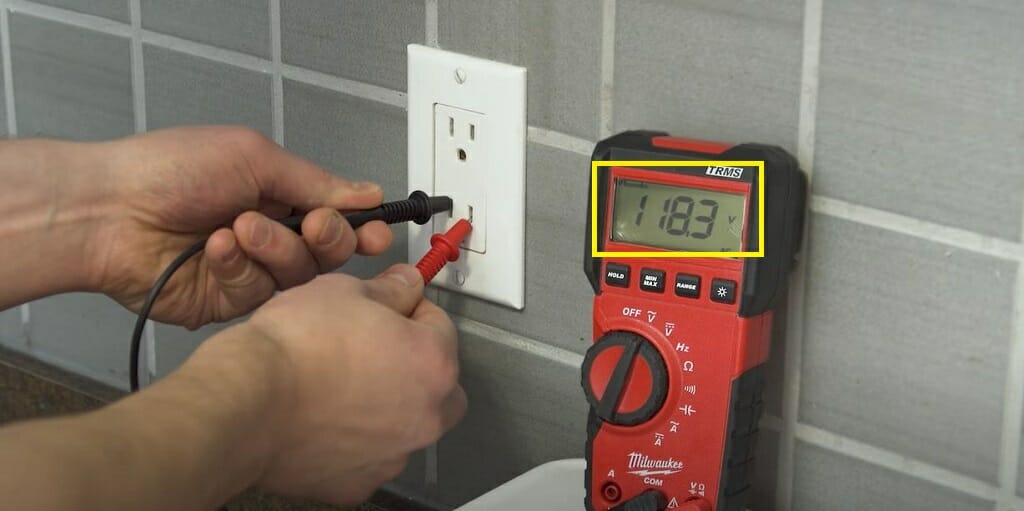
Now, for the main event! Insert the black probe into the large outlet slot and the red probe into the small one. It’s like plugging into an adventure. A healthy outlet will show you a reading around 110-120V. Anything else, and you might have a rebel outlet on your hands.
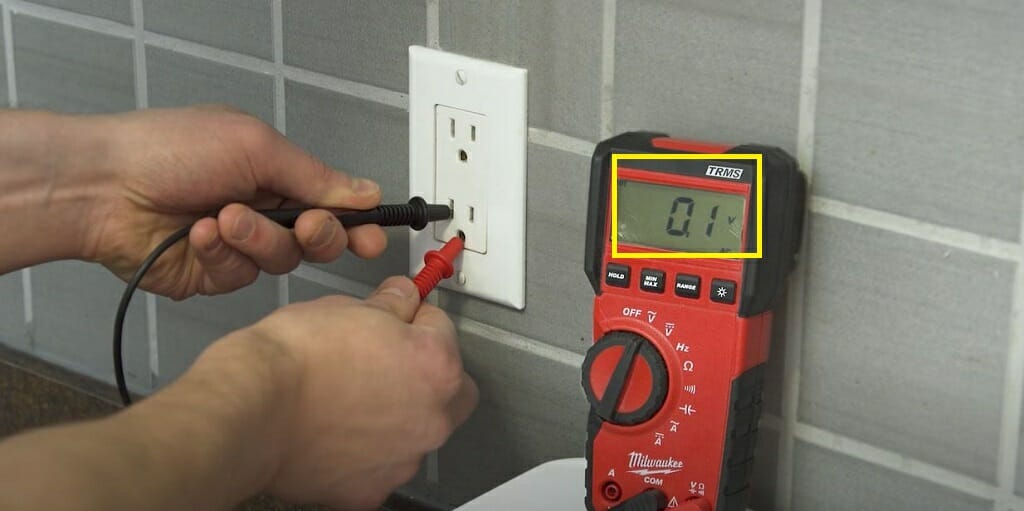
Step 5: Flipping the Script – Reversed Wiring Check
Finally, let’s see if your outlet’s wiring got its wires crossed. Insert the black probe into the large slot and the red one into the ground. If your multimeter stays quiet, you’re golden.
But if it jumps to 110-120V, you’ve got some reversed wiring shenanigans.
Apart from the above two tests, you can carry out one more voltage test for your wall outlet. This test will tell you whether your outlet is running on reversed wiring.
Multimeter Missteps: Dodging Common Outlet Testing Errors
Let’s chat about those oops moments we all have when using a multimeter to test outlets – and how to sidestep them. Trust me, I’ve been there, and learning from those little blunders is all part of the DIY adventure.
- Setting Snafus: Have you ever set your multimeter to measure resistance when you wanted voltage? Always double-check that your multimeter is set to AC voltage (look for the V with a wavy line) before you dive into testing. I learned this the hard way on a sunny Saturday afternoon, folks!
- Probe Placement Perplexities: Mixing up where to put those probes is common. Remember, red goes to the short slot (hot) and black to the long slot (neutral).
- Safety Slips: Holding onto the metal part of the probe while testing? Big no-no. Always grip the probes by their insulated handles. I recall a buddy of mine getting a zippy surprise for forgetting this – not a fun day!
- Overlooked Outlet Oddities: I got a zero reading and immediately thought the outlet was dead. Check your main breaker first. It might just be switched off.
- The Forgotten Ground Check: Ensure you test that ground connection for a complete outlet checkup. I remember a project where this step revealed a major grounding issue – talk about a close call!
- Resistance Reading Riddles: Testing resistance on a live circuit is a common mistake. Switch off the circuit first, or better yet, unplug from the outlet entirely. Safety first, always!
Remember, folks, using a multimeter is like playing a guitar – it takes practice to get it right. Embrace the learning curve, and soon, you’ll be testing those outlets like a seasoned pro. Happy and safe DIY-ing!
Cracking the Code: A DIYer’s Guide to Troubleshooting Outlet Tests
I have a troubleshooting guide to help you decode those baffling numbers and get your outlet tests back on track. Let’s break it down:
| Issue | Troubleshooting Tips |
|---|---|
| Zero or Unexpectedly Low Reading | Check if your circuit breaker has tripped. Once, I thought an outlet was out, but it was just the breaker having a day off. Also, double-check your multimeter settings – it’s easy to set it wrong. |
| Fluctuating Readings | I’ve seen this turn into a wild goose chase, only to find a wire needing a little tightening. Also, test another outlet to rule out your multimeter being the prankster. |
| High Voltage Reading | A reading higher than expected? This could indicate an overloaded circuit. Try unplugging some devices and retesting. |
| Constant ‘OL’ Reading | ‘OL’ (Open Loop) usually means no current is flowing. Check for any visible damage or loose wiring in the outlet. I once found a chewed-up wire causing the mischief. |
| Reading When Testing Neutral to Ground | If you get a reading here, it’s a telltale sign of a neutral-ground cross. This one might call for a professional electrician’s touch. |
Keep these tips handy, and you’ll be navigating those electrical puzzles with the confidence of a seasoned DIY detective. Stay safe, and keep on tinkering!
Multimeter Maintenance and Care
Taking care of your multimeter is like caring for a favorite power tool – do it right, and it’ll be your trusty sidekick for years to come.
- Regular Wipe-Downs: After each use, give your multimeter a good wipe. It keeps things neat and functioning. I once ignored this and ended up with a screen I could barely read during a crucial project!
- Battery Checks: Regularly check those batteries. There’s nothing like gearing up for a project and finding out your multimeter is dead. I always keep a spare set in my toolbox – I learned that lesson the hard way on a Sunday evening job.
- Tighten Loose Parts: Ensure everything’s snug and secure every few months. Loose parts can lead to wonky readings.
- Probe Care: Those probes are the business end of your multimeter. If they start looking frayed or worn, it’s time for a change. Quality tools lead to quality work.
- Annual Calibration: Your multimeter needs calibration to stay accurate. I usually mark my calendar for a yearly check-up. Some folks send theirs in for professional calibration, but you can also follow the manufacturer’s instructions to do it yourself.
So there you have it, my friends – a little TLC for your multimeter goes a long way. Remember these tips; your multimeter will be ready for action whenever needed. Happy testing, and remember – safety first!
Frequently Asked Questions
- Can I Test Outlets Without Turning Off the Power?
- You can test outlets without turning off the power. That’s the beauty of a multimeter. Just remember to handle the probes with their insulated parts to stay safe. It’s like checking the lights without flipping the switch off.
- Is It Safe to Test an Outlet If I’m Not an Electrician?
- Sure thing! You’re good to go if you follow safety guidelines, like using insulated tools and not touching exposed wires. It’s like painting a room – with the right prep, anyone can do it.
- What Does It Mean If My Multimeter Reads ‘OL‘ on an Outlet?
- ‘OL’ stands for ‘Open Loop.’ It’s like knocking on a door that nobody answers. It means there’s no current flowing through your test point. Check if your outlet is switched off or has a circuit break.
- Can a Multimeter Test GFCI Outlets?
- You can test GFCI outlets with a multimeter by checking the voltage. However, to test the GFCI function, you’ll need to use the test button on the outlet. It’s like checking both the light and the dimmer switch.
- Why Is My Multimeter Giving Me a Zero Reading on a Live Outlet?
- A zero reading on a live outlet could indicate a tripped breaker, a disconnected circuit, or a problem with your multimeter. It’s like finding your car won’t start – check the basics first, like whether it’s out of gas (or, in this case, power).
References
Organizations:
- National Electrical Manufacturers Association (NEMA). https://www.nema.org/
- Institute of Electrical and Electronics Engineers (IEEE). https://www.ieee.org/
Books:
- “Electrical Wiring Residential” by Ray C. Mullin and Phil Simmons. https://www.barnesandnoble.com/w/electrical-wiring-residential-ray-c-mullin/1116778103
Website Resources:
- All About Circuits. http://allaboutcircuits.com/
- The Spruce. http://thespruce.com/
Video References:
AMRE Supply
Homebuyer’s School