13 min read
How to Test an Electrical Outlet with a Multimeter (Guide)

Today, we’re diving into how to test an electrical outlet with a multimeter. It’s a simple yet powerful way to check if your outlets or appliances need TLC.
It’s a straightforward process, and I will walk you through it. Here’s the rundown:
Quick Summary:
🔧 Step 1: Setting Up Your Multimeter
🔍 Step 2: Connecting the Leads
📊 Step 3: Measuring the Voltage
🔌 Step 4: Ground Test
◀️ Step 5: Check Reverse Wiring
In this article, I’ll also dive into some troubleshooting tips. Whether it’s a reading that’s too low, indicating a potential issue with the outlet, or a high reading that could signal a larger electrical problem, I’ve got you covered with practical advice.
Testing An Electrical Outlet
Step 1: Setting Up Your Multimeter
Alright, first things first. Grab your multimeter. We’re going to set it to measure voltage. Look for the AC setting – the one with the wavy line. We’re dealing with household currents here, so we need AC.
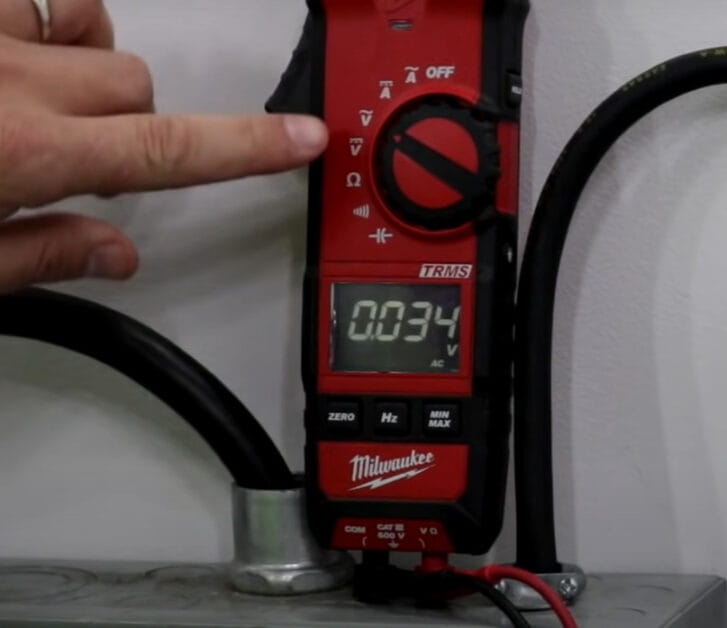
When I first used a multimeter, I mistakenly set it to DC and was baffled by the weird readings. Lesson learned!
Step 2: Connecting the Leads
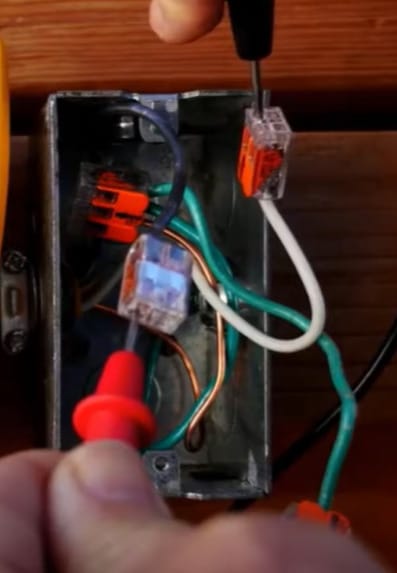
Now, let’s get those leads connected. Take the BLACK lead – it usually has a banana plug – and pop it into the ‘COM’ port on your meter. You might see a minus sign next to it.
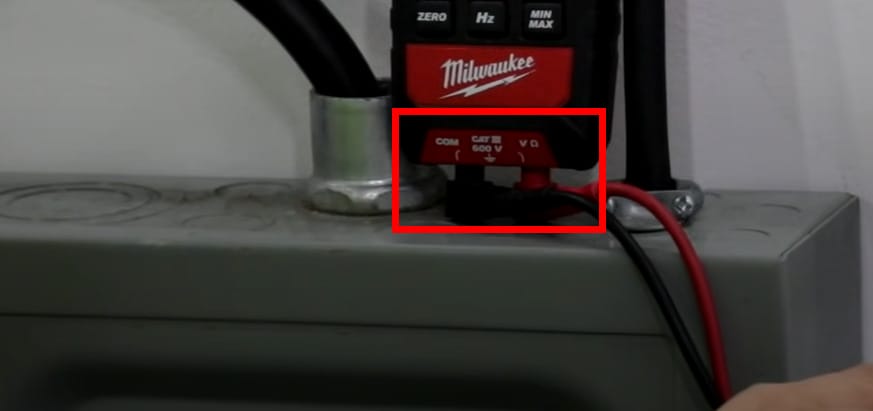
Then, grab the RED lead and connect it to the port marked with a “+” or “Ω.” This part’s crucial – I’ve seen a lot of confusion here, and getting it right makes all the difference.
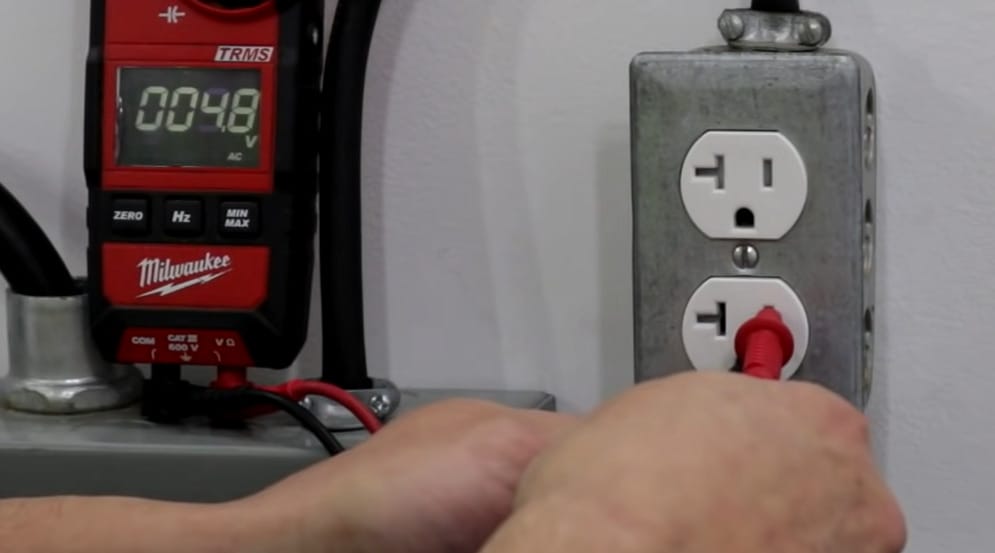
Step 3: Measuring the Voltage
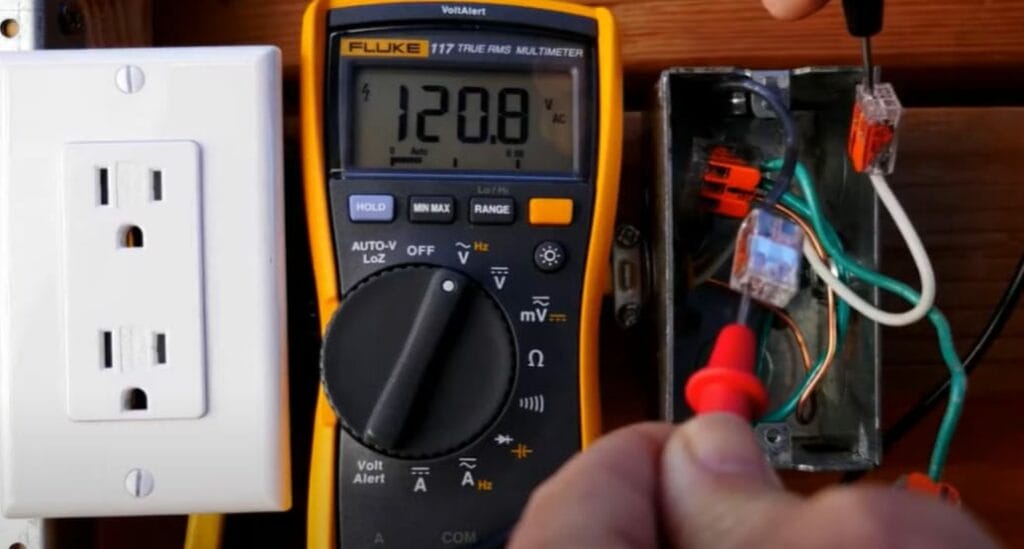
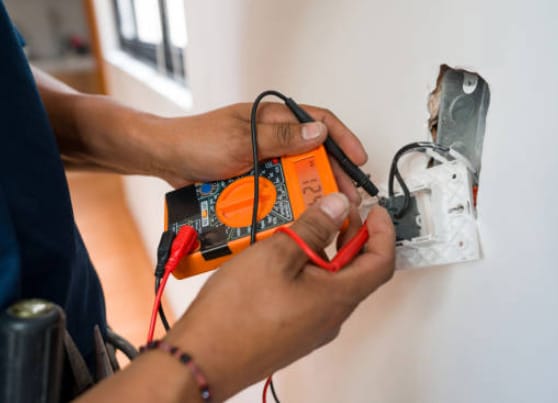
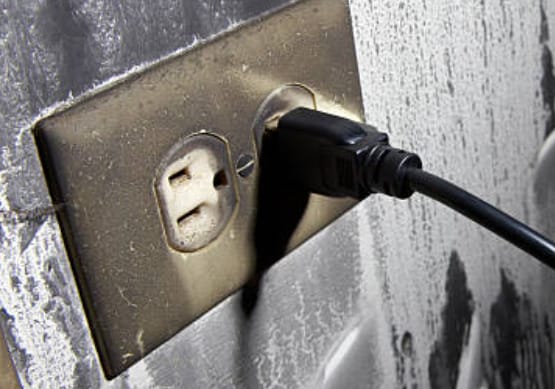
Time to check if your outlet is live. Carefully – and carefully (safety first, always) – insert the red probe into the smaller outlet slot and the black one into the larger slot.

A properly functioning outlet should give you around 110 to 120 volts. If you get zilch, it could be a tripped breaker or something else. I’ve been stumped by this before, only to find a tripped breaker was the culprit.
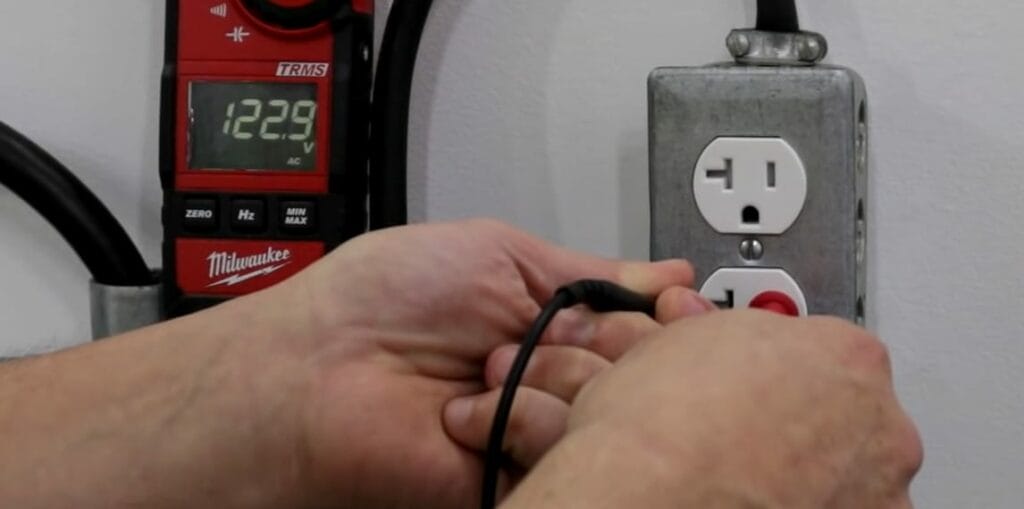
Step 4: Ground Test
Keep the red probe where it is and move the black one to the U-shaped ground slot. The reading should stay about the same.
If it changes, your outlet might not be grounded right. I’ve encountered this in older homes – it’s a common issue but super important for safety.
Step 5: Checking for Reversed Wiring
Lastly, check for reversed wiring – a sneaky problem that can throw you off.
Swap the red lead to the large slot and keep the black one in the small slot.
If you get a reading, the wiring’s reversed. This might not be a big deal for a lamp, but it can be trouble for more sensitive electronics.
I’ve relied on these steps countless times in different homes, from modern apartments to older houses, and it’s always been a lifesaver. Remember, if you’re unsure or something seems off, don’t hesitate to call in a pro.
Troubleshooting Electrical Outlet Readings with a Multimeter
Let’s jump right into the nitty-gritty of multimeter readings. This isn’t just about numbers – it’s about understanding what’s happening behind your walls. I’ve had my share of adventures with a multimeter, and I’m here to pass on that wisdom.
Here’s a breakdown of common readings and what they might mean, plus some advanced troubleshooting tips:
| Reading Issue | Possible Meaning | Troubleshooting Tips |
|---|---|---|
| Higher Voltage | Overvoltage situation, possibly due to utility problems | This is one for the pros. High voltage can wreck your appliances and is a safety risk. |
| Lower Voltage | Could be an overloaded circuit, shoddy wiring, or a wonky breaker | It could be an overloaded circuit, shoddy wiring, or a wonky breaker |
| Zero Voltage | No power, maybe a tripped breaker or an off-switch | Start by checking for overloaded circuits. I once traced low voltage back to a corroded wire – sometimes, it’s a quick fix. |
| Fluctuating Readings | Loose connections or a faulty outlet | This is like finding loose cables in your car. Tighten up those connections and check the outlet’s condition. |
Dealing with Advanced Issues
- GFCI Outlets: These guys are tricky. If you’re testing a GFCI (Ground Fault Circuit Interrupter) outlet and it’s not resetting or showing odd readings, it might be improperly wired or due for replacement. Press the test button to see if it trips and then resets. If it doesn’t, you might need to replace it.
- Fluctuating Voltage: This can signal a bigger issue, like a fluctuating load from a major appliance or a problem with your home’s grounding. This is a telltale sign if you notice your lights dimming and brightening. Get a professional in if you suspect this – it’s not something to tackle alone.
- Strange Readings with GFCI Outlets: GFCIs can be finicky with multimeters due to their sensitivity. If you get weird readings, first ensure the GFCI is properly reset. Unplugging everything from the outlet and resetting it can sometimes clear up the issue.
Remember, a multimeter is a powerful tool in your DIY arsenal, but it’s not all-knowing. Call in a pro if you’re ever in doubt or if something seems out of your league. Better safe than sorry, especially when it comes to electricity.
Navigating Common Multimeter Missteps: Tips for Safe and Accurate Testing
Hey DIY fans, let’s dive into something that can trip you up when you’re getting hands-on with electrical projects – common multimeter missteps.
Trust me, I’ve been through it all and want to help you sidestep these easy-to-make errors.
Mistake 1: Wrong Setting
Oh boy, have I seen this often! You’re all set to test, but your multimeter is in the wrong setting. Here’s a pro tip: always double-check you’re on the AC voltage setting for household outlets.
I remember testing a lamp socket and having my meter set to resistance. Talk about a confusing moment!
Mistake 2: Incorrect Lead Placement
Getting your leads mixed up is easier than you think. The BLACK lead goes into the ‘COM’ port, and the RED one into the port marked with ‘V’ or ‘Ω’.
I’ve flipped these and ended up with some head-scratching readings. Lesson learned!
Mistake 3: Testing Live Circuits Unnecessarily
Testing live circuits? That can be a hair-raising experience, literally. Unless you need to, test with the power off.
I’ve had some close calls with live circuits – not something I’d recommend.
Mistake 4: Not Testing Your Multimeter First
Never start a job without testing your multimeter on a known power source first – like a standard battery or a reliable outlet.
There was this one time I spent what felt like forever troubleshooting an outlet, only to realize my multimeter was off.
Mistake 5: Ignoring Safety Precautions
I’ve seen folks dive into testing without proper gear – not a good idea. Always wear rubber-soled shoes and insulated gloves. Electricity is no joke, and I’ve learned to respect it the hard way.
Mistake 6: Not Reading the Manual
Every multimeter has quirks, and not knowing them can set you back. I used to be too stubborn to read the manual, and boy, did I pay for it. Save yourself some trouble – give that manual a read.
Mistake 7: Overlooking the Probes
Before you start, check your probes. Damaged probes can give you false readings or, worse, a shock. I once had a probe with a frayed wire and got a nasty surprise. Always check your equipment!
Safety First: The Golden Rule of Electrical Testing
Hey everyone, let’s talk about the most crucial aspect of DIY electrical work: safety. Over the years, I’ve learned that taking shortcuts in this area is a definite no-go. Let’s break down how to keep things safe and sound while testing your outlets.
Pre-Test Safety Checks
Simple Lamp Test: Start with this easy method. Plug a lamp into the outlet you’re about to test and switch it on. If it stays off, you’re likely good to go. This has been my first move for years – it’s quick and tells you what you need to know.
Using a Non-Contact Voltage Tester: Use one of these handy tools. I’ve seen outlets that looked off but were still live – tricky, right? Hold this tester near the outlet; no light means no power. It’s a staple in my toolkit.
Keep an Eye on Switches
Watch Those Switches: Don’t overlook any switches controlling the outlet or light fixtures. I’ve seen cases where a switch was off, but the breaker wasn’t. Little details, big impact.

Safety Protocols in Detail
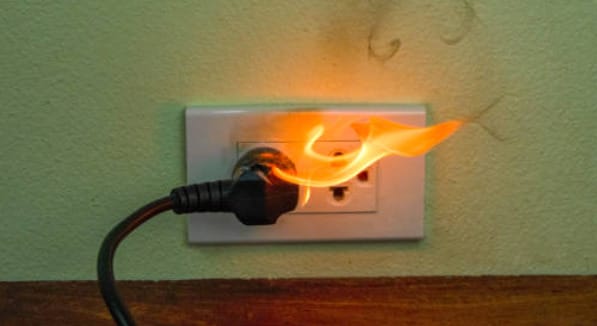
Sparking Outlets: If you see sparks, step back. Turn off the power at the breaker immediately. I’ve dealt with this before, and it’s nothing to take lightly.

Burnt Smell or Discoloration: These are danger signs. Stop what you’re doing and get a professional in if you notice them. It’s not worth the risk.
Personal Protective Equipment (PPE)
Right Gear for the Job: Wear insulated gloves and safety goggles when handling electrical testing. Even rubber-soled shoes can be a lifesaver. I’ve learned it’s better to be over-prepared than under-protected.
Safe Environment: Ensure your work area is dry and clutter-free. Water and electricity? Not a good mix. I always double-check my surroundings before I start.
What To Do in An Emergency
Handling Electrical Emergencies: Don’t throw water on an electrical fire if something goes wrong. Use a fire extinguisher rated for electrical fires. And if someone gets an electric shock, don’t touch them directly. Turn off the power source first.
Frequently Asked Questions
- What’s the Difference Between AC and DC Settings on a Multimeter?
- On your multimeter, you’ll see ‘ACV’ for testing home outlets and ‘DCV’ for things like your car battery. It’s crucial to pick the right setting for your testing.
- How Can I Test If an Outlet Is Grounded?
- Testing grounding is straightforward. Set your multimeter to AC voltage. Place one probe in the hot slot (usually the smaller slot on a standard outlet) and the other in the round ground hole. A normal voltage reading (110-120V) means it’s grounded. Your outlet might not be properly grounded if it is significantly less or zero.
- Can I Test Any Outlet With a Multimeter?
- You bet! Whether a standard household outlet or something more specialized, your multimeter is up for the task. Ensure it’s set to the correct measurement type – typically, AC voltage for those standard outlets.
- Is It Safe to Test a Live Outlet With a Multimeter?
- Yes, indeed, as long as you follow the right steps. Never touch the metal parts of the probes during testing, and always use the right settings on your multimeter. It’s like handling a hot oven – respect it, use the right tools, and you’re golden.
- How Do I Know If My Multimeter Is Accurate?
- A trusty trick is to test it on a known voltage source, like a standard battery. If the reading’s spot on, you’re good to go. If not, it might be time for some multimeter TLC or a replacement. Accurate tools are key in our world!
References
Organizations:
- National Fire Protection Association (NFPA). https://www.nfpa.org/en
- International Electrotechnical Commission (IEC). https://www.iec.ch/homepage
Books:
- “The Complete Guide to Wiring” by Black & Decker. https://www.google.com.ph/books/edition/_/oNRUEAAAQBAJ
- “Wiring Simplified: Based on the 2020 National Electrical Code” https://www.google.com.ph/books/edition/Wiring_Simplified/led3zwEACAAJ
- “Electrical Safety Handbook” by John Cadick et al. https://www.google.com.ph/books/edition/Electrical_Safety_Handbook_3E/_8tlhuXZrOwC
Website Resources:
- The Spruce (DIY Section). https://www.thespruce.com/
- Klein Tools. https://www.kleintools.com/
Video Resources:
Bill Newberry Second
Sparky Channel