12 min read
How to Crimp Spark Plug Wires (6-Easy Steps)
Hey there! I’m here to guide you through the world of crimping spark plug wires. This might seem like a task reserved for the pros, but I promise you, it’s something you can do right in your own garage.
In general, to crimp spark plug wires, follow these steps.
- Step 1 – Start by removing the insulation from the wire.
- Step 2 – With dual crimp wires, line up the conductor with the terminal’s first small crimp section.
- Step 3 – Grab those crimping pliers and give the conductor a firm press.
- Step 4 – After securing the conductor, it’s time to crimp the insulation.
- Step 5 – Now that both the conductor and insulation are crimped, check the connection.
- Step 6 – f you’re aiming for perfection, check the wire’s resistance.
So, grab your tools, and let’s dive into the steps to make sure you get a perfect crimp every time. With a little patience and the right technique, you’ll be crimping like a pro in no time. Let’s get started!
Understanding the Essentials of Crimping Spark Plug Wires
Crimping might sound like another chore, but doing it right is more satisfying than peeling the plastic off a new phone screen.
First things first, before we even think about crimping, you have to make sure you’ve picked out the right wire. Not all spark plug wires are created equal, and choosing high-quality wire can be the difference between a smooth ride and wanting to pull your hair out mid-highway. But hey, once you’ve got your hands on those premium wires, you’re halfway there.
Onto the main event: crimping. The term itself sounds a bit intimidating, right? But here’s a little secret: it’s as easy as pie once you get the hang of it.
The goal is to secure the terminal to the wire, ensuring a snug, solid connection that won’t bail on you when needed. There are a couple of tools for this job, but I’m a huge fan of a good ratcheting crimp tool. It gives you that chef’s kiss-perfect crimp every time and provides consistent pressure to avoid damaging the wire.
But wait, there’s more! Positioning is key. Holding the wire and terminal in the right spot while you crimp is akin to finding the sweet spot on your pillow. It might take a moment, but once you find it, you’ll know. And just like that, you’ve mastered one of the most overlooked skills in DIY automotive work.
So, remember, the right tools and a bit of patience can make crimping not just a task but an art form. And who doesn’t love adding another skill to their repertoire? Especially when it leads to better performance and that satisfying feeling of doing it yourself.
Tools and Materials Needed for Crimping Spark Plug Wires
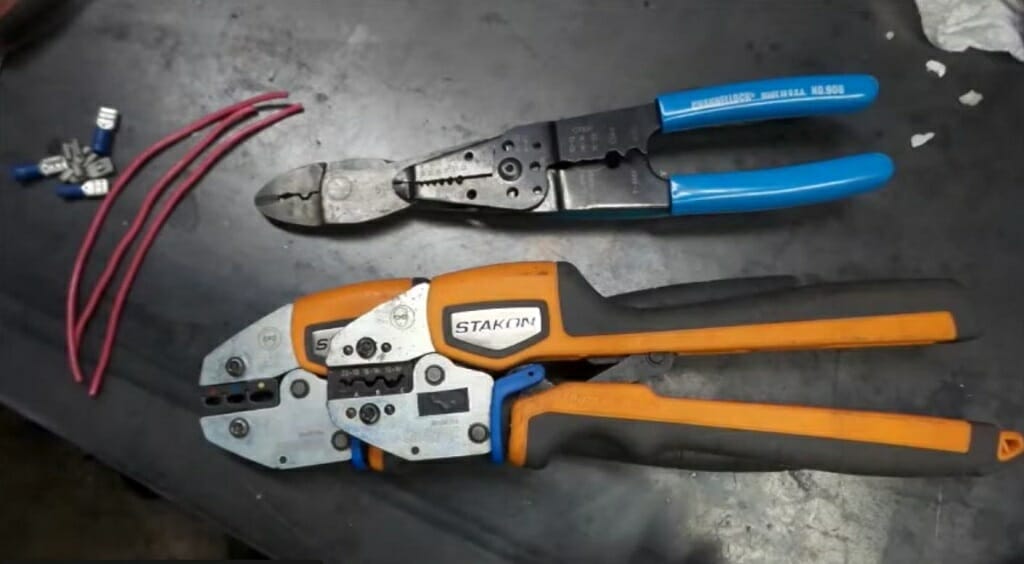
Now, before we get our hands dirty, let’s talk about what you’ll need to make magic happen. It’s like preparing a delicious meal; you must have all your ingredients ready.
- Wire Crimping Tool: Essential for crimping, designed specifically for automotive wires to ensure a perfect crimp.
- Wire Stripper: Necessary for precise wire exposure, ensuring a solid connection.
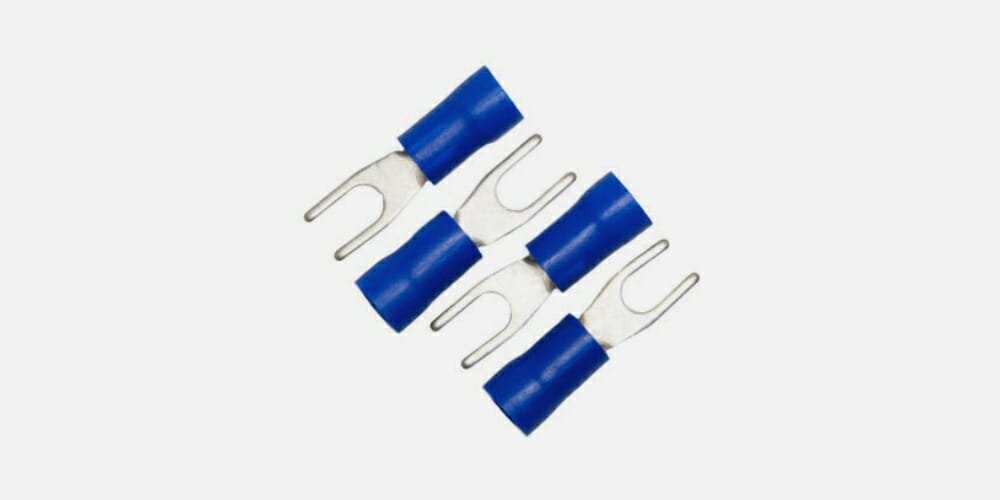
- Set of Spark Plug Wires: Choose high-quality wires to avoid engine misfires and ensure top engine performance.
- Dielectric Grease: Prevents moisture from causing corrosion and ensures a good electrical connection.
- Spark Plug Wire Gauge: Helps achieve the correct fit for the spark plug wires.
Gather these tools, and you’re set for a successful crimping session. Remember, it’s all about having the right tools for the job. With these in your arsenal, you’re not just working on your car – crafting a masterpiece.
How to Crimp Spark Plug Wires
Creating your spark plug for the engine might seem a difficult task. But it isn’t. If you follow this guide, you’ll realize it is all about execution. Here are the steps for crimping spark plug wires.
Step 1 – Cutting the Insulation
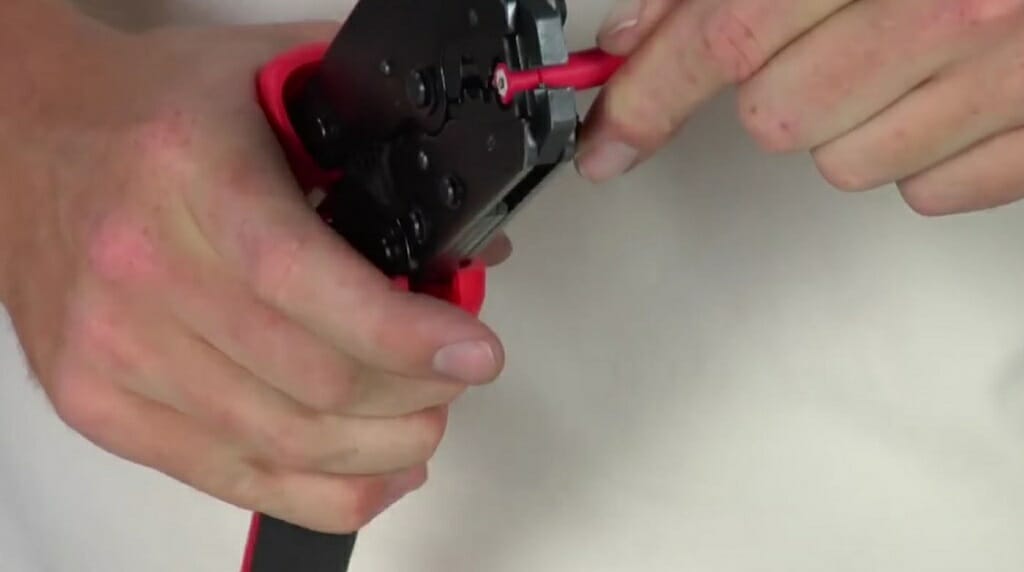
Begin with a wire and remove the insulation. The length you need to cut off depends on whether you’re using dual crimp wires or the traditional ones where you fold back the wire.
For dual crimp wires, cut just beyond where the insulation ends according to the crimp tool. For wires that require folding back, cut enough so you can fold the conductor back effectively.
Step 2 – Preparing the Terminal Type
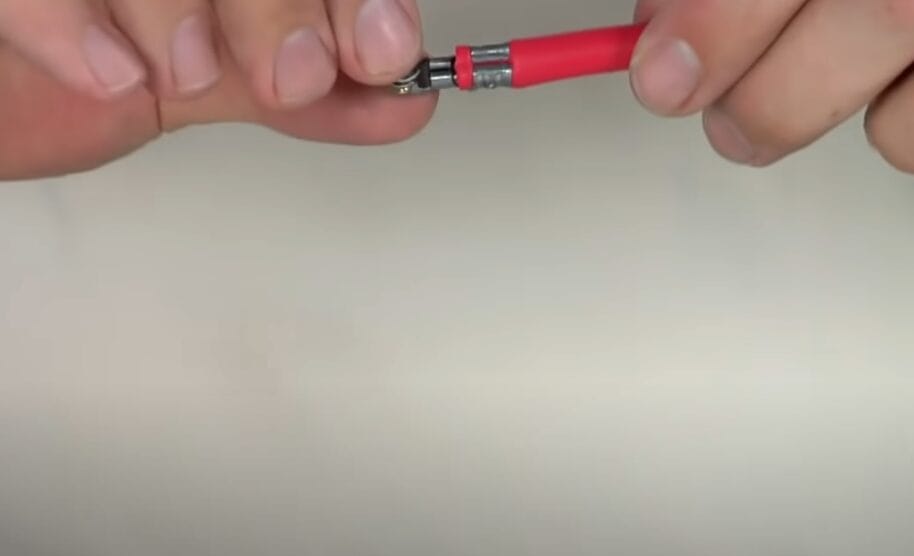
For dual crimp wires, position the conductor so it aligns with the first small crimp section on the terminal.
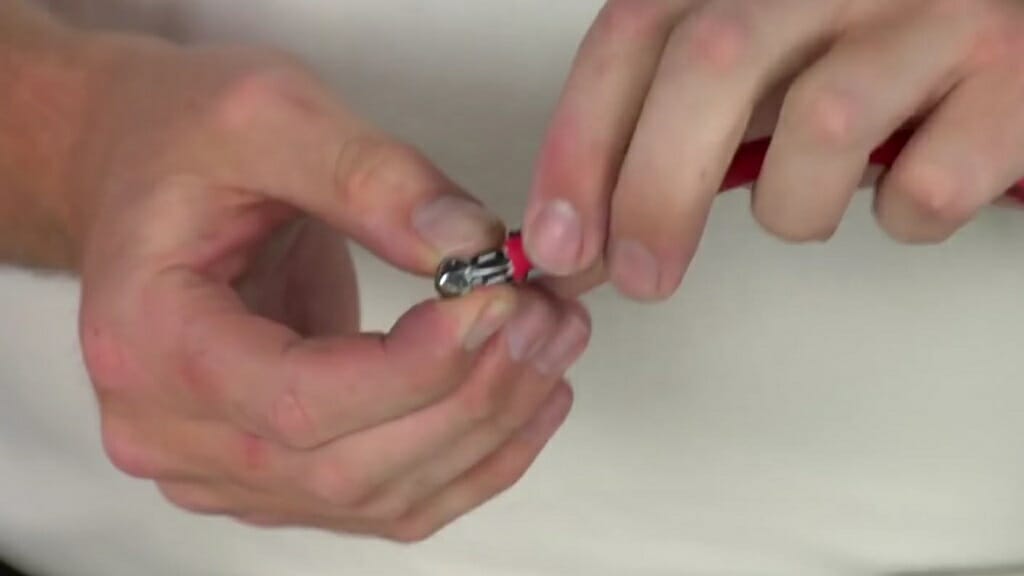
Step 3 – Crimping the Conductor
Use the crimping pliers to firmly press down on the conductor, securing it in place.

Step 4 – Crimping the Insulation
After the conductor is secured, apply a second crimp onto the insulation. This ensures the connection is strong and will not come apart.
Step 5 – Checking the Connection
Once you’ve crimped the conductor and the insulation, the wire can be connected or disconnected from the plugs or distributor as needed.
Step 6 – Measuring Resistance (Optional)
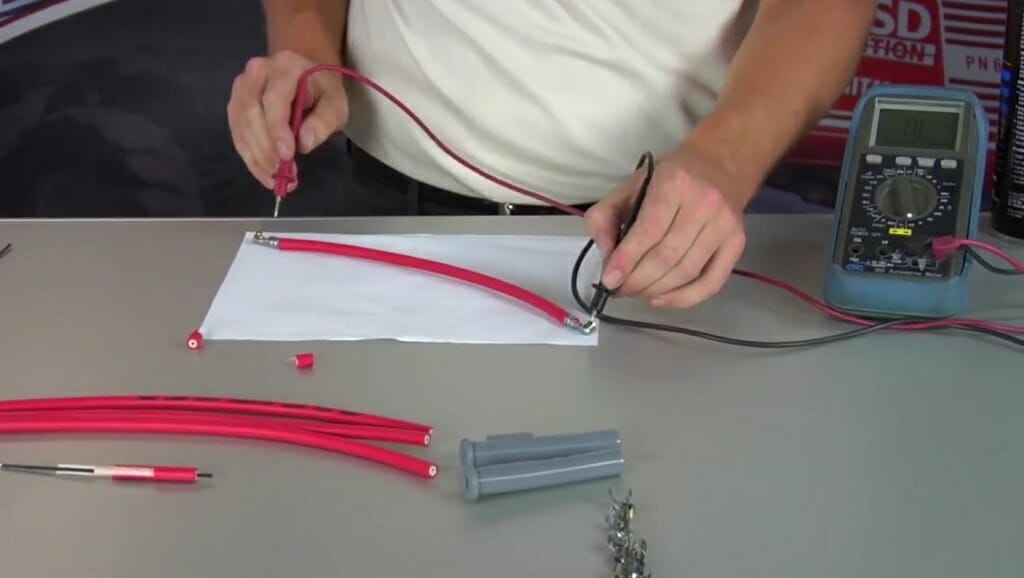
If desired, check the resistance of the wire to ensure it meets the required specifications. Ideally, it should be around 50 OHMs of resistance per foot, but slightly lower, like 45 OHMs, is even better.
Following these steps ensures a reliable and efficient connection for your spark plug wires, which is essential for your vehicle’s performance.
Single vs Double Crimp Terminals: What You Need to Know
So, we’re diving deeper into this whole spark plug wire crimping adventure, and I have to tell you, it’s crucial to understand the difference between Single and Double crimping terminals.
Getting this right could mean a smooth ride and a bumpy road ahead.
| Feature | Single Crimp Terminals | Double Crimp Terminals |
|---|---|---|
| Crimping Process | Requires one crimp on the wire | Involves two crimps: one on the conductor and another on the insulation |
| Ease of Use | Easier to use, suitable for beginners | Requires more effort and finesse |
| Connection Quality | Provides a decent connection but may not be as secure in high-vibration environments | Ensures a stronger and more reliable connection |
| Recommended For | Beginners or those preferring simplicity | Those seeking peak performance and durability in their vehicle’s wiring |
| Ideal Environment | Low-stress, less demanding installations | High-performance or high-vibration environments like automotive engines |
| Advantages | Simplified the process, less time-consuming | Enhanced connection stability and reliability |
| Disadvantages | Potential for less durable connections in demanding environments | A more complex and time-consuming process |
So, keep your tools ready and your focus sharp. With the right approach, you’re well on mastering the art of crimping spark plug wires, enhancing your engine’s performance one crimp at a time.
Troubleshooting Common Issues in Crimping Spark Plug Wires
Let’s dive into one of the trickiest parts of DIY auto maintenance: troubleshooting those pesky issues that crop up when you’re crimping spark plug wires.
It’s like putting together a puzzle, but sometimes the pieces don’t quite fit how you think they should. Don’t worry, I’ve got your back!
- Incomplete Crimping: occurs when the crimp doesn’t fully secure the wire to the terminal. It’s like giving a limp handshake—it just doesn’t make a good impression or connection! If your engine’s misfiring or you notice a drop in performance, this could be the culprit. The fix? Ensure you’re squeezing that crimping tool with enough might, and check that the terminal is snugly fastened around the wire.
- Damaged Insulation. Sometimes, we might crimp too hard in our eagerness to do the job. This can damage the insulation, exposing the wire underneath. Think of it as going into a battle without armor; it’s just not a good idea. Exposed wires can lead to shorts, electrical faults, or a complete breakdown. The golden rule? Being firm but gentle does the trick.
- Using the Wrong Terminals. With all the excitement of getting under the hood, it’s easy to overlook whether we’re using single or double-crimp terminals. Remember, it’s not just about what you prefer but what your vehicle demands. Those double-crimp terminals are your best buddies if you’re cranking up the voltage or tackling high-vibration situations.
So, when you find yourself facing these issues, take a step back, double-check your tools and technique, and remember that patience is key. With a bit of practice and attention to detail, you’ll be crimping like a pro and keeping your ride running smoothly.
Advanced Tips for Professional-Quality Crimps
So, you’ve got the basics down pat, right? But here’s the thing—I want you to go beyond just “getting it right.” Let’s aim for the stars and get those crimps looking like they just rolled off the showroom floor. It’s all in the details, folks.
- Precision Placement: Ensuring the terminal is not just attached but perfectly aligned on the spark plug wire. Even a millimeter off can impact connection efficiency.
- Quality Crimping Tool: The importance of using a high-quality crimping tool cannot be overstated. Invest in one with adjustable crimping pressure to customize pressure based on wire and terminal thickness for a snug fit.
- Practice Makes Perfect: Before crimping actual spark plug wires, practice on scrap wire and terminals. This builds muscle memory and confidence for professional-quality crimps.
- Attention to Details: Achieving professional-quality crimps is about focusing on the tiny details for a perfect result, reflecting the high standard of work.
Remember, achieving professional-quality crimps isn’t just about having the right tools and techniques; it’s about paying attention to the tiny details that others might overlook. The devil’s in the details, as they say, and that’s never been more true than in the world of spark plug wire crimping.
Maintenance Tips for Your Newly Crimped Spark Plug Wires
So, you’ve nailed the crimping of your spark plug wires. High-five to you! But guess what? That’s not the end. Keeping those wires in tip-top shape is crucial for your ride’s performance.
Let me share some knockout maintenance tips that’ll keep those wires sparking joy, not trouble.
| Maintenance Aspect | Description | Tips |
|---|---|---|
| Regular Inspection | Eyeing the wires for signs of wear, tears, or heat damage. | Inspect frequently, especially before long rides. Replace or repair damaged wires immediately. |
| Keeping Clean | Wiping down the wires to remove grime and oil collected in the engine bay. | Use a soft, clean cloth for wiping. If necessary, use a mild cleaner but avoid harsh chemicals. |
| Avoiding Stress | Ensuring wires are not bent tightly or near sharp edges to prevent damage. | Route wires carefully to avoid pinch points and keep away from hot spots for optimal longevity. |
| Proper Installation | Making sure spark plug wires are correctly installed and secured. | Check that all connections are snug and properly seated to prevent misfires or electrical issues. |
| Heat Protection | Protecting wires from excessive heat which can degrade insulation. | Use heat shields or wire protectors in high-temperature areas to extend wire life. |
| Electrical Check | Testing for proper electrical conductivity and resistance. | Use a multimeter to check for any electrical issues periodically, ensuring optimal performance. |
| Moisture Prevention | Keeping moisture away from the connections to avoid corrosion. | Apply dielectric grease at the connections to seal out moisture and ensure a good electrical connection. |
| Wire Separation | Maintaining distance between spark plug wires to prevent crossfire. | Route wires to avoid touching each other or metal surfaces, which can cause interference or electrical leakage. |
| Regular Replacement | Understanding that spark plug wires are not meant to last forever. | Adhere to your vehicle’s recommended replacement intervals to maintain engine efficiency and performance. |
| Visual Aesthetics | Keeping the engine bay looking clean and organized. | Beyond functionality, well-routed and maintained wires contribute to the overall aesthetics of your vehicle’s engine bay. |
Remember, these maintenance tips aren’t just chores; they’re part of bonding with your vehicle. It’s about getting your hands dirty, understanding what makes your car tick, and ensuring it stays healthy.
Resources
Organizations
- Automotive Aftermarket Suppliers Association (AASA) – https://automotiveaftermarket.org/listing/aasa/
- SEMA (Specialty Equipment Market Association) – https://www.sema.org/
Books
- “Automotive Wiring and Electrical Systems” by Tony Candela – https://books.google.com/books/about/Automotive_Wiring_and_Electrical_Systems.html?id=myi2QmV5RmUC
- “Haynes Techbook Automotive Electrical Manual” – https://www.canadiantire.ca/en/pdp/haynes-techbook-automotive-electrical-manual-0259320p.html
Website Resources
- The Garage Journal – https://www.garagejournal.com/
- AutomotiveForums.com – https://www.automotiveforums.com/
Video References
Talking Hands Tools
MSD Performance Ignition